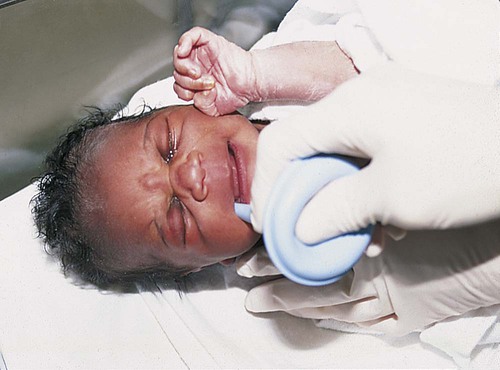
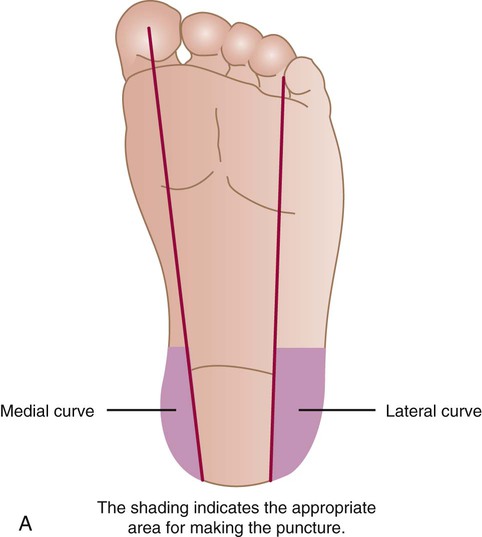
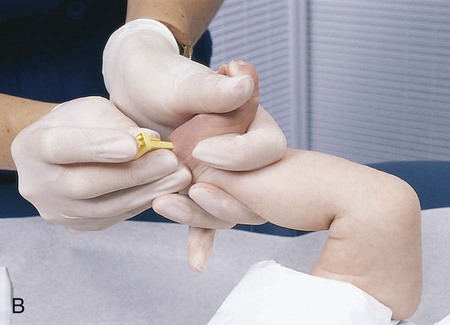
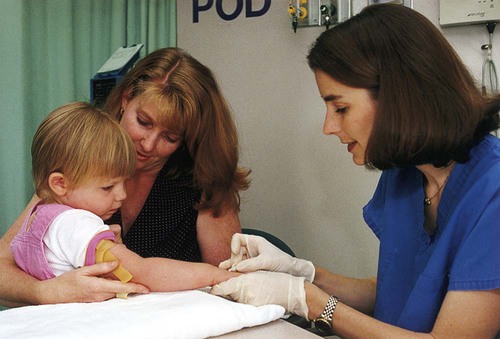
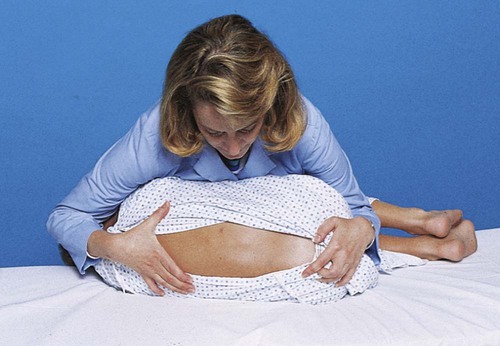
1. Define the vocabulary terms listed 2. Discuss preparation techniques for the different developmental stages 3. Explain the necessary safety precautions when bathing an infant 4. Describe the collection of urine and stool specimens with infants and children 5. Discuss how to collect blood, throat, and nasopharyngeal specimens with infants and children 6. Describe the pediatric implications of assisting with a lumbar puncture 7. Contrast the administration of medicines to children and adults 8. Describe the preferred sites for intramuscular injections in infants and small children 9. Discuss precautions necessary when a child is receiving parenteral fluids and the rationale for each precaution 10. Compare and contrast gastrostomy button and gavage feedings with infants and children 11. Discuss care of the child with a tracheostomy 12. Describe oxygen therapy related to children 13. Explain how to measure an infant’s or child’s height, weight, and head circumference Preparation of the child for a procedure is one of the most important tasks of the nurse. Children fear pain and bodily injury, so it is important for nurses to prepare the child with honest, age-appropriate explanations and carry out the procedure in the least stressful manner to the child. Hockenberry and Wilson (2009) refer to this as atraumatic care or care without trauma. Once nurses understand the stressors that affect hospitalized children, the effect of these stressors can be minimized with providing atraumatic care. Bathing not only promotes cleanliness and stimulates circulation to the skin, but also provides exercise and may help the child relax and feel more comfortable (Skill 3-1). Explain the procedure in appropriate terms. Always remain with the child when bathing occurs. Be sure to check any allergies the child may have. Always assess conditions that influence the type of bath given, such as a recent surgical incision, EEG monitor, a cast, an intravenous (IV) line or Foley catheter in place, and so on. Examine the infant or child for skin abnormalities such as rashes, birthmarks, bruises, breaks in the skin, and so on. Never use baby powder after the bath because the powder can be inhaled and cause breathing problems. Skill 3-1 can be taught to parents for home use. Skill 3-1 Bathing an Infant or Small Child • Never leave a child unattended around water (children can drown in as little as 1 inch of water). • Place a towel or rubber mat on the bottom of the tub or basin (prevents the child from slipping). • Verify that the room temperature is warm enough and draft-free (prevents chilling). • Only sponge bathe the baby until the cord has fallen off (the cord should be kept dry to promote healing). • Only sponge bathe the baby until the circumcision has healed (the circumcision should not get wet in order to promote healing). • Always run cold water first (prevents burns). • Hold on to infant securely, supporting the head while bathing (babies are slippery when wet). 1. Explain procedure (allays anxiety). 3. Wash hands. Use gloves if body fluid precautions are warranted (ensures that standard precautions are followed). 4. Run water. Temperature should be 100° F (38° C). Check the temperature by submerging your wrist in the water or placing drops on the inside surface of your forearm. It should feel comfortably warm. (May use bath thermometer if available.) (Helps prevent burns as skin is actually thinner than an adult’s). 5. Begin by removing secretions from the child’s eyes with cotton ball immersed in plain water. Use a separate cotton ball for each eye (ensures cleanliness and prevents any cross-contamination). 6. Shampoo hair (if necessary); wash the scalp of an infant younger than 1 year of age as necessary. Pour water over head. Apply shampoo, and rinse. Avoid eyes. Dry head with towel when finished (helps prevent chilling). 7. Bathe remainder of body. End with the perineal area. Remember to wash from front to back (always wash from clean to dirty) Wrap in towel when finished (prevents chilling). 8. Apply lotion as needed (provides moisturizing and hydration). 9. Dress in clean clothing. Keep top edge of diaper below umbilicus site if cord has not fallen off (promotes healing and reduces irritation). 10. Teach hygiene practices to the parents as needed: frequency of bathing, shampooing hair, cleaning genitals, avoiding bubble bath (can cause vaginal irritation), and so on. A bulb syringe is used when it is necessary to provide an open airway by removing secretions from an infant’s mouth and nose (Skill 3-2). Secretions may be the result of mucus or regurgitation of a feeding. Always assess the condition of the child after suctioning. There should be no sign of respiratory distress. Be sure parents know how to suction their baby’s mouth and nose prior to discharge from the hospital. Skill 3-2 Suctioning with a Bulb Syringe • Be sure infant shows no signs of respiratory distress after the procedure. • Do not insert bulb straight to the back of the throat (could result in a vagal response or gagging). 1. Explain the procedure to the parent (allays anxiety). 3. Wash hands; wear gloves (ensures that standard precautions are followed). 4. Hold infant’s head (stabilizes head). 5. Compress bulb and insert into mouth (along side of mouth), and release bulb slowly (releasing the bulb will pull secretions into the bulb tip). 6. Remove bulb syringe, and empty by compressing several times as needed onto tissues or washcloth (removes secretions). 7. Suction nares carefully if necessary in same manner (suctioning the mouth first ensures that nasal secretions are not placed in the mouth). 8. Discard tissues, or place washcloth with soiled linen. 9. Rinse bulb syringe with water, or take it apart and clean if applicable. 10. Remove gloves, and wash hands (ensures that standard precautions are followed). Fever is defined as body temperature above 38° C (100.4° F) rectally. The child’s metabolic rate will increase 10% for every 1° C increase. The physician may only recommend monitoring the fever, since it is the body’s way of defending itself against illness and is part of the immune process. Fever with temperatures less than 39° C (102.2° F) does not require treatment if the child is generally healthy (Kliegman et al., 2007). Antipyretic agents such as acetaminophen (10 to 15 mg/kg orally every 4 to 6 hours) and ibuprofen (5 to 10 mg/kg orally every 6 to 8 hours) may be ordered because they are considered safe and effective in proper doses for treatment of fever for children. (Always refer to a drug reference manual for specific information.) Ibuprofen should only be used for children older than 6 months of age. Aspirin is not recommended because of the risk for Reye syndrome. Cooling the child by reducing the room temperature and removing blankets and clothing may be beneficial if an antipyretic has been given approximately 1 hour beforehand. The antipyretic works to lower the “set point” associated with the fever, much like regulating a thermostat (body temperature is regulated by the hypothalamus). Hyperthermia is defined as the body temperature exceeding the set point, such as from heat stroke or seizures. Tepid sponge bathing in warm water may be ordered to reduce hyperthermia (Hockenberry and Wilson, 2009). Tepid sponge bathing, however, is not effective in treating fever. When performed, the sponge bath may be given in a tub or in the child’s bed (Skill 3-3). The child should not be permitted to shiver because shivering causes vasoconstriction and increased metabolism and can lead to a rise in temperature. The bath is given for approximately 20 minutes. Alcohol should never be added to the water because it reduces the heat too rapidly and can be absorbed (leading to brain damage or even death in infants). A table of Celsius (centigrade) and Fahrenheit temperature equivalents is provided in Appendix E. Skill 3-3 Sponge Bath to Reduce Hyperthermia 1. Explain the procedure to the patient and family (allays anxiety). 2. Assemble the equipment at the bedside. 3. Water temperature should be 37° C (98.6° F); needs only be 1° C or 2° F less than the child’s temperature to be effective (Hockenberry and Wilson, 2009). 4. Wash hands. Apply gloves if applicable (ensures that standard precautions are followed). 5. Record temperature, pulse, and respirations (establishes a baseline). 6. The child is placed in the tub, and water is put over the back and chest or (if done in the bed) 7. Cover the patient with a bath blanket or sheet. Fanfold linens to the foot of the bed. Place a waterproof sheet and bath blanket beneath the patient. Remove patient’s gown. 8. Wash the patient’s face and neck with tepid water. 9. Lift the corner of the bath blanket, and bathe the child’s body, one area at a time. 10. Place moist, folded cloths over blood vessels that lie close to the skin (underarms and groin). 11. Turn the patient and repeat the procedure, beginning with the neck, and then going to the shoulders, the back, and so forth. 12. Check color and pulse to be sure that the child is tolerating the procedure without adverse effects (report changes to charge nurse as patient’s condition may be changing). 13. If the child begins to shiver, the procedure should be immediately stopped (shivering causes vasoconstriction, increases temperature). 14. When the bath is completed, remove the waterproof sheet and blanket. Rub the skin dry (stimulates circulation), and replace the hospital gown and cover with sheet. 15. Arrange pillows and bedding for the patient’s comfort. 16. Take the patient’s temperature within 30 minutes of the time the procedure ended, and record it. If the temperature has not started to go down, check to see whether the procedure should be repeated. Note: The temperature is not expected to drop to normal but merely to a more reasonable level. Also record pulse and respirations (report changes to charge nurse as patient’s condition may be changing). 17. Document: Time procedure began, length of time administered, untoward reactions, patient’s vital signs before and after procedure. Urine specimens are often collected in doctors’ offices and clinics, as well as in the hospital (Skill 3-4). All urine specimens need to be labeled and sent to the lab immediately because bacteria accumulate at room temperature. If there is a delay, the urine specimen is to be kept refrigerated or on ice. An example would be if the patient were taking a urine specimen that was obtained at home, to a laboratory. Documentation of the procedure, including child’s reactions, is also done. The physician may request that the specimen be collected with the clean-catch method, catheterization, or 24-hour collection. Skill 3-4 Obtaining a Specimen for Urinalysis 1. Explain the procedure (allays anxiety). 2. Wash hands; wear gloves (ensures that standard precautions are followed). 3. Use a sterile container, or apply a urine collection device. 4. If a bag is used, secure the diaper over the bag or cut a slit so that the bag is outside the diaper (prevents leakage). 5. Check bag every 20 to 30 minutes (prevents leakage). 6. Label all specimens clearly, and attach the proper laboratory slip. Collected specimens should be transported in a plastic bag (check institution policy). 7. Record in nurse’s notes. Document time; also color, amount, and any odor (e.g., 30 ml clear yellow odorless urine collected in urine bag and sent to lab~signature). Infants and young children may have a sterile urine bag applied (see Skill 3-4). Check frequently under the diaper as leakage from the bag may occur. A slit may also be cut in the diaper to allow the bag to remain on the outside of the diaper where it is more visible. • Thoroughly cleaning the perineum or tip of penis with mild soap and water or povidone-iodine (be sure there are no allergies to iodine). • Using the appropriate size lubricated catheter, inserting until urine is obtained. • Urine can flow freely into a clean container, urinal, bedpan, or toilet (if the child is old enough) Stool specimens from older children are obtained as for an adult (Skill 3-5). This is embarrassing for most children, who are turned off by the suggestion. The ambulatory child can use a collection device (potty hat) placed beneath a toilet seat. It is difficult for a child to tell the nurse that the sample has been collected. The nurse can acknowledge these feelings by giving the child permission to express them without being critical. The nurse might say, “I know this must be embarrassing for you. It is for grown-ups, too, but we need this because …” Skill 3-5 Obtaining a Stool Specimen 1. Explain procedure to child or parent (allays anxiety). 2. Wash hands; wear gloves (ensures that standard precautions are followed). 3. Obtain stool specimen directly from the diaper (if it has not been contaminated by urine) with the tongue blade, or use the tongue blade to retrieve the specimen from the collection device. 4. The specimen is labeled properly, and the laboratory slip is attached. 5. Some specimens must be sent to the laboratory while they are warm. 6. The nurse documents the time; also the color, amount, consistency of the stool and the purpose for which it was collected (e.g., blood, ova, parasites, bacteria); and any related information (e.g., 20 ml. loose, brown stool specimen obtained for culture and sent to lab~signature). Blood specimens are generally collected by the laboratory technician or a specially trained nurse. Children generally fear this procedure. EMLA (eutectic mixture of lidocaine and prilocaine) cream can be used to lessen the pain. Remember, however, that the cream needs to be in place approximately 60 minutes before the blood sample is taken (if LMX or lidocaine cream is used, allow 30 minutes). If time permits, have the blood specimen obtained in the treatment room, keeping the child’s bed a safe place. The antecubital fossa is a common site for venipuncture in children older than 2 years of age. The dorsum of the hand or foot can also be used (Figure 3-1). The heel is often used in infants (Figure 3-2). If blood is to be collected from the heel, it needs to be warmed with a warmed washcloth or commercial warmer to increase the blood flow. The external jugular vein can be used in infants when other sites have not worked. The femoral vein may be used when other sites have been exhausted. Jugular and femoral venipuncture are only performed by the physician. Both the jugular and the femoral veins are large; therefore, after venipuncture, the child is checked frequently to ensure that there is no bleeding. The child is soothed accordingly if either of these sites is used, because crying and thrashing may precipitate oozing or hemorrhage. If a child has a central venous catheter or port, specially trained nurses can obtain the blood specimen by following hospital procedure. Always use standard precautions when obtaining or assisting with blood specimens. Regardless of the location used to obtain the blood specimen, the nurse charts the site used, the name of the blood test, and any untoward developments. A throat culture is frequently ordered by the physician when a child has a “sore throat” or a strep infection is suspected (Skill 3-6). The child may need to be temporarily restrained when a throat specimen is obtained. The child needs to stick out the tongue and say “ah” while the nurse swabs the pharyngeal area and tonsils. If the child is unable to cooperate, a tongue depressor should be used to hold down the tongue while obtaining the swabbed specimen. If the child has a diagnosis suspicious of epiglottitis, the throat culture should not be done because the airway may become edematous (swollen) and occlude (block air movement) from the trauma of specimen collection. Skill 3-6 Obtaining a Throat Culture 1. Explain procedure to child/parents (allays anxiety). 3. Wash hands; wear gloves; apply mask and eye goggles if necessary (ensures that standard precautions are followed). 4. Have child stick out tongue and say “ah” (helps visualize throat area for swabbing). 5. Depress anterior half of tongue with tongue depressor if necessary (use caution as this may elicit the gag reflex). 6. Swab area with exudate or redness, one time only per swab (avoid teeth, tongue, cheeks, lips, and palate). 7. Place swab(s) into media culture without touching sides of tube (ensures that bacteria will be placed directly into the medium). 8. Be sure parents or nurse comfort child (provides reassurance once procedure is over). 11. Document the time of the procedure, including description of pharyngeal area if you can see it. Other respiratory secretion specimens may be ordered to rule out such conditions as respiratory syncytial virus (RSV) or tuberculosis. An adequate specimen may be obtained using a suction device such as a mucus trap with a catheter inserted into the trachea. A nasal washing may also be attempted to obtain an RSV culture. This involves instillation of sterile saline, followed by aspiration of the contents (Hockenberry and Wilson, 2009). The child lies on the side with the back parallel to the side of the treatment table. The knees are flexed, and the head is brought down close to the flexed knees. The nurse can keep the child in this position by placing the child’s head in the crook of one arm and the knees in the crook of the other arm. The nurse then clasps hands together at the front of the child and leans forward, gently placing his or her chest against him or her (Figure 3-3). Infants may be supported in the sitting position with their backs curved and head flexed forward. The way in which the child is held can directly affect the success of the procedure and prevent serious complications. Always monitor the child’s respiratory status during a lumbar puncture. There is a potential for airway obstruction related to neck flexion.
Pediatric Procedures
Preparation for Procedures
 http://evolve.elsevier.com/Price/pediatric/
Basic Hygiene and Care
Bathing


Bulb Suctioning


Fever, Hyperthermia, and Sponge Bathing


Collection of Specimens
Collection of Urine Specimens


Obtaining a Clean-Catch Specimen
Home Care Guidelines for Intermittent Catheterization Using a “Clean” Technique
Collection of Stool Specimens


Collection of Blood Specimens
Collection of Throat Cultures


Collection of Nasopharyngeal Cultures
 Collection of Spinal Fluid for Culture
![]()
Stay updated, free articles. Join our Telegram channel

Full access? Get Clinical Tree


Pediatric Procedures
 Nursing Brief


 Nursing Brief


 Nursing Brief


 Communication


Get Clinical Tree app for offline access
