chest physical therapy
endotracheal tube
continuous positive airway pressure
positive end-expiratory pressure
General health and policy issues for respiratory health
Improving physical mobility
Breathing and coughing exercises
Mobilizing secretions
Maintaining airway patency
Oxygen therapy
 CASE STUDY
 Improving oxygenation involves promoting ventilation, assisting diffusion of gases, and facilitating the perfusion of oxygen throughout the body.
 GENERAL RESPIRATORY HEALTH AND POLICY
improves as the lungs expand more fully, and perfusion is enhanced by the increased cardiac output.
Table 4-1 Facilitating Respiratory Health | ||||||
|---|---|---|---|---|---|---|
|
 Vulnerable people, including those with respiratory disorders such as asthma or chronic obstructive pulmonary disease (COPD), should avoid going outside when the air quality index is poor.
 Policies at the local and federal levels are directed at reducing occupational exposure to hazardous materials, encouraging adequate ventilation in work sites, and requiring the use of protective apparatus.
Improving physical mobility
Breathing and coughing exercises
Mobilizing secretions
Maintaining airway patency
Oxygen therapy
 IMPROVING PHYSICAL MOBILITY
 Chest expansion and alveolar inflation are diminished during immobility and may result in atelectasis, inadequate gas exchange, or even pneumonia.
ventilation. The tripod position involves having the patient sit at the bedside with a table in front of him or her, allowing for propping of the elbows on the table while compressing the lower chest.
 In the patient with chronic airflow limitation (CAL), the orthopnea position or tripod position may provide relief from dyspnea and enhance ventilation. This position involves the patient sitting at the bedside with a table in front of him or her, allowing for propping of the elbows on the table while compressing the lower chest.
 If the patient is bedridden, he should be turned from side to side every 2 hours to allow improved chest expansion on the upward side and increased perfusion of the lung on the dependent side.
 Patients with chronic respiratory disorders such as emphysema may have an impaired ability to oxygenate their blood and a decreased capacity to exert themselves.
Pace activities with rest periods.
Eat frequent, light meals to decrease metabolic demands and gastric fullness, which might press the diaphragm upward.
Avoid holding the breath during activities, which will further diminish the Po2 and increase dyspnea.
Avoid the Valsalva maneuver, which increases intrathoracic pressure and decreases blood return into the thorax, resulting in dizziness.
Decrease temperature if febrile, as each degree (Fahrenheit) elevation results in a 7% increase in metabolic demand.
Use energy conservation exercises such as performing the work part of an activity during exhalation and using pursed-lip breathing during exertion.
 General anesthesia, postoperative pain, immobility, and pain medications can alter normal ventilation and put patients at risk for atelectasis, pneumonia, thrombophlebitis, and pulmonary embolism.
Encourage breathing exercises and incentive spirometry every 1 to 2 hours to maximize lung expansion.
Promote early ambulation and leg exercises to improve venous circulation.
Maintain airway patency with coughing to clear secretions and, if necessary, suctioning.
Administer pain medication prior to ambulation or chest physical therapy and use splinting to support surgical incisions.
 BREATHING EXERCISES
 Breathing exercises may help patients control breathing, improve ventilation, decrease anxiety, and increase activity levels.
Place the patient in a sitting position on the side of the bed or in the semi- or high Fowler’s position.
Have the patient place one hand on his or her chest and the other on his or her upper abdomen above the umbilicus. Another method that may be useful is to place a light object (e.g., tissue box) on the patient’s abdomen so he or she can see abdominal movement during diaphragmatic breathing.
Teach the patient to inhale slowly through the nose, feeling the abdomen rise up under his hands but with little movement in the chest.
Instruct the patient to exhale through pursed lips using the abdominal muscles (see next section on pursed-lip breathing).
Assess the patient’s response (e.g., dizziness and lightheadedness may indicate hyperventilation and necessitate slowing the frequency of the ventilations).
Repeat for three breaths and rest for 1 minute.
 Diaphragmatic breathing is indicated for patients with CAL or anxiety because it allows for slow, deep breaths.
Assist the patient into a sitting or high semi-Fowler’s position.
Instruct the patient to purse his or her lips as if to whistle with lips slightly open.
Have the patient inhale through the nose to a count of two and slowly exhale through pursed lips to a count of four or until he or she has completely exhaled.
Repeat this technique for 10 minutes, increasing the frequency to four to five times a day.
 The pursed-lip breathing technique is especially useful in patients with diseases of chronic airway limitation because it slows the collapse of the small airways by maintaining a higher bronchiole pressure and prolonging expiration.
 Incentive spirometry or sustained maximal inspiration devices (SMI) are tools that help maximize ventilation by increasing lung volume, flow and alveolar inflation.
 MOBILIZING SECRETIONS
adequate fluid intake, humidification of inspired air, and possibly expectorant medication (e.g., guaifenesin) are important interventions in mobilizing secretions. Other medications that can be used before breathing exercises are inhaled bronchodilators such as albuterol or systemic bronchodilators such as theophylline (see Table 4-2). These medications allow the airways to relax and dilate so that the breathing and coughing exercises are more effective.
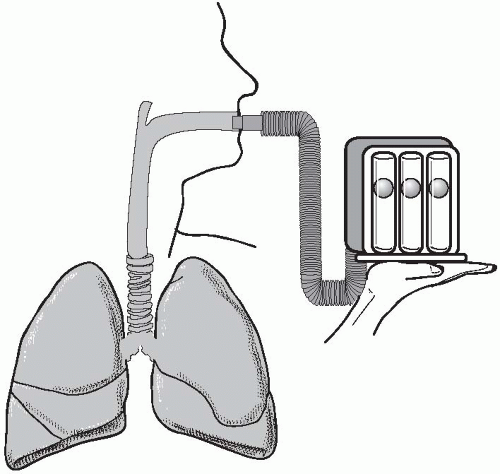 Figure 4-1 Incentive spirometer. |
from the respiratory passages. A mucus clearance device or a flutter can help patients mobilize secretions. This handheld device has a ball valve that vibrates when the patient exhales, causing vibrations to be transmitted in the airways and loosen secretions. The device is held by the patient with the stem parallel to the floor. The patient exhales with flattened cheeks followed by huffing (see next section on coughing and huffing) to remove the secretions.
Table 4-2 Instructions for Patients Taking Theophylline | ||||||||
|---|---|---|---|---|---|---|---|---|
|
 Coughing is the most effective and natural way to clear the airways. A good coughing technique allows for adequate mobilization and expulsion of pulmonary secretions.
Have the patient in an upright position such as sitting or semi-Fowler’s position.
Teach the patient to inhale and exhale slowly and deeply.
Then, have the patient inhale deeply and exhale, closing his throat and using small coughs without inhaling again, pause, and then inhale again very slowly (to decrease the cough stimulus). If paroxysmal coughing starts, instruct the patient to use slow deep breaths or pursed-lip breathing until the coughing urge passes.
Rest and repeat for a total of three cycles.
Assess ability to expel secretions and/or auscultate the lungs.
Try to set up a regular coughing schedule for patients with CAL to keep airways patent.
 Cascade coughing allows the patient to increase chest expansion during inhalation and more forcefully expel secretions with coughing.
Have the patient in the sitting or semi-Fowler’s position with arms crossed below the rib cage (hugging a pillow may be more comfortable).
Instruct the patient to inhale slowly, hold for 2 seconds, tighten the abdominal, leg, and gluteal muscles (to increase intrathoracic pressure), and then exhale in short huffs, actually saying the word huff.
Repeat and try to cough on exhalation.
Assess the patient’s response and ability to expel secretions.
Auscultate the lungs.
 Outcomes of successful CPT include improved breath sounds, increased Pao2, expulsion of sputum, and improved airflow on spirometry.
and postural drainage—are performed by respiratory therapists or nurses. Percussion is performed by applying cupped hands in a rhythmic sequence over a part or the entire lung. It is useful in patients with cystic fibrosis and bronchiectasis and may be combined with vibration. Using the percussion technique, a hollow sound is produced as the cupped hand creates an air pocket when applied to the chest wall. It is used to loosen secretions (see Figure 4-2). Percussion may be combined with postural drainage positions to optimize drainage of particular lung segments (see Figure 4-3). Percussion is contraindicated in patients with cardiac conditions, osteoporosis, pneumothorax, hemopneumothorax, or pleural effusion.
 Chest physical therapy is composed of three techniquespercussion, vibration, and postural drainage.
 Percussion is contraindicated in patients with cardiac conditions, osteoporosis, pneumothorax, hemopneumothorax, or pleural effusion.
is thought to increase the turbulence of the air in the lung and to loosen secretions. Vibration is useful in patients with cystic fibrosis and bronchiectasis.
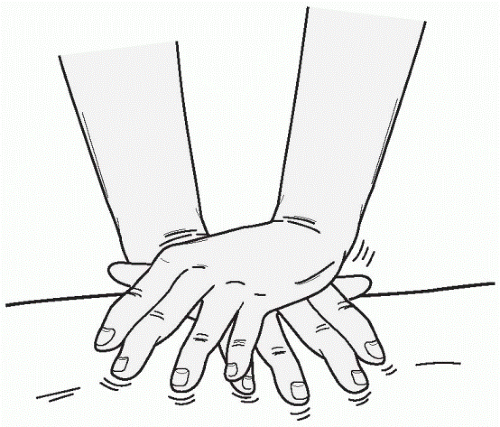 Figure 4-2 Hand position for vibration of the chest wall. |
increased intracranial pressure. Particular positions can be combined with percussion and vibration to further mobilize secretions.
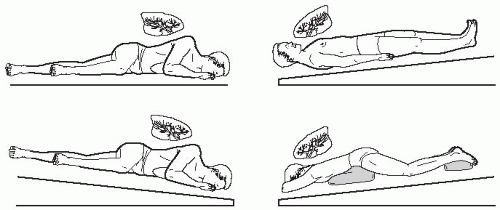 Figure 4-4 Postural drainage positions. |
 Postural drainage may be contraindicated if the patient has cardiac conditions or increased intracranial pressure.
 MAINTAINING A PATENT AIRWAY
 Patients who are semiconscious after anesthesia may not be able to maintain a patent airway because the tongue falls back and may occlude the posterior oropharynx.
posterior oropharynx. Once the patient is alert enough to maintain the airway and clear secretions, the oral airway is removed as it can be very irritating.
 Oral airways are curved to follow the normal anatomy of the oropharynx from the lips, over the tongue, and into the posterior oropharynx. The opening allows for air passage through as well as around the airway and permits suctioning of secretions in the posterior oropharynx.
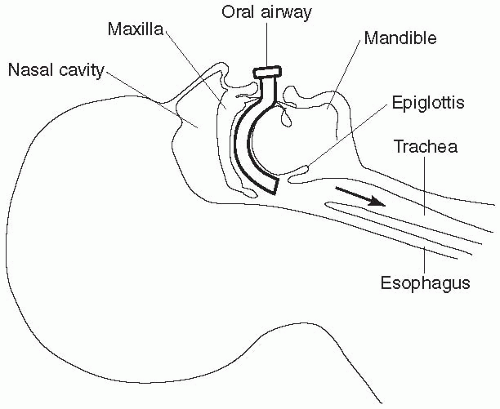 Figure 4-5 Oral airway. |
Table 4-3 Insertion of an Oral Airway | ||||||||||||||
|---|---|---|---|---|---|---|---|---|---|---|---|---|---|---|
|
airway maintenance if the oral route is not amenable due to surgery or loose teeth (see Table 4-4).
Oral or nasal airways cannot maintain a patent airway.
Effective suctioning cannot be performed with other airways.
There has been trauma to the upper airways.
The patient needs assisted or mechanical ventilation.
 Endotracheal tubes (ET) are long (240 to 360 mm in length) and 5 to 10 mm in internal diameter.
complete ventilatory support. The minimal-leak seal also minimizes damage to the tracheal wall, such as irritation and necrosis, because microcirculation in the trachea is preserved. The cuff is inflated using a cufflator, and the pressure is measured. The normal pressure in the cuff is approximately 25 mmHg. The amount of leak around the endotracheal tube cuff can also be auscultated by placing the stethoscope on the patient’s trachea and slowly inflating the cuff or balloon with air. When there is no sound during the highest pressure phase of the ventilatory cycle, then there is no leak. When only a small rush of air is heard at peak inspiratory pressure, then there is a minimal leak. A minimal leak around the endotracheal tube cuff is acceptable if there is no significant volume loss on exhalation.
Table 4-4 Insertion of a Nasal Airway | ||||||||||
|---|---|---|---|---|---|---|---|---|---|---|
|
 Figure 4-6 Positive end-expiratory pressure (PEEP). |
 A minimal leak around the endotracheal tube cuff is acceptable if there is no significant volume loss on exhalation.
(as in some chronic airway diseases), as part of the care of a patient who requires long-term ventilation, or as a means of delivering oxygen to the distal tracheobronchial tree.
 Figure 4-7 Tracheostomy tube. |
 A tracheostomy stoma is created either electively or emergently between the third or fourth ring of the trachea.
 Fenestrated tracheostomy tubes have an opening in the outer cannula that when plugged allows the patient to phonate or speak.
 The tracheostomy site and tube also require careful cleaning to prevent infection of the respiratory tract.
Table 4-5 Suctioning a Tracheostomy Tube | ||||||||||||||||||||||||||||||||||||
|---|---|---|---|---|---|---|---|---|---|---|---|---|---|---|---|---|---|---|---|---|---|---|---|---|---|---|---|---|---|---|---|---|---|---|---|---|
|
Table 4-6 Care of the Tracheostomy Site | ||||||||||||||||||||||||||||||
|---|---|---|---|---|---|---|---|---|---|---|---|---|---|---|---|---|---|---|---|---|---|---|---|---|---|---|---|---|---|---|
|
 Tracheoesophageal fistulas may develop because of necrosis of the posterior wall of the larynx from prolonged pressure (from the cuff) or malposition of the tube.
 CLOSED CHEST DRAINAGE
for lung cancer may produce excess fluid accumulation in the pleural cavity, preventing lung re-expansion.
Stay updated, free articles. Join our Telegram channel

Full access? Get Clinical Tree


