Measuring vital signs
Objectives
• Define the key terms and key abbreviations listed in this chapter.
• Explain why vital signs are measured.
• List the factors affecting vital signs.
• Identify the normal ranges for each temperature site.
• Explain when to use each temperature site.
• Describe a normal pulse and normal respirations.
• Describe the practices to follow when measuring blood pressure.
• Perform the procedures described in this chapter.
Key terms
apical-radial pulse Taking the apical and radial pulses at the same time
blood pressure (BP) The amount of force exerted against the walls of an artery by the blood
body temperature The amount of heat in the body that is a balance between the amount of heat produced and the amount lost by the body
bradycardia A slow (brady) heart rate (cardia); less than 60 beats per minute
diastole The period of heart muscle relaxation; the heart is at rest
diastolic pressure The pressure in the arteries when the heart is at rest
fever Elevated body temperature
hypotension When the systolic blood pressure is below (hypo) 90 mm Hg and the diastolic pressure is below 60 mm Hg
pulse The beat of the heart felt at an artery as a wave of blood passes through the artery
pulse deficit The difference between the apical and radial pulse rates
pulse rate The number of heartbeats or pulses felt in 1 minute
respiration Breathing air into (inhalation) and out of (exhalation) the lungs
sphygmomanometer A cuff and measuring device used to measure blood pressure
stethoscope An instrument used to listen to sounds produced by the heart, lungs, and other body organs
systole The period of heart muscle contraction; the heart is pumping blood
systolic pressure The pressure in the arteries when the heart contracts
tachycardia A rapid (tachy) heart rate (cardia); more than 100 beats per minute
vital signs Temperature, pulse, respirations, and blood pressure
KEY ABBREVIATIONS
| BP | Blood pressure |
| C | Centigrade |
| F | Fahrenheit |
| Hg | Mercury |
| ID | Identification |
| IV | Intravenous |
| mm | Millimeter |
| mm Hg | Millimeters of mercury |
Vital signs reflect the function of three body processes essential for life: regulation of body temperature, breathing, and heart function. The four vital signs of body function are:
Vital signs are often called TPR (temperature, pulse, and respiration) and BP (blood pressure). Some centers include “pain” as a vital sign (Chapter 27).
Measuring and reporting vital signs
A person’s vital signs vary within certain limits. They are affected by sleep, activity, eating, weather, noise, exercise, drugs, anger, fear, anxiety, pain, and illness.
Vital signs are measured to detect changes in normal body function. They tell about treatment response. They often signal life-threatening events. Vital signs are part of the assessment step in the nursing process. Vital signs are measured:
• When the person is admitted to the center
• As often as the person’s condition requires
• Before and after surgery, complex procedures, and diagnostic tests
• After some care measures, such as ambulation
• After a fall or other injury
• When drugs affect the respiratory or circulatory system
• As stated on the care plan (usually daily, twice a day, or weekly in nursing centers)
Vital signs show even minor changes in the person’s condition. Accuracy is essential when you measure, record, and report vital signs. If unsure of your measurements, promptly ask the nurse to take them again. Unless otherwise ordered, take vital signs with the person at rest—lying or sitting. Report the following at once:
Vital signs are recorded in the person’s medical record. If measured often, a flow sheet is used. The doctor or nurse compares current and previous measurements.
See Residents With Dementia: Measuring and Reporting Vital Signs.
See Focus on Communication: Measuring and Reporting Vital Signs.
Body temperature
Body temperature is the amount of heat in the body. It is a balance between the amount of heat produced and the amount lost by the body. Heat is produced as cells use food for energy. It is lost through the skin, breathing, urine, and feces. Body temperature stays fairly stable. It is lower in the morning and higher in the afternoon and evening. See p. 474 for the factors affecting vital signs. Pregnancy and the menstrual cycle are other factors affecting body temperature.
You use thermometers to measure temperature. It is measured using the Fahrenheit (F) and centigrade (C) scales.
Temperature sites
Temperature sites are the mouth, rectum, axilla (underarm), tympanic membrane (ear), and temporal artery (forehead) (Box 31-1). Each site has a normal range (Table 31-1). Fever means an elevated body temperature.
Table 31-1
| Site | Baseline | Normal Range |
| Oral | 98.6° F (37° C) | 97.6° to 99.6° F (36.5° to 37.5° C) |
| Rectal | 99.6° F (37.5° C) | 98.6° to 100.6° F (37.0° to 38.1° C) |
| Axillary | 97.6° F (36.5° C) | 96.6° to 98.6° F (35.9° to 37.0° C) |
| Tympanic membrane | 98.6° F (37° C) | 98.6° F (37° C) |
| Temporal artery | 99.6° F (37.5° C) | 99.6° F (37.5° C) |
Older persons have lower body temperatures than younger persons. An oral temperature of 98.6° F may signal fever in an older person. Always report temperatures that are above or below the normal range.
See Promoting Safety and Comfort: Temperature Sites.
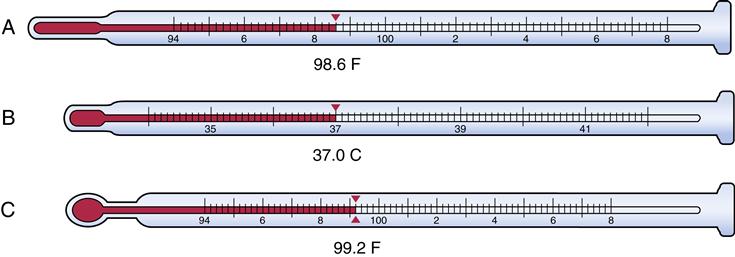
Glass thermometers
The glass thermometer is a hollow glass tube (Fig. 31-1) with a bulb (tip) at the end. The device is filled with a substance. When heated, the substance expands and rises in the tube. When cooled, the substance contracts and moves down the tube.
Long- or slender-tip thermometers are used for oral and axillary temperatures. So are thermometers with stubby and pear-shaped tips. Rectal thermometers have stubby tips. Thermometers are color-coded:
Glass thermometers are re-usable. However, the following are problems:
• They take a long time to register—3 to 10 minutes, depending on the site.
• They break easily. Broken thermometers can injure the rectum and colon.
See Promoting Safety and Comfort: Glass Thermometers.
Reading a glass thermometer
Fahrenheit thermometers have long and short lines. Every other long line is an even degree from 94° to 108° F. The short lines mean 0.2 (two-tenths) of a degree (see Fig. 31-1, A and C).
On a centigrade thermometer, each long line means 1 degree. Degrees range from 34° to 42° C. Each short line means 0.1 (one-tenth) of a degree (see Fig. 31-1, B).
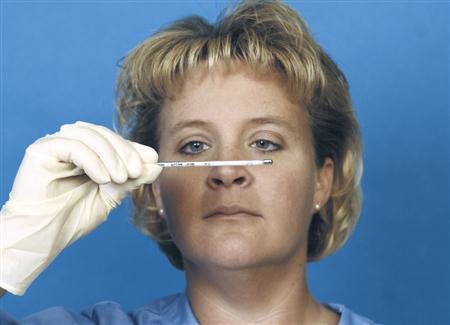
• Hold it at the stem (Fig. 31-2). Bring it to eye level.
• Turn it until you can see the numbers and the long and short lines.
• Turn it back and forth slowly until you can see the silver or red line.
• Read the nearest degree (long line).
• Read the nearest tenth of a degree (short line)—an even number on a Fahrenheit thermometer.
Using a glass thermometer
Do the following to prevent infection, promote safety, and obtain an accurate measurement:
• Follow Standard Precautions and the Bloodborne Pathogen Standard.
• Use the person’s thermometer.
• Use a rectal thermometer only for rectal temperatures.
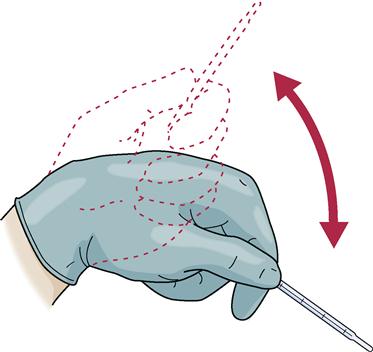
• Shake down the thermometer to move the substance down in the tube. Hold it at the stem; stand away from walls, tables, or other hard surfaces. Flex and snap your wrist until the substance is below 94° F or 34° C. See Figure 31-3.
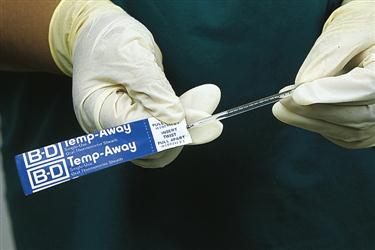
• Insert the thermometer into a plastic cover (Fig. 31-4). Remove the cover to read the thermometer. Discard the cover after use.
 Taking temperatures
Glass thermometers are used for oral, rectal, and axillary temperatures.
 TAKING A TEMPERATURE WITH A GLASS THERMOMETER
Quality of life
Remember to:
Pre-procedure
1 Follow Delegation Guidelines: Taking Temperatures. See Promoting Safety and Comfort:
a Glass Thermometers, p. 476
• Oral or rectal thermometer and holder
• Tissues
• Gloves
• Toilet tissue (rectal temperature)
• Water-soluble lubricant (rectal temperature)
• Towel (axillary temperature)
Procedure
9 Rinse the thermometer in cold water if it was soaking in a disinfectant. Dry it with tissues.
10 Check for breaks, cracks, or chips.
11 Shake down the thermometer below the lowest number. Hold the device by the stem.
12 Insert it into a plastic cover if used.
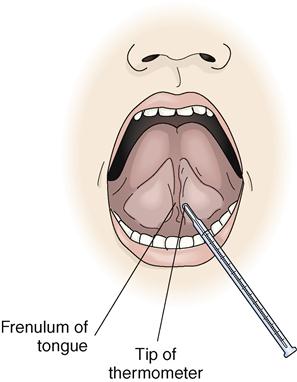
a Ask the person to moisten his or her lips.
b Place the bulb end of the thermometer under the tongue and to one side (Fig. 31-5).
c Ask the person to close the lips around the thermometer to hold it in place.
d Ask the person not to talk. Remind the person not to bite down on the thermometer.
e Leave it in place for 2 to 3 minutes or as required by center policy.
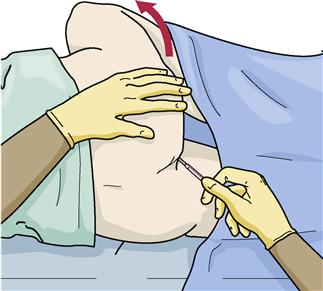
a Position the person in Sims’ position.
b Put a small amount of lubricant on a tissue.
c Lubricate the bulb end of the thermometer.
d Fold back top linens to expose the anal area.
e Raise the upper buttock to expose the anus (Fig. 31-6).
f Insert the thermometer 1 inch into the rectum. Do not force the thermometer.
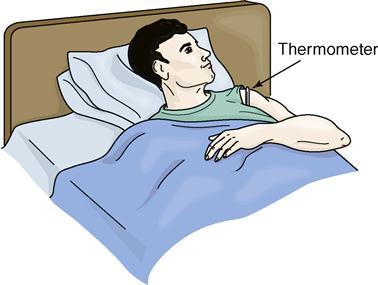
15 For an axillary temperature:
a Help the person remove an arm from the gown. Do not expose the person.
b Dry the axilla with the towel.
c Place the bulb end of the thermometer in the center of the axilla.
d Ask the person to place the arm over the chest to hold the thermometer in place (Fig. 31-7, p. 480). Hold it and the arm in place if he or she cannot help.
e Leave the thermometer in place for 5 to 10 minutes or as required by center policy.
a Place used toilet tissue on several thicknesses of clean toilet tissue.
b Place the thermometer on clean toilet tissue.
c Wipe the anal area to remove excess lubricant and any feces.
21 For an axillary temperature: Help the person put the gown back on.
22 Shake down the thermometer.
23 Clean the thermometer according to center policy. Return it to the holder.
24 Discard tissues and dispose of toilet tissue.
Post-procedure
See Focus on Communication: Taking Temperatures.
See Delegation Guidelines: Taking Temperatures, p. 478.
See Promoting Safety and Comfort: Taking Temperatures, p. 478.


