♦ Body temperature represents the balance between heat produced by metabolism, muscular activity, and other factors and heat lost through the skin, lungs, and body wastes. A stable temperature pattern promotes proper function of cells, tissues, and organs; a change in this pattern usually signals the onset of illness.
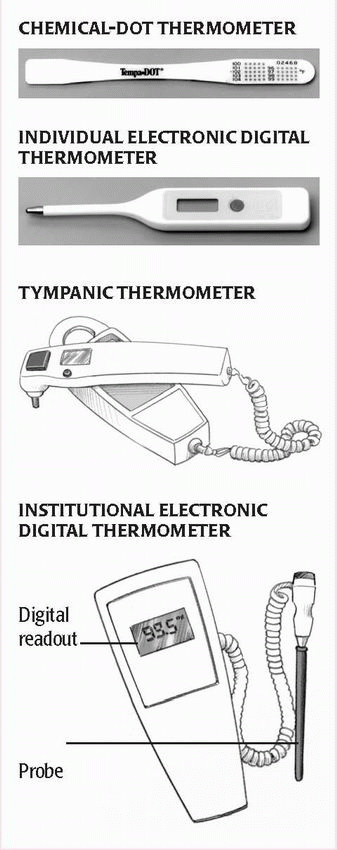
♦ Temperature can be measured with either electronic digital, tympanic, or chemical-dot thermometers. Alternatively, you may use a temporal artery (T.A.) scanner. (See Types of thermometers.)
♦ Oral temperature in adults normally ranges from 97° to 99.5° F (36.1° to 37.5° C); rectal temperature, the most accurate reading, is usually 1° F (0.6° C) higher; axillary temperature, the least accurate, reads 1° to 2° F (0.6° to 1.1° C) lower; and tympanic temperature reads 0.5° to 1° F (0.3° to 0.6° C) higher. (See Comparing temperature measurement routes.)
♦ Temperature normally fluctuates with rest and activity. Lowest readings typically occur between 4 and 5 a.m.; the highest readings occur between 4 and 8 p.m.
♦ Other factors also influence temperature, including gender, age, emotional conditions, and environment. Heightened emotions raise temperature; depressed emotions lower it. A hot external environment can raise temperature; a cold environment lowers it.
♦ Women typically have higher temperatures than men, especially during ovulation.
♦ Normal temperature is highest in neonates and lowest in elderly persons.
Implementation tips
♦ If the patient has had hot or cold liquids, chewed gum, or smoked, wait
15 minutes before taking an oral temperature.
Using an electronic thermometer
♦ Insert the probe into a disposable probe cover.
♦ If taking a rectal temperature, lubricate the probe cover to reduce friction and ease insertion.
♦ Leave the probe in place until the maximum temperature appears on the digital display. Then remove the probe and note the temperature.
Using a chemical-dot thermometer
♦ Remove the thermometer from its protective dispenser case by grasping the handle end with your thumb and forefinger, moving the handle up and down to break the seal, and pulling the handle straight out.
♦ Keep the thermometer sealed until use.
♦ Read the temperature as the last dye dot that has changed color or fired; then discard the thermometer and its dispenser case.
Using a T.A. scanner
♦ Turn the scanner on and slowly pass it over the patient’s forehead.
♦ Make sure the scanner doesn’t touch the patient’s skin.
♦ As the scanner passes over the temporal artery, it detects the patient’s body temperature.
♦ Note the temperature.
Using a tympanic thermometer
♦ Make sure the lens under the probe is clean and shiny. Attach a disposable probe cover.
♦ Stabilize the patient’s head; then gently pull the ear straight back (for children up to age 1) or up and back (for children age 1 and older to adults).
♦ Insert the thermometer until the entire ear canal is sealed. The thermometer should be inserted toward the tympanic membrane.
♦ Then press the activation button and hold it for 1 second. The temperature will appear on the display.

It’s no longer common practice to take a rectal reading on a neonate or newborn. Instead, take an axillary or tympanic reading or use a T.A. scanner. For children ages 6 months to 3 years, the American Academy of Pediatrics recommends a rectal reading but tympanic readings are acceptable. Mercury thermometers are prohibited because of the risk of toxicity if broken.
Taking an oral temperature
♦ Put on clean gloves to prevent body fluid exposure.
♦ Position the tip of the thermometer under the patient’s tongue, as far back as possible on either side of the frenulum linguae to promote contact with superficial blood vessels and obtain a more accurate reading.
♦ Instruct the patient to close his lips but to not bite down with his teeth.
♦ Leave the thermometer in place for the appropriate length of time, depending on which thermometer was used.
♦ Remove your gloves, and wash your hands.
Taking a rectal temperature
♦ Put on clean gloves to prevent body fluid exposure.
♦ Position the patient on his side with his top leg flexed, and drape him to provide privacy. Then fold back the bed linens to expose the anus.
♦ Squeeze the lubricant onto a facial tissue to prevent contamination of the lubricant supply.
♦ Lubricate about ½″ (1.3 cm) of the thermometer tip for an infant, 1″ (2.5 cm) for a child, or about 1½″ (3.8 cm) for an adult. Lubrication reduces friction and thus eases insertion.
♦ Lift the patient’s upper buttock, and insert the thermometer about ½″ for an infant or 1½″ for an adult. Gently direct the thermometer along the rectal wall toward the umbilicus. This will avoid perforating the anus or rectum. It will also help ensure an accurate reading because the thermometer will register hemorrhoidal artery temperature instead of fecal temperature.
♦ Hold the thermometer in place for the appropriate length of time to prevent damage to rectal tissues caused by displacement.
♦ Carefully remove the thermometer and wipe it as necessary. Then wipe the patient’s anal area to remove any lubricant or feces.
♦ Remove your gloves, and wash your hands.
Taking an axillary temperature
♦ Put on clean gloves.
♦ Because moisture conducts heat, gently pat the axilla dry with a facial tissue. Avoid harsh rubbing, which generates heat.
♦ Position the thermometer in the center of the axilla, with the tip pointing toward the patient’s head.
♦ Tell the patient to grasp his opposite shoulder and to lower his elbow and hold it against his chest. This promotes skin contact with the thermometer.
♦ Axillary temperature takes longer to register than oral or rectal temperature
because the thermometer isn’t enclosed in a body cavity. Leave the thermometer in place for the appropriate length of time, depending on which thermometer you’re using.
♦ Grasp the end of the thermometer and remove it from the axilla.
♦ Remove your gloves and wash your hands.
Special considerations
♦ Oral measurement is contraindicated in young children and infants; patients who are unconscious or disoriented; patients who must breathe through their mouth; and patients prone to seizures.
♦ Because it may injure inflamed tissue, rectal measurement is contraindicated in patients with diarrhea, bleeding tendencies, recent rectal or prostatic surgery or injury.
♦ Rectal measurement should be avoided in patients with recent myocardial infarction because anal manipulation may stimulate the vagus nerve, causing bradycardia or another rhythm disturbance.
♦ Use the same thermometer for repeated temperature measurements to avoid variations caused by equipment differences.
♦ Store chemical-dot thermometers in a cool area because exposure to heat activates the dye dots.
♦ Oral temperatures can still be measured when the patient is receiving nasal oxygen because oxygen administration raises oral temperature by only about 0.3° F (0.2° C).
♦ Use disposable thermometers for patients in isolation.