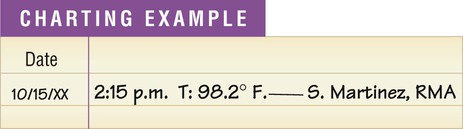
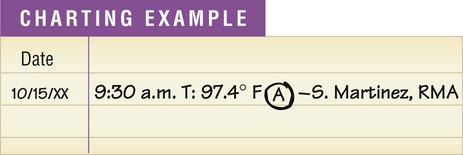
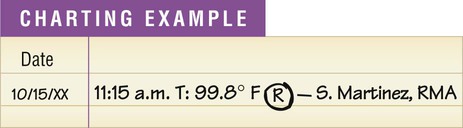
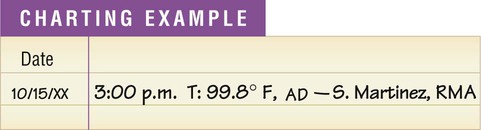
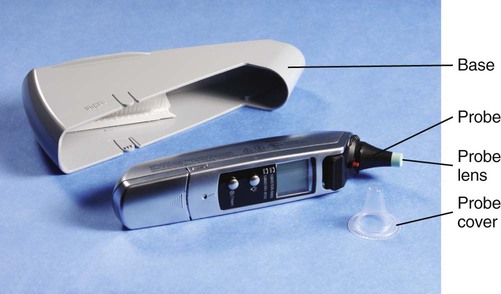
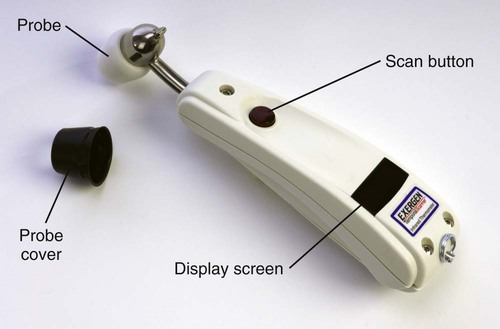
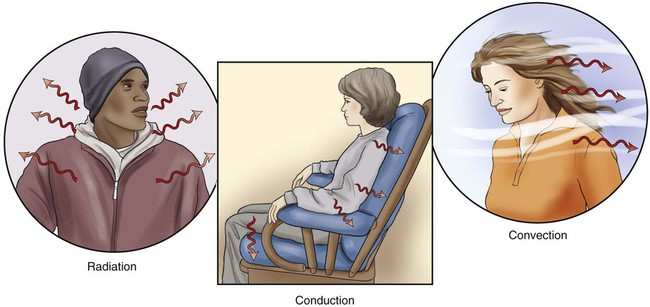
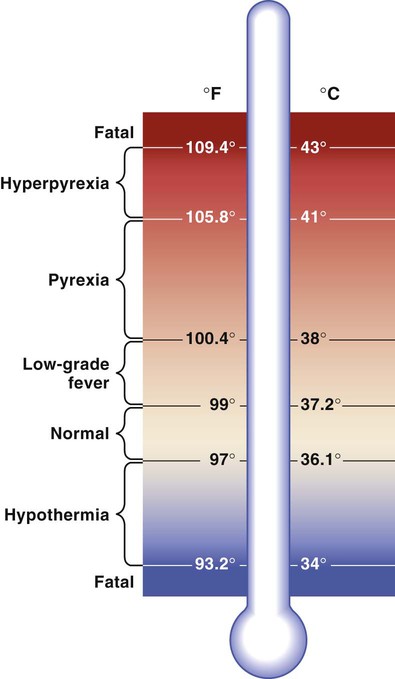
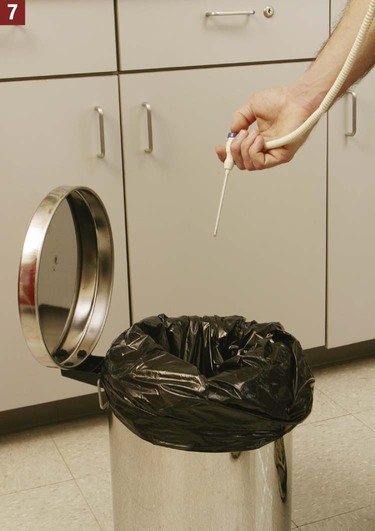
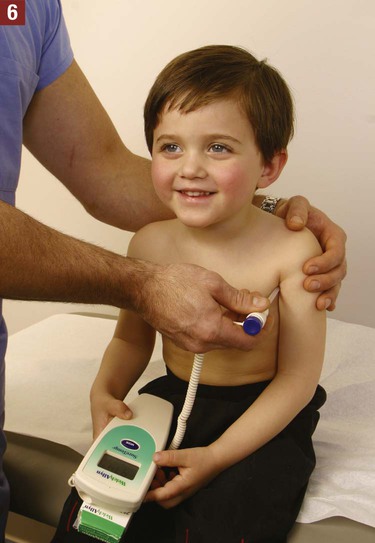
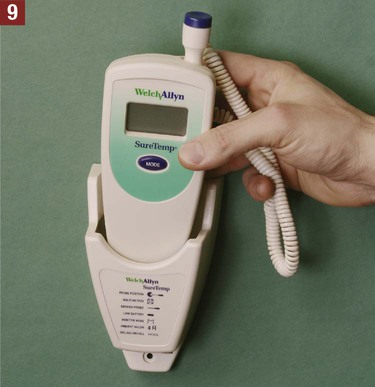
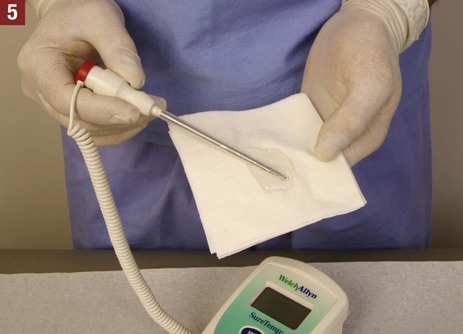
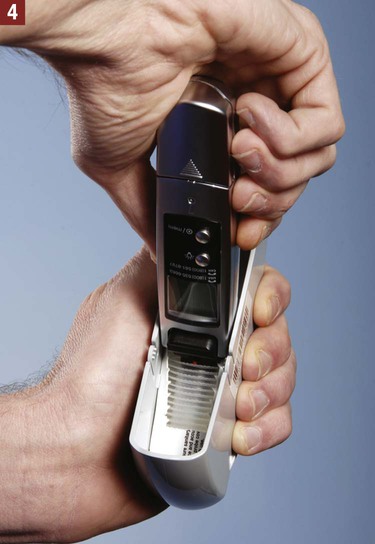
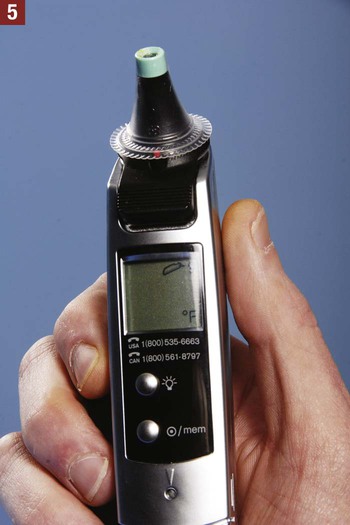
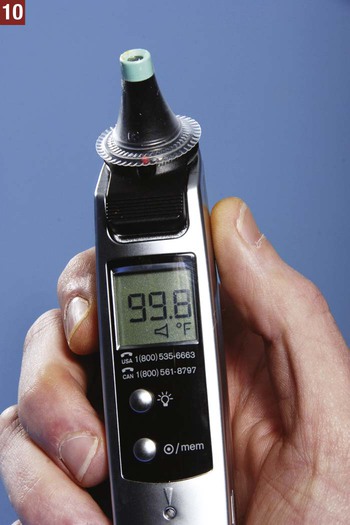
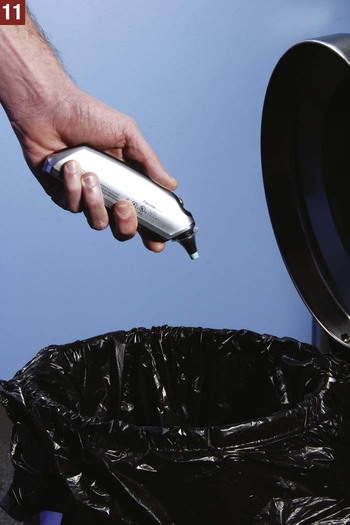
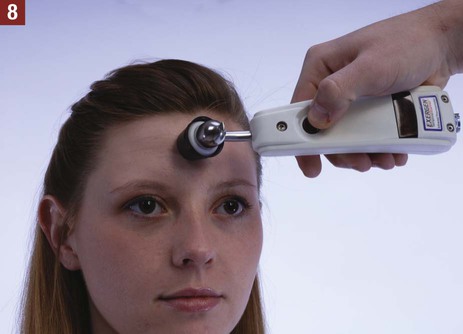
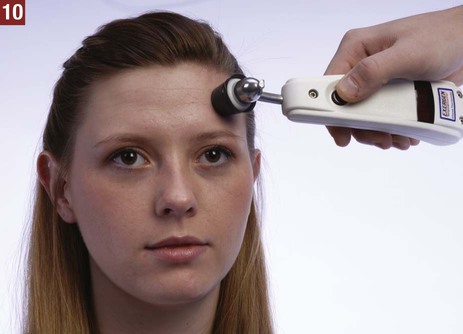
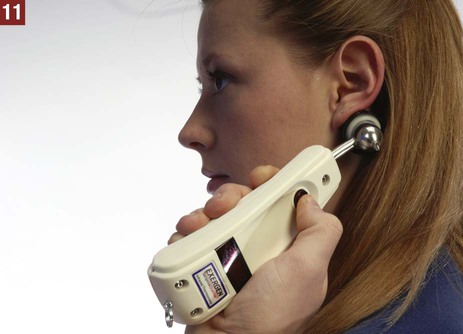
1. Be familiar with the normal ranges for all vital signs. Keep in mind that normal ranges vary based on the different age groups (infant, child, adult, elder). 2. Make sure that all equipment for measuring vital signs is in proper working condition to ensure accurate findings. 3. Eliminate or minimize factors that affect the vital signs, such as exercise, food and beverage consumption, smoking, and emotional state. 4. Use an organized approach when measuring the vital signs. If all of the vital signs are ordered, they are usually measured starting with temperature, followed by pulse, respiration, blood pressure, and pulse oximetry. Body temperature is maintained through a balance of the heat produced in the body and the heat lost from the body (Figure 19-1). A constant temperature range must be maintained for the body to function properly. When minor changes in the temperature of the body occur, the hypothalamus senses this and makes adjustments as necessary to ensure that the body temperature stays within a normal and safe range. If an individual is playing tennis on a hot day, the body’s heat-cooling mechanism is activated to remove excess heat from the body through perspiration. Radiation, conduction, and convection all cause loss of heat from the body. Radiation is the transfer of heat in the form of waves; body heat is continually radiating into cooler surroundings. Conduction is the transfer of heat from one object to another by direct contact; heat can be transferred by conduction from the body to a cooler object it touches. Convection is the transfer of heat through air currents; cool air currents can cause the body to lose heat. These processes are illustrated in Figure 19-2. The purposes of measuring body temperature are to establish the patient’s baseline temperature and to monitor an abnormally high or low body temperature. The normal body temperature range is 97° F to 99° F (36.1° C to 37.2° C), the average temperature being 98.6° F (37° C). Body temperature is usually recorded using the Fahrenheit system of measurement. Table 19-1 lists comparable Fahrenheit and Celsius temperatures and explains how to convert temperatures from one scale to the other. Table 19-1 Equivalent Fahrenheit and Celsius Temperatures From Bonewit-West K: Clinical procedures for medical assistants, ed 8, St Louis, 2011, Saunders. A body temperature less than 97° F (36.1° C) is classified as subnormal, or hypothermia. This means that the heat the body is losing is greater than the heat it is producing. A person usually cannot survive with a temperature less than 93.2° F (34° C). Terms used to describe alterations in body temperature are illustrated in Figure 19-3. 1. Age. Infants and young children normally have a higher body temperature than adults because their thermoregulatory system is not yet fully established. Elderly individuals usually have a lower body temperature owing to factors such as loss of subcutaneous fat, lack of exercise, and loss of thermoregulatory control. Table 19-2 shows the normal ranges of body temperature according to age group. Table 19-2 Variations in Body Temperature by Age From Bonewit-West K: Clinical procedures for medical assistants, ed 8, St Louis, 2011, Saunders. 2. Diurnal variations. During sleep, body metabolism slows down, as do muscle contractions. The body’s temperature is lowest in the morning before metabolism and muscle contractions begin increasing. 3. Emotional states. Strong emotions, such as crying and extreme anger, can increase the body temperature. This is important to consider when working with young children, who frequently cry during examination procedures or when they are ill. 4. Environment. Cold weather tends to decrease the body temperature, whereas hot weather increases it. 5. Exercise. Vigorous physical exercise causes an increase in voluntary muscle contractions, which elevates the body temperature. 6. Patient’s normal body temperature. Some patients normally run a low or high temperature. The medical assistant should review the patient’s past vital sign recordings. 7. Pregnancy. Cell metabolism increases during pregnancy, and this elevates body temperature. A fever can be divided into the following three stages: 1. The onset is when the temperature first begins to increase. This increase may be slow or sudden, the patient often experiences coldness and chills, and the pulse and respiratory rate increase. 2. During the course of a fever, the temperature rises and falls in one of the following three fever patterns: continuous, intermittent, or remittent. Fever patterns are described and illustrated in Table 19-3. During this stage the patient has an increased pulse and respiratory rate and feels warm to the touch. The patient also may experience one or more of the following: flushed appearance, increased thirst, loss of appetite, headache, and malaise. Malaise refers to a vague sense of body discomfort, weakness, and fatigue. Table 19-3 From Bonewit-West K: Clinical procedures for medical assistants, ed 8, St Louis, 2011, Saunders. 3. During the subsiding stage, the temperature returns to normal. It can return to normal gradually or suddenly (known as a crisis). As the body temperature is returning to normal, the patient usually perspires and may become dehydrated. The temperature obtained through the axillary method measures approximately 1° F lower than the same person’s temperature taken through the oral route (see Table 19-2). The medical assistant should make a notation to tell the physician that the temperature was taken through the axillary route. The rectal temperature provides an extremely accurate measurement of body temperature because few factors can alter the results. The rectum is highly vascular and, of the five sites, provides the most closed cavity. The temperature obtained through the rectal route measures approximately 1° F higher than the same person’s temperature taken through the oral route (see Table 19-2). The medical assistant should make a notation on the patient’s chart if the temperature has been taken rectally. An electronic thermometer measures body temperature in a brief time, which varies between 4 and 20 seconds, depending on the brand of thermometer used. The temperature results are digitally displayed on an LCD screen. An electronic thermometer consists of interchangeable oral and rectal probes attached to a battery-operated portable unit (Figure 19-4). The probes are color-coded for ease in identifying them. The oral probe is color-coded with blue on its collar and is used to take oral and axillary temperatures; the rectal probe is color-coded with red on its collar and is used to take rectal temperatures only. Procedures 19-1, 19-2, and 19-3 outline the methods for measuring oral, axillary, and rectal temperatures using an electronic thermometer. Measure oral body temperature. 1. Procedural Step. Sanitize your hands, and assemble the equipment. 2. Procedural Step. Remove the thermometer unit from its storage base, and attach the oral (blue collar) probe to it. This is accomplished by inserting the latching plug (at the end of the coiled cord of the oral probe) to the plug receptacle on the thermometer unit until it clicks into place. Insert the probe into the face of the thermometer. Principle. The oral probe is color-coded with a blue collar for ease in identifying it. 3. Procedural Step. Greet the patient and introduce yourself. Identify the patient and explain the procedure. If the patient has recently ingested hot or cold food or beverages or has been smoking, you must wait 15 to 30 minutes before taking the temperature. 4. Procedural Step. Grasp the probe by the collar, and remove it from the face of the thermometer. Slide the probe into a disposable plastic probe cover until it locks into place. 5. Procedural Step. Take the patient’s temperature by inserting the probe under the patient’s tongue in the pocket located on either side of the frenulum linguae. Instruct the patient to keep the mouth closed. 6. Procedural Step. Hold the probe in place until you hear the tone. At that time, the patient’s temperature appears as a digital display on the screen. Make a mental note of the temperature reading. (The temperature indicated on this thermometer is 98.2° F [36.8° C]). 7. Procedural Step. Remove the probe from the patient’s mouth. Discard the probe cover by firmly pressing the ejection button while holding the probe over a regular waste container. Do not allow your fingers to come in contact with the probe cover. 8. Procedural Step. Return the probe to its stored position in the thermometer unit. Return the thermometer unit to its storage base. Principle. Returning the probe to the unit automatically turns off and resets the thermometer. 9. Procedural Step. Sanitize your hands, and chart the results. Include the date, the time, and the temperature reading. 1. Procedural Step. Sanitize your hands, and assemble the equipment. 2. Procedural Step. Remove the thermometer unit from its storage base, and attach the oral (blue collar) probe to it. This is accomplished by inserting the latching plug (on the end of the coiled cord of the oral probe) to the plug receptacle on the thermometer unit until it locks into place. Insert the probe into the face of the thermometer. 3. Procedural Step. Greet the patient and introduce yourself. Identify the patient and explain the procedure. 4. Procedural Step. Remove clothing from the patient’s shoulder and arm. Ensure that the axilla is dry. If it is wet, pat it dry with a paper towel or a gauze pad. 5. Procedural Step. Grasp the probe by the collar, and remove it from the face of the thermometer. Slide the probe into a disposable probe cover until it locks into place. 6. Procedural Step. Take the patient’s temperature by placing the probe in the center of the patient’s axilla. Instruct the patient to hold the arm close to the body. Hold the arm in place for small children and other patients who cannot maintain the position themselves. 7. Procedural Step. Hold the probe in place until you hear the tone. At that time, the patient’s temperature appears as a digital display on the screen. Make a mental note of the temperature reading. 8. Procedural Step. Remove the probe from the patient’s axilla. Discard the probe cover by firmly pressing the ejection button while holding the probe over a regular waste container. Do not allow your fingers to come in contact with the probe cover. 9. Procedural Step. Return the probe to its stored position in the thermometer unit. Return the thermometer unit to its storage base. 10. Procedural Step. Sanitize your hands, and chart the results. Include the date, the time, and the axillary temperature reading. The symbol Measure rectal body temperature. 1. Procedural Step. Sanitize your hands, and assemble the equipment. 2. Procedural Step. Remove the thermometer unit from its storage base. Attach the rectal (red collar) probe to it. This is accomplished by inserting the latching plug (on the end of the coiled cord of the rectal probe) to the plug receptacle on the thermometer unit. Insert the probe into the face of the thermometer. Principle. The rectal probe is color-coded with a red collar for ease in identifying it. 3. Procedural Step. Greet the patient and introduce yourself. Identify the patient and explain the procedure. If a patient is a child or an adult, provide him or her with a patient gown. Instruct the patient to remove enough clothing to provide access to the anal area and to put on the gown with the opening in the back. If the patient is an infant, ask the parent to remove his or her diaper. 4. Procedural Step. Apply gloves. Position the patient. Adults and children: Position the patient in the Sims position, and drape the patient to expose only the anal area. Infants: Position the infant on his or her abdomen. 5. Procedural Step. Grasp the probe by the collar, and remove it from the face of the thermometer. Slide the probe into a disposable plastic probe cover until it locks into place. Apply a lubricant to the tip of the probe cover up to a level of 1 inch. 6. Procedural Step. Instruct the patient to lie still. Separate the buttocks to expose the anal opening, and gently insert the thermometer probe approximately 1 inch into the rectum of an adult, 7. Procedural Step. Hold the probe in place until you hear the tone. At that time, the patient’s temperature appears as a digital display on the screen. Make a mental note of the temperature reading. 8. Procedural Step. Gently remove the probe from the rectum in the same direction as it was inserted. Avoid touching the probe cover. Discard the probe cover by firmly pressing the ejection button while holding the probe over a regular waste container. Return the probe to its stored position in the thermometer unit. Return the thermometer unit to its storage base. 9. Procedural Step. Wipe the patient’s anal area with tissues to remove excess lubricant. Dispose of the tissues in a regular waste container. Principle. Wiping the anal area makes the patient more comfortable. 10. Procedural Step. Remove gloves, and sanitize your hands. Chart the results. Include the date, the time, and the rectal temperature reading. The symbol The tympanic membrane thermometer is used at the aural site. The tympanic membrane thermometer functions by detecting thermal energy that is naturally radiated from the body. As with the rest of the body, the tympanic membrane gives off heat waves known as infrared waves. The tympanic thermometer functions like a camera by taking a “picture” of these infrared waves, which are considered a documented indicator of body temperature (Figure 19-5). The thermometer calculates the body temperature from the energy generated by the waves and converts it to an oral or rectal equivalent. The tympanic membrane thermometer is battery operated and consists of a small handheld device with a sensor probe (Figure 19-6). To operate the thermometer, the probe is covered with a disposable soft plastic cover and is placed in the outer third of the external ear canal. An activation button is depressed momentarily, and the results are displayed in 1 to 2 seconds on a digital screen. The probe cover is ejected into a regular waste container. The procedure for taking aural body temperature using a tympanic membrane thermometer is presented in Procedure 19-4. Measure aural body temperature. 1. Procedural Step. Sanitize your hands, and assemble the equipment. Principle. Your hands should be clean and free from contamination. 2. Procedural Step. Greet the patient and introduce yourself. Identify the patient and explain the procedure. 3. Procedural Step. Remove the thermometer from its storage base. Ensure that the probe lens is clean and intact. To clean the lens, gently wipe its surface with an antiseptic wipe and immediately wipe it dry with a cotton swab. After cleaning, allow at least 5 minutes before taking a temperature. Principle. A dirty or damaged probe lens could result in a falsely low temperature reading. 4. Procedural Step. Attach a cover on the probe by pressing the probe tip straight down into the cover box. You will be able to see and feel the cover snap securely into place on the probe. This procedure automatically turns on the thermometer. 5. Procedural Step. Pull the probe straight up from the cover box. Look at the digital display to see if the thermometer is ready to use. 6. Procedural Step. Hold the thermometer in your dominant hand. If you are right-handed, you should take the temperature in the patient’s right ear. If you are left-handed, take the temperature in the patient’s left ear. 7. Procedural Step. Straighten the patient’s external ear canal with your nondominant hand, as follows: Adults and Children Older Than 3 Years Old. Gently pull the ear auricle upward and backward. Children Younger Than 3 Years Old. Gently pull the ear pinna downward and backward. 8. Procedural Step. Insert the probe into the patient’s ear canal tightly enough to seal the opening, but without causing patient discomfort. Point the tip of the probe toward the opposite temple (approximately midway between the opposite ear and eyebrow). 9. Procedural Step. Ask the patient to remain still. Hold the thermometer steady, and depress the activation button. Depending on the brand of the thermometer, perform one of the following: a. Hold the button down for one full second, and then release it, or b. Hold down the button down until an audible tone is heard. 10. Procedural Step. Remove the thermometer from the ear canal. Turn the digital display of the thermometer toward you, and read the temperature. Make a mental note of the temperature reading. If the temperature seems to be too low, repeat the procedure to ensure that you have used the proper technique. The temperature indicated on this thermometer is 99.8° F (37.7° C). The temperature remains on the display screen for 30 to 60 seconds or until another cover is inserted on the probe (whichever occurs first). 11. Procedural Step. Dispose of the probe cover by ejecting it into a regular waste container. 12. Procedural Step. Replace the thermometer in its storage base. 13. Procedural Step. Sanitize your hands. 14. Procedural Step. Chart the results. Include the date, the time, the aural temperature reading, and which ear was used to take the temperature (AD: right ear; AS: left ear). When these abbreviations are used, the physician knows that the temperature was taken through the aural route. Measuring temperature using a temporal artery thermometer is the newest method for assessing body temperature. A temporal artery thermometer is an electronic device consisting of a probe attached to a portable unit (Figure 19-7). Along with measuring the peak temperature, the probe sensor automatically measures the ambient temperature, which is the surrounding air temperature. This is done because there is a small heat loss from the forehead that occurs as a result of cooling by ambient temperature. The thermometer’s computer determines and automatically corrects for any effect from ambient temperature. An accurate body temperature reading is digitally displayed on the screen on the thermometer. The procedure for measuring temperature using a temporal artery thermometer is presented in Procedure 19-5. Measure temporal artery body temperature. 1. Procedural Step. Sanitize your hands, and assemble the equipment. 2. Procedural Step. Greet the patient and introduce yourself. Identify the patient and explain the procedure. 3. Procedural Step. Examine the probe lens of the temporal artery thermometer to ensure that the lens is clean and intact. Principle. A dirty or damaged probe lens could result in a falsely low temperature reading. 4. Procedural Step. Place a disposable cover over the probe. If the thermometer does not use disposable covers, clean the probe with an antiseptic wipe, and allow it to dry. 5. Procedural Step. Select an appropriate site; the right or left side of the forehead can be used. The site selected should be fully exposed to the environment. 6. Procedural Step. Prepare the patient by brushing away any hair that is covering the side of the forehead to be scanned and the area behind the earlobe on the same side. 7. Procedural Step. Hold the thermometer in your dominant hand with your thumb on the scan button. 8. Procedural Step. Gently position the probe of the thermometer on the center of the patient’s forehead, midway between the eyebrow and the hairline. 9. Procedural Step. Depress the scan button, and keep it depressed for the entire measurement. Principle. Not keeping the scan button depressed can result in a falsely low temperature reading. 10. Procedural Step. Slowly and gently slide the probe straight across the forehead, midway between the eyebrow and the upper hairline. Continue until the hairline is reached. Keep the scan button depressed and the probe flush (flat) against the forehead. During this time, a beeping sound occurs and a red light blinks to indicate that a measurement is taking place. Rapid beeping and blinking indicate a rise to a higher temperature. Slow beeping indicates that the thermometer is still scanning but is not finding a higher temperature. 11. Procedural Step. Keeping the button depressed, lift the probe from the forehead, and gently place the probe behind the earlobe in the soft depression of the neck just below the mastoid process. Hold the probe in place for 1 to 2 seconds. 12. Procedural Step. Release the scan button on the digital display, and read the temperature. Make a mental note of the temperature reading (The temperature indicated on this thermometer is 99.1° F [37.3° C]). The reading remains on the display for approximately 15 to 30 seconds after the button is released. The thermometer shuts off automatically after 30 seconds. To turn the thermometer off immediately, press and release the scan button quickly. If the patient’s temperature needs to be taken again, wait 60 seconds, or use the opposite side of the forehead. 13. Procedural Step. Dispose of the probe cover by pushing it off the probe with your thumb and ejecting it into a regular waste container. Wipe the probe with an antiseptic wipe, and allow it to dry. 14. Procedural Step. Sanitize your hands, and chart the results. Include the date, the time, and the temperature reading. The symbol
Vital Signs
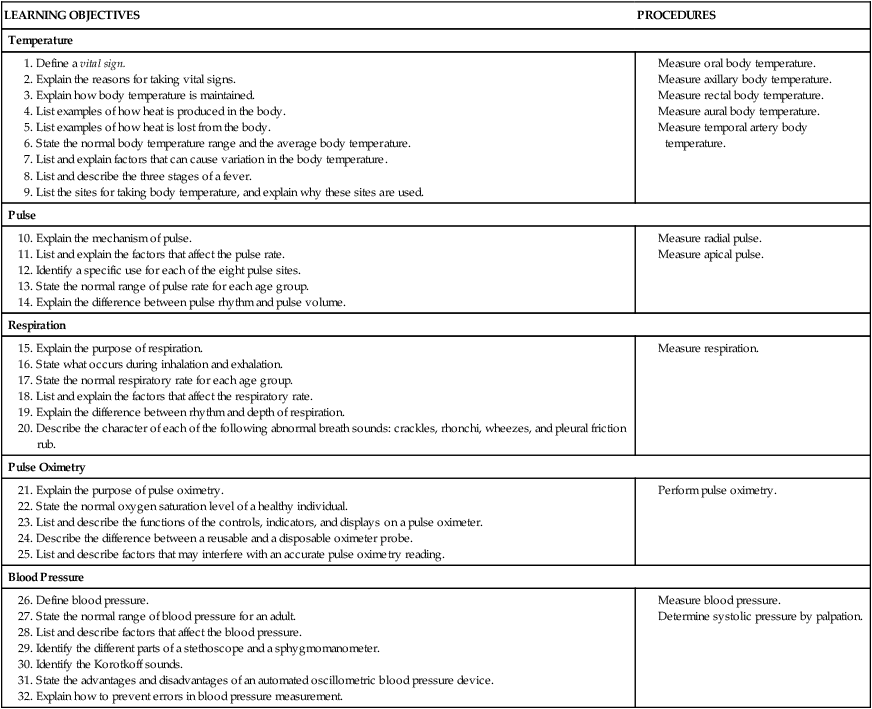
Introduction to Vital Signs
Temperature
Regulation of Body Temperature

Heat Loss
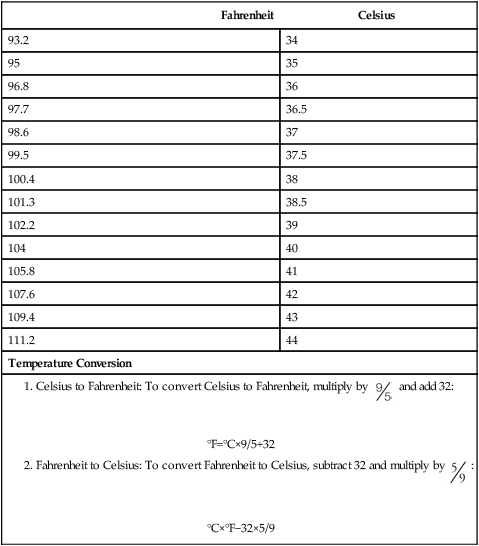
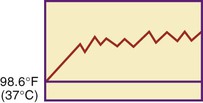
Body Temperature Range
Fahrenheit
Celsius
93.2
34
95
35
96.8
36
97.7
36.5
98.6
37
99.5
37.5
100.4
38
101.3
38.5
102.2
39
104
40
105.8
41
107.6
42
109.4
43
111.2
44
Temperature Conversion
Alterations in Body Temperature
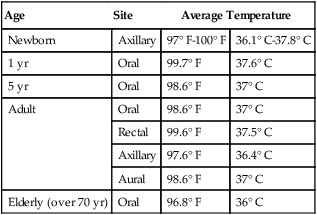
Variations in Body Temperature
Age
Site
Average Temperature
Newborn
Axillary
97° F-100° F
36.1° C-37.8° C
1 yr
Oral
99.7° F
37.6° C
5 yr
Oral
98.6° F
37° C
Adult
Oral
98.6° F
37° C
Rectal
99.6° F
37.5° C
Axillary
97.6° F
36.4° C
Aural
98.6° F
37° C
Elderly (over 70 yr)
Oral
96.8° F
36° C
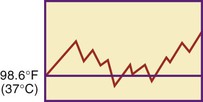
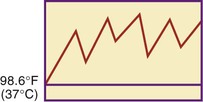
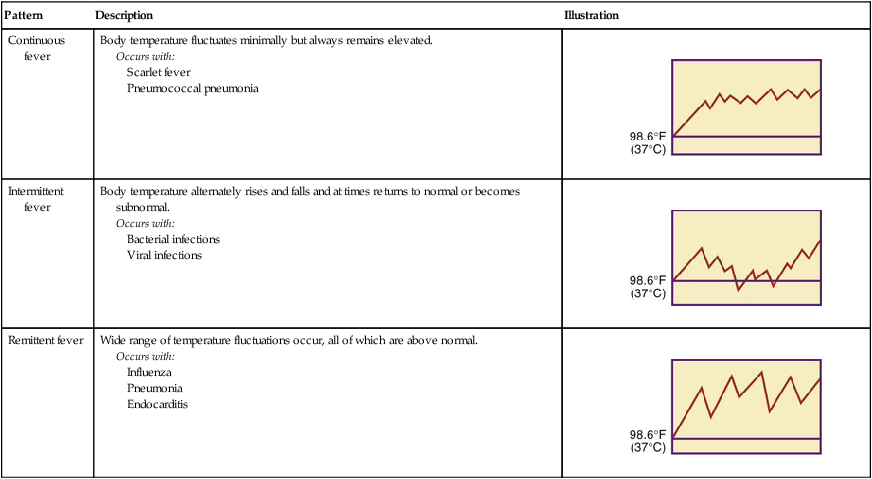
Fever
Stages of a Fever
Pattern
Description
Illustration
Continuous fever
Body temperature fluctuates minimally but always remains elevated.
Occurs with:
Scarlet fever
Pneumococcal pneumonia
Intermittent fever
Body temperature alternately rises and falls and at times returns to normal or becomes subnormal.
Occurs with:
Bacterial infections
Viral infections
Remittent fever
Wide range of temperature fluctuations occur, all of which are above normal.
Occurs with:
Influenza
Pneumonia
Endocarditis
Assessment of Body Temperature
Assessment Sites
Axillary Temperature
Rectal Temperature
Types of Thermometers
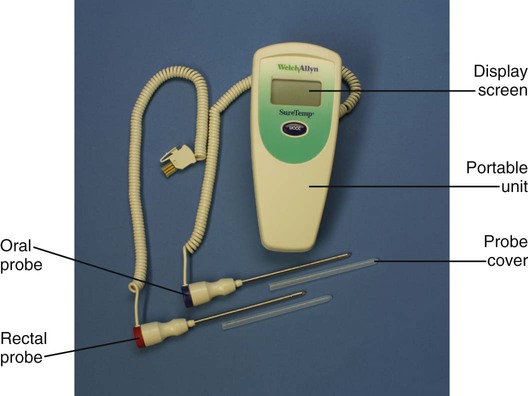
Electronic Thermometer
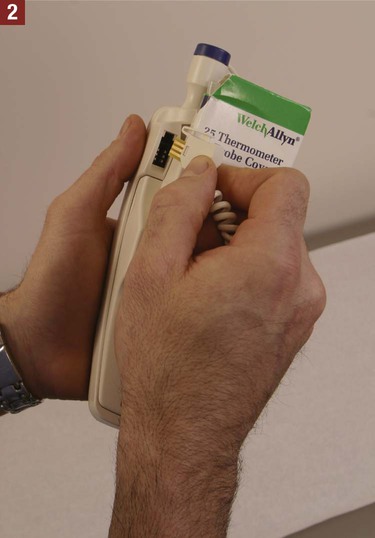
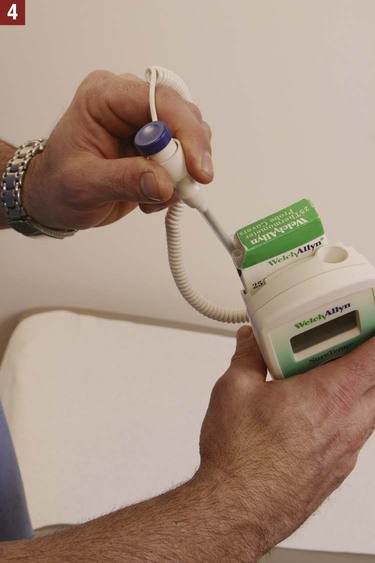
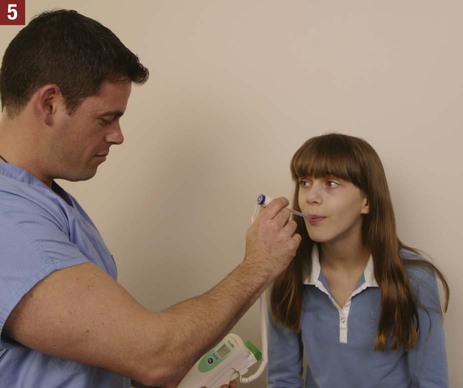
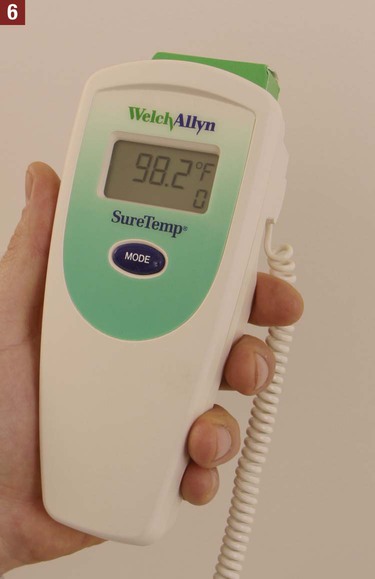
 Procedure 19-1 Measuring Oral Body Temperature—Electronic Thermometer
 Procedure 19-2 Measuring Axillary Body Temperature— Electronic Thermometer
 must be charted next to the temperature reading to tell the physician that an axillary reading was taken.
 Procedure 19-3 Measuring Rectal Body Temperature— Electronic Thermometer

 inch in children, and
  inch in infants. Do not force insertion of the probe. Hold the probe in place until the temperature registers.
 must be charted next to the temperature reading to tell the physician that a rectal reading was taken.
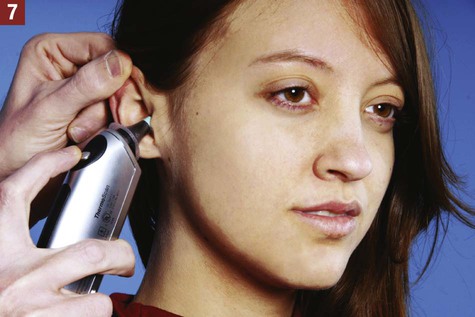
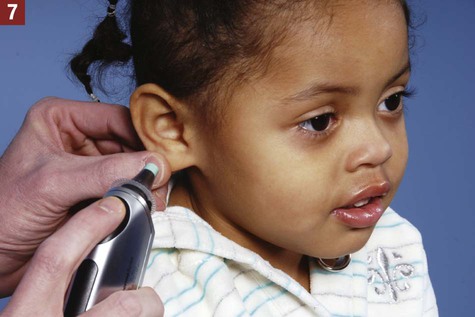
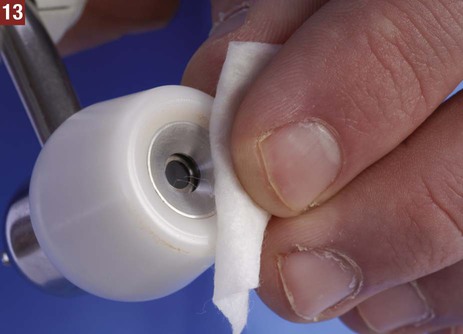
Tympanic Membrane Thermometer
 Procedure 19-4 Measuring Aural Body Temperature—Tympanic Membrane Thermometer
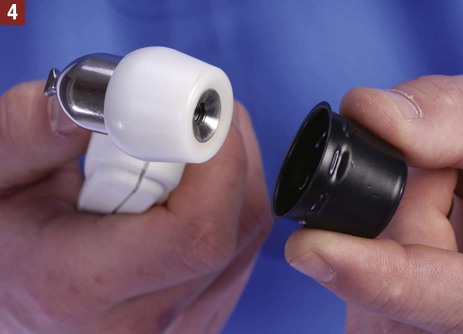
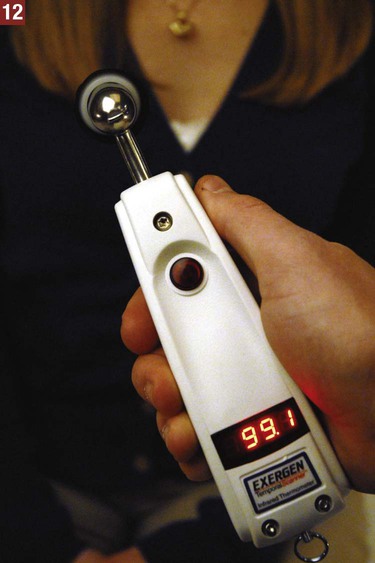
Temporal Artery Thermometer
 Procedure 19-5 Measuring Temporal Artery Body Temperature
 must be charted next to the temperature reading to tell the physician that a temporal artery reading was taken. Store the thermometer in a clean, dry area.

![]()
Stay updated, free articles. Join our Telegram channel

Full access? Get Clinical Tree


Vital Signs
 and add 32:
 :
: 


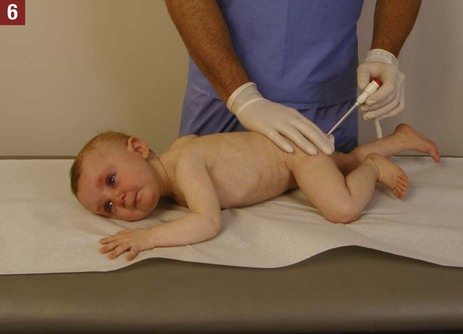
 inch into the rectum.
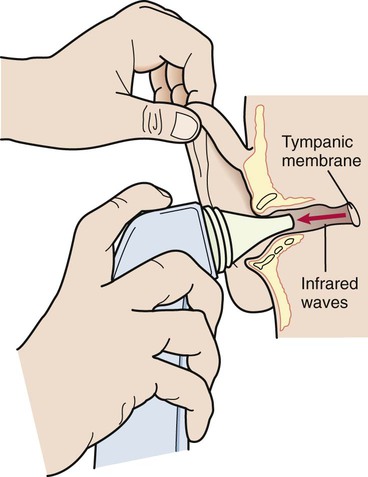
Get Clinical Tree app for offline access