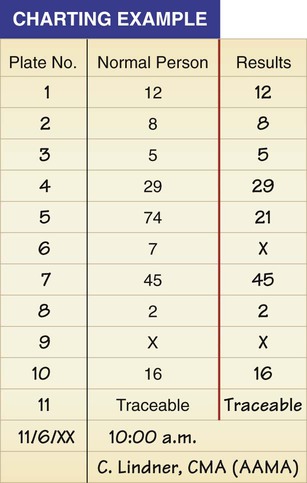
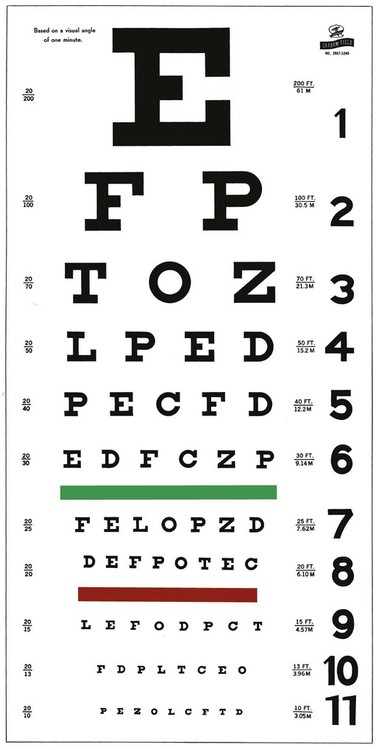
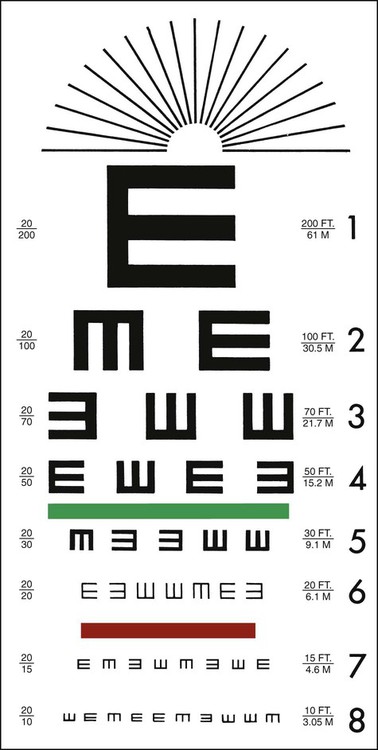
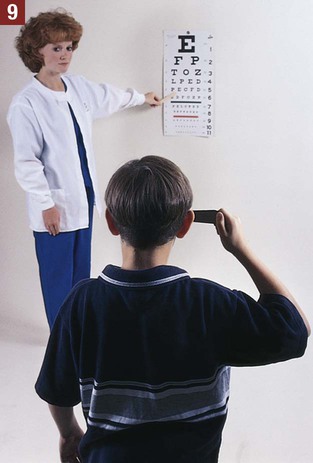
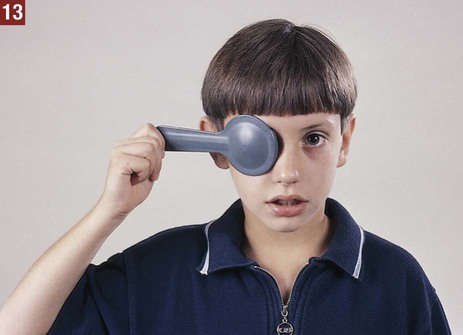
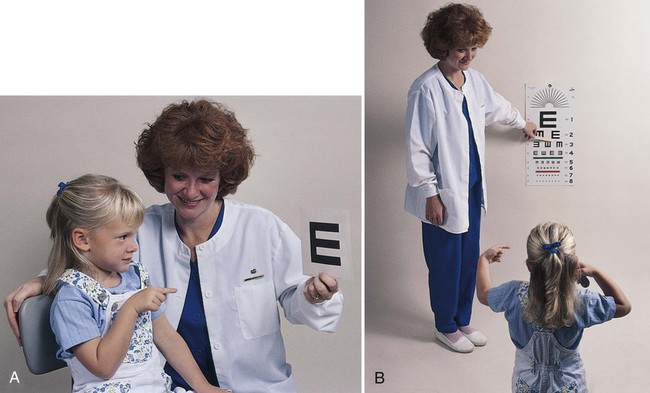
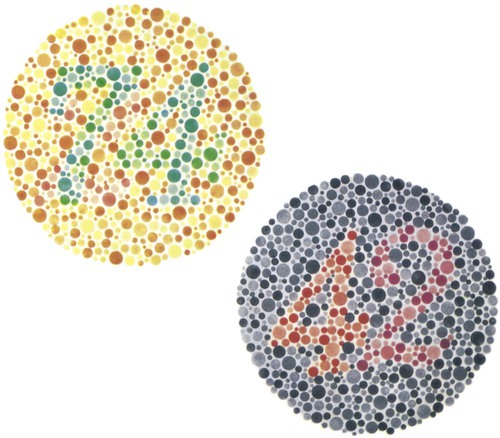
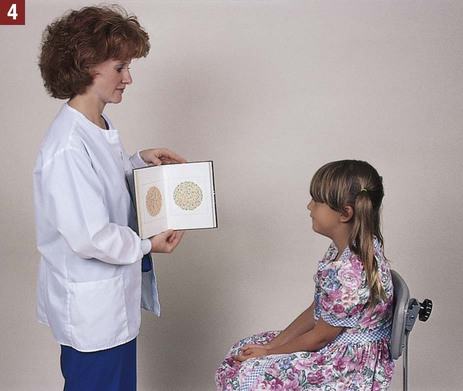
The medical assistant is responsible for performing a variety of assessments and procedures that involve the eye. An understanding of the structure and function of the eye is essential to mastering skills in these areas. Refer to Chapter 10 to review the structure and function of the eye. The medical assistant is responsible for performing or teaching the patient to perform eye irrigations and instillations. Irrigation is washing a body canal with a flowing solution. Instillation is dropping a liquid into a body cavity. Eye irrigations and instillations should be performed using the important principles of medical asepsis outlined in Chapter 17. Errors of refraction are the most common causes of defects in visual acuity (Figure 21-1). Refraction refers to the ability of the eye to bend the parallel light rays coming into it so that they can be focused on the retina. An error of refraction means that the light rays are not being refracted or bent properly and are not adequately focused on the retina. A defect in the shape of the eyeball can cause a refractive error. Errors of refraction can be improved with corrective lenses. Myopia can be diagnosed (in combination with other tests) by a distance visual acuity test. In the medical office, the Snellen eye chart is most often used. Two types of charts are commonly used. One type is used for school-age children and adults and consists of a chart of letters in decreasing sizes (Figure 21-2). The other type is used for preschool children, non–English-speaking people, and nonreaders; it is composed of the capital letter E in decreasing sizes and arranged in different directions (Figure 21-3). Visual acuity charts with pictures of familiar objects also are available for use with preschool children. Testing with these charts tends to be less accurate than with the Snellen charts. Some children are unable to identify the objects because of lack of recognition, not because of a defect in visual acuity. It is suggested that the Snellen Big E chart be used with preschool children. The acuity of each eye should be measured separately, traditionally beginning with the right eye. Most physicians prefer that the patient wear his or her contact lenses or glasses, except reading glasses, during the test; the medical assistant should record in the patient’s chart that corrective lenses were worn by the patient during the test. An eye occluder should be held over the eye not being tested. The patient’s hand should not be used to cover the eye because this may encourage peeking through the fingers, especially in the case of children. The patient should be instructed to leave open the eye not being tested because closing it causes squinting of the eye that is being tested. The procedure for measuring distance visual acuity is outlined in Procedure 21-1. Assess distance visual acuity. 1. Procedural Step. Sanitize your hands. 2. Procedural Step. Assemble the equipment. Perform the test in a well-lit room that is free of distractions. Wipe the eye occluder with an antiseptic wipe, and allow it to dry completely. Principle. The eye occluder should be disinfected before use. 3. Procedural Step. Greet the patient and introduce yourself. Identify the patient and explain the procedure. Tell the patient that he or she will be asked to read several lines of letters. The patient should not have an opportunity to study or memorize the letters before beginning the test. 4. Procedural Step. Determine whether the patient wears contact lenses or glasses (other than reading glasses). If the patient wears such aids, he or she should be told to keep them on during the test. 5. Procedural Step. Ask the patient to stand on the marked line located 20 feet from the chart. 6. Procedural Step. Position the center of the Snellen chart at the patient’s eye level. Stand next to the chart during the test to indicate to the patient the line to be identified. 7. Procedural Step. Test the acuity of each eye separately. Measure the visual acuity of the right eye first. 8. Procedural Step. Ask the patient to cover the left eye with the eye occluder. If the patient wears eyeglasses, tell him or her to place the occluder in front of the glasses gently to prevent the glasses from being moved out of their normal position. Instruct the patient to keep the left eye open. During the test, the medical assistant should check to make sure the patient is keeping the left eye open. 9. Procedural Step. Instruct the patient not to squint during the test because squinting temporarily improves vision. Ask the patient to identify orally one line at a time on the Snellen chart, starting with the 20/70 line (or a line that is several lines above the 20/20 line). 10. Procedural Step. If the patient is able to read the 20/70 line, proceed down the chart until reaching the smallest line of letters the patient can read. If the patient is unable to read the 20/70 line, proceed up the chart until the smallest line of letters the patient can read is reached. 11. Procedural Step. While the patient is reading the letters, observe him or her for unusual symptoms, such as squinting, tilting of the head, or watering of the eyes. 12. Procedural Step. On a small piece of paper, jot down the numbers that are displayed next to the smallest line of letters that the patient is able to read. If one or two letters are missed, record the visual acuity with a minus sign next to the bottom number, along with the number of letters missed. If more than two letters are missed, the previous line is recorded. 13. Procedural Step. Ask the patient to cover the right eye with the eye occluder and to keep the right eye open. Measure the visual acuity in the left eye as described in steps 9 through 12. During the test, check to make sure the patient is keeping the right eye open. Principle. Keeping the right eye open prevents squinting of the left eye. 14. Procedural Step. Chart the procedure. Include the date and time, the name of the test (Snellen test), the visual acuity results, and any unusual symptoms the patient exhibited during the test. Also chart whether the patient was wearing corrective lenses during the test. Use the following abbreviations: 15. Procedural Step. Disinfect the eye occluder with an antiseptic wipe, and sanitize your hands. With minor variations, Procedure 21-1 can be used to test distance visual acuity in preschool children. The Snellen Big E chart is used for this purpose. A child needs a complete and thorough explanation of what is expected of him or her before beginning the test. Tell the child you will be playing a pointing game. Do not force the child to play the game because the results then tend to be inaccurate. Draw the capital letter E on an index card, and teach the child to point in the direction of the open part of the E by turning the card in different directions (up, down, to the right, and to the left). Using such phrases as “fingers” or the “legs of the table” to describe the open part of the E helps the child understand what is expected (Figure 21-4). Allow the child to practice the pointing game with the index card until you are sure this level of skill has been mastered. Be sure to praise the child when the correct response is given. The test is conducted with a card similar to the Snellen eye chart; however, the size of the type ranges from the size of newspaper headlines down to considerably smaller print such as would be found in a telephone directory (Figure 21-5). The test card is available in a variety of forms, such as printed paragraphs, printed words, and pictures. Defects in color vision may be classified as congenital or acquired. Congenital defects are more common and refer to a color vision deficiency that is inherited and is present at birth. Congenital color vision deficiencies most often affect males. Acquired defects refer to a color vision deficiency that is acquired after birth, resulting from such factors as an eye or brain injury, disease, and certain drugs. Color vision tests, such as the Ishihara test (Figure 21-6), detect congenital color vision disturbances and are commonly performed in the medical office. A basic screening for color vision can be performed by asking the patient to identify the red and green lines on the Snellen eye chart. The Ishihara test for color blindness is a convenient and accurate method to detect total congenital color blindness and red-green color blindness by assessing an individual’s ability to perceive primary colors and shades of color. The Ishihara book contains a series of polychromatic plates of primary colored dots arranged to form a numeral against a background of similar dots of contrasting colors (see Figure 21-6). Patients with normal color vision are able to read the appropriate numeral; however, patients with color vision defects read the dots either as not forming a number at all or as forming a number different from the one identified by the individual with normal color vision. The first plate in the Ishihara book is designed to be read correctly by all individuals (with normal vision and exhibiting color vision deficiencies) and should be used to explain the procedure to the patient. If a defect in color vision is detected, the patient is referred for additional assessment of color vision to an ophthalmologist or optometrist, who would use more precise color vision tests. The procedure for assessing color vision using the Ishihara color plates is outlined in Procedure 21-2. 1. Procedural Step. Sanitize your hands. Assemble the equipment. 2. Procedural Step. Conduct the test in a quiet room illuminated by natural daylight. 3. Procedural Step. Greet the patient and introduce yourself. Identify the patient and explain the procedure. Using the first (practice) plate as an example, instruct the patient to orally identify numbers formed by colored dots. Tell the patient that 3 seconds will be given to identify each plate. 4. Procedural Step. Hold the first color plate 30 inches (75 cm) from the patient, at a right angle to the patient’s line of vision. The patient should keep both eyes open during the test. 5. Procedural Step. Ask the patient to identify the number on the plate. If the plate consists of a traceable winding colored line, ask the patient to trace the line using a cotton swab or the eraser end of a pencil. The patient’s finger should not be used to make the tracing. 6. Procedural Step. Record results after each plate. Continue until the patient has viewed all the plates. To record color vision results, use the plate identification number and the number given by the patient. If the patient is unable to identify a number, the mark X should be recorded to indicate that the patient could not read the plate. Examples: Plate 5: 21. This means the patient read the number 21 on plate 5 (instead of 74). Plate 6: X. This means the patient could not identify a number on plate 6. Plate 11: Traceable. This means that the patient correctly traced a winding line on plate 11. As you can see from the results of this patient’s color vision test, the patient correctly identified all 11 plates, which indicates normal color vision. Because the patient has normal color vision, the medical assistant did not need to include plates 12, 13, and 14 in the color vision test. 7. Procedural Step. Complete the charting entry. Include the date and time, the name of the test (Ishihara test), and any unusual symptoms the patient exhibited during the test, such as squinting or rubbing the eyes. 8. Procedural Step. Return the Ishihara book to its proper place. The book of color plates must be stored in a closed position to protect it from light. Principle. Exposing the plates to excessive and unnecessary light results in fading of the color.
Eye and Ear Assessment and Procedures
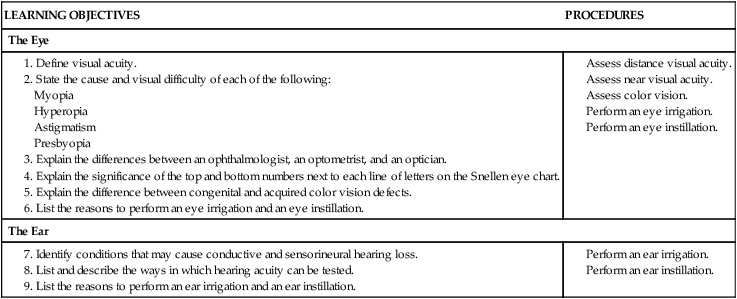
Introduction to the Eye
Visual Acuity
Assessment of Distance Visual Acuity (DVA)
Conducting a Snellen Test
 Procedure 21-1 Assessing Distance Visual Acuity—Snellen Chart
 without correction or
  with correction. Latin abbreviations are used to record visual acuity. The abbreviation for the right eye is OD (oculus dexter), the abbreviation for the left eye is OS (oculus sinister), and the abbreviation for both eyes is OU (oculus uterque).
Assessing Distance Visual Acuity in Preschool Children
Assessment of Near Visual Acuity (NVA)

Assessment of Color Vision
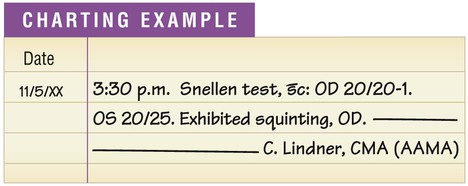
Ishihara Test
 Procedure 21-2 Assessing Color Vision—Ishihara Test
![]()
Stay updated, free articles. Join our Telegram channel

Full access? Get Clinical Tree


Eye and Ear Assessment and Procedures


Get Clinical Tree app for offline access