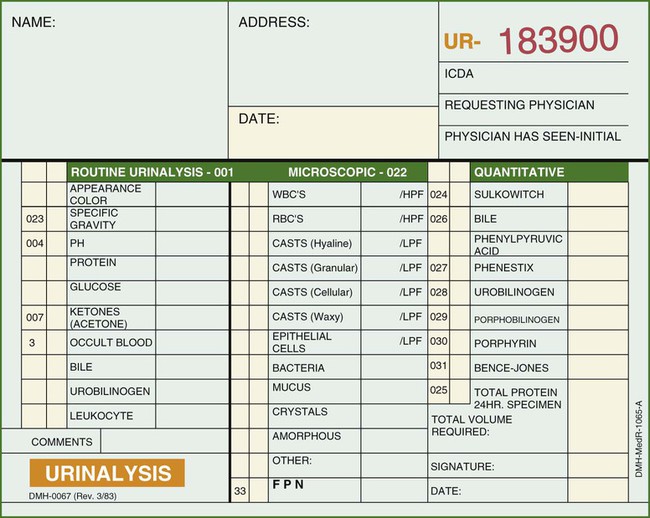
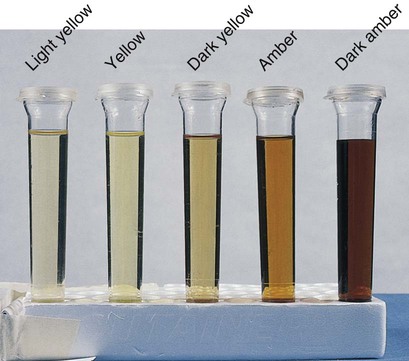
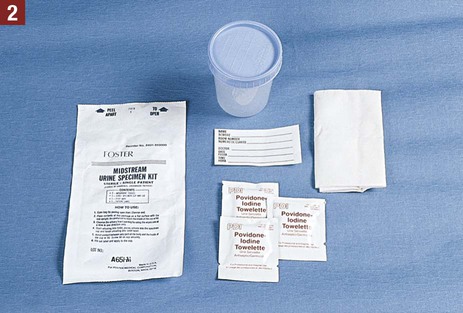
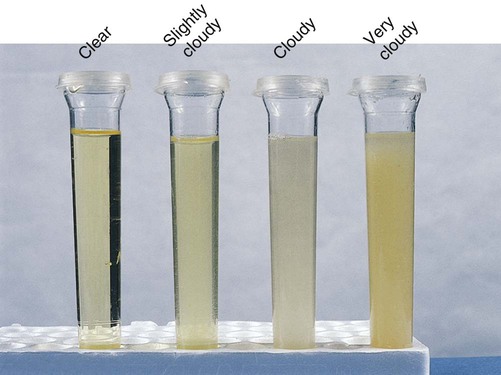
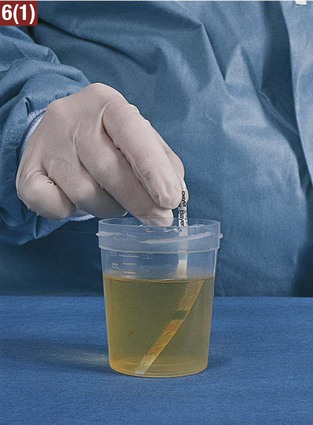
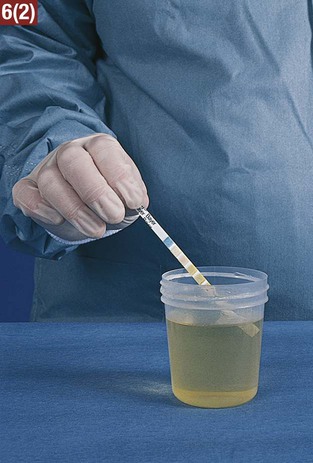
3. Explain why a first-voided morning specimen is often preferred for urinalysis. 4. Explain the purpose of collecting a clean-catch midstream specimen. 5. Explain the purpose of a 24-hour urine collection. 6. List changes that may occur if urine is allowed to remain standing for longer than 1 hour. Anuria Failure of the kidneys to produce urine Diuresis Secretion and passage of large amounts of urine Dysuria Difficult or painful urination Frequency The condition of having to urinate often Hematuria Blood present in the urine Nocturia Excessive (voluntary) urination during the night Nocturnal enuresis Inability of an individual to control urination at night during sleep (bedwetting) Oliguria Decreased output of urine Polyuria Increased output of urine Pyuria Pus present in the urine Retention The inability to empty the bladder. The urine is being produced normally but is not being voided Urgency The immediate need to urinate The guidelines listed should be followed in collection of a urine specimen: 1. The medical assistant must obtain an adequate volume of urine as necessary for the type of test (usually 30 to 50 mL of urine). 2. Each specimen must be labeled properly with the patient’s name and date of birth, the date and time of collection, and the type of specimen (i.e., urine) to avoid any mix-ups in specimens. 3. Any medication the patient is taking should be recorded on the laboratory requisition and in the patient’s chart, because some medications may interfere with the accuracy of the test results. 4. If possible, the collection of a urine specimen should be avoided in women during menstruation and for several days thereafter because the specimen may become contaminated with blood. This results in a false-positive test result for blood in the urine. 5. The medical assistant should take into consideration that voiding may be difficult for patients under stress and anxiety. In these instances, understanding and patience should be conveyed to the patient. 6. A urine specimen may be difficult to obtain from a child, even with the assistance of a parent. In this case, the physician should be informed because another collection method may be used, such as a urine collection bag, suprapubic aspiration, or catheterization of the patient. Guidelines that should be followed when collecting a clean-catch midstream specimen are listed: 1. A clean-catch midstream specimen is collected by the patient at the medical office. The medical assistant must provide complete instructions for collection of this specimen. Failure to instruct the patient adequately may necessitate a return to the medical office for the collection of another specimen because of bacterial contamination. Patient instructions for obtaining a clean-catch midstream specimen are presented in Procedure 30-1. Instruct a patient in the procedure for collecting a clean-catch midstream urine specimen. 1. Procedural Step. Sanitize your hands. Greet the patient and introduce yourself. Identify the patient and explain the procedure. 2. Procedural Step. Assemble equipment. Label the specimen container with the patient’s name and date of birth, the date, the type of specimen (clean-catch midstream), and your initials. 3. Procedural Step. Instruct a female patient on collection of the specimen as follows: a. Wash the hands, open the package of towelettes, and place them on their wrapper. b. Remove the lid from the specimen container and place it on a paper towel with the opening of the lid facing upward. Do not touch the inside of the lid or the inside of the specimen container. c. Pull undergarments down and sit on the toilet. Expose the urinary meatus by spreading apart the labia with one hand. d. Cleanse each side of the urinary meatus with an antiseptic towelette using a front-to-back motion (from pubis to anus). Use a separate antiseptic towelette for each side of the meatus. After use, discard each towelette in the toilet. e. Cleanse directly across the meatus (front to back) with a third antiseptic towelette. f. Continue to hold the labia apart, and void a small amount of urine into the toilet. Principle. Voiding a small amount flushes microorganisms out of the distal urethra. g. Without stopping the urine flow, collect the next amount of urine by voiding into the sterile container. Do not touch the inside of the container. Fill the specimen container about half full with urine. h. Void the last amount of urine into the toilet. This means that the first and last portions of the urine flow are not included in the specimen. Replace the lid of the specimen container. i. Wipe the area dry with a tissue, and discard it in the toilet. Flush the toilet and wash the hands. 4. Procedural Step. Instruct a male patient as follows: a. Wash the hands, open the towelettes, remove the lid from the specimen container, and remove undergarments. b. Stand in front of the toilet. Retract the foreskin of the penis (if uncircumcised). c. Cleanse the area around the meatus (glans penis) and the urethral opening (meatal orifice) by wiping each side of the meatus with a separate antiseptic towelette. d. Cleanse directly across the meatus with a third antiseptic towelette. After use, discard each towelette in the toilet. e. Void a small amount of urine into the toilet. f. Collect the next amount of urine by voiding into the sterile container without touching the inside of the container with the hands or penis. Fill the container about half full with urine. g. Void the last amount of urine into the toilet and replace the lid on the container. h. Wipe the area dry with a tissue, and discard it in the toilet. Flush the toilet and wash the hands. 5. Procedural Step. Provide the patient with instructions about what to do with the specimen after it has been collected (e.g., placing it in a designated area, directly handing it to the medical assistant). 6. Procedural Step. Record the procedure in the patient’s chart. Include the date and time and the type of specimen collected (clean-catch midstream collection). 7. Procedural Step. Test the specimen at the office or prepare the specimen for transport to an outside laboratory for testing. If the specimen is to be transported to an outside laboratory, do the following: a. Place the specimen container in a biohazard specimen bag. b. Place the laboratory request in the outside pocket of the specimen bag. c. Properly preserve the specimen while awaiting pickup by a laboratory courier by placing it in a refrigerator. d. Chart the date the specimen was transported to the laboratory and the tests requested. 2. The medical assistant must label the container with the patient’s name and date of birth, the date, the time of collection, and the type of specimen (clean-catch midstream specimen). 3. For reliable test results, the specimen should be tested immediately and should not be allowed to stand. If this is not possible, the specimen should be refrigerated, or a preservative should be added. 4. If the specimen is to be tested at an outside laboratory, completion of a laboratory requisition to accompany it is necessary. A urinalysis laboratory request form is shown in Figure 30-1. 5. The procedure is completed by sanitizing the hands and recording the procedure in the patient’s chart. The information to be charted for specimens tested at the medical office includes the date and time, the type of specimen collected, and the laboratory test results. If the specimen is being transported to an outside laboratory for testing, record the date and time, the type of specimen collected, and the date the specimen was transported to the laboratory. 1. Bacteria in the environment that get into the urine specimen work on the urea present in the urine, converting it to ammonia. Because ammonia is alkaline, an acid urine becomes alkaline, increasing the pH. In addition, an alkaline pH may result in a false-positive result on the protein test. 2. Bacteria multiply rapidly in the urine, resulting in a cloudy specimen and an increase in the nitrite. 3. If glucose is present in the specimen, it decreases in amount because microorganisms use the glucose as a source of food. 4. If any red or white blood cells are present, they may break down. The color of the urine is the result of the presence of a yellow pigment known as urochrome, produced by the breakdown of hemoglobin. It is common for the color of urine to vary among different shades of yellow within the course of a day. Classifications that can be used to describe the color of urine include light yellow, yellow, dark yellow, light amber, amber, and dark amber (Figure 30-2). In the medical office, specific gravity is most commonly measured using a reagent strip. This involves a color comparison determination with a reagent strip that contains a reagent area for specific gravity. The reagent strip is dipped into the urine specimen, and the results are compared with a color chart (see Procedure 30-2). Perform a chemical assessment of a urine specimen. 1. Procedural Step. Perform the quality control testing procedure if using a new bottle of testing strips. Principle. Performing the quality control procedure ensures the reliability of test results. 2. Procedural Step. Obtain a freshly voided urine specimen from the patient with a clean container. The specimen should be uncentrifuged and at room temperature. 3. Procedural Step. Sanitize your hands. 4. Procedural Step. Assemble the equipment. Check the expiration date of the reagent strips. Principle. Outdated reagent strips may lead to inaccurate test results. 5. Procedural Step. Apply gloves. Remove a reagent strip from its plastic container, and recap the container immediately. Do not touch the test areas with your fingers or lay the strip on the table. It is permissible, however, to lay the reagent strip on a clean, dry paper towel. 6. Procedural Step. Thoroughly mix the urine specimen and remove the lid from the container. Using the dominant hand, completely immerse the reagent strip in the urine specimen, and remove it immediately. While removing, run the edge of the strip against the rim of the urine container to remove excess urine. 7. Procedural Step. With the nondominant hand, start the timer, pick up the reagent strip container, and rotate it to the color chart. Hold the reagent strip in a horizontal position and place it as close as possible to the corresponding color blocks on the color chart. Do not lay the strip directly on the color chart because this will result in soiling of the chart by the urine. Read the results carefully and at the exact reading times, starting with the shortest time specified on the color chart and as indicated here:
Urinalysis
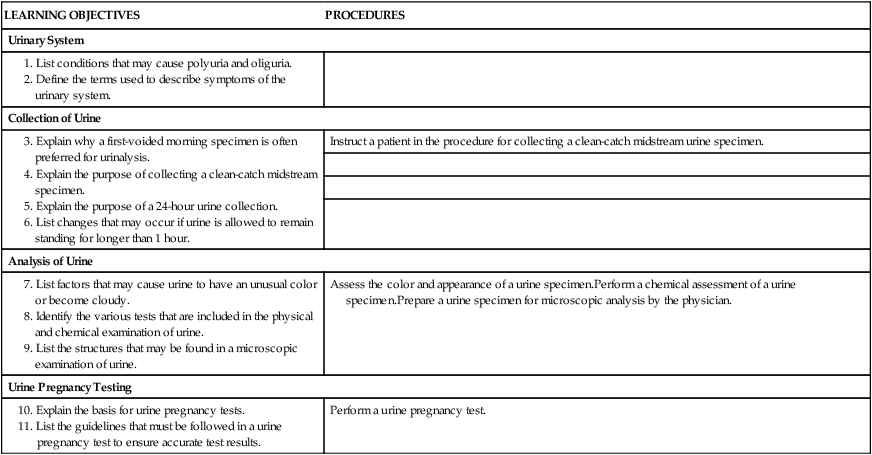
LEARNING OBJECTIVES
PROCEDURES
Urinary System
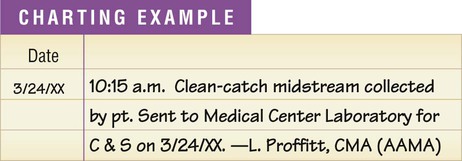
Collection of Urine
Instruct a patient in the procedure for collecting a clean-catch midstream urine specimen.
Analysis of Urine
Assess the color and appearance of a urine specimen.Perform a chemical assessment of a urine specimen.Prepare a urine specimen for microscopic analysis by the physician.
Urine Pregnancy Testing
Perform a urine pregnancy test.
Composition of Urine
Terms Related to the Urinary System
Collection of Urine
Guidelines for Urine Collection
Urine Specimen Collection Methods
Clean-Catch Midstream Specimen
Guidelines
 Procedure 30-1 Clean-Catch Midstream Specimen Collection Instructions
Analysis of Urine
Physical Examination of Urine
Color
Specific Gravity
 Procedure 30-2 Chemical Testing of Urine with the Multistix 10 SG Reagent Strip

Glucose, 30 seconds
Bilirubin, 30 seconds
Ketone, 40 seconds
Specific gravity, 45 seconds
Blood, 60 seconds
pH, 60 seconds
Protein, 60 seconds
Urobilinogen, 60 seconds
Nitrite, 60 seconds
Leukocytes, 2 minutes ![]()
Stay updated, free articles. Join our Telegram channel

Full access? Get Clinical Tree


Urinalysis

Get Clinical Tree app for offline access