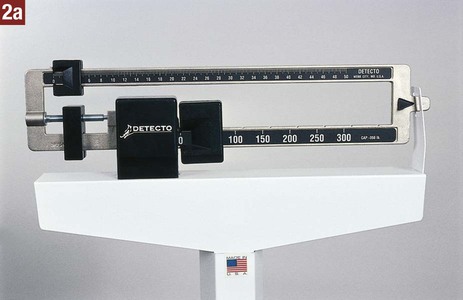
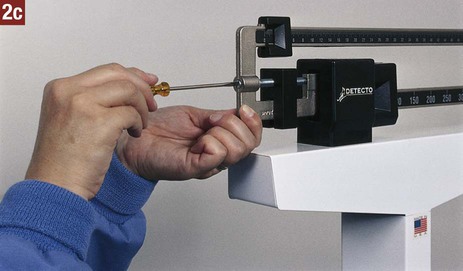
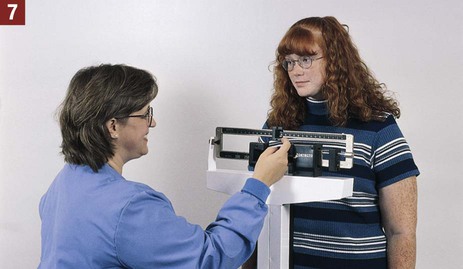
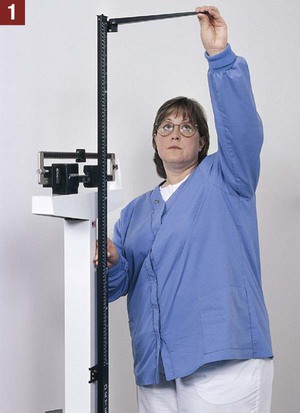
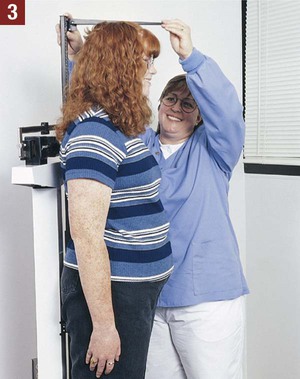
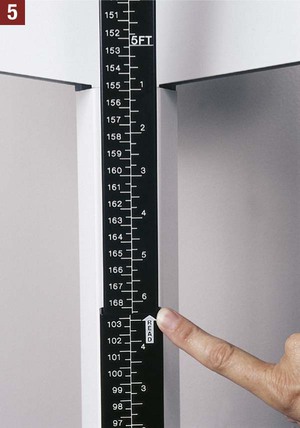
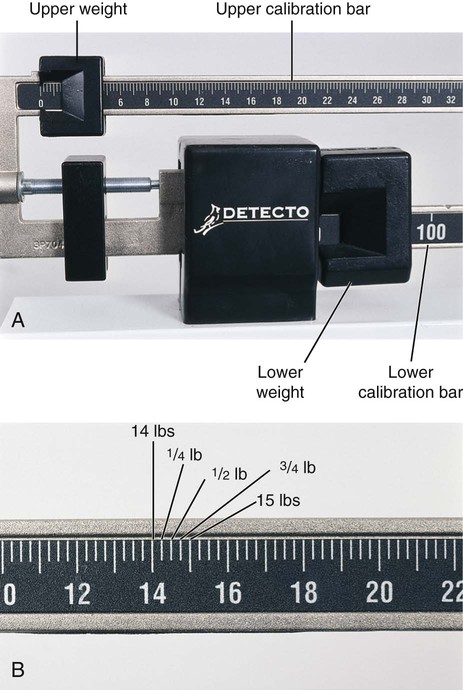
Final diagnosis. Often simply called the diagnosis, this term refers to the scientific method of determining and identifying a patient’s condition through evaluation of the health history, the physical examination, laboratory tests, and diagnostic procedures. A final diagnosis is crucial because it provides a logical basis for treatment and prognosis. Clinical diagnosis. The clinical diagnosis is an intermediate step in the determination of a final diagnosis. The clinical diagnosis of a patient’s condition is obtained through evaluation of the health history and the physical examination without the benefit of laboratory or diagnostic tests. Laboratory and diagnostic imaging facilities provide a space to specify the clinical diagnosis on their request forms; this information assists the facility in correlating data from their test results with the physician’s needs. When the physician has analyzed the test results, a final diagnosis can often be established. Differential diagnosis. Two or more diseases may have similar symptoms. The differential diagnosis involves determining which of these diseases is producing the patient’s symptoms so that a final diagnosis can be established. For example, streptococcal sore throat and pharyngitis have similar symptoms. A differential diagnosis is made by obtaining a throat specimen and performing a strep test. Prognosis. The prognosis consists of the probable course and outcome of a patient’s condition and the patient’s prospects for recovery. Risk factor. A risk factor is a physical or behavioral condition that increases the probability that an individual will develop a particular condition; examples are genetic factors, habits, environmental conditions, and physiologic conditions. The presence of a risk factor for a certain disease does not mean that the disease will develop; it means only that a person’s chances of developing that disease are greater than those of a person without the risk factor. For example, cigarette smoking is a risk factor for developing lung cancer and heart disease. A person who smokes has a higher risk of developing lung cancer than a person who does not or who has stopped smoking. Acute illness. An acute illness is characterized by symptoms that have a rapid onset, are usually severe and intense, and subside after a relatively short time. In some cases, the acute episode progresses into a chronic illness. Examples of acute illness include colds, influenza, strep throat, and pneumonia. Chronic illness. A chronic illness is characterized by symptoms that persist for longer than 3 months and show little change over a long time. Examples of chronic illness include diabetes mellitus, hypertension, and emphysema. Therapeutic procedure. A therapeutic procedure is performed to treat a patient’s condition with the goal of eliminating it or promoting as much recovery as possible. Examples of therapeutic procedures include administration of medication, ear and eye irrigations, and application of heat and cold. Laboratory testing. Laboratory testing involves the analysis and study of specimens obtained from patients to assist in diagnosing and treating disease. Examples of laboratory testing include the hemoglobin test, glucose test, urinalysis, and strep testing. Diagnostic procedure. A diagnostic procedure is a procedure performed to assist in the diagnosis of a patient’s condition; examples include electrocardiography, colonoscopy, and mammography. 1. Ensure that the examining room is free of clutter and well lit. 2. Check the examining rooms daily to ensure there are ample supplies. Restock supplies that are getting low. 3. Empty waste receptacles frequently. 4. Replace biohazard containers as necessary. When removing biohazard containers from the examining room (see Chapter 17), follow the OSHA Bloodborne Pathogens Standard. 5. Make sure the room is well ventilated, and install an air freshener to eliminate odors. 6. Maintain room temperatures that are comfortable not only for a fully clothed individual, but also for an individual who has disrobed. 7. Clean and disinfect examining tables, countertops, and faucets daily. 8. Remove dust and dirt from furniture and towel dispensers. 9. Change the examining table paper after each patient by unrolling a fresh length. Check to ensure there is an ample supply of gowns and drapes ready for use. 10. Ensure that the examining room door is closed during the examination because patient privacy is paramount. 11. Properly clean and prepare equipment, instruments, and supplies that are used for patient examinations so that they are ready for use by the physician. Table 20-1 lists the equipment and supplies, along with their uses, that may be employed during a physical examination. Table 20-1 Equipment and Supplies for the Physical Examination From Bonewit-West K: Clinical procedures for medical assistants, ed 8, St Louis, 2011, Saunders. 12. Check equipment and instruments regularly to verify that they are in proper working condition. This protects the patient from harm caused by faulty equipment. 13. Have equipment and supplies ready for the examination and arranged for easy access by the physician. Equipment and supplies needed for the physical examination vary according to the type of examination and the physician’s preference (Figure 20-1). 14. Know how to operate and care for each piece of equipment and each instrument. The manufacturer provides an operating manual, which should be read carefully and thoroughly and kept available for reference. Highlight on Patient Teaching Fact: Patients who are active, informed participants in their health care are more apt to follow the physician’s instructions than patients who are passive recipients of medical services. Action: Provide patients with information on health care. Every patient interaction is an opportunity for teaching. Fact: Adult learners are goal oriented and performance centered. They need and want information that would assist them in managing and improving their health. Action: Review the information that you provide to patients, and determine whether it is nice to know or necessary to know. Select subject matter that is practical and useful and relates directly to the patient’s needs. Fact: The more information that is presented, the more the patient is likely to forget. Approximately one half of information presented to the patient is forgotten in the first 5 minutes after giving it. Action: When teaching, use the following pointers to help patients learn and retain information: • Keep it short and be specific. • Speak in terms the patient can understand. • Focus on “how,” rather than “why.” • Repeat and reinforce important information. • Give practical examples, and provide ample time for patient practice. • Ask for feedback from the patient to determine whether he or she understands the information. • Provide the patient with written information. Fact: Each individual has a distinct style of learning and learns best when using his or her preferred learning style. The three main learning styles are reading, listening, and doing. People often use more than one style for learning. Action: Use a variety of teaching strategies to engage the various learning styles of patients. Examples of teaching strategies include explanations, printed handouts, audiovisual aids, demonstrations, and discussions. Fact: Only two thirds of patients comply with health care instructions prescribed by the physician. Factors that influence compliance include the patient’s adaptation to illness, motivation to change, physical capability, and support systems. Action: The following help increase patient compliance with prescribed treatment: • Address the patient by his or her name of choice. (Keep in mind that many patients object to being called by their first name by strangers.) • Encourage the patient to take an active role in personal health care. • Help the patient set goals and objectives for change. • Encourage care and support from family members. • Make the patient aware of outside resources. • Give positive reinforcement when the patient makes healthy changes. The medical assistant routinely measures the weight and height of many types of patients. The process of measuring the patient is mensuration. A change in weight may be significant in the diagnosis of a patient’s condition and in prescribing the course of treatment. Underweight and overweight patients who follow a diet therapy program should be weighed at regular intervals to determine their progress. Prenatal patients are weighed during each prenatal visit to assist in the assessment of fetal development and of the mother’s health. Procedure 20-1 describes how to measure height and weight. 1. Procedural Step. Sanitize your hands. 2. Procedural Step. Check the scale to ensure it is balanced as follows: a. Make sure the upper and lower weights are on zero. When the weights are on zero, they are all the way to the left of the calibration bars. b. Look at the indicator point. If the scale is balanced, the indicator point is resting in the center of the balance area. c. If the indicator point rests below the center, adjust the screw on the balance knob by turning it clockwise (to the right) until the indicator point rests in the center of the balance area. d. If the indicator point rests above the center, adjust the screw on the balance knob by turning it counterclockwise (to the left) until the indicator point rests in the center of the balance area. Principle. If the scale is not balanced, the weight measurement will be inaccurate. 3. Procedural Step. Greet the patient and introduce yourself. 4. Procedural Step. Identify the patient and explain to the patient that you will be measuring his or her height and weight. 5. Procedural Step. Instruct the patient to remove shoes and outer clothing such as a jacket or sweater. A good medical aseptic practice is to place a paper towel on the platform of the scale to protect the patient’s feet. 6. Procedural Step. Assist the patient onto the scale, and instruct the patient not to move. Principle. It is not possible to balance the scale if the patient is moving. 7. Procedural Step. Balance the scale as follows: a. Move the lower weight to the notched groove that does not cause the indicator point to drop to the bottom of the calibration area. Ensure that the lower weight is seated firmly in its groove. b. Slide the upper weight slowly along its calibration bar by tapping it gently until the indicator point comes to rest at the center of the balance area. Principle. Not seating the lower weight firmly in its groove results in an inaccurate reading. 8. Procedural Step. Read the results to the nearest quarter pound by adding the measurement on the lower scale to the measurement on the upper scale. Jot down this value or make a mental note of it. 9. Procedural Step. Ask the patient to step off of the scale platform. Provide assistance if needed. 1. Procedural Step. Slide the movable calibration rod upward until the measuring bar is well above the patient’s apparent height. Open the measuring bar to its horizontal position. 2. Procedural Step. Instruct the patient to step onto the scale platform with his or her back to the scale. Provide assistance if needed. Instruct the patient to stand erect and to look straight ahead. 3. Procedural Step. Carefully lower the measuring bar (keeping it horizontal) until it rests gently on top of the patient’s head with the hair compressed. The measuring bar should form a 90-degree angle with the calibration rod. Principle. The measuring bar must be at a 90-degree angle to ensure an accurate height measurement. 4. Procedural Step. Keeping the measuring bar in a horizontal position, instruct the patient to step down and put on his or her shoes. Hold the bar in a horizontal position until the patient has stepped off the scale. 5. Procedural Step. Read the height measurement from the top down to the nearest quarter-inch marking at the junction of the stationary calibration rod and the movable calibration rod. (NOTE: If the patient’s height is less than the top value of the stationary rod, read the measurement from the bottom up directly on the stationary calibration rod.) Jot down this value or make a mental note of it. 6. Procedural Step. Return the measuring bar to its vertical (resting) position, and slide the movable calibration rod to its lowest position. Return the weights to zero. 7. Procedural Step. Sanitize your hands, and chart the results. Include the date and time and the patient’s weight and height measurements. The weight should be charted in pounds to the nearest quarter pound, and the height should be charted in feet and inches to the nearest quarter inch. Highlight on Cultural Diversity Guidelines for Achieving Cultural Competence 1. Respect the patient’s values, beliefs, and practices. Even if you do not agree with them, it is important to respect the patient’s right to hold these values and to not dismiss them as strange or odd. Cultural values play an important role in a patient’s lifestyle. Patients from some cultures believe that losing blood depletes the body’s strength and provides a route for the soul to leave the body. If a blood specimen is needed, these patients may become highly distressed or refuse to have their blood drawn. Members of some cultural groups believe that illness results when the body’s natural balance or harmony is disturbed. To restore the balance, alternative forms of medicine, such as herbal remedies and aromatherapy, are used. 2. Refrain from cultural stereotypes. Not all people of a cultural group have the same beliefs, practices, and values. Assuming that all members of a cultural group are alike is known as stereotyping and should be avoided. Just as one would never assume that all people in the United States like hamburgers and baseball, every individual must be approached according to his or her specific beliefs and practices. 3. Always address patients by their last names (and Mr., Mrs., Miss, Ms.) unless they give you permission to use other names. In many cultures, using a first name to address anyone other than family or friends is considered disrespectful. Most older people in the United States dislike being called by their first name and feel it shows a lack of respect. 4. Speak slowly and clearly. Communicating with a patient may be difficult if the patient has a limited knowledge of English. With these patients, you should speak slowly and clearly in a normal tone and volume of voice. Speaking loudly does not help the patient understand any better and may be offensive to the patient. 5. Show respect for cultural lines of authority. In many cultures, respect is given based on age and gender. In certain cultures, elders are considered the holders of the culture’s wisdom and are highly respected. In other cultures, youth is valued over age. In certain cultures, the male dominates, and women have very little status. Because of this, a female patient from this type of culture may not be permitted to give her own health history or to answer questions. In addition, a male patient from this culture may not accept instructions from a female medical assistant. 6. Use appropriate eye contact. In most cultures, direct eye contact is important and generally shows that the other is attentive and listening. It conveys self-confidence, openness, interest, and honesty, whereas the lack of eye contact may be interpreted as secretiveness, shyness, guilt, or lack of interest. Other cultures consider eye contact impolite or an invasion of privacy; these patients show respect by avoiding direct eye contact. 7. Be aware of cultural responses to illness. The conditions under which an individual assumes the role of a (sick) patient and the way he or she performs in that role vary with culture. Individuals of some cultures resist the sick role and blame sickness on external forces as a means of punishment. These individuals may deny their illness and fail to provide much information when the medical assistant takes their symptoms. In other cultures, individuals take an optimistic view of the outcome of health care and, because of this, are more likely to elicit information and to follow the physician’s instructions. 8. Learn to appreciate the richness of diversity as an asset, rather than a hindrance, to communication and effective interaction with patients. Patient Teaching Health Promotion and Disease Prevention • Keeping up to date with immunizations • Eating nutritiously from the food pyramid • Maintaining high self-esteem • Understanding how the environment affects health and taking appropriate action to improve it • Knowing the facts about cardiovascular disease, cancer, infections, sexually transmitted diseases, and accidents, and using this knowledge to protect against them • Understanding the changes that occur through the natural processes of aging • Developing a sense of responsibility for health by taking an active role in establishing and maintaining a healthy lifestyle Guidelines for Measuring Weight and Height When using an upright balance scale to measure weight and height, use the following guidelines. 1. Locate the scale to provide privacy for the patient. Place the scale on a hard, level surface in a private location. Many patients are self-conscious about having their weight measured and prefer that it be done in privacy. Do not make weight-sensitive comments during the procedure. This is especially important for patients with weight control problems such as obesity and eating disorders. 2. Balance the scale before measuring weight. If the scale is not balanced, the weight measurement will be inaccurate. The scale is balanced when the upper and lower weights are on zero and the indicator point comes to a rest at the center of the balance area. 3. Assist the patient. Assist the patient onto and off of the scale platform. The scale platform moves slightly and may cause the patient to become unsteady. 4. Obtain an accurate weight. Always ask the patient to remove his or her shoes. Measure weight with the patient in normal clothing. Ask the patient to remove heavy outer clothing, such as a sweater or a jacket. 5. Interpret the calibration markings accurately. The lower calibration bar is divided into 50-lb increments (Figure 20-3, A). The upper calibration bar is divided into pounds and quarter pounds. The longer calibration lines indicate pound increments, and the shorter calibration lines indicate quarter-pound and half-pound increments (Figure 20-3, B). 6. Determine the patient’s weight correctly. Add the measurement on the lower scale to the measurement on the upper scale. The result should be rounded to the nearest quarter pound. Occasionally, the patient’s weight may need to be converted to kilograms, which is the metric unit of measurement for weight. This may be required when determining medication dosage. The following formulas are used to convert weight and height measurements from one system to another.
The Physical Examination
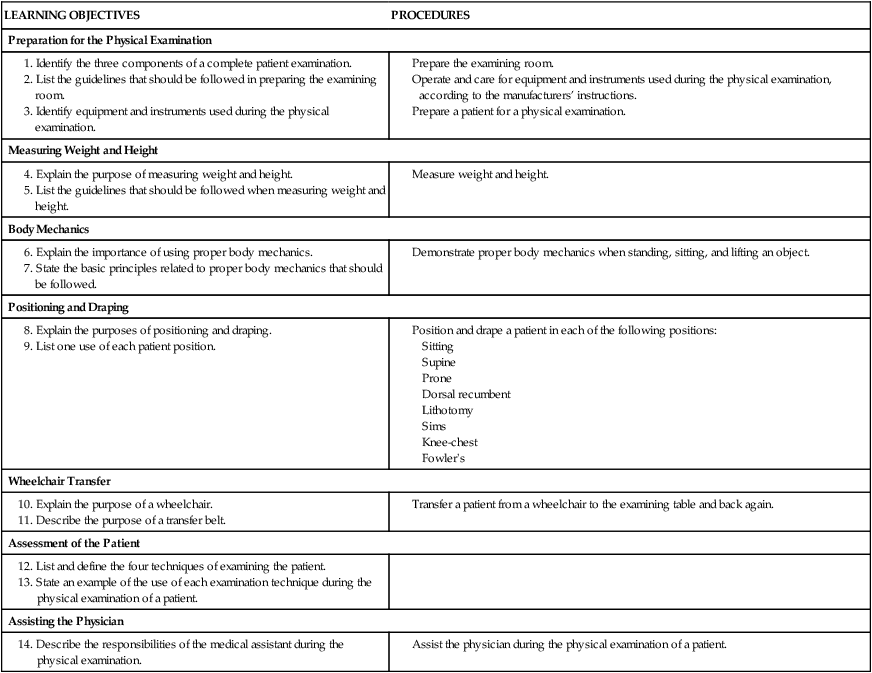
LEARNING OBJECTIVES
PROCEDURES
Preparation for the Physical Examination
Measuring Weight and Height
Body Mechanics
Positioning and Draping
Wheelchair Transfer
Assessment of the Patient
Assisting the Physician
Introduction to the Physical Examination
Definitions of Terms
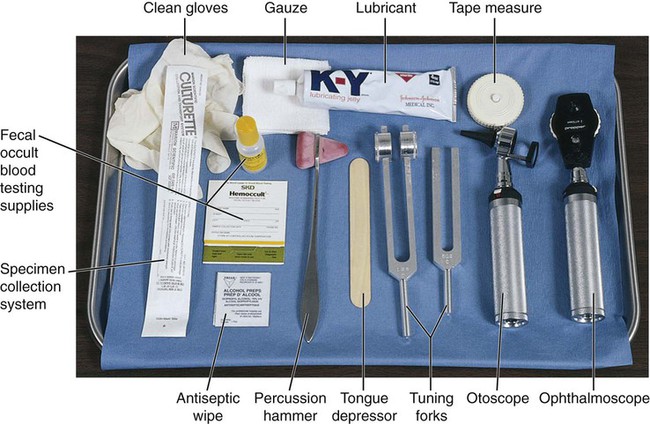
Preparation of the Examining Room
Item
Description and Purpose
Patient examination gown
Gown made of disposable paper or cloth that provides patient modesty, comfort, and warmth.
Drape
A length of disposable paper or cloth to cover a patient or parts of a patient to provide comfort and warmth and reduce exposure.
Sphygmomanometer
Instrument used to measure blood pressure.
Stethoscope
Instrument used to auscultate body sounds, such as blood pressure and lung and bowel sounds.
Thermometer
Instrument used to measure body temperature.
Upright balance scale
Device used to measure weight and height.
Otoscope
Lighted instrument with lens, used to examine external ear canal and tympanic membrane.
Tuning fork
Small metal instrument consisting of stem and two prongs, used to test hearing acuity.
Ophthalmoscope
Lighted instrument with lens, used for examining interior of eye.
Tongue depressor
Flat wooden blade used to depress patient’s tongue during examination of mouth and pharynx.
Antiseptic wipe
Disposable pad saturated with antiseptic, such as alcohol, that is used to cleanse skin.
Tape measure
Flexible device calibrated in inches on one side and centimeters on the other side, used to measure patient (e.g., diameter of limb, head circumference).
Percussion hammer
Instrument with rubber head, used for testing neurologic reflexes.
Speculum
Instrument for opening body orifice or cavity for viewing (e.g., ear speculum, nasal speculum, vaginal speculum).
Disposable gloves
Gloves, usually latex, that are worn only once to provide protection from bloodborne pathogens and other potentially infectious materials.
Lubricant
Agent that is applied to physician’s gloved hand or to speculum that reduces friction between parts to make insertion easier.
Specimen container
Container in which body specimen is placed for transport to laboratory (after it has been labeled).
Tissues
Used for wiping body secretions.
Cotton-tipped applicator
Small piece of cotton wrapped around the end of a slender wooden stick, used for collection of specimen from the body.
Overhead examination light
Light mounted on flexible movable stand to focus light on area for good visibility.
Basin
Container in which used instruments are deposited.
Biohazard container
Specially made container used for receiving items that contain infectious waste.
Waste receptacle
Container for used disposable articles that do not contain infectious waste.
Preparation of the Patient

Measuring Weight and Height
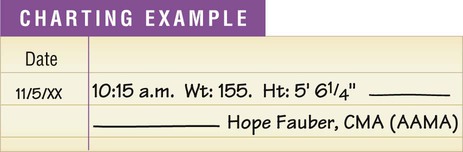
 Procedure 20-1 Measuring Weight and Height


The Physical Examination


Get Clinical Tree app for offline access