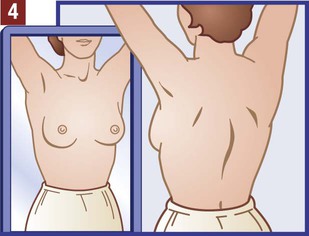
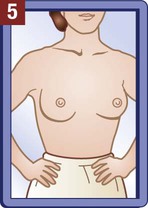
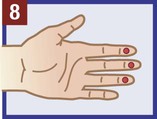
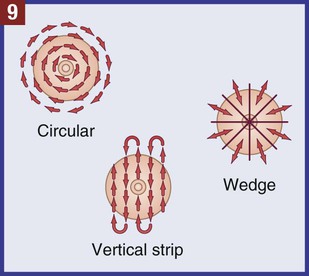
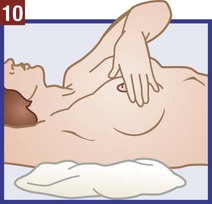
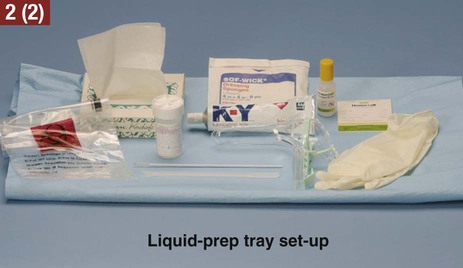
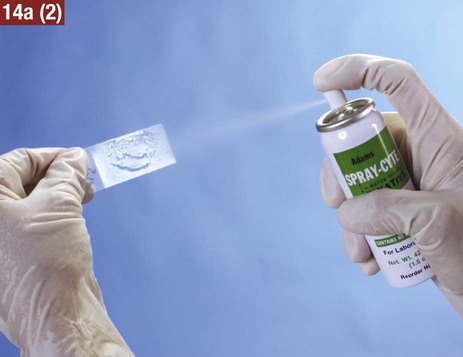
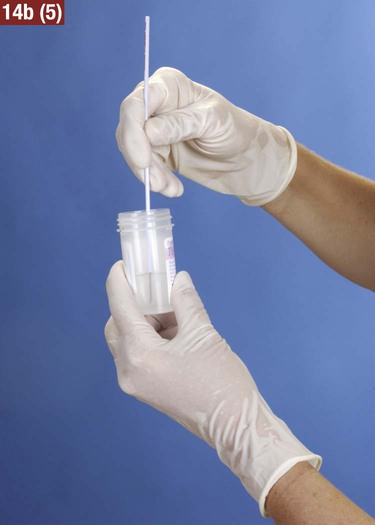
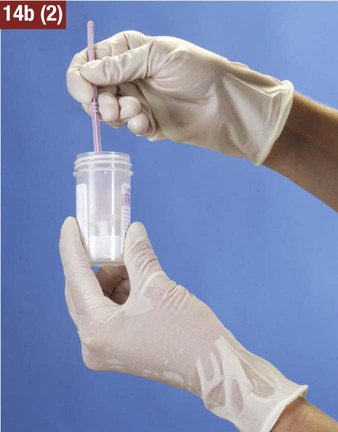
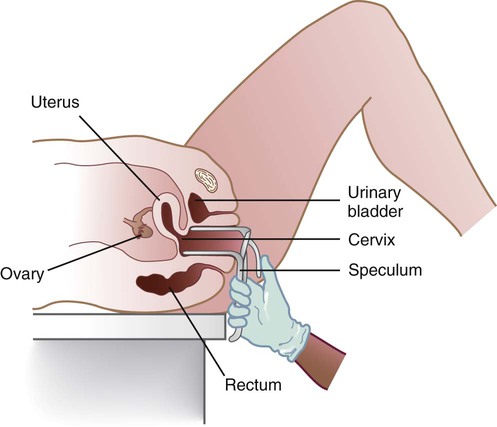
The medical assistant should have a thorough knowledge of the female reproductive system (refer to Chapter 16) and the following terms associated with the female reproductive system: Amenorrhea Absence or cessation of the menstrual period. Amenorrhea occurs normally before puberty, during pregnancy, and after menopause. Cervix The lower narrow end of the uterus that opens into the vagina. Colposcopy Examination of the cervix using a colposcope (a lighted instrument with a magnifying lens). Dysmenorrhea Pain associated with the menstrual period. Dyspareunia Pain in the vagina or pelvis experienced by a woman during sexual intercourse. Dysplasia The growth of abnormal cells. Dysplasia is a precancerous condition that may or may not develop into cancer. Menopause The permanent cessation of menstruation, which usually occurs between the ages of 45 and 55 with an average age of 51. Menorrhagia Excessive bleeding during a menstrual period, in the number of days, the amount of blood, or both. Also called dysfunctional uterine bleeding (DUB). Metrorrhagia Bleeding between menstrual periods. Perimenopause Before the onset of menopause, the phase during which a woman with regular periods changes to irregular cycles and increased periods of amenorrhea. Perineum The external region between the vaginal orifice and the anus in a female and between the scrotum and the anus in a male. Risk factor Anything that increases an individual’s chance of developing a disease. Some risk factors (e.g., smoking) can be avoided, but others cannot (e.g., age and family history). The patient should know how to examine her breasts at home for the presence of lumps and other changes with a breast self-examination (BSE). Most breast cancers are first discovered by women themselves. The American College of Obstetricians and Gynecologists recommends that women 20 years of age and older examine their breasts once every month. The medical assistant may be responsible for instructing the patient in this procedure at the medical office (Procedure 23-1). If a lump or other change is discovered, the woman should schedule an appointment with her physician as soon as possible. Most breast lumps are not cancerous, but the physician must make that diagnosis. Instruct a patient in the procedure for performing a breast self-examination. 1. Procedural Step. Greet the patient and introduce yourself. Identify the patient and inform the patient that you will be showing her how to perform a breast self-examination. Discuss with her the purpose of a breast self-examination and when to examine the breasts (see the box Patient Teaching: Breast Self-Examination). 2. Procedural Step. Explain to the patient that a complete breast self-examination should be performed in three ways—before a mirror, lying down, and in the shower. Instruct the patient in the procedure for performing a breast self-examination as follows: 3. Procedural Step. Remove clothing from the waist up. Stand in front of a large mirror with your arms relaxed at your sides. Observe each breast for the following: b. Swelling, puckering, or dimpling of the skin e. Changes in size or position of one nipple compared with the other 4. Procedural Step. Slowly raise your arms over your head, and repeat the same inspection listed in Procedural Step 3. 5. Procedural Step. Rest your palms on your hips and press down firmly to flex your chest muscles. Repeat the inspection in Procedural Step 3. Principle. Flexing the chest muscles allows abnormalities to become more apparent. 6. Procedural Step. Gently squeeze the nipple of each breast with your fingertips and look for a discharge. 7. Procedural Step. To examine the right breast, lie on your back and place a small pillow (or folded towel) under your right shoulder. Place your right hand behind your head. 8. Procedural Step. Extend your left hand with the fingers held flat. The pads of the middle three fingers of the left hand are used to perform the examination. The finger pads include the top third of each finger. Do not use the tips of the fingers. Use small rotating motions (about the size of a dime) and continuous firm pressure with the finger pads. 9. Procedural Step. Use one of the following patterns to move around the breast: circular, vertical strip, or wedge. Choose the pattern that is easiest for you. When you have chosen a pattern, use the same pattern each time you examine your breasts. a. Visualize the breast as a clock face. b. Start at the outside top edge of the breast. c. Proceed clockwise around the entire outer rim of the breast until your fingers return to the starting point. d. Move in about 1 inch toward the nipple, and make the same circling motion again. e. Move around the breast in smaller and smaller circles until you reach the nipple. a. Mentally divide your breast into wedges, similar to the pieces of a pie. b. Starting at the outer edge of the breast, move your fingers toward the nipple and back to the edge of the breast. c. Check your entire breast, covering one small wedge-shaped section at a time. Principle. Using a specific pattern ensures that the entire breast is examined. 10. Procedural Step. Holding the middle three fingers of your hand together with the thumb extended, use your finger pads and the pattern you selected to examine the right breast thoroughly. Press firmly enough to feel the different breast tissues. The breast should be palpated for lumps, hard knots, and thickening. Breast tissue normally feels a little lumpy and uneven. 11. Procedural Step. Examine the entire chest area from your collarbone to the base of a properly fitted bra and from the breastbone to the underarm. Pay special attention to the area between the breast and the underarm, including the underarm itself. A ridge of firm tissue in the lower curve of the breast is normal. Continue the examination until every part of the breast has been examined, including the nipple. 12. Procedural Step. Repeat this procedure on the left breast. Place a small pillow (or folded towel) under the left shoulder, and place your left hand behind your head. Use the finger pads of the right hand to examine the left breast. 13. Procedural Step. Gently lather each breast. 14. Procedural Step. Place your right hand behind your head. Extend your left hand with the fingers held flat. With the finger pads of the middle three fingers, use small rotating motions (about the size of a dime) and continuous firm pressure with the finger pads to examine the right breast. Use your preferred pattern (circular, vertical strip, or wedge) to palpate for lumps, hard knots, and thickening. Examine the area between the breast and the underarm, including the underarm itself. 15. Procedural Step. Repeat the procedure on the left breast. Place the left arm behind the head, and use the right fingers to examine the left breast. 16. Procedural Step. Instruct the patient to report lumps and other changes to the physician immediately. Reassure the patient that most breast lumps are not cancerous, but the only way to know for sure is to see the physician as soon as possible. 17. Procedural Step. Chart the procedure. Include the date and time and the type of instructions given to the patient. If you gave a printed instruction sheet or educational brochure to the patient, document this as well. Patient Teaching Breast Self-Examination Answer questions that patients have about breast self-examination. When should I examine my breasts? • Regular periods: Approximately 2 to 3 days after your menstrual period has ended. At this time, your breasts are least likely to be tender or swollen, and it will be easier to perform the examination. • No periods (because of menopause or hysterectomy): Any day of the month is fine; however, it helps to choose a particular day, such as the first day of the month or an easy-to-remember date such as your birthday. • Hormone therapy: If you are taking hormones, talk to your physician about when to examine your breasts. What should be reported to the physician? • Inspection of the external genitalia, vagina, and cervix • Collection of a specimen for a Pap test The medical assistant can help the patient relax during the examination by telling her to breathe deeply, slowly, and evenly through the mouth. If the patient is relaxed, it is easier for the physician to insert the vaginal speculum and to perform the bimanual pelvic examination; it also is more comfortable for the patient. It is recommended that the medical assistant remain in the room during the pelvic examination to provide legal protection for the physician, to reassure the patient, and to assist the physician. Procedure 23-2 outlines the medical assistant’s role in assisting the physician with a gynecologic examination. 1. Procedural Step. Sanitize your hands. 2. Procedural Step. Assemble the equipment. Complete as much of the cytology request form as possible. Some information on the form, such as the last menstrual period (LMP), requires input from the patient and must be completed later. Prepare the collection materials as follows: 3. Procedural Step. Greet the patient and introduce yourself. 4. Procedural Step. Escort the patient to the examining room and ask her to be seated. Identify the patient. Seat yourself so that you are facing the patient. Ask the patient whether she has any problems or concerns, and record the information in the patient’s chart. Ask the patient the necessary questions to complete the rest of the cytology request form. 5. Procedural Step. Measure the patient’s vital signs, height, and weight, and chart the results. 6. Procedural Step. Instruct and prepare the patient for the examination as follows: a. Ask the patient whether she needs to empty the bladder before the examination. If a urine specimen is needed, instruct the patient in the proper collection of the specimen. b. Provide the patient with a patient gown. Instruct the patient to remove all clothing and to put on the patient gown with the opening in front. If the patient is wearing socks, tell her she can keep them on. Offer assistance if you sense the patient may have trouble undressing. c. Tell the patient to have a seat on the examining table after she has put on the examining gown. d. Inform the patient that the physician will be with her soon, and leave the room to give her privacy. 7. Procedural Step. Make the medical record available for review by the physician. The medical office has a designated location where the record is placed, such as a small shelf mounted on the wall next to the outside of the examining room door or a chart holder on the outside of the examining room door. Position the medical record so that patient-identifiable information is not visible. 8. Procedural Step. Check to make sure the patient is ready to be seen by the physician. Before entering a patient’s room, always knock lightly on the door to let the patient know you are getting ready to enter the room. Inform the physician that the patient is ready. This may be done using a color-coded flagging system mounted on the wall next to the examining room. 9. Procedural Step. Assist the patient into a supine position, and properly drape her for the breast examination. 10. Procedural Step. Assist the patient into the lithotomy position for the pelvic examination. 11. Procedural Step. Prepare the vaginal speculum by removing it from the warming drawer and performing one of the following: Pap Smear Method: Moisten the blades of the speculum with warm water. Principle. Preparing the vaginal speculum facilitates its insertion into the vagina. 12. Procedural Step. Prepare the light for the physician as follows: a. Overhead examination lamp: Adjust and focus the light for the physician. b. Speculum-illumination system: Snap the light source device into the light holder on the vaginal speculum and turn it on. The lighting system produces a beam of light that shines through the blades of the speculum for visualization of the vagina and cervix. Principle. Visualization of the vagina and cervix requires direct light. 13. Procedural Step. Hand the vaginal speculum to the physician. Reassure the patient, and help her relax the abdominal muscles during the examination by telling her to breathe deeply, slowly, and evenly through the mouth. 14. Procedural Step. Apply gloves, and assist with the collection of the Pap specimen as follows: (1) Hold each slide so that the physician can smear the specimen on it. (2) Fix each slide immediately after collection by flooding it with 95% ethyl alcohol or by spraying it with a cytology fixative. The slide should be sprayed lightly with a continuous motion from a distance of 5 to 6 inches. (3) Allow the slides to air dry for 5 to 10 minutes, and place them in a protective slide container. (1) Remove the cap from the ThinPrep vial, and hold it so that the physician can insert the spatula into the vial. (2) Rinse the plastic spatula in the liquid preservative by vigorously swirling it around in the solution 10 times. (3) Discard the spatula in a biohazard waste container. (4) Hold the vial so that the physician can insert the endocervical brush into the vial. (5) Rinse the brush in the liquid preservative by vigorously rotating it in the solution 10 times while pushing the brush against the vial wall. Swirl the brush in the solution to further release cellular material. (6) Discard the brush in a biohazard waste container. Securely tighten the cap so that the torque line on the cap passes the torque line on the vial. (1) Remove the cap from the ThinPrep vial, and hold it so that the physician can insert the broom into the vial. (2) Rinse the broom in the liquid preservative by pushing the broom vigorously into the bottom of the vial 10 times. This motion forces the broom bristles apart, releasing cervical cells into the solution. Swirl the broom vigorously in the liquid preservative to further release cellular material. (3) Discard the broom in a biohazard waste container. Tighten the cap so that the torque line on the cap passes the torque line on the vial. c. Liquid-Prep Method (SurePath) (1) Remove the cap from the SurePath vial, and hold it so that the physician can insert the collection device into the vial. (2) Break off or disconnect the tip of the collection device from the handle. (3) Discard the handle of the collection device in a waste container. (4) Repeat the above steps until the physician has collected all of the specimens needed for the Pap test. 15. Procedural Step. Turn off the examining lamp or disconnect the light source from the vaginal speculum. Discard the disposable vaginal speculum in a biohazard waste container. Apply lubricant to a gauze square. Hold it out so that the physician can apply lubricant to his or her gloves to perform the bimanual and rectal-vaginal examinations. Assist with the collection of the fecal specimen for the fecal occult blood test. 16. Procedural Step. After the examination, assist the patient into a sitting position, and allow her the opportunity to rest for a moment. Offer the patient tissues to remove excess lubricant from the perineum. Assist the patient off the examining table. 17. Procedural Step. Instruct the patient to get dressed. Tell the patient how and when she will be notified of Pap test results. 18. Procedural Step. Test the fecal occult blood specimen, and chart the results. 19. Procedural Step. Prepare the Pap specimen for transport to the laboratory. Place the specimen (slide container or vial) in a biohazard specimen transport bag, and seal the bag. Insert the cytology requisition into the outside pocket of the bag, and tuck the top of the requisition under the flap. Place the bag in the appropriate location for pickup by the laboratory. 20. Procedural Step. Chart the transport of the Pap specimen to an outside laboratory. 21. Procedural Step. Clean the examining room. Next, the physician inserts a vaginal speculum into the vagina. Specula are available in two forms—metal and plastic. Metal specula are reusable and must be sanitized and sterilized after each use. Plastic specula are disposable and are designed to be used only once. Vaginal specula come in three sizes—small, medium, and large. The physician determines the size required based on the physical and sexual maturity of the patient. The function of the speculum is to hold the walls of the vagina apart to allow visual inspection of the vagina and cervix (Figure 23-1). Highlight on Breast Cancer • Gender. Women are much more likely than men to develop breast cancer. • Age. The risk of breast cancer increases as women get older. Most women diagnosed with breast cancer are older than age 50. • Personal history. Women with cancer in one breast have a greater chance of developing a new cancer in the other breast or in another part of the same breast. • Family history. A woman’s risk of developing breast cancer increases if her mother, sister, or daughter had breast cancer, especially at a young age. • Dense breast tissue. Women with dense breast tissue (meaning they have more glandular tissue than fat tissue as seen on a mammogram) have a higher risk of developing breast cancer. • Breast biopsy. Women who have had a breast biopsy that indicated certain types of benign breast disease (characterized by atypical hyperplasia) have an increased risk of developing breast cancer. • Breast cancer genes. A woman who has inherited mutations in breast cancer genes (mutations of the BRCA1 and BRCA2 genes) from either parent is more likely to develop breast cancer. • Reproductive history. Women who began menstruating at an early age (before age 12) or who went through menopause at a late age (after age 55) have a slightly increased risk of breast cancer. • Childbearing. Women who have never had a child or women who had their first child late (after age 30) have a slightly increased risk of developing breast cancer. • Hormone replacement therapy (HRT). Studies indicate that the long-term use of estrogen and progesterone combination hormone replacement therapy for relief of menopausal symptoms increases the risk of breast cancer. • Radiation treatment. Women who have had radiation of the chest before age 30 as treatment for another type of cancer (e.g., Hodgkin disease) have a significantly increased risk of developing breast cancer. • Race. Caucasian women are diagnosed more frequently than Hispanic, Asian, or African American women. • Lifestyle factors. Studies suggest that the use of alcohol (more than two drinks per day) increases the risk of breast cancer. Obesity, especially for women after menopause, also may increase the risk of breast cancer.
The Gynecologic Examination and Prenatal Care
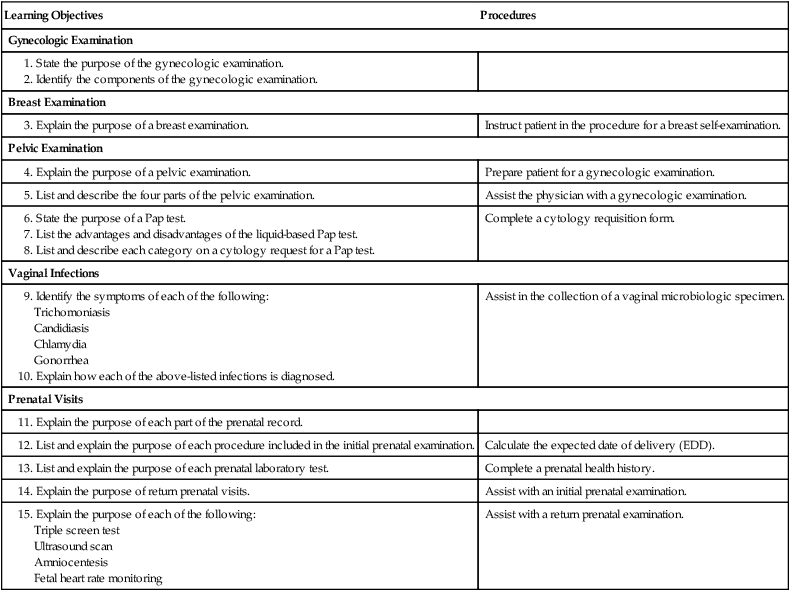
Learning Objectives
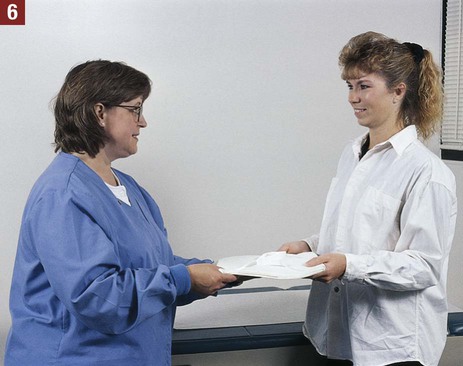
Procedures
Gynecologic Examination
Breast Examination
Instruct patient in the procedure for a breast self-examination.
Pelvic Examination
Prepare patient for a gynecologic examination.
Assist the physician with a gynecologic examination.
Complete a cytology requisition form.
Vaginal Infections
Assist in the collection of a vaginal microbiologic specimen.
Prenatal Visits
Calculate the expected date of delivery (EDD).
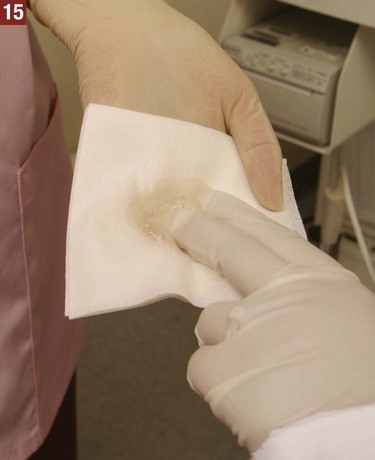
Complete a prenatal health history.
Assist with an initial prenatal examination.
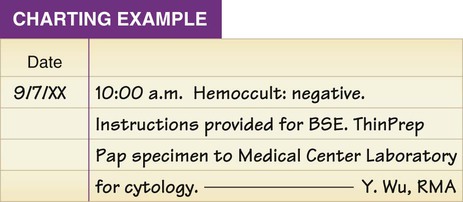
Assist with a return prenatal examination.
Gynecologic Examination
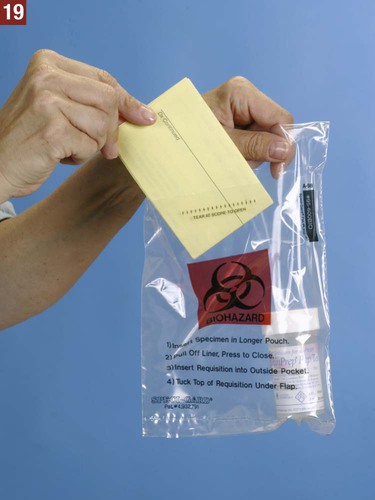
Gynecology
Terms Related to Gynecology
Breast Examination
 Procedure 23-1 Breast Self-Examination Instructions

Pelvic Examination
 Procedure 23-2 Assisting with a Gynecologic Examination


Inspection of External Genitalia, Vagina, and Cervix
The Gynecologic Examination and Prenatal Care


Get Clinical Tree app for offline access
