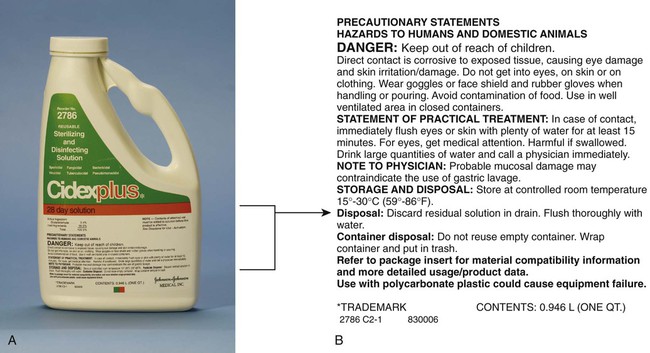
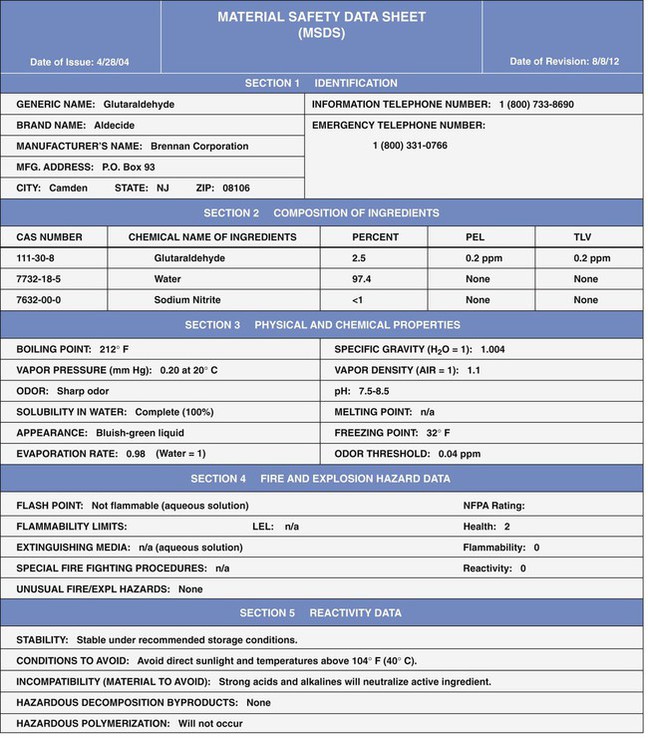
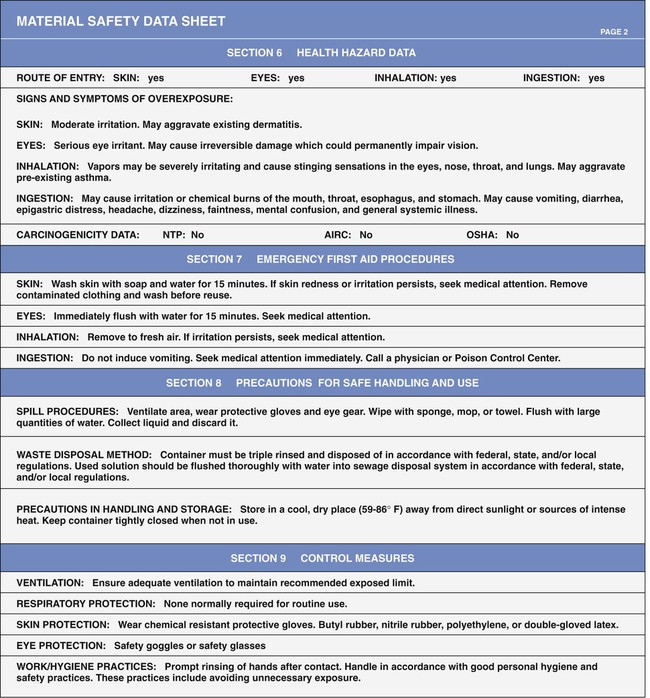
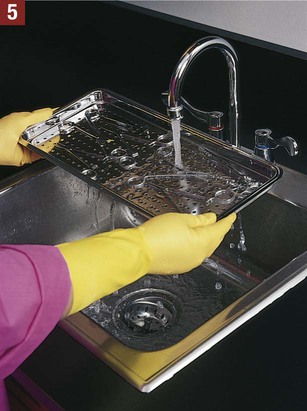
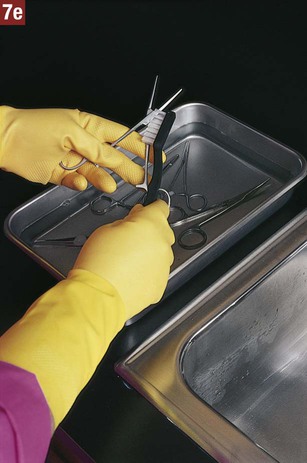
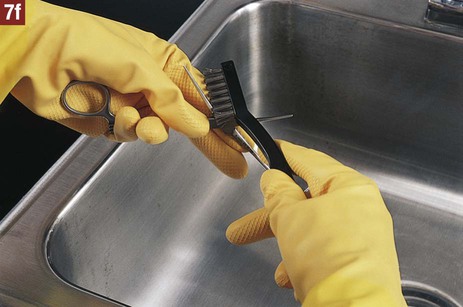
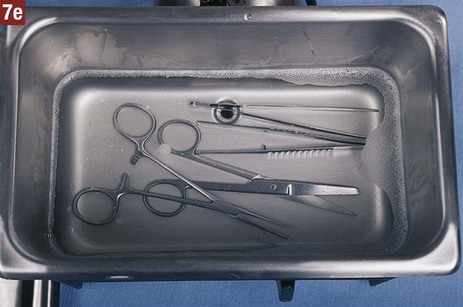
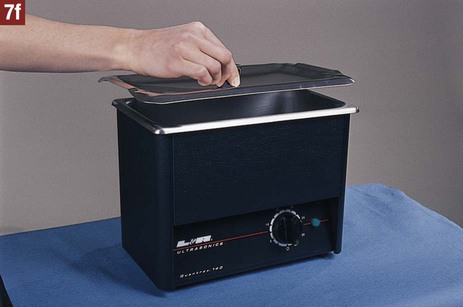
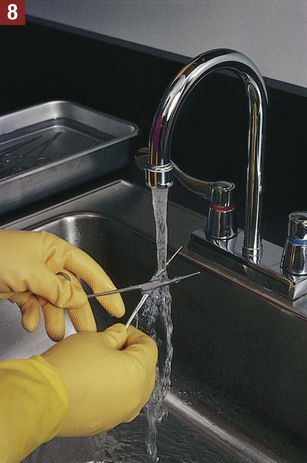
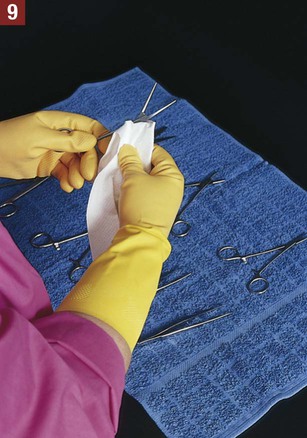
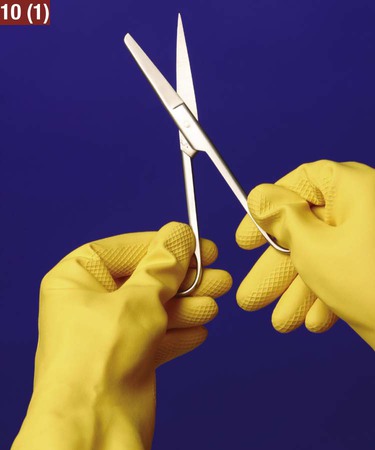
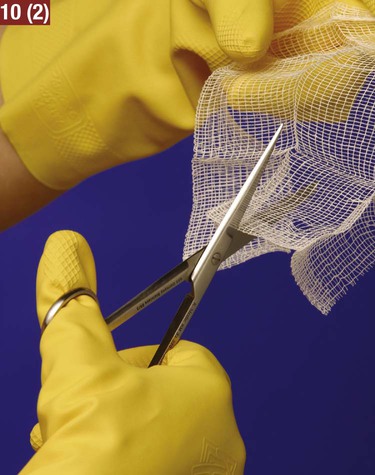
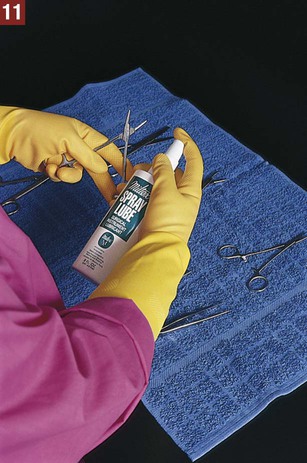
12. List and describe types of sterilization indicators. 13. Identify the advantages and disadvantages of each of the following types of wraps: sterilization paper, sterilization pouches, and muslin. 14. List the guidelines that should be followed when the autoclave is loaded. 15. Identify the sterilization times for each of the following categories: unwrapped articles, wrapped articles, liquids, and large wrapped packs. 16. Describe the method for storing wrapped articles. 17. Describe the daily, weekly, and monthly maintenance of the autoclave. The air and all objects around us contain microorganisms. The medical assistant is responsible for helping to reduce and eliminate microorganisms to prevent the spread of disease. This can be accomplished by practicing good techniques of medical and surgical asepsis (see Chapters 17 and 25). Terms that aid in understanding this chapter are listed and defined here. Sanitization Sanitization is a process that removes organic material and reduces the number of microorganisms to a safe level as determined by public health requirements. Sanitization removes all organic material, such as blood, body fluids, and tissue, from an article. For articles that are used in examinations, treatments, and office surgery to be properly sterilized or disinfected, they must first be sanitized. Decontamination Decontamination refers to the use of physical or chemical means to remove or destroy pathogens on an item so that it is no longer capable of transmitting disease; this makes the item safe to handle. Detergent A detergent is an agent that cleanses by emulsifying dirt and oil. Disinfectant A disinfectant is an agent used to destroy pathogenic microorganisms; however, it does not kill the resistant bacterial spores. Disinfectants are generally applied to inanimate objects. Spore A spore is a hard, thick-walled capsule that some bacteria form by losing moisture and condensing their contents to contain only the essential parts of the protoplasm of the cell. Spores represent a resting and protective stage of the bacterial cell and are more resistant to drying, sunlight, heat, and disinfectants than is the vegetative form of the bacterium. Favorable conditions cause the spore to germinate into a vegetative bacterium again that is capable of reproducing. Two examples of species of bacteria that form spores are Clostridium botulinum, which causes botulism, and Clostridium tetani, which causes tetanus. Sterilization Sterilization is the process of destroying all forms of microbial life, including bacterial spores. An object that is sterile is free of all living microorganisms and spores. There can be no relative degrees of sterility—an object is either sterile or not sterile. The device most commonly used to sterilize articles in the medical office is the autoclave. The HCS consists of the following components: • Development of a hazard communication program • Inventory of hazardous chemicals • Material safety data sheet requirements • Products used for sanitization, disinfection, and sterilization (e.g., chemical disinfectants, autoclave cleaners) • Chemicals used for laboratory testing (e.g., laboratory testing reagents, developing solutions, controls) • Pharmaceutical products such as local anesthetics (e.g., lidocaine [Xylocaine]) • Front office products (e.g., toner for copying machine and laser printer) The HCS requires that each container of a hazardous chemical be labeled by the manufacturer with a warning to alert the user that the chemical is dangerous (Figure 18-1). This label must include the possible hazards of the chemical and the steps that can be taken to protect against those risks. Hazard warnings can use words, pictures, or symbols to provide the user with an understanding of the physical and health hazards of the chemical. If a label falls off a product or is damaged or obscured, a replacement label must be applied. If a chemical is transferred to a new container, a label with all the required information must be attached to the new container. 1. Name of the chemical. The name of the chemical must be clearly indicated on the label. 2. Manufacturer information. The name, address, and emergency phone number of the company that manufactures the chemical must be stated on the label. 3. Physical hazards of the chemical. Physical hazards that must be stated include the potential of the chemical to catch fire, explode, or react with other chemicals or materials. 4. Health hazards of the chemical. Health hazards include the potential of the chemical to cause irritation to tissue, cancer, a sensitivity reaction, or a toxic or corrosive reaction. 5. Safety precautions. The protective clothing, equipment, and procedures that are recommended when working with the chemical must be stated on the label. Examples include gloves, protective eyewear, and working with the chemical in a well-ventilated area. 6. Storing, handling, and disposal of the chemical. Information on how the chemical should be stored, handled, and disposed of must be stated on the label. A material safety data sheet (MSDS) provides more detailed information than the container label regarding the chemical, its hazards, and measures to take to prevent injury and illness when handling the chemical (Figure 18-2). The HCS requires that a current MSDS be kept on file for each hazardous chemical used or stored in the workplace. MSDSs must be readily accessible to employees and provided to them on request. It is important that the medical assistant review the MSDS before working with a hazardous chemical. The HCS requires that manufacturers of hazardous chemicals include the following information on the MSDS (see Figure 18-2): 1. Identification. This section provides information used to identify the chemical and must include the chemical’s generic name and its brand name; the name, address, and emergency phone number of the manufacturer; and the date the MSDS was prepared. 2. Composition of ingredients. This section provides a list of the ingredients in the hazardous chemical and exposure limits of each chemical. 3. Physical and chemical properties. Physical and chemical properties of the chemical must be listed in this section, such as appearance, odor, boiling point, and freezing point. 4. Fire and explosion data. Some hazardous chemicals may cause a fire or explosion if used improperly. This section indicates under what circumstances this may occur and what to do if it does occur, including recommended extinguishing agents. 5. Reactivity data. Some chemicals react when combined with other chemicals or materials. The reactivity data list the substances and conditions that the chemical should be kept away from to prevent a dangerous reaction. This information helps in determining where and how to store the chemical. 6. Health hazard data. This section is one of the most important areas for health care workers and includes the following information: • Route of entry, which indicates how the chemical can enter the body, including skin contact, eye contact, inhalation, and ingestion • Signs and symptoms of overexposure (e.g., burning eyes, nausea, dizziness, difficulty in breathing) • Medical conditions that are aggravated by exposure to the chemical (e.g., asthma, dermatitis) • Acute and chronic health hazards that could result from overexposure (e.g., skin irritation, eye damage, lung damage) 7. Emergency first-aid procedures. This section identifies the first-aid measures to take if exposed to the chemical (e.g., in case of eye contact, immediately flush eyes with water for 15 minutes). 8. Precautions for safe handling and use. This section tells what to do for a spill or leak, the method of disposal of the chemical, and how to handle and store the chemical. 9. Control measures. This section lists engineering controls, work practice controls, and personal protective equipment that should be used to protect oneself from the hazardous chemical. Examples of these measures include using chemical-resistant gloves and eye protection and working in a well ventilated area. 1. Requirements making up the HCS. 2. Physical and health hazards associated with exposure to chemicals in the workplace. 3. Measures employees can take to protect themselves from injury or illness from hazardous chemicals. 4. Emergency procedures to carry out in the event of exposure to a hazardous chemical or a chemical spill. 5. The meaning of the information on container labels and how to use that information. 6. The meaning of the information on the MSDS and how to use that information. 7. The location of the following: hazard communication program plan, list of hazardous chemicals in the workplace, and MSDS for each chemical in the workplace. Sanitization involves a series of steps designed to remove organic material from an article and to reduce to a safe level the number of microorganisms on the article (Procedure 18-1). Organic material on an article may result in incomplete sterilization or disinfection. This is because the organic material acts as a physical barrier preventing the physical or chemical agent from reaching the surface of the article to kill microorganisms. 1. Procedural Step. Review the MSDS for the hazardous chemicals you will be using in the sanitization process. 2. Procedural Step. Apply disposable gloves. Transport the contaminated instruments to the cleaning area as soon as possible after use. The instruments should be carried in a covered basin from the examining room to the cleaning area. 3. Procedural Step. Apply heavy-duty utility gloves over the disposable gloves. Principle. Utility gloves help protect the hands from the irritating effects of chemical solutions. 4. Procedural Step. Separate sharp instruments and delicate instruments from other instruments. 5. Procedural Step. Immediately rinse the instruments thoroughly under warm, not hot, running water (approximately 110° F [44° C]) to remove organic material, such as blood, body fluids, tissue, and other debris. 6. Procedural Step. Decontaminate the instruments by disinfecting them in an EPA-approved chemical disinfectant as follows: a. Select the proper chemical disinfectant; check the expiration date on the container label. b. Observe all personal safety precautions listed on the label of the disinfectant (e.g., wearing safety goggles). c. Follow the manufacturer’s directions on the label for proper mixing and use of the disinfectant. d. Label the plastic or stainless steel disinfecting container with the name of the disinfectant and the date when the disinfectant is no longer effective and must be discarded (reuse life). e. Pour the disinfectant into the labeled container and immerse the articles into the disinfectant. Ensure the articles are completely submerged in the disinfectant. f. Cover the container that holds the chemical disinfectant. g. Disinfect the articles for 10 minutes. 7. Procedural Step. Clean the instruments. The instruments can be cleaned using the manual method or the ultrasound method as follows. Manual Method for Cleaning Instruments a. Obtain the instrument cleaning solution; check its expiration date. b. Observe all personal safety precautions listed on the label of the cleaning agent. c. Follow the directions on the manufacturer’s label for proper mixing and use of the cleaning agent. The detergent may need to be diluted with water. d. Remove the articles from the chemical disinfectant and place them in the basin containing the cleaning solution. e. Use a stiff nylon brush to clean the surface of each instrument. Scrub all parts of the instrument thoroughly. Brush delicate instruments carefully to prevent damaging them. f. Use a stainless-steel wire brush to clean grooves, crevices, or serrations where contaminants such as blood and tissue may collect. g. If there is a stain on the instrument, attempt to remove it using a damp cloth or sponge to which a commercial stain remover has been applied. h. Scrub each instrument until it is visibly clean and free from organic material and stains. Ultrasound Method for Cleaning Instruments a. Using a cleaning agent recommended by the manufacturer, prepare the cleaning solution in the ultrasonic cleaner. Observe all personal safety precautions listed on the label. b. Remove the articles from the chemical disinfectant, and separate instruments made of dissimilar metals, such as stainless steel, aluminum, and bronze. c. Place the instruments in the ultrasonic cleaner with hinged instruments in an open position. d. Ensure that sharp instruments do not touch other instruments. e. Ensure that all instruments are fully submerged in the cleaning solution. f. Place the lid on the ultrasonic cleaner. h. Turn on the ultrasonic cleaner, and clean the instruments for the length of time recommended by the manufacturer. i. After completion of the cleaning cycle, remove the instruments from the machine. 8. Procedural Step. Rinse each instrument thoroughly with warm, not hot, water (110° F [44° C]) for at least 20 to 30 seconds to remove all traces of the detergent. Open and close hinged instruments while rinsing to ensure the solution is completely rinsed out of every part of the instrument. 9. Procedural Step. Dry each instrument with a paper towel, and place the instrument on a cloth towel for additional air drying. Principle. If the instrument is not completely dry, stains may occur on the instrument. 10. Procedural Step. Check each instrument for defects and proper working condition. Scissors should cut all the way to the end of a thin piece of gauze without catching. If defects are noted, or the instrument is not working properly, it must be discarded or sent to the manufacturer for repair. 11. Procedural Step. Lubricate hinged instruments using a steam-penetrable lubricant as follows: a. Apply the lubricant to a hinged instrument in its open position. b. Open and close the instrument after applying the lubricant so it reaches all parts of the hinged area. c. Place the instrument back on the towel and allow it to drain. Rinsing or wiping is unnecessary. Principle. Lubricating an instrument makes it function better and last longer. 12. Procedural Step. Dispose of the cleaning solution according to the manufacturer’s instructions. Remove both sets of gloves, and sanitize your hands. 13. Procedural Step. Wrap the instruments and sterilize them in the autoclave according to the medical office policy. 1. Rinse the instruments to prevent organic material from drying on the instruments. 2. Decontaminate the instruments with a chemical disinfectant to remove pathogenic microorganisms, making the instrument safe to handle. 3. Clean the instruments to remove all organic matter. 4. Thoroughly rinse the instruments to remove all detergent residue. 5. Dry the instruments to prevent stains on the instruments. 6. Check the instruments for defects and working condition. 7. Lubricate hinged instruments to make the instruments function well and last longer.
Sterilization and Disinfection
LEARNING OBJECTIVES
PROCEDURES
Hazard Communication Standard
Read and interpret an MSDS.
Sanitization
Sanitize instruments.
Disinfection
Sterilization
Wrap articles to be autoclaved.
Sterilize articles in the autoclave.
Maintain the autoclave.
Other Sterilization Methods
Introduction to Sterilization and Disinfection
Definitions of Terms
Hazard Communication Standard
Inventory of Hazardous Chemicals
Labeling of Hazardous Chemicals
Container Label Requirements
Material Safety Data Sheets
Material Safety Data Sheet Requirements
Employee Information and Training
Sanitization
 Procedure 18-1 Sanitization of Instruments


Sanitizing Instruments
![]()
Stay updated, free articles. Join our Telegram channel

Full access? Get Clinical Tree


Sterilization and Disinfection


Get Clinical Tree app for offline access
