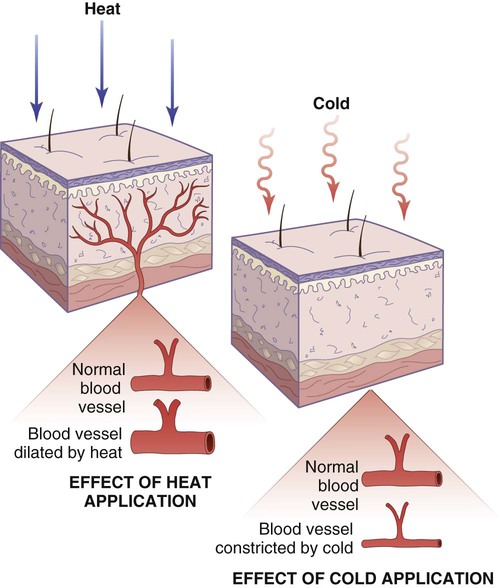
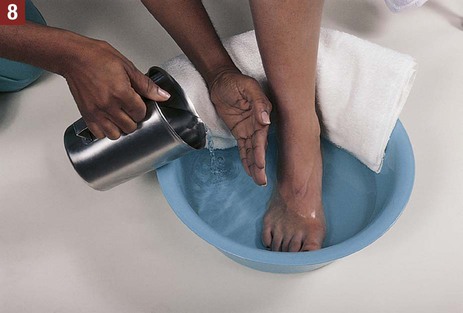
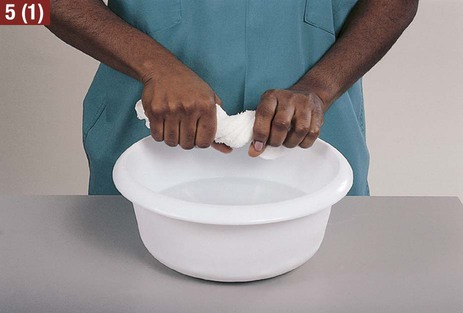
1. Dry heat: heating pad, chemical hot pack 2. Moist heat: hot soak, hot compress 3. Dry cold: ice bag, chemical cold pack 1. The age of the patient. Young children and elderly patients tend to be more sensitive to the application of heat or cold. 2. Location of the application. Certain areas of the body are more sensitive to the application of heat or cold, especially thin areas of the skin and areas that are usually covered by clothing, such as the chest, back, and abdomen. The skin on the hands and face is not as sensitive and is better able to tolerate temperature change. Broken skin, such as is found with an open wound, is more sensitive to heat and cold and is more prone to tissue damage. 3. Impaired circulation. Patients with impaired circulation tend to be more sensitive to heat and cold. This impairment may be at the site of the application or may be a systemic problem involving the entire body that is a result of certain conditions, such as peripheral vascular disease, diabetes mellitus, or congestive heart failure. 4. Impaired sensation. Patients with impaired sensation, such as diabetic patients, must be watched carefully because tissue damage may occur from the application of heat or cold without the patient’s awareness. 5. Individual tolerance to change in temperature. Some individuals cannot tolerate temperature change as easily as others. The application of moderate heat to a localized area of the body for a short time (approximately 15 to 30 minutes) produces dilation, or an increase in diameter, of the blood vessels in the area as the body tries to rid itself of excess heat (Figure 22-1). This results in an increased blood supply to the area, and tissue metabolism increases. Nutrients and oxygen are provided to the cells at a faster rate, and wastes and toxins are carried away faster. The skin in the area becomes warm and exhibits erythema. Erythema is reddening of the skin caused by dilation of superficial blood vessels in the skin. Procedures 22-1, 22-2, 22-3, and 22-6 (see later) present the proper application of heat with a heating pad, a hot soak, a hot compress, and a chemical hot pack. 1. Procedural Step. Sanitize your hands. 2. Procedural Step. Assemble the equipment. 3. Procedural Step. Greet the patient and introduce yourself. Identify the patient and explain the procedure. Explain the purpose of the application (e.g., to relieve pain). 4. Procedural Step. Place the heating pad in the protective covering. Principle. The protective covering provides more comfort for the patient and absorbs perspiration. 5. Procedural Step. Connect the plug to an electric outlet. Set the selector switch at the proper setting, as designated by the physician (usually low or medium). 6. Procedural Step. Place the heating pad on the patient’s affected body area. Ask the patient how the temperature feels. The heating pad should feel warm but not uncomfortable. 7. Procedural Step. Instruct the patient not to lie on the pad or turn the control higher to prevent burns. 8. Procedural Step. Check the patient periodically for signs of an increase or decrease in redness or swelling, and ask the patient whether the site is painful. Administer the treatment for the proper length of time as designated by the physician. 9. Procedural Step. Sanitize your hands, and chart the procedure. Include the date and time, method of heat application (heating pad), temperature setting of the pad, location and duration of the application, appearance of the application site, and the patient’s reaction. Also, chart any instructions provided to the patient on applying a heating pad at home. 10. Procedural Step. Properly care for equipment, and return it to its storage location. 1. Procedural Step. Sanitize your hands. 2. Procedural Step. Assemble the equipment. Check the label on the solution container to make sure you have the correct solution as ordered by the physician. Place the solution containers in a basin of warm water. Warm the soaking solution to a temperature between 105° F and 110° F (41° C and 44° C). 3. Procedural Step. Greet the patient and introduce yourself. Identify the patient and explain the procedure. Explain the purpose of the application (e.g., to apply a medicated solution). 4. Procedural Step. Fill the basin one-third to two-thirds full with the warmed soaking solution. 5. Procedural Step. Check the temperature of the solution with a bath thermometer. The temperature for an adult should be 105° F to 110° F (41° C to 44° C). 6. Procedural Step. Assist the patient into a comfortable position to avoid fatigue and muscle strain. Pad the side of the basin with a towel for the patient’s comfort. 7. Procedural Step. Slowly and gradually immerse the patient’s affected body part in the solution. Ask the patient how the temperature feels. Principle. The affected body part should gradually become accustomed to the change in temperature. 8. Procedural Step. Test the temperature of the solution frequently. To keep the solution at a constant temperature, remove cooler fluid every 5 minutes, and replace it with hot solution. Pour the hot solution in near the edge of the basin by placing your hand between the patient and the solution. Stir the solution as you pour. 9. Procedural Step. Check the patient’s skin periodically for signs of an increase or decrease in redness or swelling, and ask the patient whether the site is painful. Apply the hot soak for the proper length of time as designated by the physician (usually 15 to 20 minutes). 10. Procedural Step. Dry the affected part completely and gently. 11. Procedural Step. Sanitize your hands, and chart the procedure. Include the date and time, method of heat application (hot soak), name and strength of the solution, temperature of the soak, location and duration of the application, appearance of the application site, and the patient’s reaction. 12. Procedural Step. Properly care for equipment, and return it to its storage location. 1. Procedural Step. Sanitize your hands. 2. Procedural Step. Assemble the equipment. Check the label on the solution container to make sure you have the correct solution as ordered by the physician. Place the solution containers in a basin of warm water. Warm the soaking solution to a temperature between 105° F and 110° F (41° C and 44° C). 3. Procedural Step. Greet the patient and introduce yourself. Identify the patient and explain the procedure. Explain the purpose of the application (e.g., to soften an exudate). 4. Procedural Step. Fill the basin half full with warmed solution. Check the temperature of the solution with the bath thermometer. The temperature for an adult should be 105° F to 110° F (41° C to 44° C). 5. Procedural Step. Completely immerse the compress in the solution. Wring the compress to remove excess moisture. The compress should be wet but not dripping. Apply it lightly at first to the affected site to allow the patient to become used to the heat gradually. You may want to cover the compress with a waterproof cover to help hold in the heat. Ask the patient how the temperature feels. The compress should be as hot as the patient can comfortably tolerate.
Physical Agents to Promote Tissue Healing
Introduction to Tissue Healing
Local Application of Heat and Cold
Factors Affecting the Application of Heat and Cold
Heat
Local Effects of Heat
Types of Heat Applications
Chemical Hot Pack
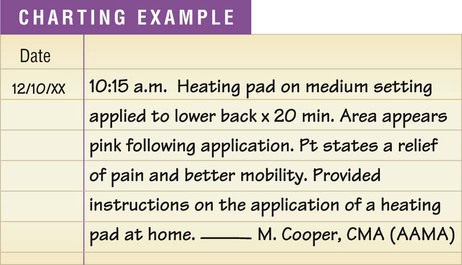
 Procedure 22-1 Applying a Heating Pad
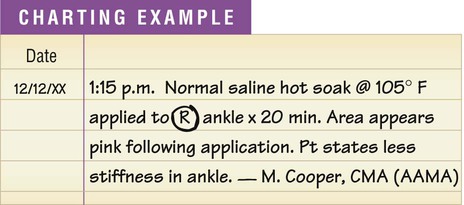
 Procedure 22-2 Applying a Hot Soak
 Procedure 22-3 Applying a Hot Compress
![]()
Stay updated, free articles. Join our Telegram channel

Full access? Get Clinical Tree


Physical Agents to Promote Tissue Healing


Get Clinical Tree app for offline access