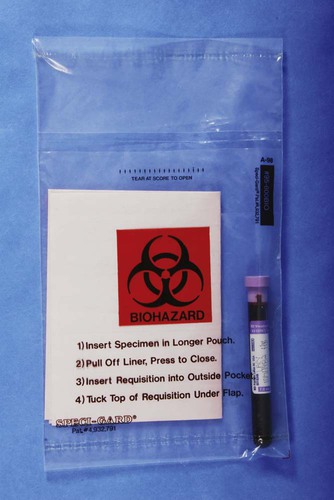
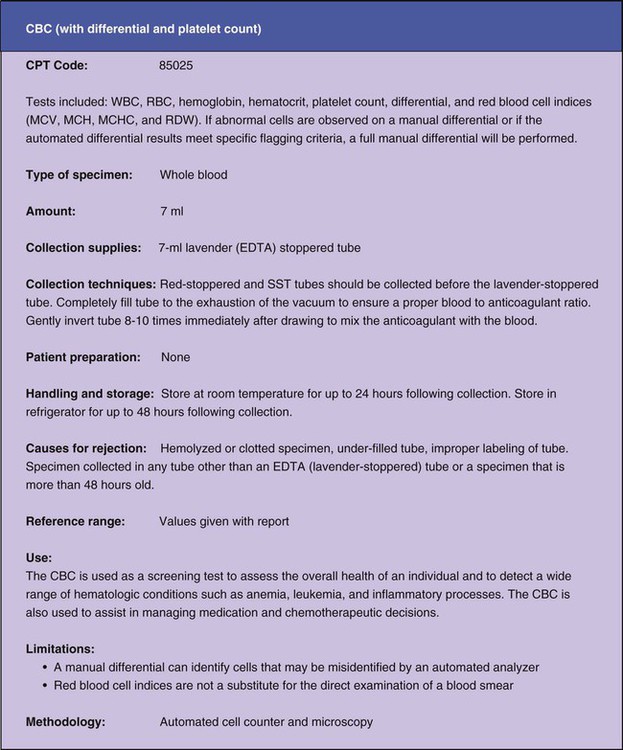
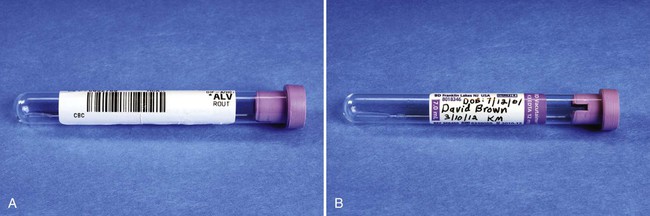
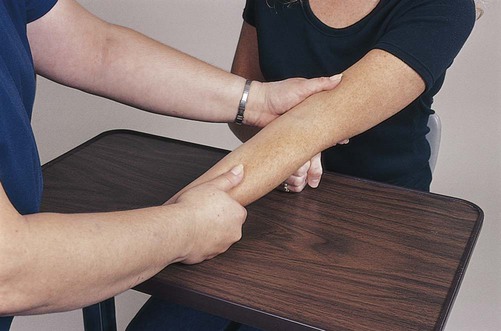
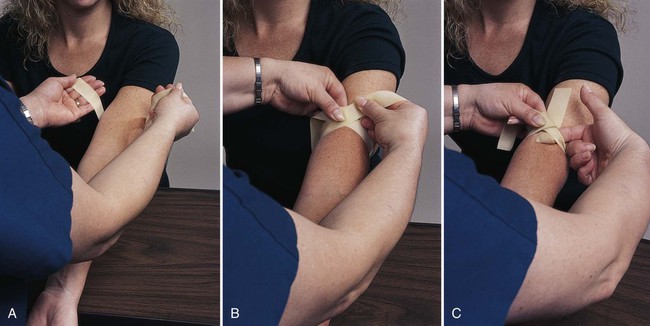
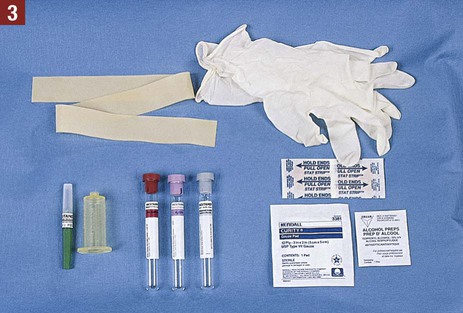
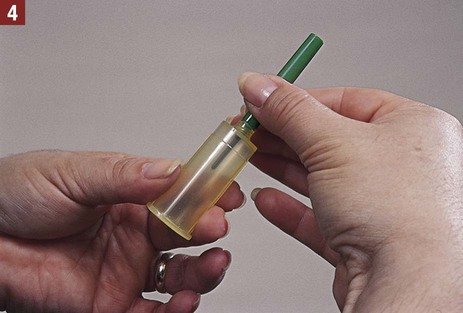
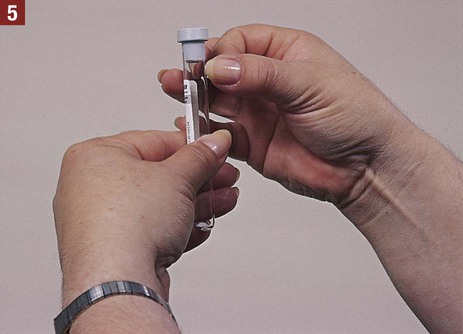
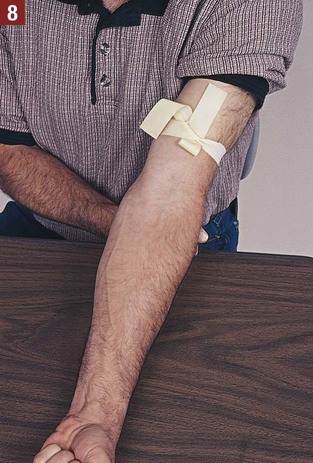
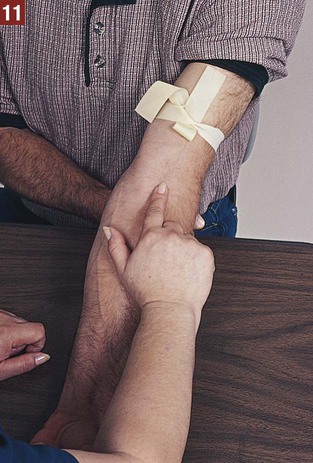
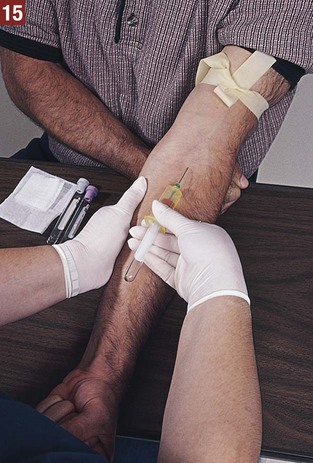
Some blood specimens are tested in the medical office, and others are picked up and taken to an outside laboratory for testing. The latter specimens need to be placed in a biohazard specimen bag along with a laboratory request (Figure 31-1), so that laboratory personnel know what type of test the physician desires. The medical assistant may be responsible for completing the laboratory request form either on the computer or manually. The request form includes the physician’s name and address; the patient’s name, address, age, and gender; the date and time of collection of the specimen; the International Classification of Diseases (ICD) code of the clinical diagnosis; and a mark next to the type of test or tests to be performed. Phlebotomy encompasses three major areas of blood collection: The medical assistant must review the requirements for collecting and handling the blood specimen. These include the collection supplies necessary, the type of specimen to be collected (e.g., serum, plasma, whole blood, clotted blood), the amount necessary for laboratory analysis, the techniques to follow to collect the specimen, and the proper handling and storage of the specimen. The medical assistant must refer to the appropriate reference source to determine the collection and handling requirements for each test ordered by the physician. If the specimen is transported to an outside laboratory, this information is indicated in the laboratory directory. Figure 31-2 shows an example of the collection and handling requirements for a complete blood count (CBC) as it is presented in a laboratory directory. The collection and handling requirements necessary for specimens tested in the medical office are listed in the manufacturer’s instructions that accompany the test system. The medical assistant should check each blood tube before use to ensure that it is not broken, chipped, cracked, or otherwise damaged. Damaged blood tubes are unsuitable for specimen collection and should be discarded. Blood tubes have an expiration date (Figure 31-3). The medical assistant should make sure to check the expiration date on the tube to avoid using an outdated blood tube. The medical assistant must be sure to label each blood tube. An unlabeled specimen is a cause for rejection of the specimen by an outside laboratory. Two unique identifiers should be used to label the specimen. A unique identifier is information that clearly identifies a specific patient, such as the patient’s name and date of birth. A specimen can be labeled by attaching a computerized bar code label to the specimen (Figure 31-4, A). The bar code label includes (at least) two unique patient identifiers. A specimen can also be labeled by handwriting the information on the label, which should include the patient’s name and date of birth (two unique identifiers), the date and time of collection, the medical assistant’s initials, and any other information required by the laboratory (Figure 31-4, B). The information should be printed legibly, and the medical assistant should be certain that the information is accurate to avoid a mix-up of specimens. The medical assistant must also complete a laboratory request form to accompany the blood specimen. (NOTE: The medical assistant should follow the medical office policy as to when the tubes should be labeled. Some offices prefer the tubes be labeled before the specimen is drawn; other offices want the tubes to be labeled right after the specimen is obtained.) The patient should be seated comfortably in a chair. The arm should be extended downward to form a straight line from the shoulder to the wrist with the palm facing up; the arm should not bend at the elbow. The arm should be well supported on the armrest by a rolled towel or by having the patient place the fist of the other hand under the elbow (Figure 31-5). The following guidelines help to ensure successful application of the tourniquet: 1. Do not apply the tourniquet over sores or burned skin. 2. Place the tourniquet 3 to 4 inches above the bend in the elbow. This allows adequate room for cleansing the site and performing the venipuncture without the tourniquet getting in the way. 3. Apply the tourniquet so that it is snug, but not so tight that it pinches the patient’s skin or is otherwise painful to the patient. 4. When applying the tourniquet, ask the patient to clench his or her fist. This pushes blood from the lower arm into the veins and makes them easier to palpate. You can ask the patient to clench and unclench the fist a few times; however, vigorous pumping should be avoided because it could lead to hemoconcentration, which could produce inaccurate test results. 5. Never leave the tourniquet on for longer than 1 minute because this would be uncomfortable for the patient. In addition, prolonged application of the tourniquet causes the venous blood to stagnate, or pool in one place too long—a condition known as venous stasis. When venous stasis occurs, the plasma portion of the blood filters into the tissues, causing hemoconcentration. Hemoconcentration is an increase in the concentration of nonfilterable blood components in the blood vessels, such as red blood cells, enzymes, iron, and calcium, as a result of a decrease in the fluid content of the blood. This can result in inaccurate results for a variety of laboratory tests. 6. Ideally, you should remove the tourniquet as soon as a good blood flow is established; however, this may not be practical when you are first learning the venipuncture procedure. Removing the tourniquet may cause the needle to move such that no more blood can be obtained, and the blood has to be redrawn. When you are learning the venipuncture procedure, it is better to wait until just before the needle is removed to remove the tourniquet. 7. Always remove the tourniquet before removing the needle from the patient’s arm. If the needle is removed first, the pressure of the tourniquet causes blood to be forced out of the puncture site and into the surrounding tissue, resulting in a hematoma. A hematoma is defined as a swelling or mass of coagulated blood caused by a break in a blood vessel. 8. After use, wipe a tourniquet thoroughly with a disinfectant such as alcohol. Disposable tourniquets are available that are thrown away after one use. The rubber tourniquet consists of a flat, soft band of rubber approximately 1 inch (2.5 cm) wide and 15 to 18 inches (38 to 45 cm) long. Rubber tourniquets are commercially available in latex or nonlatex rubber. They offer the advantage of being easily removable with one hand. The technique for applying a rubber tourniquet is described next and is illustrated in Figure 31-6. 1. Hold each end of the tourniquet with one hand. Position the tourniquet 3 to 4 inches (7.5 to 10 cm) above the bend in the elbow, making sure that the tourniquet lies flat against the patient’s skin. Pull the ends away from each other to create tension (see Figure 31-6, A). 2. Bring the ends of the tourniquet toward each other and cross one over the other at the point of your grasp, with enough tension so that the tourniquet is snug but is not pinching the patient’s skin (see Figure 31-6, B). 3. Tuck a portion of the top length into the bottom length, forming a loop between the tourniquet and the patient’s arm. This allows for a one-handed release of the tourniquet when pulled on one end. Make sure the flaps are directed upward so that they do not dangle into the working area (see Figure 31-6, C). The Velcro-closure tourniquet consists of a band of rubber or elastic material with Velcro attached at the ends. This type of tourniquet is easier to apply and is more comfortable for the patient than the rubber tourniquet. The disadvantage of the Velcro-closure tourniquet is that it is more difficult to remove with one hand than the rubber tourniquet. In addition, this type of tourniquet may not fit around the arms of extremely obese patients. The technique for applying a Velcro-closure tourniquet is described next and is illustrated in Figure 31-7. Procedure: Velcro-Closure Tourniquet 1. Hold each end of the tourniquet with one hand. Position the tourniquet 3 to 4 inches (7.5 to 10 cm) above the bend in the elbow. 2. Wrap the tourniquet around the arm, and secure it with the Velcro fastener. The tourniquet should be applied with enough tension so that it is snug but is not pinching the patient’s skin. For most patients, the best site to use is the veins in the antecubital space (Figure 31-8). If the patient has large, visible antecubital veins, drawing blood is easy. If the patient has small veins or veins that cannot be palpated, obtaining a blood specimen can be quite a challenge, even for the most experienced medical assistant. The best vein to use in the antecubital space is the median cubital. The median cubital is a prominent vein in the middle of the antecubital space and does not roll (see Figure 31-8). At times, however, the median cubital vein cannot be used, for example, when it lies deep in the tissues and cannot be palpated or is scarred from repeated venipunctures. Specific guidelines should be followed to facilitate the selection of a good vein: 1. Ensure that the lighting is adequate. Good lighting facilitates inspection of the veins. 2. Ensure that the veins “stand out” as much as possible. Before locating a venipuncture site, always apply the tourniquet, and have the patient make a fist. This combination makes the veins more prominent. 3. Examine the antecubital veins of both arms. The best site to perform a venipuncture varies with each individual. The patient may have larger veins in one arm than in the other. It is advisable to ask the patient whether he or she has had a venipuncture before. Most adults have had previous venipunctures and know which of their veins are best to use and which should be avoided. Listen to and evaluate information offered by the patient. 4. Use inspection and particularly palpation to select a vein. A vein does not have to be seen to be a good selection. If you cannot see a vein, palpation alone can be used to locate it. A vein feels like an elastic tube that “gives” under the pressure of the fingertips. 5. Always palpate for the median cubital vein (middle vein) first. It usually is bigger, is anchored better, bruises less, and poses the smallest risk of injuring underlying structures (e.g., nerves and arteries) than the other veins. Because of this, if the patient’s median cubital vein cannot be seen but still can be palpated, it should be used as the first choice when selecting a vein. If the median cubital vein is good in both arms, select the one that appears the fullest. The cephalic vein located on the thumb side is the next best vein choice because it does not roll and bruise as easily as the basilic vein. The basilic vein, located on the little finger side of the antecubital space, is the least desirable venipuncture site in the antecubital space. Branches of the median nerve may lie close to this vein in some individuals. In addition, the basilic vein lies in close proximity to the brachial artery. Both of these conditions pose a risk of injury to underlying structures when blood is drawn from the basilic vein. 6. Thoroughly assess the patient’s veins. To assess a vein as a possible site for venipuncture, place one or two fingertips (index and middle fingers) over it and press lightly, then release pressure. Do not use your thumb to palpate the vein because it is not as sensitive as the index finger. To be suitable for a venipuncture, the vein should feel round, firm, elastic, and engorged. When you depress and release an engorged vein, it should spring back in a rounded, filled state. 7. Determine the size, depth, and direction of the vein. When a suitable vein has been located, it should be palpated thoroughly and carefully to determine the direction of the vein and to estimate the size and depth of the vein. Palpate and trace the path of the vein several times by rolling your index finger back and forth over the vein to determine its size. Inspect and palpate the vein for problems. Some veins that appear suitable at first sight feel small, hard, bumpy, or flat when palpated. 8. Map the location of the site. After locating an acceptable vein, mentally “map” the location of the puncture site on the patient’s arm with “skin marks.” This technique is particularly helpful if the vein cannot be seen, but only palpated. The puncture site may be located on or next to a skin mark, such as a freckle, a small wrinkle, or a pigmented area. 9. Do not leave the tourniquet on for longer than 1 minute. When first learning the venipuncture procedure, you may need to perform numerous assessments of the patient’s arms to locate the best vein. After each assessment, remove the tourniquet for approximately 2 minutes to allow normal circulation of the blood to occur. This prevents patient discomfort and hemoconcentration, which can lead to inaccurate results for a variety of laboratory tests. 10. If a good vein cannot be found, the following techniques can be employed to make the veins more prominent: If it is impossible to locate a suitable vein in the antecubital space, alternative sites are available, including the inner forearm, the wrist area above the thumb, and the back of the hand (Figure 31-9). These alternative veins are smaller and have thinner walls than the antecubital veins and should be used for venipuncture only when all possibilities for obtaining the blood specimen at the antecubital site have been considered. If the medical assistant is able to palpate a small vein in the antecubital space, it may be possible to obtain blood there using the butterfly method of venipuncture. 1. Clotted blood. Clotted blood is obtained from a tube that does not contain an anticoagulant. A tube without an anticoagulant causes the blood cells to clot. 2. Serum. Serum is obtained from clotted blood by allowing the specimen to stand and then centrifuging it. Centrifuging a blood specimen that does not contain an anticoagulant causes the blood to separate into the following layers (Figure 31-10, A): 3. Whole blood. Whole blood is obtained by using a tube that contains an anticoagulant. An anticoagulant is a substance that inhibits blood clotting. It is important to mix the anticoagulant with the blood by gently inverting the tube back and forth 8 to 10 times after collection. 4. Plasma. Plasma is obtained from whole blood that has been centrifuged. Centrifuging a blood specimen that contains an anticoagulant causes the blood to separate into the following layers (Figure 31-10, B): The OSHA Bloodborne Pathogens Standard presented in Chapter 17 must be carefully followed during the venipuncture procedure to avoid exposure to bloodborne pathogens. The following OSHA requirements apply specifically to the venipuncture procedure and to separation of serum from whole blood (see later): 1. Wear gloves when it is reasonably anticipated that you will have hand contact with blood. 2. Avoid hand-to-mouth contact, such as eating, drinking, or applying makeup, while working with blood specimens. 3. Wear a face shield or mask in combination with an eye protection device whenever splashes, spray, splatter, or droplets of blood may be generated. 4. Perform all procedures involving blood in a manner so as to minimize splashing, spraying, splattering, and generating droplets of blood. 5. Bandage cuts and other lesions on the hands before gloving. 6. Sanitize hands as soon as possible after removing gloves. 7. If your hands or other skin surfaces come in contact with blood, wash the area as soon as possible with soap and water. 8. If your mucous membranes (e.g., eyes, nose, mouth) come in contact with blood, flush them with water as soon as possible. 9. Do not bend, break, or shear contaminated venipuncture needles. 10. Do not recap a contaminated venipuncture needle. 11. Locate the sharps container as close as possible to the area of use. Immediately after use, place the contaminated venipuncture needle (and plastic holder) in the biohazard sharps container. 12. Place blood specimens in containers that prevent leakage during collection, handling, processing, storage, transport, and shipping. 13. Handle all laboratory equipment and supplies properly and with care as indicated by the manufacturer. For example, wait until the centrifuge comes to a complete stop before opening it. 14. Do not store food in refrigerators where testing supplies or specimens are stored. 15. If you are exposed to blood, report the incident immediately to your physician-employer. The vacuum tube method is frequently used to collect venous blood specimens. This method is considered ideal for collecting blood from normal healthy antecubital veins that are adequate in size to withstand the pressure of the vacuum in the evacuated tube. Procedure 31-1 outlines the venipuncture vacuum tube method. The vacuum tube system consists of a collection needle, a plastic holder, and an evacuated tube (Figure 31-11). One commercially available vacuum tube system is the Vacutainer System (Becton Dickinson, Franklin Lakes, NJ). Perform a venipuncture using the vacuum tube method. 1. Procedural Step. Review the requirements for collecting and handling the blood specimen as ordered by the physician. Sanitize your hands. 2. Procedural Step. Greet the patient and introduce yourself. Identify the patient by asking the patient to state his or her full name and date of birth. Compare this information with the demographic data in the patient’s chart. If the patient was required to prepare for the test (e.g., fasting, medication restriction), determine whether he or she has prepared properly. If the patient has not followed the patient preparation requirements, notify the physician for instructions on handling this situation. 3. Procedural Step. Assemble the equipment. Select the proper evacuated tubes for the tests to be performed. Check the expiration date on the tubes. Label each tube using one of the following methods: (a) attaching a computer bar code label to each tube to be drawn and labeling it with your initials, or (b) manually labeling each tube with the patient’s name and date of birth, the date, and your initials. If the specimen is to be tested at an outside laboratory, complete a laboratory request form. (NOTE: Follow the medical office policy as to when the tubes should be labeled. Some offices prefer that tubes be labeled before the specimen is drawn; other offices want the tubes to be labeled right after the specimen is drawn.) 4. Procedural Step. Prepare the vacuum tube system. Remove the cap from the posterior needle using a twisting and pulling motion. Insert the posterior needle into the small opening on the plastic holder. Screw the plastic holder onto the Luer adapter, and tighten it securely. Principle. An unsecured needle can fall out of its plastic holder. 5. Procedural Step. Open the sterile gauze packet, and lay it flat to allow the gauze pad to rest on the inside of its wrapper. Position the evacuated tubes in the correct order of draw. If the evacuated tube contains a powdered additive, tap the tube just below the stopper to release any additive adhering to the stopper. Principle. If an additive remains trapped in the stopper, erroneous test results may occur. 6. Procedural Step. Place the first tube loosely in the plastic holder. 7. Procedural Step. Explain the procedure to the patient, and reassure the patient. Perform a preliminary assessment of both arms to determine the best vein to use. It also is helpful to ask the patient which arm has been used in the past to obtain blood. 8. Procedural Step. Apply the tourniquet. Position the tourniquet 3 to 4 inches above the bend in the elbow. The tourniquet should be snug but not tight. Ask the patient to clench the fist of the arm to which the tourniquet has been applied. 9. Procedural Step. With a tourniquet in place, thoroughly assess the veins of first one arm and then the other to determine the best vein to use. 10. Procedural Step. Position the patient’s arm. The arm with the vein selected for the venipuncture should be extended and placed in a straight line from the shoulder to the wrist with the antecubital veins facing anteriorly. The arm should be supported on the armrest by a rolled towel or by having the patient place the fist of the other hand under the elbow. Principle. This position allows easy access to the antecubital veins. 11. Procedural Step. Thoroughly palpate the selected vein. Gently palpate the vein with the fingertips to determine the direction of the vein and to estimate its size and depth. Never leave the tourniquet on an arm for longer than 1 minute at a time. (NOTE: If you need to perform several assessments to locate the best vein, the tourniquet must be removed and reapplied after a 2-minute waiting period.) 12. Procedural Step. Remove the tourniquet and cleanse the site with an antiseptic wipe. Cleansing should be done in a circular motion, starting from the inside and moving away from the puncture site. Allow the site to air-dry; after cleansing, do not touch the area, wipe the area with gauze, or fan the area with your hand. Place the remaining supplies within comfortable reach of your nondominant hand. 13. Procedural Step. Reapply the tourniquet. Apply gloves. If you are using a needle with a safety shield, rotate the shield backward toward the holder (refer to Figure 31-13, A). Remove the cap from the needle using a twisting and pulling motion. Hold the vacuum tube system by placing the thumb of the dominant hand on top of the plastic holder and the pads of the first three fingers underneath the holder and evacuated tube. The needle should be positioned with the bevel facing up. Position the evacuated tube so that the label is facing down. 14. Procedural Step. Anchor the vein. Grasp the patient’s arm with the nondominant hand. Your thumb should be placed 1 to 2 inches below and to the side of the puncture site. Using your thumb, draw the skin taut over the vein in the direction of the patient’s hand. 15. Procedural Step. Position the needle at a 15-degree angle to the arm. Rest the backs of the fingers on the patient’s forearm. Ensure that the needle points in the same direction as the vein to be entered. The needle should be positioned so that it enters the vein approximately
Phlebotomy
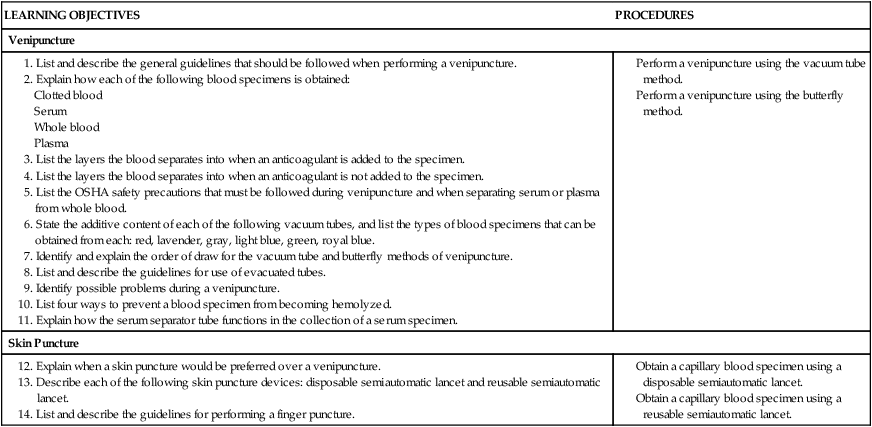
Introduction to Phlebotomy
Venipuncture
General Guidelines for Venipuncture
Review Collection and Handling Requirements
Assemble the Equipment and Supplies

Patient Position for Venipuncture
Application of the Tourniquet
Guidelines for Applying the Tourniquet
Types of Tourniquets
Rubber Tourniquet
Velcro-Closure Tourniquet

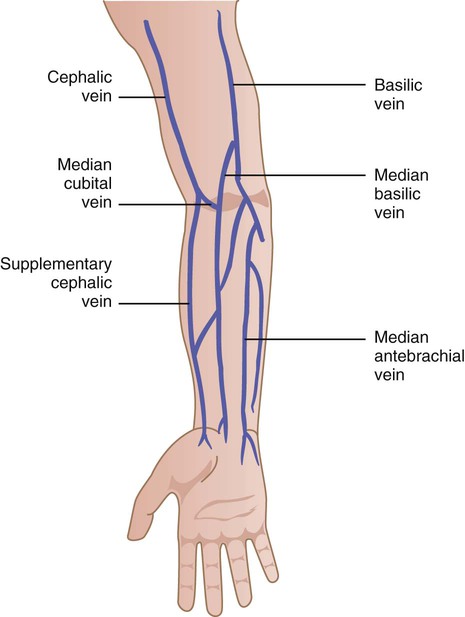
Site Selection for Venipuncture
Guidelines for Site Selection
Alternative Venipuncture Sites

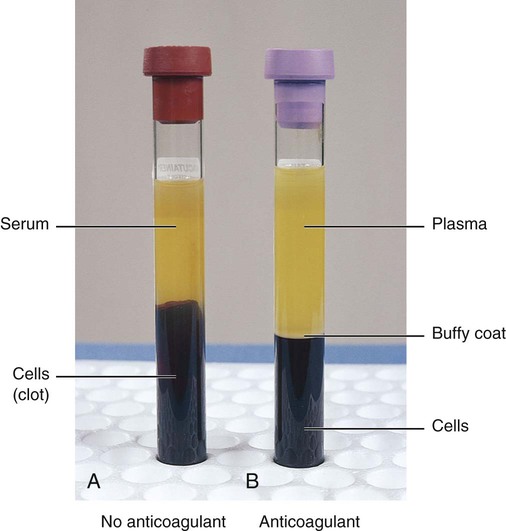
Types of Blood Specimens
OSHA Safety Precautions
Vacuum Tube Method of Venipuncture
 Procedure 31-1 Venipuncture—Vacuum Tube Method


 inch below the place where the vein is to be entered.
![]()
Stay updated, free articles. Join our Telegram channel

Full access? Get Clinical Tree


Phlebotomy


Get Clinical Tree app for offline access