Patient mobility, hygiene, comfort, and safety


Patient mobility, hygiene, comfort, and safety


This chapter covers the fundamental procedures needed to ensure patient mobility, hygiene, comfort, and safety. Each entry begins with a brief introduction and, where appropriate, a description of equipment preparation. The entry then provides implementation tips to help you perform each procedure efficiently and effectively. Each entry also includes sections on special considerations and documentation. No matter which procedure you’re performing, make sure to follow standard nursing protocol.


Standard nursing protocol

Standard nursing protocol should be followed before, during, and after each procedure.


Before a procedure

♦ Verify the physician’s order.

♦ Review the procedure in the facility’s policy and procedure manual, if necessary.

♦ Ensure patient privacy.

♦ Introduce yourself to the patient by giving your name, title, and role.

♦ Check the patient’s I.D. bracelet and ask for his name, when possible, to confirm his identity.

♦ Explain the procedure and rationale in language familiar to the patient.

♦ Gather the needed equipment.

♦ Maintain proper standard precautions.

♦ Adjust the bed to an appropriate height.

♦ Position the patient as needed according to the procedure being done.


During a procedure

♦ Encourage patient involvement whenever possible.

♦ Explain each step during the procedure and answer any questions.

♦ Monitor the patient’s tolerance of the procedure. Watch for signs of discomfort or fatigue.


After a procedure

♦ Help the patient into a comfortable position.

♦ Remove or dispose of soiled supplies and equipment appropriately.

♦ Wash your hands.

♦ Place items the patient may need within reach.

♦ Place the call bell within reach, and make sure the patient knows how to use it.

♦ Raise the side rails, if appropriate, and place the bed in its lowest position.

♦ Document the procedure, the patient’s response, and expected and unexpected outcomes.


Body mechanics and transfer techniques


Passive range-of-motion exercises

♦ With passive range-of-motion (ROM) exercises, a nurse, physical therapist, or caregiver moves the patient’s joints through their full range of motion.

♦ Passive ROM exercises are used for patients with temporary or permanent loss of mobility, sensation, or consciousness.

♦ These exercises improve or maintain joint mobility, help prevent contractures, and increase circulation to the affected part.

♦ To perform passive ROM exercises properly, you must recognize the patient’s limits of motion and support all joints during movement.

♦ These exercises are contraindicated for patients with infected joints, acute thrombophlebitis, severe arthritic joint
inflammation, or recent trauma with possible hidden fractures or internal injuries.


Implementation tips

♦ Follow the standard nursing protocol described at the start of the chapter.

♦ Determine which joints need ROM exercises, and ask the physician or physical therapist about limitations or precautions for specific exercises.

♦ The exercises described below are designed to move all of the patient’s joints, but they don’t have to be performed in the order given or all at once. You can schedule them over the course of a day, whenever the patient is in the most convenient position.

♦ Perform all exercises slowly, gently, and to the end of the normal ROM or to the point of discomfort, but no further.

♦ At the end of each exercise, return the involved area to a neutral position. (See Glossary of joint movements, page 4.)

♦ Support each joint by holding the areas distal and proximal to it.


Exercising the neck

♦ Support the patient’s head with your hands and extend the neck, flex the chin to the chest, and tilt the head laterally toward each shoulder.

♦ Rotate the head from right to left, rotate the head in a circular motion, and gently bend the head to extend the neck.


Exercising the shoulders

♦ Support the patient’s arm in an extended, neutral position; then extend the forearm and flex it back.

♦ Abduct the arm outward from the side of the body, and adduct it back to the side.

♦ Rotate the shoulder so the arm crosses the midline, and bend the elbow so the hand touches the opposite shoulder.

♦ Return the shoulder to a neutral position and, with elbow bent, push the arm backward for complete external rotation.


Exercising the elbow

♦ Place the patient’s arm at his side with his palm facing up.

♦ Flex and extend the arm at the elbow.


Exercising the forearm

♦ Stabilize the patient’s elbow, and then rotate the hand to bring the palm up (supination).

♦ Rotate it back again to bring the palm down (pronation).


Exercising the wrist

♦ Stabilize the forearm, and flex and extend the wrist.

♦ Then rock the hand sideways for lateral flexion, and rotate the hand in a circular motion.


Exercising the fingers and thumb

♦ Extend the patient’s fingers, and then flex the hand into a fist; repeat extension and flexion of each joint of each finger and thumb separately.

♦ Spread two adjoining fingers apart (abduction), and then bring them together (adduction).

♦ Oppose each fingertip to the thumb, and rotate the thumb and each finger in a circle.


Exercising the hip and knee

♦ Fully extend the patient’s leg.

♦ Bend the hip and knee toward the chest, allowing full joint flexion, and then return to the extended position.

♦ Next, move the straight leg sideways, out and away from the other leg (abduction), and then back, over, and across it (adduction).


♦ Rotate the straight leg toward and then away from the midline.


Exercising the ankle

♦ Bend the patient’s foot so the toes push upward (dorsiflexion).

♦ Then bend the foot so the toes push downward (plantar flexion).

♦ Rotate the ankle in a circle.

♦ Invert the ankle so it moves toward the midline; then evert the ankle so it moves away from the midline.


Exercising the toes

♦ Flex the patient’s toes toward the sole, and then extend them back toward the top of the foot.

♦ Spread two adjoining toes apart (abduction), and then bring them together (adduction).

image Stop passive ROM exercises if the patient complains of pain or you encounter resistance or muscle spasms.


Special considerations

♦ Because joints begin to stiffen within 24 hours of disuse, start passive ROM exercises as soon as possible and perform them at least every 4 hours.

♦ Ensure proper body mechanics, and repeat each exercise at least five times.

♦ Patients who are on prolonged bed rest or who have limited activity but who aren’t profoundly weak should be taught to perform ROM exercises on their own (called active ROM), or they may benefit from isometric exercises.

♦ If a disabled patient needs longterm rehabilitation after discharge teach a family member or caregiver to perform passive ROM exercises and consult a physical therapist for followup care.


Documentation

♦ Record which joints were exercised; whether active or passive ROM was performed; whether the patient had edema, pressure areas, pain from the exercises, or limited ROM; and the patient’s tolerance of the exercises.


Transfer from bed to stretcher

♦ This is one of the most common transfers you’ll perform.

♦ Depending on the patient’s size and condition and your physical abilities, you may need help from one or more coworkers to accomplish it.

♦ Techniques for performing this transfer include the straight lift, carry lift, lift sheet, and slide board.

image Before attempting a transfer, review the principles of body mechanics. Consider using additional staff when transferring heavier patients.


Implementation tips

♦ Follow the standard nursing protocol described at the start of the chapter.

♦ To prevent injury, remember to use good body mechanics with all transfers.

♦ Tell the patient that you’re going to move him onto a stretcher.

♦ Adjust the bed to the same height as the stretcher. Lock the bed and stretcher wheels to ensure the patient’s safety.

♦ Move I.V. lines and other tubing out of the way, and make sure there’s no danger of them pulling loose.


Four-person straight lift

♦ Place the stretcher parallel to the bed.

♦ One team member stands at the center of the outside edge of the stretcher, and another stands at the patient’s head.

♦ The two other team members stand next to the outside edge of the bed— one at the center and the other at the patient’s feet.


♦ Slide your arms, palms up, under the patient while the other team members do the same. This way, the people in the center support the patient’s buttocks and hips, the person at the head of the bed supports the patient’s head and shoulders, and the person at the foot supports the patient’s legs and feet.

♦ On a count of three, everyone lifts the patient several inches, moves him onto the stretcher, and slides their arms out from under him. Keep movements smooth to minimize patient discomfort and avoid muscle strain by team members.


Four-person lift sheet transfer

♦ Position the bed, stretcher, and team members for the straight lift.

♦ Each team member grasps the edges of the sheet close to the patient —a position that allows a firm grip, provides stability, and spares the patient undue feelings of instability.

♦ On a count of three, everyone lifts or slides the patient onto the stretcher in a smooth, continuous motion to avoid muscle strain and minimize patient discomfort.


Slide-board transfer

♦ Place the stretcher parallel to the bed.

♦ Stand next to the bed while a coworker stands next to the stretcher.

♦ Reach over the patient and pull the far side of the bed sheet toward you to turn the patient slightly on his side. Your coworker then places the slide board beneath the patient, making sure the board bridges the gap between stretcher and bed.

♦ Ease the patient onto the slide board and release the sheet. Your coworker then grasps the near side of the sheet at the patient’s hips and shoulders and pulls him onto the stretcher in a smooth, continuous motion. Your coworker then reaches over the patient, grasps the far side of the sheet, and logrolls him toward her.

♦ Remove the slide board as your coworker returns the patient to the supine position.


Special considerations

♦ After all transfers, position the patient comfortably on the stretcher, apply safety straps, and raise and secure the side rails.

♦ When transferring an immobile or obese patient from bed to stretcher, first lift and move him, in increments, to the edge of the bed. Then rest for a few seconds, repositioning the patient if needed, and lift him onto the stretcher. If the patient can bear weight on his arms or legs, two or three coworkers can perform this transfer.


Documentation

♦ Record the time and, if needed, the type of transfer in your notes.


Transfer from bed to wheelchair

♦ For a patient with little or no lowerbody sensation or one-sided weakness, immobility, or injury, the transfer from bed to wheelchair may require partial support to full assistance—initially by at least two people.

♦ After transfer, proper positioning helps prevent excessive pressure on bony prominences and the skin breakdown that may result.


Implementation tips

♦ Follow the standard nursing protocol described at the start of the chapter.

♦ Use proper body mechanics during the transfer to prevent injury.

♦ Place the wheelchair parallel to the bed, facing the foot of the bed, and lock its wheels. Make sure the bed
wheels are also locked and that the bed is in its lowest position.

♦ Remove the wheelchair footrests to avoid interfering with the transfer.

♦ With the patient in a supine position, obtain a baseline pulse rate and blood pressure.

♦ Help the patient into appropriate clothing, nonslip footwear, and ordered braces or assistive devices.

♦ Raise the head of the bed, and let the patient rest briefly to adjust to posture changes and decrease postural hypotension. Then bring him to the dangling position. If the patient could have cardiovascular instability, recheck his pulse rate and blood pressure. To prevent falls, don’t proceed until his vital signs stabilize.

♦ Apply a liftbelt if needed.

♦ Ask the patient to move toward the edge of the bed and, if possible, to place his feet flat on the floor. Stand in front of the patient, blocking his toes with your feet and his knees with yours to keep his knees from buckling.

♦ Flex your knees slightly, place your arms around the patient’s waist, and tell him to place his hands on the edge of the bed. To prevent back strain, don’t bend at your waist.

♦ Ask the patient to push himself off the bed and to support as much of his own weight as possible. Use the liftbelt to assist the patient, as needed. At the same time, straighten your knees and hips, raising the patient as you straighten your body.

♦ Supporting the patient as needed, pivot toward the wheelchair, keeping your knees against his. Tell the patient to grasp the farthest armrest of the wheelchair with his closest hand, and to back up so that the backs of his legs touch the wheelchair.

♦ Help the patient lower himself into the wheelchair by flexing your hips and knees, but not your back. Instruct him to reach back and grasp the other wheelchair armrest as he sits to avoid abrupt contact with the seat.

♦ To check cardiovascular stability, check the patient’s pulse rate and blood pressure. If the systolic blood pressure drops by 20 mm Hg or more, or the diastolic blood pressure drops by at least 10 mm Hg, the patient has orthostatic hypotension. The pulse rate may increase by 20 beats or more as well. Recheck the patient’s status after 3 minutes until vital signs are stable and the patient is asymptomatic.

♦ If the patient can’t position himself correctly, help him move his buttocks against the back of the chair so that the ischial tuberosities, not the sacrum, provide the base of support.

♦ Put the footrests back on the wheelchair, and place the patient’s feet flat on the footrests, pointed straight ahead. Then position the knees and hips with the correct amount of flexion and in appropriate alignment. If appropriate, use elevating leg rests to flex the patient’s hips at more than 90 degrees; this position relieves pressure on the popliteal space and places more weight on the ischial tuberosities.

♦ Position the patient’s arms on the wheelchair’s armrests with shoulders abducted, elbows slightly flexed, forearms pronated, and wrists and hands in the neutral position. If needed, support or elevate the patient’s hands and forearms with a pillow to prevent dependent edema.


Special considerations

♦ If the patient starts to fall during the transfer, ease him to the closest surface—bed, floor, or chair. Never stretch to finish the transfer. Doing so can cause loss of balance, falls, muscle strain, and other injuries to you and the patient.

♦ If the patient has one-sided weakness, place the wheelchair on his unaffected side. Instruct the patient to pivot
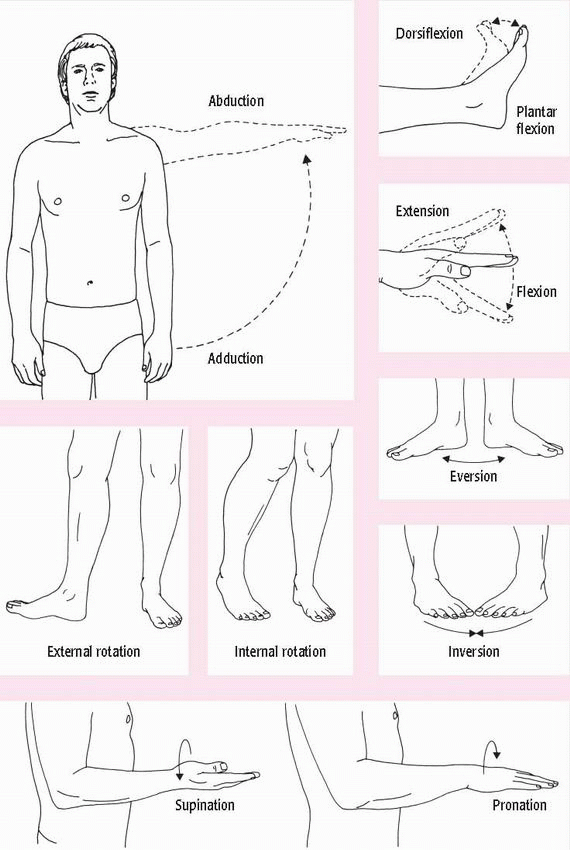
and bear as much weight as possible on the unaffected side. Support the affected side because the patient will tend to lean to this side. To prevent slumping in the wheelchair, use pillows to support a hemiplegic patient’s affected side.


Documentation

♦ Record the time of transfer, the amount of assistance needed, and the patient’s tolerance of the transfer.


Common patient positions

♦ Proper patient positioning maintains functional body alignment, ensures patient safety, promotes respiration and circulation, relieves pressure, and aids in administering treatment. (See Positioning patients.)


Assistive devices


Canes

♦ For a patient who’s occasionally unsteady or has one-sided weakness or joint pain or pressure, a cane can provide balance and support for walking. It also reduces fatigue and strain on weight-bearing joints.

♦ Canes aren’t appropriate for patients with bilateral weakness; they should use crutches or a walker.

♦ Although wooden canes are available, aluminum canes are most common. They come in three types and provide varying levels of support.

♦ The standard design with a halfcircle handle provides the least support. It’s used by patients who need only slight assistance with walking.

♦ The T-handle cane has a straight handle with grips and a bent shaft. It’s used by patients with hand weakness and provides greater stability than a standard cane.

♦ Three- or four-footed (quad) canes are used by patients with poor balance or one-sided weakness and an inability to hold onto a walker with both hands.


Preparation of equipment

♦ To function properly, a cane must be the correct height for the patient.

♦ A poorly fitted cane can cause the patient to lose his balance and fall. If a cane is too short, the patient will have to drop his shoulder out of alignment to use it. If the cane is too long, he’ll have to raise his shoulder, making it difficult to support his weight.

♦ To fit properly, the handle of the cane should be level with the greater trochanter and allow about 15 degrees of flexion at the elbow.

♦ Ask the patient to hold the cane on his unaffected side 4″ to 6″ (10 to 15 cm) from the base of his little toe. If the cane is aluminum, adjust its height by depressing the metal button on the shaft and raising or lowering the handle. If the cane is wooden, you’ll have to remove the rubber tip, have any excess length sawed off, and reapply the rubber tip.


Implementation tips

♦ Follow the standard nursing protocol described at the start of the chapter.

♦ Explain how to walk with a cane, and show the patient how to do it.

♦ Tell the patient to hold the cane on his unaffected (strong) side, close to his body. This position moves weight away from the involved side, promotes a steady gait, and keeps the patient from leaning toward the cane.

♦ Teach the patient to move the cane and affected (weak) leg together, and then move the strong leg by itself.

♦ Urge the patient to keep the length and timing of each step equal rather


than making one step long and slow and the other short and quick.


♦ After showing the patient how to walk with the cane, have him try it. If needed, coordinate practice sessions with the physical therapy department.

image Urge the patient to maintain good posture and to look ahead, not down, while walking.


Using stairs


STAIRS WITH A RAILING

♦ The patient may hold the cane in whichever hand he prefers and use the railing for support.

♦ To go up the stairs, the patient should lead with the strong leg and follow with the weak leg.

♦ To go down the stairs, he should lead with the weak leg and follow with the strong one.

♦ Help the patient remember by giving him this reminder sentence: “The strong go up; the weak go down.”


STAIRS WITHOUT A RAILING

♦ If the stairs have no railing, the patient should use the standard walking technique, but he should move the cane just before moving the affected leg.

♦ To go up the stairs, the patient should hold the cane on his strong side, step with the strong leg, advance the cane, and then move the weak leg.

♦ To go down the stairs, he should hold the cane on his strong side, advance the cane, step with the weak leg, and then move the strong leg.


Using a chair

♦ To teach the patient to sit down, stand by his affected side, and tell him to place the backs of his legs against the edge of the chair seat. Then tell him to move the cane away from his body and to reach back with both hands to grasp the chair’s armrests. Supporting his weight on the armrests, he can then lower himself onto the seat.


♦ While he’s seated, he should keep the cane hooked on the armrest or the chair back.

♦ To teach the patient to get up, stand by his affected side, and tell him to unhook the cane from the chair and hold it in his stronger hand as he grasps the armrests. Then tell him to move his strong foot slightly forward, to lean slightly forward, and to push against the armrests to raise himself upright.

♦ Tell the patient not to lean on the cane when sitting or rising from the chair to prevent falls.

♦ Supervise the patient each time he gets in or out of a chair until you’re both certain he can do it alone.


Special considerations

♦ To prevent falls during the learning period, guard the patient carefully by standing on his stronger side, slightly behind him, and placing one foot between his feet and the other to the outside of his stronger leg. If needed, use a walking belt to provide increased stability.


Documentation

♦ Record the type of cane used, the amount of guarding needed, the distance walked, and the patient’s understanding and tolerance of cane walking.


Crutches

♦ Crutches let the patient support himself with his hands and arms, shifting weight away from one or both legs. Usually, crutches are used for patients who have leg injuries or weakness.

♦ To use crutches successfully, the patient needs balance, stamina, and upper-body strength.

♦ The type of crutches selected, and the walking gait used, depend on the patient’s condition.

♦ Three types of crutches are commonly used. Standard aluminum or wooden crutches are used by a patient with a sprain, strain, or cast. These crutches require stamina and upperbody strength.

♦ Aluminum forearm crutches are for patients, such as paraplegics, who use a swing-through gait. These crutches have a collar that fits around the forearm and a horizontal handgrip for support.

♦ Platform crutches provide padded arm surfaces and are used by arthritic patients and those who can’t bear weight through their wrists.


Implementation tips

♦ Follow the standard nursing protocol described at the start of the chapter.

♦ Consult with the patient’s physician and physical therapist to coordinate rehabilitation orders and teaching.

♦ Make sure the crutches fit the patient properly. (See Fitting a patient for a crutch.)

♦ Find out which gait the patient will be using. Describe it to him. Then show him how to do it.

♦ If needed to help prevent falls, place a walking belt around the patient’s waist while you teach him.

♦ To start, position the crutches and have the patient shift his weight from side to side. Then, if possible, place him in front of a full-length mirror so he can see the process of walking while he learns it.


Four-point gait

♦ A patient who can bear weight on both legs may use the four-point gait.

♦ Teach this sequence: right crutch, left foot, left crutch, right foot.

♦ Suggest that the patient count out the steps to help develop the rhythm of the gait.


♦ Tell him to make sure each step (crutch and foot) is of equal length.

♦ This is the safest gait because three points are always in contact with the floor. However, the four-point gait requires more coordination than others because the patient is constantly shifting his weight.

♦ If the patient masters this gait, he may be able to use the faster two-point gait.


Two-point gait

♦ If a patient has weak legs but good coordination and arm strength, teach the two-point gait.

♦ This is the most natural crutchwalking gait because it mimics walking, with alternating swings of the arms and legs.

♦ Tell the patient to advance the right crutch and left foot together, followed by the left crutch and right foot together.


Three-point gait

♦ If the patient can bear only partial or no weight on one leg, teach the three-point gait.

♦ Tell him to advance the affected (weak) leg and both crutches by 6″ to 8″ (15 to 20 cm) while supporting his weight on the unaffected (strong) leg.

♦ Then tell him to bring the strong leg forward while supporting most of his weight on the crutches and some of it on the weak leg, if possible.

♦ Stress the importance of taking steps of equal length and duration with no pauses.


Swing gaits

♦ If the patient has paralysis of the hips and legs, teach the swing-to or swing-through gaits. These are the fastest gaits.

♦ Tell him to advance both crutches and then to swing his legs into line with (swing-to) or beyond (swingthrough) the position of the crutches.


Chairs and stairs

♦ To teach the patient to get up from a chair, tell him to hold both crutches in one hand with the tips resting firmly on the floor. Then have him push up from the chair with his free hand while supporting himself with the crutches.

♦ To teach him to sit down, tell him to reverse the process, supporting himself with both crutches in one hand and lowering himself into the chair with the other.

♦ To teach the patient to go up stairs using a three-point gait, tell him to
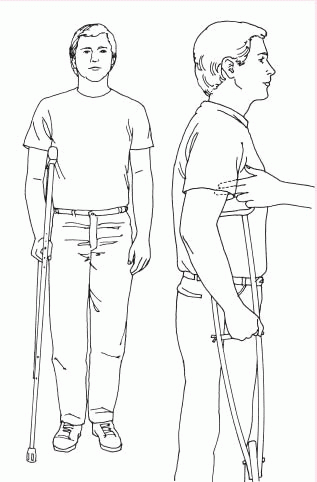
step up with the strong leg while supporting his weight with both crutches and the weak leg on the lower step. Then he can move the crutches and weak leg up.

♦ To teach him to go down stairs, tell him to step down with both crutches and the weak leg. Then he can follow with the strong leg.

♦ To help him remember, give him this reminder sentence: “The strong go up; the weak go down.”


Special considerations

♦ If time permits, urge the patient to perform arm- and shoulder-strengthening exercises to prepare for crutch walking.

♦ Find out from the physician or physical therapist if you can teach the patient two walking techniques—one fast and one slow. That way, he can switch between them to reduce muscle fatigue and adapt to various walking conditions.


Complications

♦ If the patient has a chronic condition, the swing-to and swing-through gaits can lead to atrophy of the hips and legs unless he routinely performs appropriate therapeutic exercises.

♦ Caution the patient against habitually leaning on his crutches because prolonged pressure on the axillae can damage the brachial nerves, causing brachial nerve palsy.


Documentation

♦ Record the type of gait used, the patient’s weight-bearing status, the amount of assistance needed, the distance walked, and the patient’s tolerance of the crutches and gait.


Walkers

♦ A walker is a three-sided metal frame with four legs and handgrips. The patient stands in the open side of the frame and is supported on three sides.

♦ A walker offers greater stability and security than other walking aids. It’s used for patients with too little strength or balance for crutches or a cane and for patients who need frequent rest periods.

♦ The standard walker is for patients with one- or two-sided weakness and patients who can’t bear weight on one leg. This walker requires arm strength and balance.

♦ For extremely weak or poorly coordinated patients, wheels may be placed on the two front legs of a standard walker. That way, the patient can roll the walker forward instead of having to lift it. However, because wheels can increase the risk of falling, they must be used with caution.

♦ For patients who have to use stairs without double handrails, a stair walker may be helpful. It has an extra set of handles that extend toward the patient on the open side. To use this walker, the patient needs good arm strength and balance.

♦ A patient with very weak legs may prefer a rolling walker, which has four wheels and may also have a seat.

♦ For a patient with very weak arms, a reciprocal walker may be best. It lets the patient move one side of the walker at a time.


Preparation of equipment

♦ Obtain the prescribed walker, and make sure it’s adjusted properly to the patient’s height.

♦ Standing comfortably in the walker with his hands on the grips, the patient’s elbows should be flexed at a 15-degree angle.

♦ To adjust the height of the walker, turn it upside down. Push the button on the shaft of one leg, adjust the leg length by sliding the shaft in or out,
and then release the button. Then do the same for the other legs. Make sure the walker is level when you’re finished.


Implementation tips

♦ Follow the standard nursing protocol described at the start of the chapter.

♦ Help the patient stand in the walker, and tell him to hold the handgrips firmly and equally. Stand behind him; if he has one affected leg, stand closer to that leg.

Aug 18, 2016 | Posted by in NURSING | Comments Off on Patient mobility, hygiene, comfort, and safety

Full access? Get Clinical Tree

Get Clinical Tree app for offline access