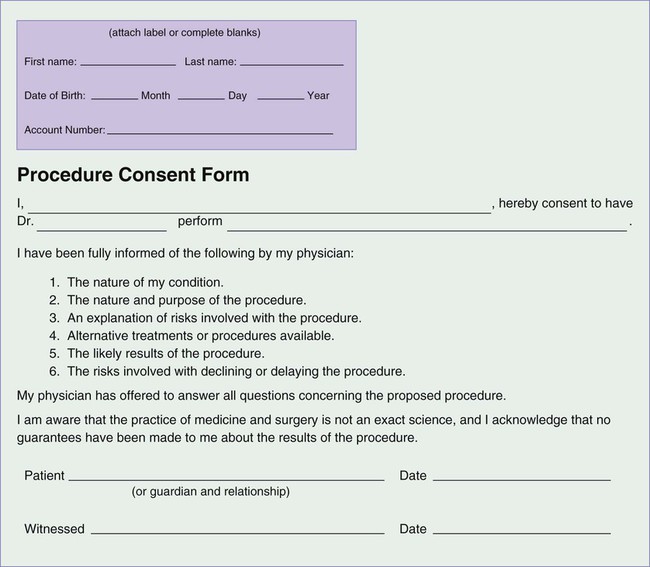
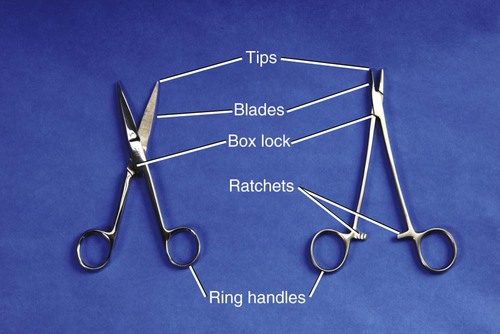
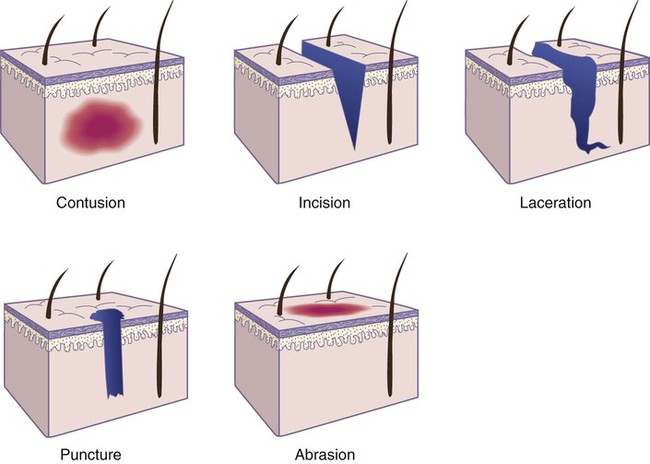
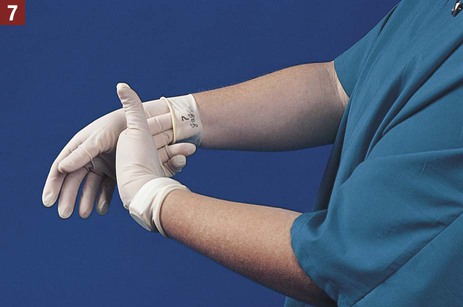
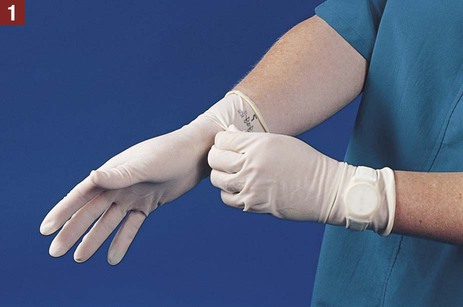
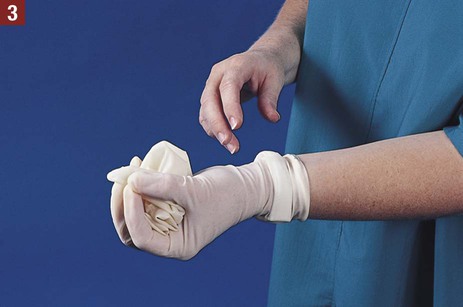
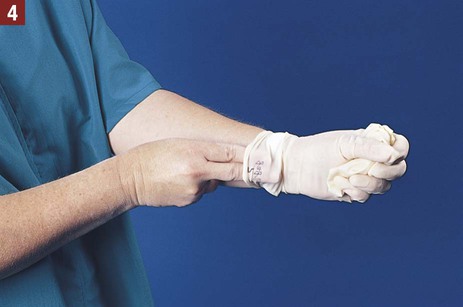
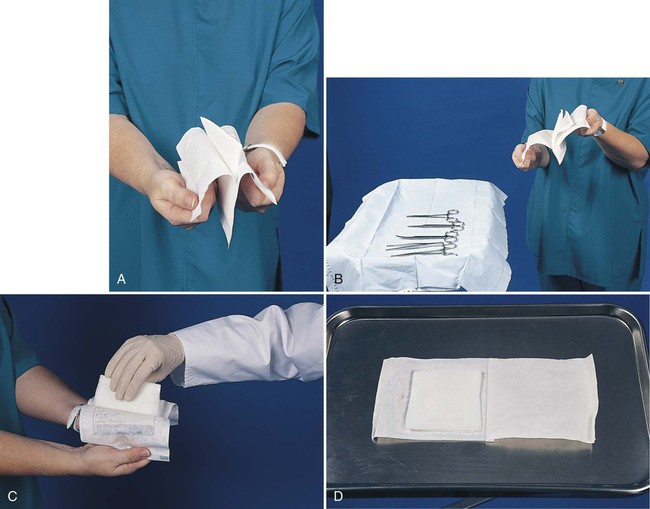
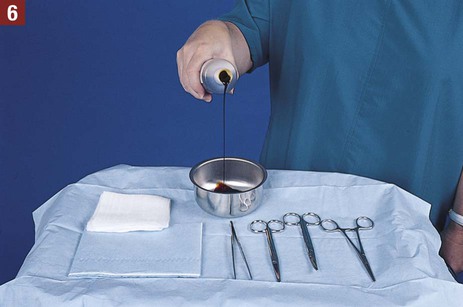
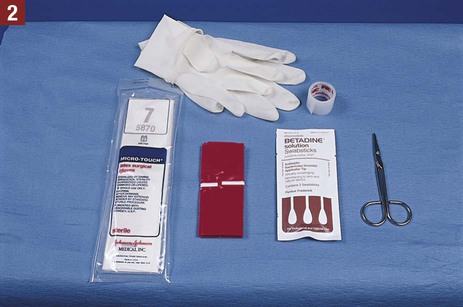
1. State the characteristics of a minor surgical procedure. 2. Identify procedures that require the use of surgical asepsis. 3. Describe the medical assistant’s responsibilities during a minor surgical procedure. 4. List the guidelines to follow to maintain surgical asepsis during a sterile procedure. 5. Identify and explain the use and care of instruments commonly used for minor office surgery. 13. Explain the purpose of and procedure for each of the following minor surgical operations: sebaceous cyst removal, incision and drainage of a localized infection, mole removal, needle biopsy, ingrown toenail removal, colposcopy, cervical punch biopsy, and cryosurgery. 14. Explain the principles underlying each step in the minor office surgery procedures. • Are performed in an ambulatory health care facility, such as a physician’s office or clinic • Can be performed in a short period of time, usually in less than 1 hour • Require a local anesthetic, a topical anesthetic, or no anesthetic • Can be performed safely with a minimum of discomfort to the patient • Do not, under normal circumstances, pose a major risk to life, or function of an organ or body parts Various types of minor surgical operations are performed in the medical office, such as insertion of sutures, sebaceous cyst removal, incision and drainage of infections, mole removal, needle biopsies, cervical biopsies, and ingrown toenail removal. The physician explains the nature of the surgical procedure and any risks to the patient and offers to answer questions. The medical assistant is responsible for explaining the patient preparation required for the procedure and for obtaining the patient’s signature on a written consent to treatment form, which grants the physician permission to perform the surgery (Figure 25-1). Sterility of the hands cannot be attained. Sanitizing the hands renders them medically aseptic and must be performed before and after every surgical procedure using proper technique (see Chapter 17). To prevent contamination of sterile articles, sterile gloves must be worn while picking up or transferring articles during a sterile procedure. Procedure 25-1 describes the procedure for applying and removing sterile gloves. Apply and remove sterile gloves. 1. Procedural Step. Remove all rings and put them in a safe place. Wash your hands with an antimicrobial soap. 2. Procedural Step. Choose appropriate-sized gloves; they should not be too small or too large. The gloves should fit snugly but not be too tight. 3. Procedural Step. Place the glove package on a clean flat surface. Open the glove package without touching the inside of the wrapper. The tops of the gloves are turned down to form a cuff. Principle. The hands are not sterile, and the inside of the wrapper is sterile. 4. Procedural Step. Pick up the first glove on the inside of the cuff with the fingers of the opposite hand, being sure not to touch the outside of the glove with your ungloved hand. 5. Procedural Step. Step back and pull the glove on. Allow the cuff to remain turned back on itself. 6. Procedural Step. Pick up the second glove by slipping your sterile gloved fingers under its cuff and grasping the opposite side of the cuff with your thumb. Princi ple. The cuff is sterile and may be touched by the sterile gloved hand. 7. Procedural Step. Remove your thumb from the cuff and pull the glove on. Turn back the cuff. 8. Procedural Step. Turn back the cuff of the first glove by reaching under the cuff with the other gloved hand. Do not allow your sterile gloved hand to come in contact with the inside of the cuff. Adjust the gloves to a comfortable position. Inspect the gloves for tears. 1. Procedural Step. With your gloved left hand, grasp the outside of the right glove 1 to 2 inches from the top. (NOTE: It does not matter which glove is removed first—you may start with the left glove if you prefer.) 2. Procedural Step. Slowly pull the right glove off the hand. It turns inside out as it is removed from your hand. 3. Procedural Step. Pull the right glove free, and scrunch it into a ball with your gloved left hand. 4. Procedural Step. Place the index and middle fingers of the right hand on the inside of the left glove. Do not allow your clean hand to touch the outside of the glove. 5. Procedural Step. Pull the second glove off the left hand. It turns inside out as it is removed from your hand, enclosing the balled-up right glove. Discard both gloves in an appropriate waste container. If your gloves are visibly contaminated with blood or other potentially infectious materials, discard them in a biohazard waste container; otherwise, they can be discarded in a regular waste container. 6. Procedural Step. Sanitize your hands thoroughly to remove any microorganisms that may have come in contact with your hands. A variety of surgical instruments are used for minor office surgery. Most instruments are made of stainless steel and have either a bright, highly polished finish or a dull finish. The medical assistant should become familiar with the name, use, and proper care of all instruments used in the medical office. Surgical instruments are named by one or more of the following: (1) function (e.g., splinter forceps); (2) design (e.g., mosquito hemostatic forceps); and (3) the individual who developed the instrument (e.g., Kelly hemostatic forceps). The parts of an instrument are illustrated in Figure 25-2; some common instruments are described here and are illustrated in Figure 25-3. Scissors are cutting instruments that have ring handles and straight (str) or curved (cvd) blades. Both blade tips may be sharp (s/s), both may be blunt (b/b), or one tip may be blunt and the other sharp (b/s). The two parts of a pair of scissors come together at a hinge joint known as a box lock (see Figure 25-2). The type of scissors employed depends on the intended use. The various types of scissors are listed and described next. Forceps are instruments for grasping, squeezing, or holding tissue or an item such as sterile gauze. Some forceps have two prongs and a spring handle (e.g., thumb, tissue, splinter, dressing forceps) that provides the proper tension for grasping an object such as tissue, a foreign object, or sterile gauze. Some forceps have serrations (e.g., thumb and hemostatic forceps), which are sawlike teeth that grasp tissue and prevent it from slipping out of the jaws of the instrument. As is shown in Figure 25-3, some varieties have toothed clasps on the handle, known as ratchets (see Figure 25-2), to hold the tips securely together and lock them in place (e.g., Allis tissue forceps, hemostatic forceps). The ratchets are designed to allow locked closure of the instrument at two or more positions. The various types of forceps are listed and described next. Various miscellaneous instruments used in the medical office are listed and described next. 1. Always handle instruments carefully. Dropping an instrument on the floor or throwing an instrument into a basin could damage it. 2. Do not pile instruments in a heap because they become entangled and might be damaged when separated. 3. Keep sharp instruments separate from the rest of the instruments to prevent damaging or dulling the cutting edge. Also, keep delicate instruments, such as lensed instruments, separate to protect them from damage. 4. To prolong the proper functioning of the ratchet, keep instruments with a ratchet in an open position when not in use. 5. Rinse blood and body secretions off an instrument as soon as possible to prevent them from drying and hardening on the instrument. 6. When performing procedures that require surgical instruments, always use the instrument for the purpose for which it was designed. Substituting one type of instrument for another could damage it. 7. Sanitize and sterilize instruments using proper technique. Commercially prepared disposable packages are used frequently and may contain one particular article (e.g., sterile dressing) or a complete sterile setup (e.g., one for the removal of sutures). The directions for opening the package are stated on the outside of the package; they should be followed carefully to prevent contamination of the sterile contents. Procedure 25-2 describes opening a sterile package. Open a sterile package. A sterile package that has been wrapped after the procedure for wrapping presented in Chapter 18 is opened using the procedure outlined here. The sterile package may be in the form of a commercially prepared disposable package (e.g., sterile dressing change) or a pack that has been assembled and sterilized at the medical office (e.g., sebaceous cyst removal pack); in both cases, the inside of the sterile wrapper serves as the sterile field. 1. Procedural Step. Sanitize your hands. 2. Procedural Step. Assemble the equipment. 3. Procedural Step. Check the pack to make sure it is not wet, torn, or opened. These factors cause contamination of the sterile contents and the pack must not be used. If autoclave tape has been used to close the pack, check to make sure the tape has changed color. 4. Procedural Step. Place the wrapped package on the table so that the top flap of the wrapper opens away from you. Always face the sterile field, and do not talk, laugh, cough, or sneeze over the field. These actions contaminate the sterile field. 5. Procedural Step. Loosen and remove the fastener on the wrapped package, and discard it in a waste container. 6. Procedural Step. Open the first flap away from the body. Handle only the outside of the wrapper. 7. Procedural Step. Without crossing over the sterile field, open the left and right flaps. 8. Procedural Step. Open the flap closest to the body by lifting it toward you. Touch only the outside of the wrapper. 9. Procedural Step. Adjust the sterile wrapper by the corners as needed to make sure it lies in proper position on the tray or table. 10. Procedural Step. Check the sterilization indicator on the inside of the pack to make sure it has changed appropriately. This indicates that the contents of the pack are sterile. One type of commercially prepared package is the peel-apart package (commonly referred to as a peel-pack). This type of sterile package has an edge with two flaps that can be pulled apart in the following manner: Grasp each unsterile flap between your bent index finger and extended thumb, and, rolling your hands outward, pull the package apart (Figure 25-4, A). The inside of the wrapper and the contents are sterile, and to prevent contamination, they must not be touched with the bare hands. The medical assistant can place the contents of the peel-pack directly on the sterile field by stepping back slightly from the field and gently ejecting or “flipping” the contents onto the center of the sterile field (Figure 25-4, B). Stepping back prevents the unsterile outer wrapper and the medical assistant’s hands from crossing over the sterile field, which would result in contamination. The contents of the package also can be removed with a sterile gloved hand. This technique is useful during minor office surgery, when the physician needs additional supplies, such as gauze pads and sutures. The medical assistant opens the sterile package, and the physician removes the sterile contents from the package using a gloved hand (Figure 25-4, C). The inside of the package can be used as a sterile field by opening the peel-apart package completely and laying it flat on a clean dry surface (Figure 25-4, D). Once a sterile package has been opened and set up, the medical assistant may need to pour a sterile solution, such as an antiseptic, into a container located on the field. To do so, the steps of surgical asepsis outlined in Procedure 25-3 should be followed. 1. Procedural Step. Read the label of the solution to ensure that you have the correct solution. 2. Procedural Step. Check the expiration date on the solution. Do not use an outdated solution. Principle. Outdated solutions may produce undesirable effects and should be discarded. 3. Procedural Step. Check the solution label a second time to make sure you have the correct solution. 4. Procedural Step. Place the palm of your hand over the label. Remove the cap by touching only the outside, and place the cap on a flat surface with the open end up. Do not place the cap on the sterile field, as the outside of the cap is contaminated. 5. Procedural Step. Rinse the lip of the bottle (if it has been previously used) by pouring a small amount of solution into a separate container. Principle. Rinsing the lip washes away any microorganisms that may be on it. 6. Procedural Step. Pour the proper amount of solution into the sterile container at a height of approximately 6 inches. Do not allow the neck of the bottle to come in contact with the sterile container, and be careful not to splash solution onto the sterile field. 7. Procedural Step. Replace the cap on the container without contaminating it. Check the label a third time to ensure that you have poured the correct solution. A closed wound involves an injury to the underlying tissues of the body without a break in the skin surface or mucous membrane; an example is a contusion, or bruise. A contusion results when the tissues under the skin are injured and is often caused by a blunt object. Blood vessels rupture, allowing blood to seep into the tissues, which results in a bluish discoloration of the skin. After several days, the color of the contusion turns greenish yellow as a result of oxidation of blood pigments. Bruising commonly occurs with injuries such as fractures, sprains, strains, and black eyes. Open wounds involve a break in the skin surface or mucous membrane that exposes the underlying tissues; examples include incisions, lacerations, punctures, and abrasions. Figure 25-5 illustrates specific wounds. • An incision is a clean, smooth cut caused by a sharp instrument, such as a knife, razor, or piece of glass. Deep incisions are accompanied by profuse bleeding; in addition, damage to muscles, tendons, and nerves may occur. • A laceration is a wound in which the tissues are torn apart, rather than cut, leaving ragged and irregular edges. Lacerations are caused by dull knives, large objects that have been driven into the skin, and heavy machinery. Deep lacerations result in profuse bleeding, and a scar often results from the jagged tearing of the tissues. • A puncture is a wound made by a sharp-pointed object piercing the skin layers, for example, a nail, splinter, needle, wire, knife, bullet, or animal bite. A puncture wound has a very small external skin opening, and for this reason bleeding is usually minor. A tetanus booster may be administered with this type of wound because the tetanus bacteria grow best in a warm anaerobic environment, such as the one in a puncture. • An abrasion or scrape is a wound in which the outer layers of the skin are scraped or rubbed off, resulting in oozing of blood from ruptured capillaries. Abrasions are often caused by falling on gravel and floors (floor burn). These falls can result in skinned knees and elbows. Wound healing occurs in three phases, which are described here and illustrated in Figure 25-6. Patient Teaching Wound Care Explain the following to the patient regarding wounds: • The type of wound that the patient has: incision, laceration, puncture, or abrasion. • The purpose of suturing the wound: to close the skin and protect against further contamination, to facilitate healing, and to leave a smaller scar. • If a tetanus toxoid has been administered, explain the purpose of this immunization: to protect against tetanus (lockjaw). • Teach the patient how to care for the wound, as follows: • Keep the dressing clean and dry. If it becomes wet, contact the medical office to schedule a sterile dressing change. • Apply an ice bag for swelling (if prescribed by the physician). • Report immediately any signs that the wound is infected. These signs include the following: • Notify the office if the sutures become loose or break. • Return as instructed by the physician for the removal of sutures. • Teach the patient how to apply an ice bag (if prescribed by the physician). • Give the patient written instructions on wound care to refer to at home. Nonadherent pads also are used as a sterile dressing; they have one surface impregnated with agents that prevent the dressing from sticking to the wound. One brand of this type of material is Telfa pads. The nonadherent side, which is shiny, is placed next to the wound. Telfa dressings are often used to cover burned skin. Procedure 25-4 presents the procedure for changing a sterile dressing. 1. Procedural Step. Wash your hands with an antimicrobial soap. 2. Procedural Step. Assemble the equipment. Set up the nonsterile items on a side table or counter. Position the waterproof waste bag in a location convenient for disposal of contaminated items. 3. Procedural Step. Greet the patient and introduce yourself. Identify the patient by full name and date of birth and explain the procedure. Instruct the patient not to move during the procedure. Adjust the light so that it is focused on the dressing. 4. Procedural Step. Apply clean gloves. Loosen the tape on the dressing, and pull it toward the wound. Carefully and gently remove the soiled dressing by pulling it upward. Do not touch the inside of the dressing that was next to the open wound. If the dressing is stuck to the wound, it can be loosened by moistening it with a normal saline solution. Place the soiled dressing in the waste bag without allowing the dressing to touch the outside of the bag. 5. Procedural Step. Inspect the wound, and observe for the following: amount of healing; presence of inflammation; and presence of drainage, including the amount (scant, moderate, or profuse) and type of drainage. 6. Procedural Step. Open the pouch containing the sterile antiseptic swabs, and place it in a convenient location or hold it in your nondominant hand. 7. Procedural Step. Using the antiseptic swabs, apply the antiseptic to the wound. Apply the antiseptic from the top to the bottom of the wound, working from the center to the outside of the wound. Use a new swab for each motion. Discard each contaminated swab in the waste bag after use. Principle. The purpose of the antiseptic is to decrease the number of microorganisms in the wound. 8. Procedural Step. Remove the clean disposable gloves, and discard them in the waste bag without contaminating yourself. Sanitize your hands and prepare the sterile field using surgical asepsis. Items are either placed onto a sterile field or are contained in a prepackaged setup. Instruct the patient not to talk, laugh, sneeze, or cough over the sterile field. 9. Procedural Step. Open a package of sterile gloves, and apply them. 10. Procedural Step. Pick up the sterile dressing with your gloved hand or sterile forceps. Place the sterile dressing over the wound by lightly dropping it in place. Do not move the dressing once you have dropped it into place. Discard the gloves or forceps in the waste bag. 11. Procedural Step. Apply hypoallergenic adhesive tape to hold the dressing in place. The tape must be long enough to adhere to the skin, but not so long that it loosens when the patient moves. The strips of tape should be evenly spaced, with strips at each end of the dressing. 12. Procedural Step. Instruct the patient in wound care as follows: a. Provide the patient with written wound care instructions (see the patient teaching box on wound care in this chapter). b. Explain the wound care instructions, and ask the patient whether he or she has any questions. Tell the patient to keep the wound clean and dry and to contact the office if signs of infection occur such as excessive swelling, pain, or discharge. c. Ask the patient to sign the instruction sheet on the appropriate line. d. Witness the patient’s signature by signing your name in the appropriate space on the form. Include today’s date. e. Before the patient leaves the medical office, make a copy of the instruction sheet. Give a signed copy of the wound care instructions to the patient, and file the original in the patient’s medical record. 13. Procedural Step. Return the equipment. Tightly secure the bag containing the soiled dressing and contaminated articles, and dispose of it in a biohazard waste container. Principle. Contaminated items must be disposed of properly to prevent the spread of infection. 14. Procedural Step. Sanitize your hands. 15. Procedural Step. Chart the procedure. Include the date and time, location of the dressing, condition of the wound, type and amount of drainage, care of the wound, and any problems the patient experienced with the wound. Also chart the instructions given to the patient on wound care. Absorbable sutures consist of surgical gut (Surgigut) or synthetic materials, such as polyglycolic acid (Dexon), polyglactin 910 (Vicryl), polydioxanone (PDS II), polyglyconate (Maxon), and poliglecaprone (Monocryl), lactomer (Polysorb), and Caprosyn (Figure 25-7, A). Surgical gut is made from sheep or cow intestine. This type of suturing material is gradually digested by tissue enzymes and is absorbed by the body’s tissues 7 to 21 days after insertion, depending on the kind of surgical gut employed. Plain surgical gut has a rapid absorption time, whereas chromic surgical gut is treated to slow down its rate of absorption in the tissues. Absorbable sutures frequently are used to suture subcutaneous tissue, fascia, intestines, bladder, and peritoneum, and to ligate, or tie off, vessels. Because suturing of this type of tissue is generally done during surgery performed by the physician in the hospital with the patient under a general anesthetic, the medical office may not stock absorbable suture material.
Minor Office Surgery
LEARNING OBJECTIVES
PROCEDURES
Surgical Asepsis
Wound Healing
Change a sterile dressing.
Sutures
Medical Office Surgical Procedures
Assist the physician with minor office surgery.
Bandaging
Introduction to Minor Office Surgery
Surgical Asepsis
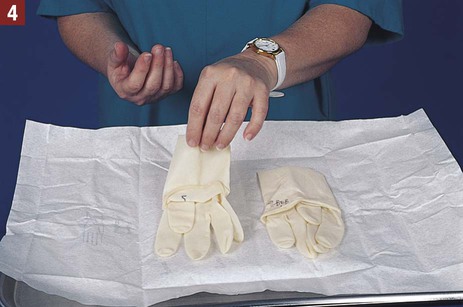
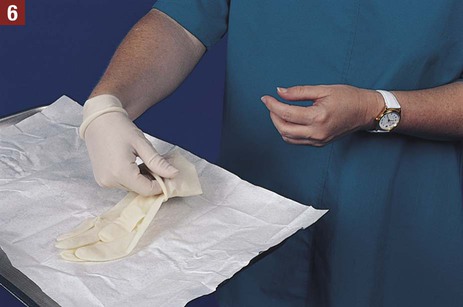
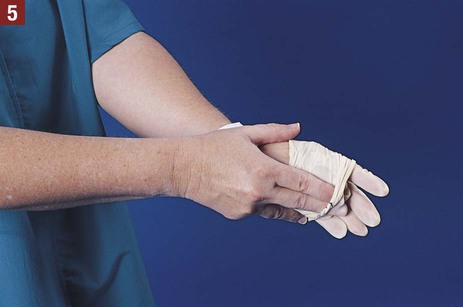
 Procedure 25-1 Applying and Removing Sterile Gloves

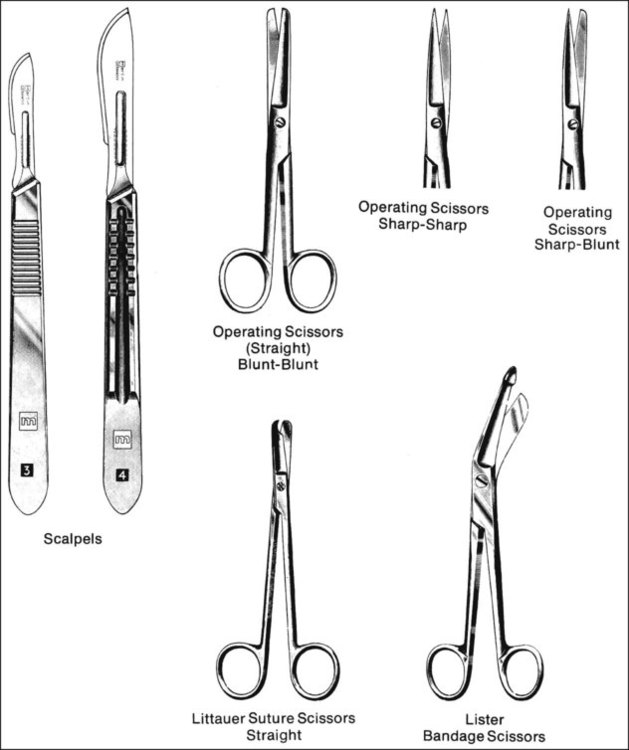
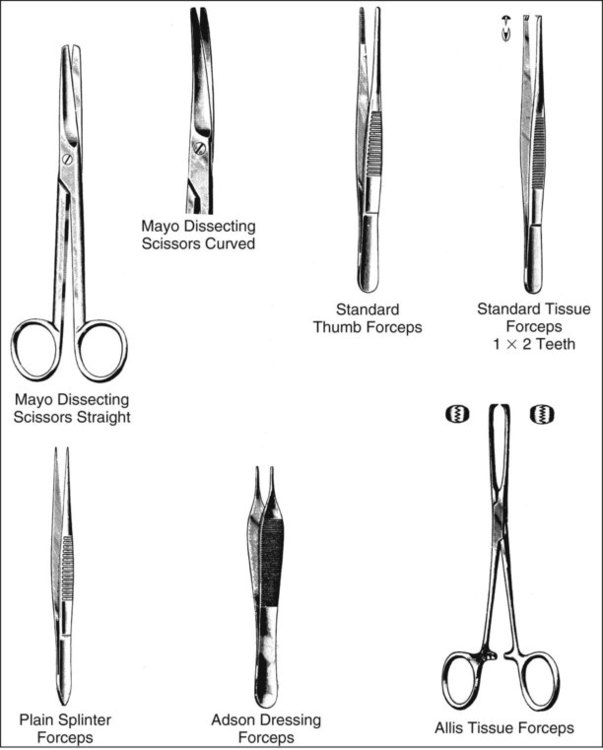
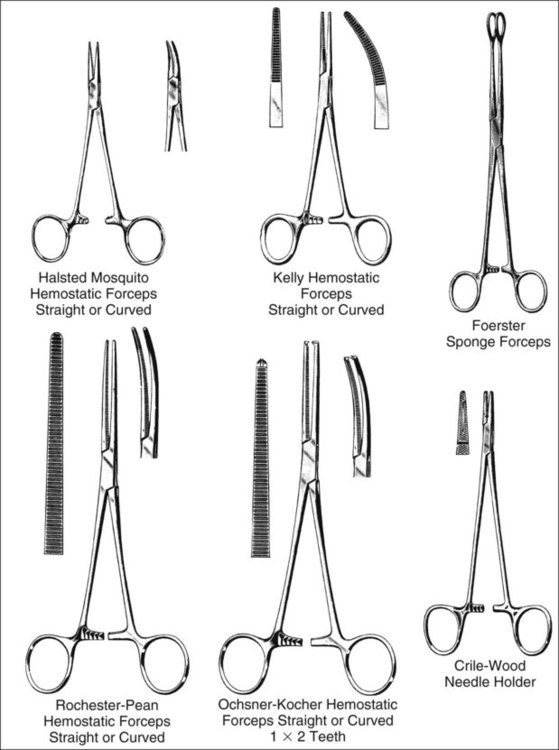
Instruments Used in Minor Office Surgery
Scissors
Forceps
Miscellaneous Instruments
 Needle holders have serrated tips, ring handles, ratchets, and box locks. A needle holder is used to firmly grasp a curved needle for insertion of the needle through the skin flaps of an incision. The serrated tips of a needle holder are designed to hold a curved needle securely without damaging it. A needle holder is sometimes referred to as a “driver” because it functions to “drive” the curved needle through the skin.
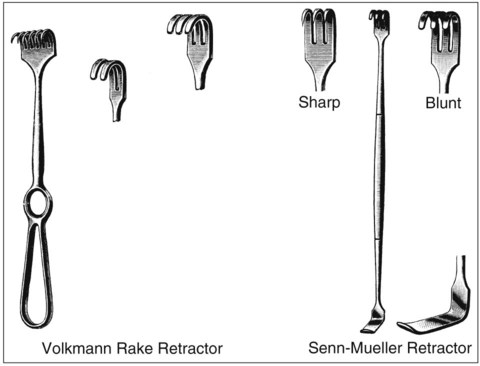
 Retractors are used to hold tissues aside to improve the exposure of the operative area.
Care of Surgical Instruments
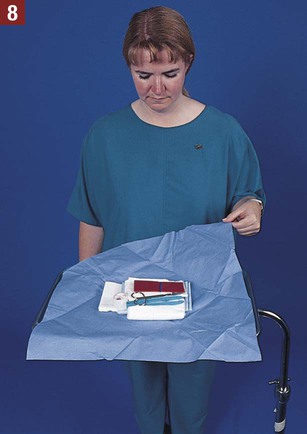
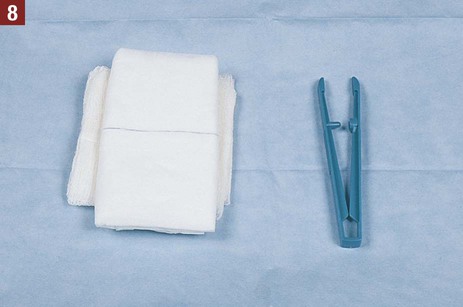
Commercially Prepared Sterile Packages
 Procedure 25-2 Opening a Sterile Package
 Procedure 25-3 Pouring a Sterile Solution
Wounds
Wound Healing
Phases of Wound Healing
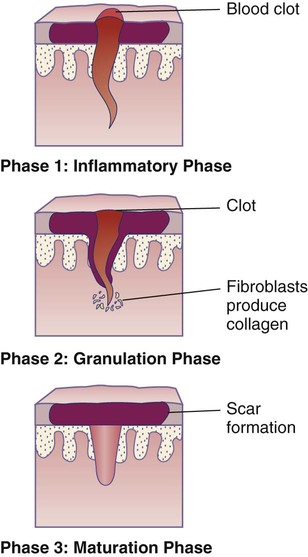
Phase 1

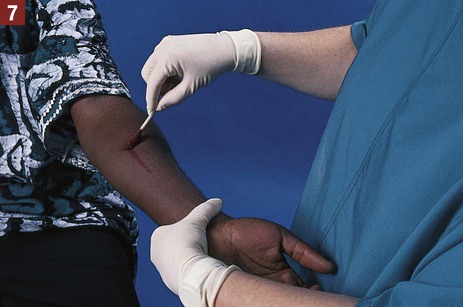
Sterile Dressing Change
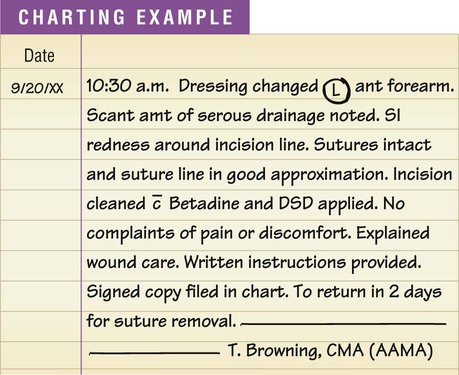
 Procedure 25-4 Changing a Sterile Dressing


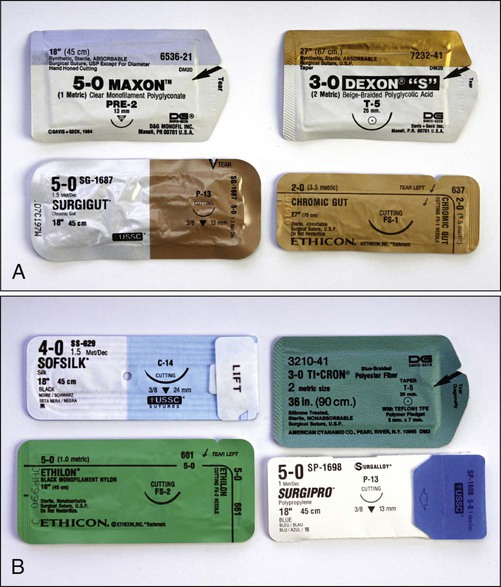
Sutures
Types of Sutures
![]()
Stay updated, free articles. Join our Telegram channel

Full access? Get Clinical Tree


Minor Office Surgery


Get Clinical Tree app for offline access
