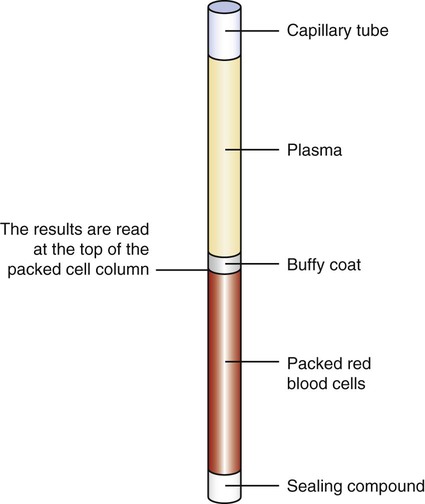
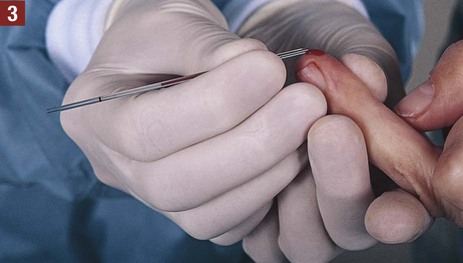
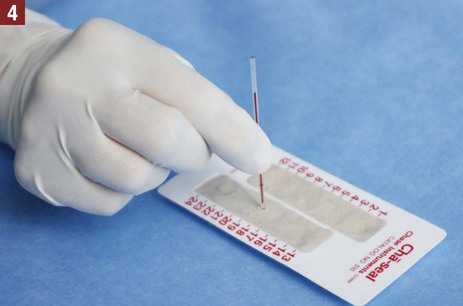
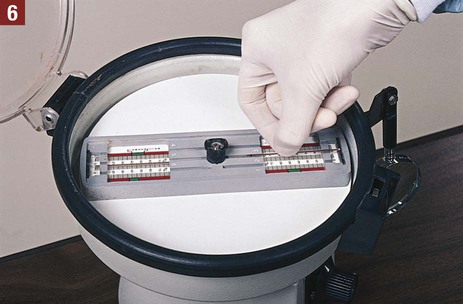
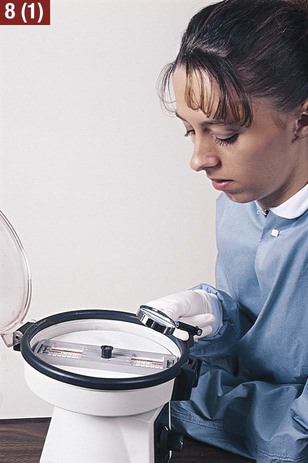
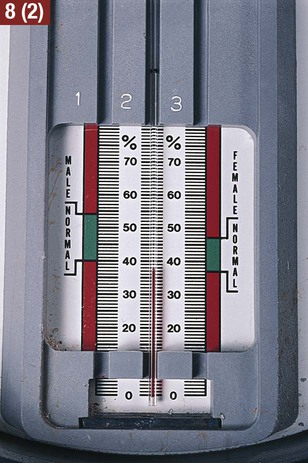
Hematology is the study of blood, including the morphologic appearance and function of blood cells and diseases of the blood and blood-forming tissues. Before beginning a study of this chapter, it is suggested that you review the components and function of blood presented in Chapter 12. An example of a laboratory report indicating the results of a CBC is presented in Figure 32-1. The hemoglobin determination can be performed on capillary or venous blood. Hemoglobin can be measured in the medical office using a hemoglobin analyzer. A hemoglobin analyzer permits processing of the specimen in a short time with accurate and reliable test results, allowing the physician to evaluate the condition while the patient is still at the medical office. Examples of CLIA-waived hemoglobin analyzers often used in the medical office include the Hemoglobin Hb 201+ Analyzer (HemoCue, Inc., Lake Forest, Calif.) and the Stat-Site Hgb Meter (Stanbio Laboratory, Boerne, Tex.) (Figure 32-2). One of the primary advantages of using a hemoglobin analyzer is that it requires only a finger puncture to perform the test rather than a venous blood specimen collected through a venipuncture. The manufacturer of each hemoglobin analyzer provides an operating manual (and sometimes an instructional video) with the instrument that includes information needed to perform quality control procedures, precautions to take when running the test, and information on storage and stability of the testing devices (e.g., testing cards or cuvettes) and control reagents, collection of the specimen, and the procedure for testing the specimen. It is important that the medical assistant become completely familiar with all aspects of the hemoglobin analyzer. Quality control procedures are of particular importance to ensure that the analyzer is functioning properly, and that test results are reliable and accurate. (Refer to Chapter 29, Quality Control, to review quality control guidelines for laboratory testing.) The hematocrit (Hct) is a simple, reliable, and informative test that is frequently performed in the medical office. The word hematocrit means “to separate blood.” The solid or cellular elements are separated from the plasma by centrifuging an anticoagulated blood specimen. The heavier red blood cells become packed and settle to the bottom of a tube. The top layer contains the clear, straw-colored plasma. Between the plasma and the packed red blood cells is a small, thin, yellowish-gray layer known as the buffy coat, which contains the platelets and white blood cells (Figure 32-3). The microhematocrit method is used most often in the medical office to perform a hematocrit determination. Through capillary action, blood is drawn directly from a free-flowing skin puncture into a disposable capillary tube lined with an anticoagulant. An anticoagulated blood specimen collected by venipuncture also can be used; through capillary action, the blood specimen is drawn into the capillary tube from the evacuated collection tube. After the specimen is collected, one end of the capillary tube is sealed with a commercially prepared sealing compound (e.g., Cha-Seal [Chase Scientific, Langley, Wash.], Seal-Ease [Becton Dickinson, Franklin Lakes, NJ]). The capillary tube is then placed in a microhematocrit centrifuge. The centrifuge spins the blood at an extremely high speed; only 3 to 5 minutes are required to pack the red blood cells. The results are read at the top of the packed cell column. Procedure 32-1 describes how to perform a hematocrit determination. Perform a hematocrit determination. 1. Procedural Step. Sanitize your hands. Greet the patient and introduce yourself. Identify the patient by full name and date of birth, and explain the procedure. 2. Procedural Step. Assemble equipment. Open the gauze packet. Cleanse the puncture site with an antiseptic wipe, and allow it to air-dry. Apply gloves and perform a finger puncture, then dispose of the lancet in a biohazard sharps container. 3. Procedural Step. Wipe away the first drop of blood with a gauze pad. Fill the first capillary tube by holding one end of it horizontally, but slightly downward, next to the free-flowing puncture. Keep the tip of the capillary tube in the blood, but do not allow it to press against the patient’s skin. Calibrated tubes are filled to the calibration line; uncalibrated tubes are filled approximately three quarters (within 10 to 20 mm of the end of the tube). The blood is drawn into the tube through capillary action. Fill a second tube using the method just described. Place a gauze pad over the puncture site and apply pressure. 4. Procedural Step. Push the dry end of the tube (end opposite the filling end that does not contain blood) down into the sealing compound. This seals the end of the capillary tube. The sealing compound can be used to hold the capillary tubes until they are ready to be placed in the microhematocrit centrifuge. To do this, the sealing compound should be placed on a flat surface with the tubes in a vertical position. Before removing a capillary tube from the sealing compound, rotate the tube between the thumb and index finger to prevent the sealing compound from pulling out when the tube is lifted out of the sealing compound. 5. Procedural Step. Check the patient’s puncture site for bleeding and apply an adhesive bandage, if needed. 6. Procedural Step. Place the capillary tubes in the microhematocrit centrifuge with the sealed end facing out. Balance one tube with the other capillary tube placed on the opposite side of the centrifuge. 7. Procedural Step. Place the cover on the centrifuge, and lock it securely. Centrifuge the blood specimen for 3 to 5 minutes at a speed of 10,000 rpm. 8. Procedural Step. Allow the centrifuge to come to a complete stop. Read the results, as follows: Calibrated tube. If a capillary tube with a calibration line was used, read the results using the special graphic reading device that is part of the centrifuge. Adjust the capillary tube so that the bottom of the red blood cell column (just above the sealing compound) is placed on the 0 line. With a magnifying glass, read the results at the top of the packed red blood cell column, and you will see a percentage on the reading device. Uncalibrated tube. If an uncalibrated tube was used, you must use a microhematocrit reader card to determine the results; place the top of the plasma column on the 100% mark and the bottom of the cell column on the 0 line. Read the results on the scale, which corresponds to the top of the packed cell column. Principle. Stopping the centrifuge with your hands can injure you and can damage the machine. 9. Procedural Step. Read the second tube in the manner just described; the results of the tubes should agree within 4 percentage points. If not, the hematocrit procedure must be repeated. If they are within 4 percentage points, the two values are averaged to derive the test results. 10. Procedural Step. Properly dispose of the capillary tubes in a biohazard sharps container. Remove gloves and sanitize your hands. Chart the results. Include the date and time and the hematocrit results. 11. Procedural Step. Return the equipment to its proper storage place. Store the sealing compound at room temperature. Exposing it to a temperature above 80° F adversely affects its consistency.
Hematology
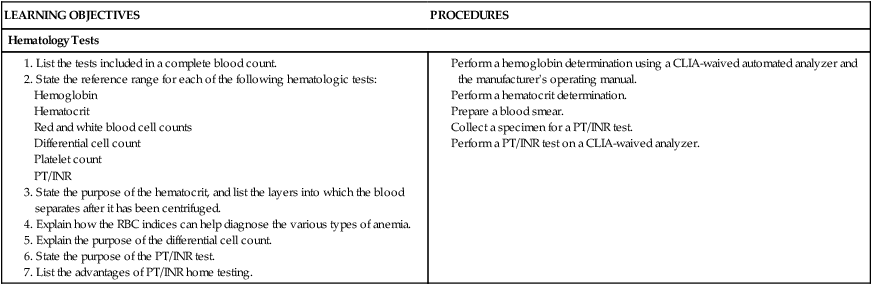
Introduction to Hematology
Hemoglobin Determination

Hematocrit
 Procedure 32-1 Hematocrit


Hematology


Get Clinical Tree app for offline access