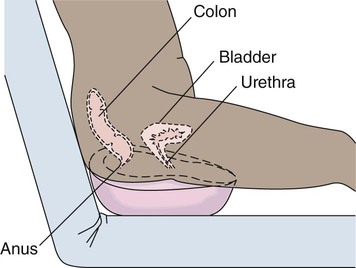
• Define the key terms and key abbreviations listed in this chapter. • Describe the rules for normal urination. • Identify the observations to report to the nurse. • Describe urinary incontinence and the care required. • Explain why catheters are used. • Explain how to care for persons with catheters. • Describe the bladder training methods. • Perform the procedures described in this chapter. • Explain how to promote PRIDE in the person, the family, and yourself. See Promoting Safety and Comfort: Assisting With Urinary Elimination. Some persons need help getting to the bathroom. Others use bedpans, urinals, or commodes. Follow the rules in Box 18-1 and the person’s care plan. See Focus on Communication: Normal Urination. Normal urine is pale yellow, straw-colored, or amber (Fig. 18-1). It is clear with no particles. A faint odor is normal. Observe urine for color, clarity, odor, amount, particles, and blood. Ask the nurse to observe urine that looks or smells abnormal. Report these problems. • Dysuria—painful or difficult (dys) urination (uria) • Hematuria—blood (hemat) in the urine (uria) • Nocturia—frequent urination (uria) at night (noc) • Oliguria—scant amount (olig) of urine (uria); less than 500 mL in 24 hours • Polyuria—abnormally large amounts (poly) of urine (uria) • Urinary frequency—voiding at frequent intervals • Urinary incontinence—the involuntary loss or leakage of urine • Urinary retention—the inability to void The standard bedpan is shown in Figure 18-2. The wide rim is placed under the buttocks. A fracture pan has a thin rim. It is only about ½-inch deep at one end (see Fig. 18-2). The smaller end is placed under the buttocks (Fig. 18-3). Fracture pans are used: See Delegation Guidelines: Bedpans. See Promoting Safety and Comfort: Bedpans. See procedure: Giving the Bedpan, p. 274. 7. Lower the bed rail near you. 8. Lower the head of the bed. Position the person supine. Or raise the head of the bed slightly for the person’s comfort. 9. Fold the top linens and gown out of the way. Keep the lower body covered. 10. Ask the person to flex the knees and raise the buttocks by pushing against the mattress with his or her feet. 11. Slide your hand under the lower back. Help raise the buttocks. If using a waterproof pad, place it under the person’s buttocks. 12. Slide the bedpan under the person (Fig. 18-4). 13. If the person cannot assist in getting on the bedpan: a. Place the waterproof pad under the person’s buttocks if using one. b. Turn the person onto the side away from you. c. Place the bedpan firmly against the buttocks (Fig. 18-5). d. Hold the bedpan securely. Turn the person onto his or her back. 15. Raise the head of the bed so the person is in a sitting position (Fowler’s position) if the person uses a standard bedpan. (Note: Some state competency tests require that you remove gloves and wash your hands before raising the head of the bed.) 16. Make sure the person is correctly positioned on the bedpan (Fig. 18-6). 17. Raise the bed rail if used. 18. Place the toilet tissue and call light within reach. (Note: Some state competency tests require that you ask the person to use hand wipes to clean the hands after wiping with toilet tissue.) 19. Ask the person to signal when done or when help is needed. 20. Remove and discard the gloves. Practice hand hygiene. 21. Leave the room and close the door. 22. Return when the person signals. Or check on the person every 5 minutes. Knock before entering. 23. Practice hand hygiene. Put on gloves. 24. Raise the bed for body mechanics. Lower the bed rail (if used) and lower the head of the bed. 25. Ask the person to raise the buttocks. Remove the bedpan. Or hold the bedpan and turn him or her onto the side away from you. 26. Clean the genital area if the person cannot do so. Clean from front (urethra) to back (anus) with toilet tissue. Use fresh tissue for each wipe. Provide perineal care if needed. Remove and discard the waterproof pad if using one. 27. Cover the bedpan. Take it to the bathroom. Raise the bed rail (if used) before leaving the bedside. 28. Note the color, amount, and character of urine or feces. 29. Empty the bedpan contents into the toilet and flush. 30. Rinse the bedpan. Pour the rinse into the toilet and flush. 31. Clean the bedpan with a disinfectant. Pour disinfectant into the toilet and flush. 32. Remove and discard soiled gloves. Practice hand hygiene and put on clean gloves. 33. Return the bedpan and clean cover to the bedside stand. 34. Help the person with hand washing. (Wear gloves for this step.) 36. Provide for comfort. (See the inside of the front cover.) 37. Place the call light within reach. 38. Lower the bed to a comfortable and safe level appropriate for the person. Follow the care plan. 39. Raise or lower bed rails. Follow the care plan. 41. Complete a safety check of the room. (See the inside of the front cover.) 42. Follow agency policy for soiled linen. Men use urinals to void (Fig. 18-7). Plastic urinals have caps and hook-type handles. The urinal hooks to the bed rail within the man’s reach. He stands to use the urinal if possible. Or he sits on the side of the bed or lies in bed to use it. Some men need support when standing. You may have to place and hold the urinal for some men. Some beds may not have bed rails. Follow agency policy for where to place urinals. See Focus on Communication: Urinals. See Delegation Guidelines: Urinals. See Promoting Safety and Comfort: Urinals. See procedure: Giving the Urinal. 7. Give him the urinal if he is in bed. Remind him to tilt the bottom down to prevent spills. a. Help him sit on the side of the bed. b. Put non-skid footwear on him. c. Help him stand. Provide support if he is unsteady. 9. Position the urinal if necessary. Place his penis in the urinal if he cannot do so. 10. Place the call light within reach. Ask him to signal when done or when he needs help. 12. Remove and discard the gloves. Practice hand hygiene. 13. Leave the room and close the door. 14. Return when he signals for you. Or check on him every 5 minutes. Knock before entering. 15. Practice hand hygiene. Put on gloves. 16. Close the cap on the urinal. Take it to the bathroom. 17. Note the color, amount, and clarity of urine. 18. Empty the urinal into the toilet and flush. 19. Rinse the urinal with cold water. Pour rinse into the toilet and flush. 20. Clean the urinal with a disinfectant. Pour disinfectant into the toilet and flush. 21. Return the urinal to its proper place. 22. Remove and discard the soiled gloves. Practice hand hygiene and put on clean gloves. 25. Provide for comfort. Pour disinfectant into the toilet. (See the inside of the front cover.) 26. Place the call light within reach. 27. Raise or lower bed rails. Follow the care plan. 29. Complete a safety check of the room. (See the inside of the front cover.) 30. Follow agency policy for soiled linen. A commode is a chair or wheelchair with an opening for a container (Fig. 18-8). Persons unable to walk to the bathroom often use commodes. The commode allows a normal position for elimination. The commode arms and back provide support and help prevent falls. See Delegation Guidelines: Commodes, p. 278. See Promoting Safety and Comfort: Commodes, p. 278. See procedure: Helping the Person to the Commode, p. 278. 6. Bring the commode next to the bed. 7. Help the person sit on the side of the bed. Lower the bed rail if used. 8. Help him or her put on a robe and non-skid footwear. 10. Assist the person to the commode. Use the transfer belt. 11. Remove the transfer belt. Cover the person with a bath blanket for warmth. 12. Place the toilet tissue and call light within reach. 13. Ask him or her to signal when done or when help is needed. (Stay with the person if necessary. Be respectful. Provide as much privacy as possible.) 14. Remove and discard the gloves. Practice hand hygiene. 15. Leave the room. Close the door. 16. Return when the person signals. Or check on the person every 5 minutes. Knock before entering. 17. Practice hand hygiene. Put on the gloves. 18. Help the person clean the genital area as needed. Remove and discard the gloves. Practice hand hygiene. 19. Apply the transfer belt. Help the person back to bed using the transfer belt. Remove the transfer belt, robe, and footwear. Raise the bed rail if used. 20. Put on clean gloves. Remove and cover the commode container. 21. Take the container to the bathroom. 22. Observe urine and feces for color, amount, and character. 23. Empty the contents into the toilet and flush. 24. Rinse the container. Pour the rinse into the toilet and flush. 25. Clean and disinfect the container. Pour disinfectant into the toilet and flush. 26. Return the container to the commode. Close the lid on the commode. Clean other parts of the commode if necessary. 27. Return supplies to their proper place. 28. Remove and discard the soiled gloves. Practice hand hygiene and put on clean gloves.
Assisting With Urinary Elimination
Normal Urination
Observations
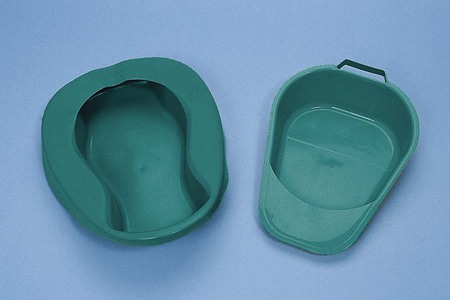
 Bedpans
 Giving the Bedpan
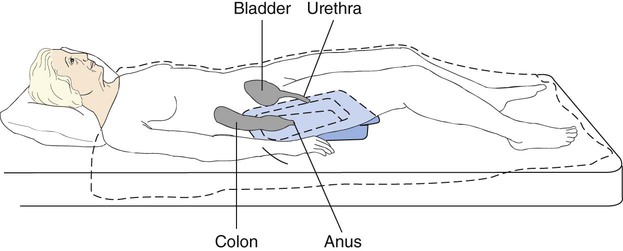


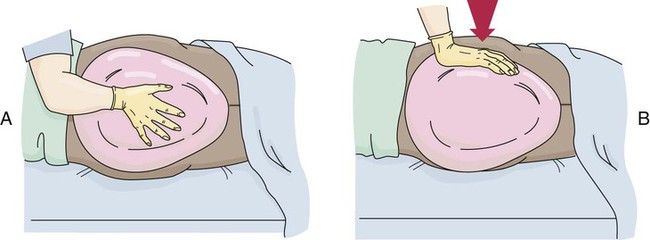
A, Position the person on the side away from you. Place the bedpan firmly against the buttocks. B, Push downward on the bedpan and toward the person.
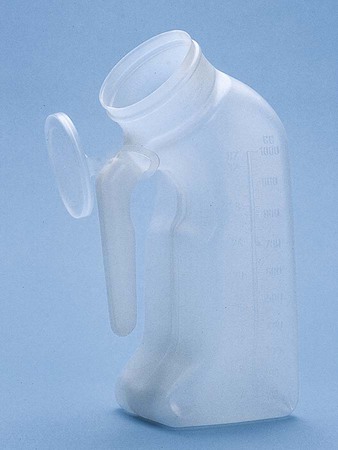
 Urinals
 Giving the Urinal
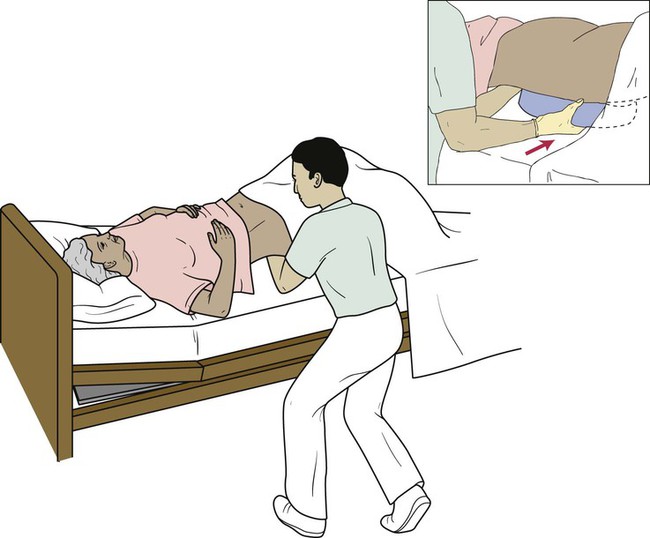
 Commodes
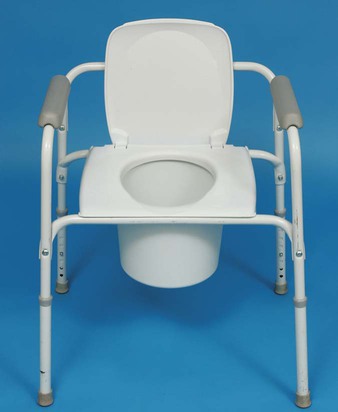
 Helping the Person to the Commode
![]()
Stay updated, free articles. Join our Telegram channel

Full access? Get Clinical Tree