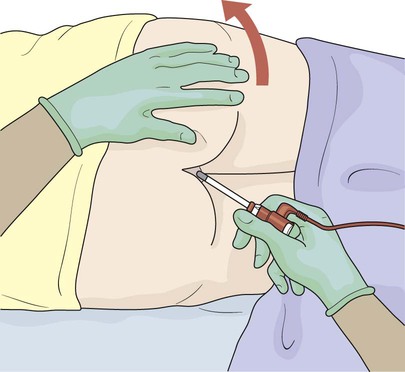
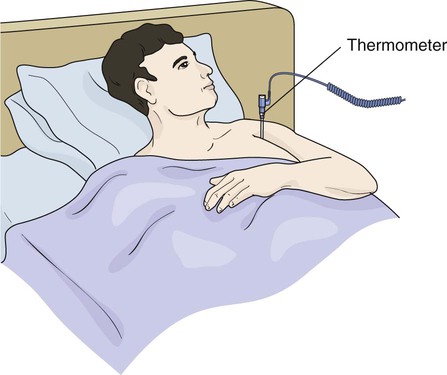
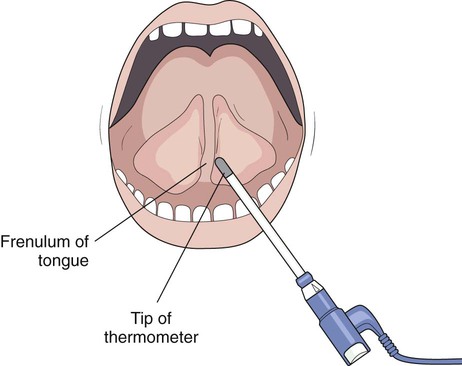
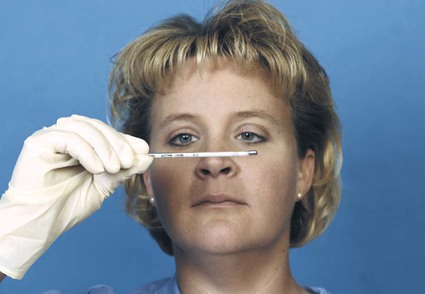
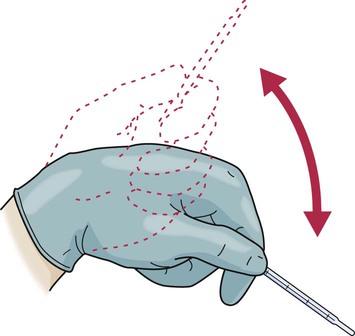
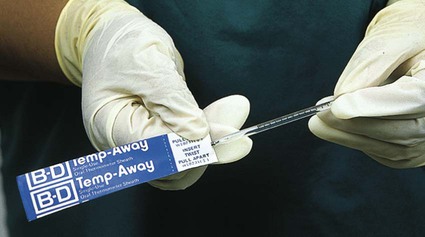
• Define the key terms and key abbreviations listed in this chapter. • Explain why vital signs are measured. • List the factors affecting vital signs. • Identify the normal ranges for each temperature site. • Explain when to use each temperature site. • Explain how to use thermometers. • Describe a normal pulse and normal respirations. • Describe the practices to follow when measuring blood pressure. • Describe the 4 types of pain. • Explain why pain is personal. • List the signs and symptoms of pain. • Identify the fluids counted as intake and the fluids counted as output. • Explain how to prepare the person for weight and height measurements. • Explain how you assist with assessment. • Perform the procedures described in this chapter. • Explain how to promote PRIDE in the person, the family, and yourself. Vital signs are often called TPR (temperature, pulse, and respirations) and BP (blood pressure). A person’s vital signs vary within certain limits. Box 21-1 lists the factors affecting vital signs. See Focus on Communication: Vital Signs. See Focus on Older Persons: Vital Signs. Body temperature is the amount of heat in the body. It is a balance between the amount of heat produced and the amount lost by the body. Heat is produced as cells use food for energy. It is lost through the skin, breathing, urine, and feces. Body temperature stays fairly stable. It is lower in the morning and higher in the afternoon and evening. See Box 21-1 for the factors affecting body temperature. Temperature sites are the mouth, rectum, axilla (underarm), tympanic membrane (ear), and temporal artery (forehead) (Box 21-2). Each site has a normal range (Table 21-1). Fever means an elevated body temperature. Always report temperatures that are above or below the normal range. TABLE 21-1 See Focus on Communication: Temperature Sites. See Focus on Older Persons: Temperature Sites. See Promoting Safety and Comfort: Temperature Sites. Follow the manufacturer’s instructions and agency procedures to use, clean, and store thermometers. • Electronic thermometers are battery operated. The temperature is shown on the front of the device. See “Electronic Thermometers.” • Standard electronic thermometer—measures body temperature at the oral, rectal, and axillary sites. See Figure 21-1, A. • Tympanic membrane thermometer—measures body temperature at the tympanic membrane in the ear (Fig. 21-1, B). • Temporal artery thermometer—measures body temperature at the temporal artery in the forehead (Fig. 21-1, C). • Digital thermometer—measures body temperature at the oral, rectal, and axillary sites. Depending on the type, the temperature is measured in 6 to 60 seconds. See Figure 21-1, D. • Glass thermometers have a hollow glass tube and a bulb tip (Fig. 21-1, E). The device is filled with a substance. When heated, the substance expands and rises in the tube. When cooled, the substance contracts and moves down the tube. See “Glass Thermometers” on p. 336. Electronic thermometers are commonly used. Probe covers or caps prevent the spread of infection. Electronic thermometers have batteries. Some are kept in chargers when not in use. • Standard electronic thermometers (see Fig. 21-1, A) measure temperature in a few seconds. They have oral (blue) and rectal (red) probes. The oral (blue) probe is used for axillary temperatures. • Tympanic membrane thermometers measure temperature in 1 to 3 seconds. They are comfortable and not invasive. There are fewer microbes in the ear than in the mouth or rectum. The risk of spreading infection is reduced. To use one, gently insert the covered probe into the ear (see Fig. 21-1, B). • Temporal artery thermometers measure body temperature in 3 to 4 seconds. Non-invasive, they measure the temperature of the blood in the temporal artery. It is the same temperature of the blood coming from the heart. To use one: 1. Use the side of the head that is exposed. Do not use the side covered by hair, a dressing, a hat, or other covering. Do not use the side that was on a pillow. 2. Place a disposable cap or cover on the thermometer. 3. Place the device in the center of the forehead. 5. Slide the device across the forehead and across the temporal artery (see Fig. 21-1, C). See Focus on Older Persons: Electronic Thermometers. See procedure: Taking a Temperature With an Electronic Thermometer, p. 334. 1. Follow Delegation Guidelines: Taking Temperatures, p. 333. See Promoting Safety and Comfort: Taking Temperatures, p. 333. 2. For an oral temperature, ask the person not to eat, drink, smoke, or chew gum for at least 15 to 20 minutes before the measurement or as required by agency policy. • Thermometer—electronic or tympanic membrane • Probe (blue for an oral or axillary temperature; red for a rectal temperature) • Toilet tissue (rectal temperature) • Water-soluble lubricant (rectal temperature) 5. Plug the probe into the thermometer if using a standard electronic thermometer. 7. Identify the person. Check the identification (ID) bracelet against the assignment sheet. Also call the person by name. 8. Provide for privacy. Position the person for an oral, rectal, axillary, or tympanic membrane temperature. The Sims’ position is used for a rectal temperature. 9. Put on gloves if contact with blood, body fluids, secretions, or excretions is likely. 10. Insert the probe into a probe cover. a. Ask the person to open the mouth and raise the tongue. b. Place the covered probe at the base of the tongue and to 1 side (Fig. 21-2). a. Put a small amount of lubricant on a tissue. b. Lubricate the end of the covered probe. e. Insert the probe ½ inch into the rectum (Fig. 21-3). 13. For an axillary temperature: a. Help the person remove an arm from the gown. Do not expose the person. b. Dry the axilla with the towel. c. Place the covered probe in the center of the axilla (Fig. 21-4). d. Place the person’s arm over the chest. 14. For a tympanic membrane temperature: a. Ask the person to turn his or her head so the ear is in front of you. b. Pull up and back on the adult’s ear to straighten the ear canal (Fig. 21-5). 16. Hold the probe in place until you hear a tone or see a flashing or steady light. 17. Read the temperature on the display. 18. Remove the probe. Press the eject button to discard the cover. 19. Note the person’s name, temperature, and temperature site on your note pad or assignment sheet. 20. Return the probe to the holder. 21. Help the person put the gown back on (axillary temperature). For a rectal temperature: 22. Provide for comfort. (See the inside of the front cover.) 23. Place the call light within reach. 25. Complete a safety check of the room. (See the inside of the front cover.) 26. Return the thermometer to the charging unit. 28. Report and record the temperature. Note the temperature site when reporting and recording. Report an abnormal temperature at once. Long- or slender-tip thermometers are used for oral and axillary temperatures. So are thermometers with stubby and pear-shaped tips. Rectal thermometers have stubby tips. See Figure 21-6. Glass thermometers are color-coded. Glass thermometers are re-usable. However, the following are problems. • They take a long time to register—3 to 10 minutes depending on the site. • They break easily. Broken rectal thermometers can injure the rectum and colon. • The person may bite down and break an oral thermometer. Cuts in the mouth are risks. If the thermometer contains mercury, swallowed mercury can cause mercury poisoning. See Box 21-3 for how to use and read glass thermometers. Box 21-3 Glass Thermometers • Fahrenheit thermometers (see Fig. 21-6, A and C): • Centigrade thermometers (see Fig. 21-6, B): • To read a glass thermometer: • Hold it at the stem (Fig. 21-7). Bring it to eye level. • Turn it until you can see the numbers and the long and short lines. • Turn it back and forth slowly until you can see the silver or red line. • Read the nearest degree (long line). • Read the nearest tenth of a degree (short line)—an even number on a Fahrenheit thermometer. • Follow Standard Precautions and the Bloodborne Pathogen Standard. • Use the person’s thermometer. • Use a rectal thermometer only for rectal temperatures. • Rinse the thermometer under cold, running water if it was soaking in a disinfectant. Dry it from the stem to the bulb end with tissues. • Check the thermometer for breaks, cracks, and chips. Discard it following agency policy if it is broken, cracked, or chipped. • Shake down the thermometer to move the substance down in the tube. Hold it at the stem and stand away from the walls, tables, or other hard surfaces. Flex and snap your wrist until the substance is below 94°F or 34°C. See Figure 21-8. • Insert the thermometer into a plastic cover (Fig. 21-9). Remove the cover to read the device. Discard the cover after use. • Clean and store the thermometer following agency policy. Wipe it with tissues first to remove mucus, feces, or sweat. Do not use hot water. It causes the substance to expand so much that the thermometer could break. After cleaning, rinse the thermometer under cold, running water. Then store it in a container with a disinfectant solution. • Provide for privacy. The buttocks and anus are exposed. The procedure embarrasses many people. • Lubricate the bulb end of the rectal thermometer for easy insertion and to prevent injury. • Hold the device in place so it is not lost into the rectum or broken. • Leave the thermometer in the rectum for 2 minutes or as required by agency policy. See Promoting Safety and Comfort: Glass Thermometers. See procedure: Taking a Temperature With a Glass Thermometer, p. 338. 1. Follow Delegation Guidelines: Taking Temperatures, p. 333. See Promoting Safety and Comfort: 2. For an oral temperature, ask the person not to eat, drink, smoke, or chew gum for at least 15 to 20 minutes before the measurement or as required by agency policy. • Oral or rectal thermometer and holder • Toilet tissue (rectal temperature) • Water-soluble lubricant (rectal thermometer) 6. Identify the person. Check the ID bracelet against the assignment sheet. Also call the person by name. 9. Rinse the thermometer under cold running water if it was soaking in a disinfectant. Dry it with tissues. 10. Check for breaks, cracks, or chips. 11. Shake down the thermometer below the lowest number. Hold the device by the stem. 12. Insert it into a plastic cover if used. a. Ask the person to moisten his or her lips. b. Place the bulb end of the thermometer under the tongue and to 1 side (see Fig. 21-2). c. Ask the person to close the lips around the thermometer to hold it in place. d. Ask the person not to talk. Remind the person not to bite down on the thermometer. e. Leave it in place for 2 to 3 minutes or as required by agency policy.
Assisting With Assessment
Vital Signs
Body Temperature
Temperature Sites.
Site
Baseline
Normal Range
Oral
98.6°F (37.0°C)
97.6°F to 99.6°F
(36.5°C to 37.5°C)
Rectal
99.6°F (37.5°C)
98.6°F to 100.6°F
(37.0°C to 38.1°C)
Axillary
97.6°F (36.5°C)
96.6°F to 98.6°F
(35.9°C to 37.0°C)
Tympanic membrane
98.6°F (37.0°C)
98.6°F (37.0°C)
Temporal artery
99.6°F (37.5°C)
99.6°F (37.5°C)
Thermometers.
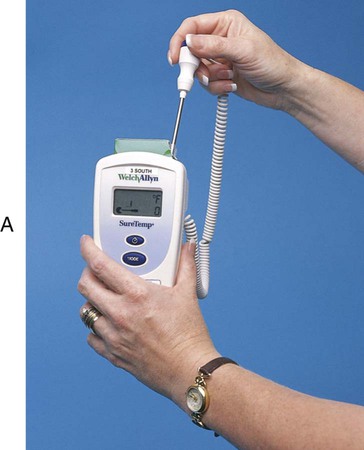
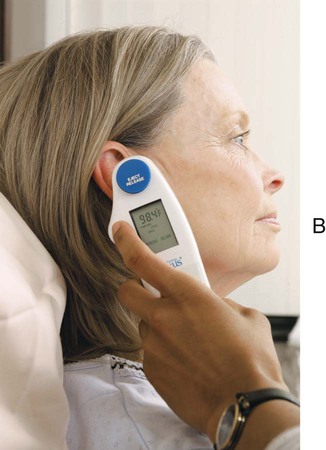
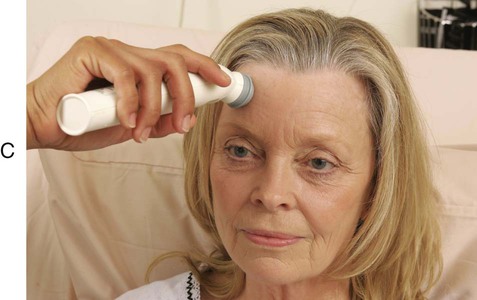
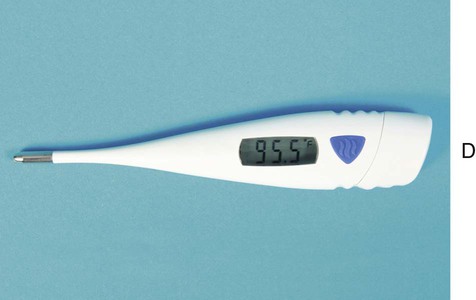

A, Standard electronic thermometer. B, Tympanic membrane thermometer. C, Temporal artery thermometer. D, Digital thermometer. E, Glass thermometer.
 Electronic Thermometers.
 Taking a Temperature With an Electronic Thermometer


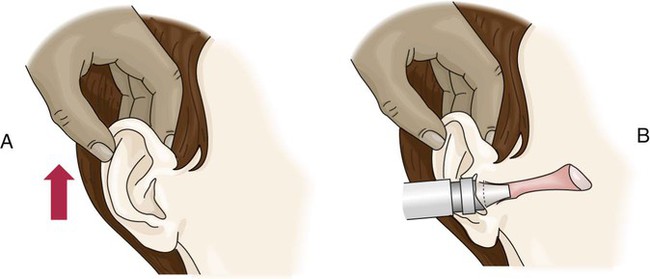
A, The ear is pulled up and back. B, The probe is inserted into the ear canal.
 Glass Thermometers.
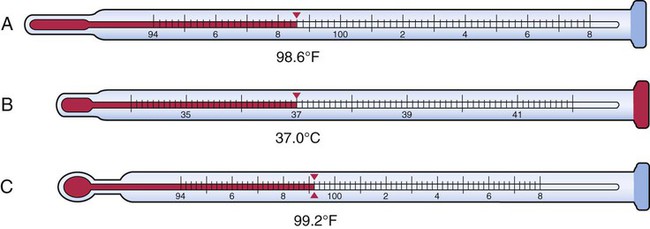
A, A Fahrenheit thermometer with a long or slender tip. The temperature measurement is 98.6°F. B, Centigrade thermometer with a stubby tip (rectal thermometer). The temperature measurement is 37.0°C. C, Fahrenheit thermometer with a pear-shaped tip. The temperature measurement is 99.2°F.
 Taking a Temperature With a Glass Thermometer
![]()
Stay updated, free articles. Join our Telegram channel

Full access? Get Clinical Tree


Assisting With Assessment
Get Clinical Tree app for offline access