Urinalysis
Objectives
After completing this chapter you should be able to:
Fundamental Concepts
1. Demonstrate an understanding of the urinary system.
2. Describe urine formation, renal threshold, the flow of urine, and the composition of urine.
3. Discuss the importance of urinalysis.
4. Define medical terms related to the urinary system.
6. Properly handle and dispose of urine specimens according to the most current OSHA safety guidelines.
7. Educate the patient in the proper method of urine collection.
CLIA-Waived Tests
1. Describe the three parts of urinalysis: physical, chemical, and microscopic.
2. State the tests involved in physical urinalysis.
3. Recognize the diseases that cause abnormal results in a physical urinalysis.
5. List the 10 tests that can be performed with Multistix urine chemistry test strips.
6. Correlate various pathological conditions with abnormal results on chemistry strips.
9. Apply the correct quality control for physical and chemical urinalysis testing.
10. Follow the most current OSHA safety guidelines when performing a physical and chemical urinalysis.
Advanced Concepts
1. Describe the standardized urine microscopic method (e.g., Kova).
2. Perform a microscopic urinalysis setup according to the conditions required.
3. Follow the most current OSHA safety guidelines when setting up a microscopic urinalysis.
4. Recognize the various elements in normal and abnormal urine microscopic sediment.
5. Correlate abnormal microscopic results with certain pathological conditions.
6. Correlate the results of the physical, chemical, and microscopic urinalysis.
Key Terms
anuria no flow of urine
Bence Jones protein protein found in the urine of patients with multiple myeloma
bilirubin waste product from the breakdown of hemoglobin
casts elements excreted in the urine in the shape of the renal tubules and ducts
diuresis increase in the volume of urine output
dysuria painful urination
glomerular (Bowman’s) capsule cup-shaped structure surrounding the glomerulus that collects the glomerular filtrate
glycosuria sugars (especially glucose) in the urine
hematuria intact red blood cells in the urine
hemolysis red cells breaking open and releasing hemoglobin
iatrogenic caused by treatment or diagnostic procedures
ketonuria ketones in the urine
lipiduria lipids in the urine
lyse to break open
micturition expelling of urine, also referred to as voiding and urination
nephron functional unit of the kidney
nocturia excessive urination at night
oliguria decrease in the volume of urine output
pH scale that measures the level of acidity or alkalinity of a solution
polyuria passing abnormally large amounts of urine
porphyrin intermediate substance in the formation of heme (part of hemoglobin)
proteinuria proteins in the urine
pyuria white blood cells in the urine
reducing substance substance that easily loses electrons
renal corpuscle part of the nephron that contains the glomerulus and glomerular capsule
renal threshold level blood reabsorption limit of a substance and the point at which the substance is then excreted in the urine
renal tubules parts of the nephron composed of proximal convoluted tubules, the nephron loop (loop of Henle), and distal convoluted tubules
retroperitoneal located behind the peritoneal cavity
sediment the material at the bottom of the centrifuged tube of urine
specific gravity in urinalysis the weight of urine compared with the weight of an equal volume of water; measures the amount of dissolved substances in urine
supernatant the liquid portion of urine on top of the spun sediment
urethra tube that carries urine to the outside of the body
urethral meatus urethral opening through which urine is expelled
urinary bladder hollow muscular organ that holds urine until it is expelled
 FUNDAMENTAL CONCEPTS AND COLLECTION PROCEDURES
Anatomy of the Urinary System
Before the results of urine testing can be interpreted, the overall anatomy and function of the urinary system must be understood.
Function of the Urinary System
The urinary system has the following functions:
Structures of the Urinary System
The urinary system consists of the kidneys, ureters, urinary bladder, and urethra (Fig. 3-1).
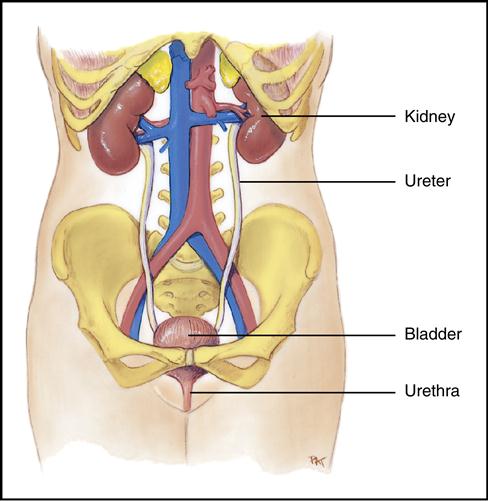
Kidneys
Each person normally has two kidneys (Fig. 3-2), which are reddish-brown, bean-shaped organs. The kidneys are 4 to 5 inches long and are located in the retroperitoneal space (behind the peritoneal cavity) slightly above the waistline in the posterior wall of the abdominal cavity. The kidney is composed of three main sections: the cortex, which is the outer part; the medulla, which is the middle area; and the renal pelvis, which is the hollow inner area.
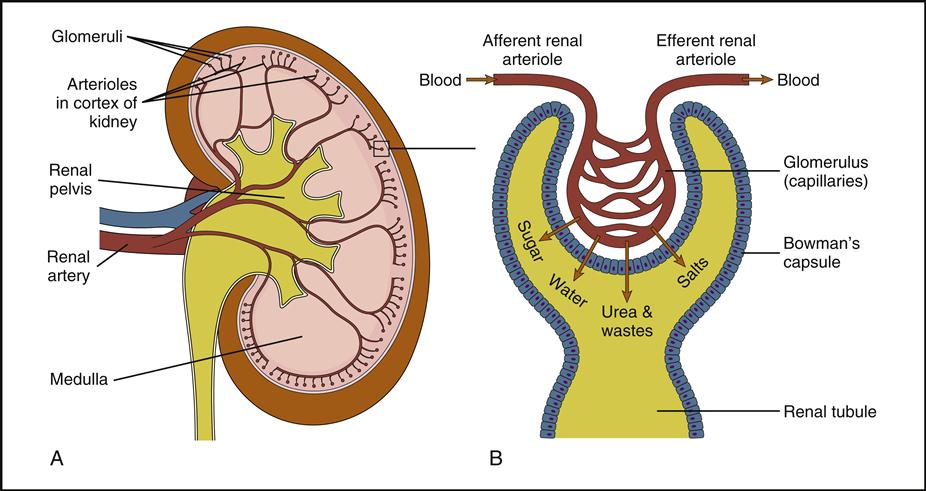
The functional unit of the kidney is the microscopic nephron (Fig. 3-3), located within the cortex and medulla of the kidney. Approximately 1 million nephrons are in each kidney. The nephrons filter waste substances from the blood and simultaneously maintain the essential water and electrolyte balance of the body. The structural components of the nephron are the renal corpuscle and renal tubules.
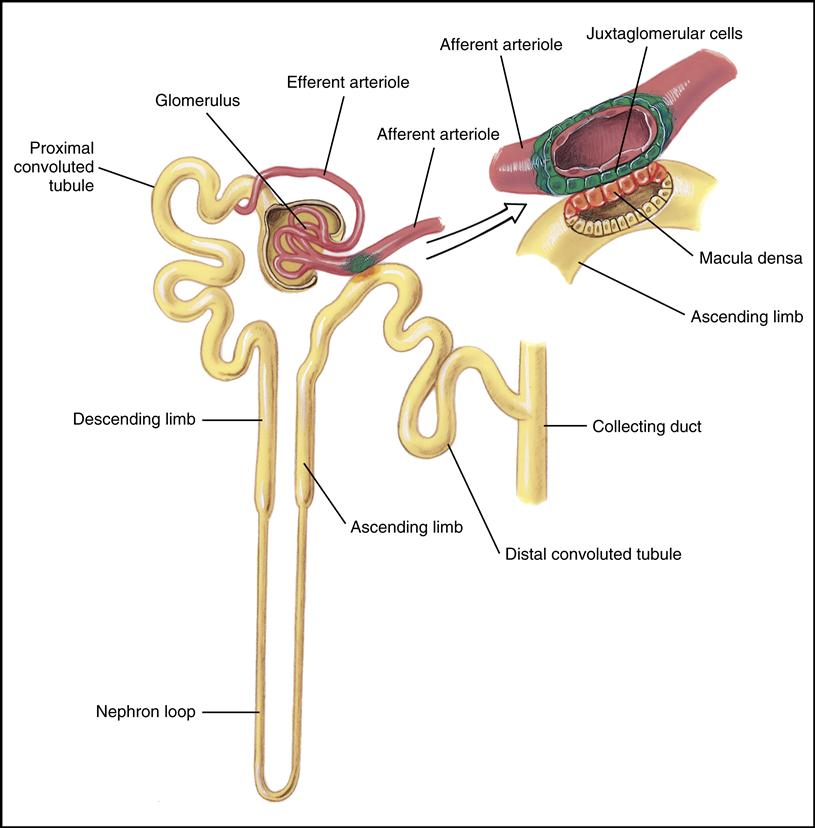
The renal corpuscle consists of two structures: the glomerulus and the glomerular (Bowman’s) capsule. The glomerulus is made up of tangled blood capillaries in which the hydrostatic pressure in the capillaries pushes substances through the capillary pores. The filtered substance is called the glomerular filtrate, and it is collected in the glomerular (Bowman’s) capsule, a cup-shaped structure surrounding the glomerulus (see Fig. 3-2, B).
Renal tubules are composed of proximal convoluted tubules, the nephron loop (loop of Henle), and distal convoluted tubules. The glomerular filtrate fluid flows through these tubules and undergoes changes in composition. This process is discussed later in this chapter.
Also in the medulla of the kidney are collecting tubules and ducts that empty into the renal pelvis.
Ureters
The two ureters are slender, muscular tubes 10 to 12 inches long. They carry the urine formed in the kidneys to the urinary bladder.
Urinary Bladder
The urinary bladder is a hollow muscular organ that holds the urine until it is expelled by a process called micturition (also referred to as voiding and urination).
Urethra
The urethra is a tube that carries urine to the outside of the body. The length of a woman’s urethra is approximately 1.5 inches. A man’s urethra is longer, approximately 8 inches. The opening at the end of the urethra, where the urine is expelled, is called the urethral meatus.
Formation and Flow of Urine
In the nephron urine is formed by three mechanisms: filtration, reabsorption, and secretion.
Filtration
Filtration is the process by which fluids and dissolved substances in the blood are forced through the pores of the glomerulus into the glomerular capsule by hydrostatic pressure. Substances such as water, salts, sugar, and nitrogen waste products (urea, creatinine, and uric acid) can pass through the pores. Substances such as RBCs and proteins are too large and therefore remain in the blood.
Reabsorption
In the process of reabsorption, some of the substances that flow through the renal tubules that are needed by the body cross back into the blood by the peritubular capillaries surrounding the tubules. Examples of reabsorbed substances are glucose, water, and electrolytes (elements or compounds that form positively or negatively charged ions that, when dissolved, can conduct electricity).
When blood levels of a substance such as glucose reach a point at which no more can be reabsorbed, the substance is excreted in the urine. This is the renal threshold level for that particular substance. For example, the renal threshold for glucose is 160 to 180 mg/dL.
Secretion
The final process in the formation of urine is called secretion, in which substances are transported from the peritubular blood capillaries into the renal tubules. Metabolized drugs, potassium, and hydrogen ions are examples of substances that are secreted into the urine.
Flow of Blood and Urine Through the Kidney
Blood is carried into the kidney by the renal artery, which eventually branches into the afferent arterioles. The afferent arterioles carry blood into the capillaries of the glomerulus, and the efferent arterioles carry the blood out of the glomerulus. The glomerular filtrate is collected in the glomerular capsule (Bowman’s) and flows through the proximal convoluted tubules to the nephron loop, then to the distal convoluted loop, the collecting tubule, the collection duct, and finally to the calyces of the renal pelvis. The filtrate then flows into the hollow renal pelvis and at this point is called urine. The urine then passes through the ureters to the urinary bladder, where it is stored until released by the process of urination or voiding. The main structures involved in the formation and excretion of urine, in sequence, are the following:
Composition of Urine
Water makes up 95% of urine. Urine also contains nitrogen waste products such as urea, uric acid, ammonia, and creatinine. Urea, uric acid, and ammonia are derived from the breakdown of protein, and creatinine is a waste product of muscle metabolism. Other waste products found in urine include chloride, sodium, potassium, calcium, magnesium, phosphate, and sulfate.
Approximately 1200 mL of blood pass into the renal arteries per minute, with a daily output of 1200 to 1500 mL of urine per day. This amount varies depending on the amount of fluid intake and the amount of fluid lost from perspiration, feces, and water vapor from the lungs.
The following terms are related to urination:
1. Oliguria—decreased urine volume that can occur in the following situations:
• Vomiting
• Diarrhea
2. Diuresis—increase in the volume of urine output, which can be caused by the following:
• Intake of excessive amounts of fluids, especially those that contain caffeine
• Some drugs, such as diuretics
5. Nocturia—excessive urination at night
6. Polyuria—frequently passing abnormally large amounts of urine
Urine Specimen Collection
The urine sample is usually easily obtained, but all types of urine collection methods have the following general requirements:
• The volume needed is usually between 25 and 50 mL.
• The outside of the filled container should be cleaned with a disinfectant.
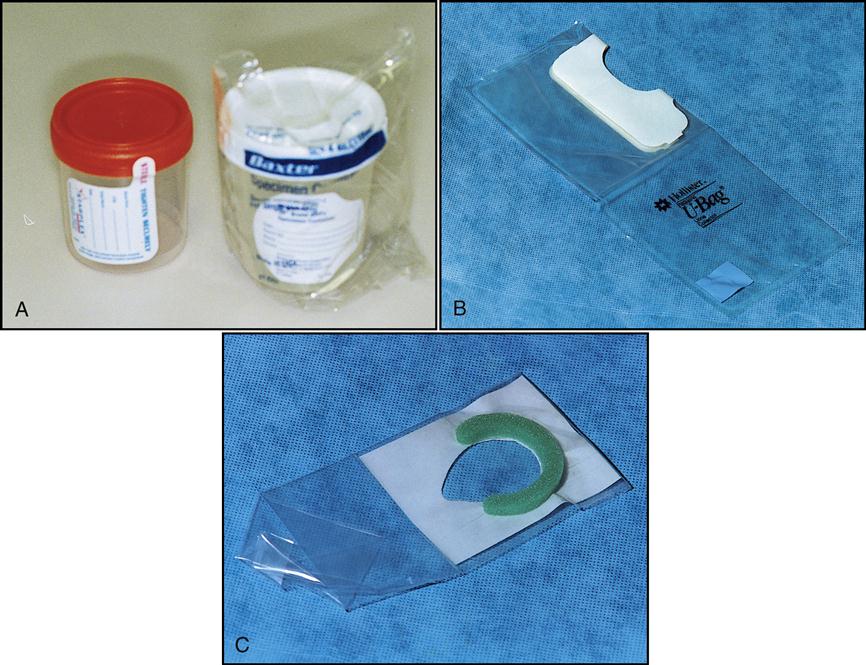
• Use the correct urine containers (Fig. 3-4). The physician’s office should provide the patient with a urine container. Containers from the patient’s home, such as glass jars, should not be used because their previous contents can affect the accuracy of the tests. The most common types of containers are disposable, nonsterile plastic cups with lids. For infants and children who are not toilet trained, special pliable polyethylene bags are available that contain an adhesive section to stick to the skin. If urine is being collected for microbiological studies, a sterile urine container should be used.
The method of collection for urine specimens is dictated by the type of test being ordered. For example, special collection procedures are performed if the urine will be cultured for bacteria or if a 24-hour test is ordered. Documentation of the method used to collect the specimen should be noted on the specimen container, the requisition, and the patient’s chart.
Random Specimen
A random specimen is usually collected in the medical office. The patient should collect the midstream portion of urine when voiding. The patient is instructed to void a small amount of urine into the toilet to flush the area around the urinary opening of contaminants and to get a steady midstream flow. The second portion is collected in the container to a volume of at least 25 mL. Once the specimen has been collected, the remaining urine in the bladder can be emptied into the toilet. A specimen collected this way is more representative of the contents of the bladder. The lid should be tightly placed on the container, and the outside of the container should be disinfected. The sample container (not the lid) should be appropriately labeled.
First Morning Specimen
The first morning specimen is usually the specimen of choice because it is the most concentrated and has the greatest amount of dissolved substances. Provided the patient has not voided during the night, the first morning urine specimen has formed over an approximately 8-hour period. Because this urine is more concentrated, the probability of detecting abnormalities increases and the microscopic elements remain intact for a longer period.
The patient must collect the first morning specimen soon after rising and preserve it by refrigeration until it is brought into the office. The collection procedure is the same as that described for the random specimen.
Clean-Catch Midstream Urine Specimen
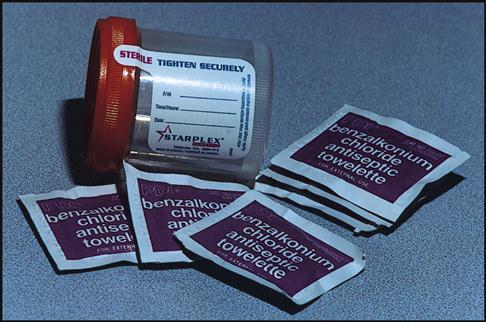
The urethra and urinary meatus harbor many microorganisms. Therefore, when a urine specimen is collected for culture to determine the source of a urinary tract infection (UTI), only the organisms causing the infection should be cultured. To avoid contamination, the midstream clean-catch method of collection is used. This method consists of having the patient clean the urinary opening first using antiseptic wipes, as seen in Fig. 3-5. The patient then urinates into the sterile container by using the midstream method (Procedure 3-1.) NOTE: If the medical assistant does not know if the urine specimen will be needed for culture, collect a clean-catch midstream just in case.
When the urine requires further evaluation in the lab, it may be necessary to send it to the lab in a sterile tube with preservative to keep the organisms alive during transportation. This transferring of the clean-catch midstream urine specimen to a sterile vacuum tube will be covered in the microbiology chapter.
Other options for collecting urine specimens for culturing are bladder catheterization and suprapubic aspiration. In catheterization a sterile tube called a catheter is passed through the urethra into the bladder to remove urine. With suprapubic aspiration urine is removed by passing a needle through the abdominal wall into the bladder.
Timed Urine Specimen
Some tests require that a urine specimen be collected at a certain time. One example is a 24-hour urine specimen. Collecting all the urine produced over a 24-hour period allows greater accuracy of measurement for urinary components. Substances produced in the urine are affected over time by body metabolism, exercise, and hydration. Substances measured in a 24-hour specimen include calcium, creatinine, lead, potassium, protein, and urea nitrogen. In addition, this type of specimen is used in the diagnosis of the cause, control, and prevention of kidney stones.
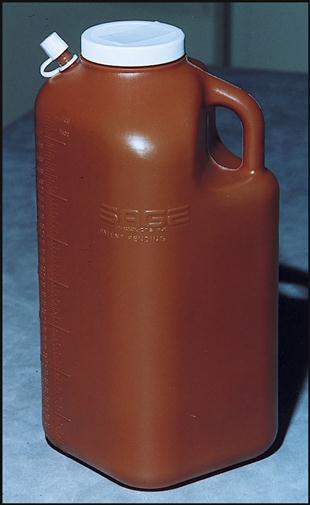
24-Hour Collection Procedure
Urine containers for 24-hour collection (Fig. 3-6) are quite large, holding approximately 3000 mL.
The following guidelines should be given to the patient:
• The specimen should be kept refrigerated.
• The patient should be provided with verbal and written directions.
• The physician should determine whether medication should be discontinued during the procedure because some medications, such as thiazides, phosphorus-binding antacids, allopurinol, and vitamin C, could alter the results (Procedure 3-2).
PROCEDURE 3-1
Instructing Patients How to Collect a Clean-Catch Urine Specimen
Equipment and Supplies
Sterile urine collection container, label, antiseptic towelettes
Procedure
For a Female Patient
1. Wash your hands, and gather the equipment.
2. Greet and identify the patient, and provide her with the clean-catch urine supplies.
3. Instruct the patient to sanitize her hands and remove her underwear.
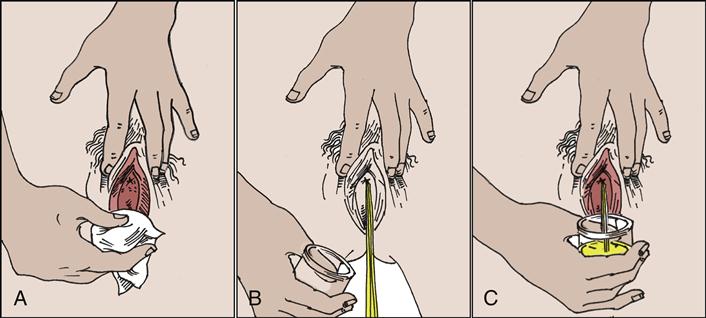
4. Instruct the patient to spread apart her labia with one hand to expose the urinary meatus (Fig. A). Tell her to keep this area spread apart with her nondominant hand during the entire cleaning procedure.
8. Instruct the patient to continue to keep the labia spread apart and to void a small amount of urine into the toilet to flush away microorganisms that may be around the urinary meatus (Fig. B). Tell her to be careful not to touch the inside of the sterile container at any time during the procedure.
9. Instruct the patient to collect the second part of the urine in the container (Fig. C). This is the midstream flow of urine.
11. Instruct the patient to dry the area with a tissue and wash her hands.
For a Male Patient
1. Wash your hands, and gather the equipment.
2. Greet and identify your patient, and provide him with the clean-catch urine supplies.
3. Instruct the patient to sanitize his hands and remove his underwear.
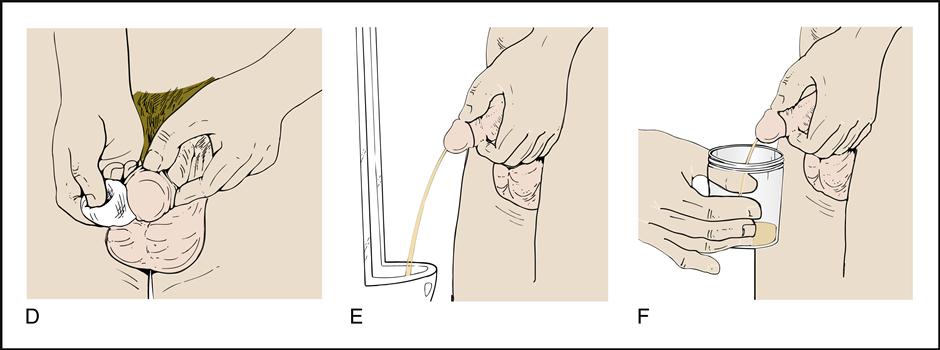
5. Instruct the patient to clean the area around the penis opening (glans penis) by starting at the tip of the penis and cleaning downward (Fig. D), using a separate antiseptic towelette for each side.
6. Instruct the patient to use a third antiseptic towelette to clean directly across the meatus.
7. Instruct the patient to void a small amount (one third) of the urine into the toilet to flush away microorganisms that may be around the urinary meatus (Fig. E).
8. Instruct the patient to collect the second part of the urine in the container, being careful not to touch the inside of the container (Fig. F).
10. Instruct the patient to dry the area with a tissue if needed.
∗Figs. A through C courtesy Gala Bent.
 CLIA-WAIVED TESTS
Urinalysis
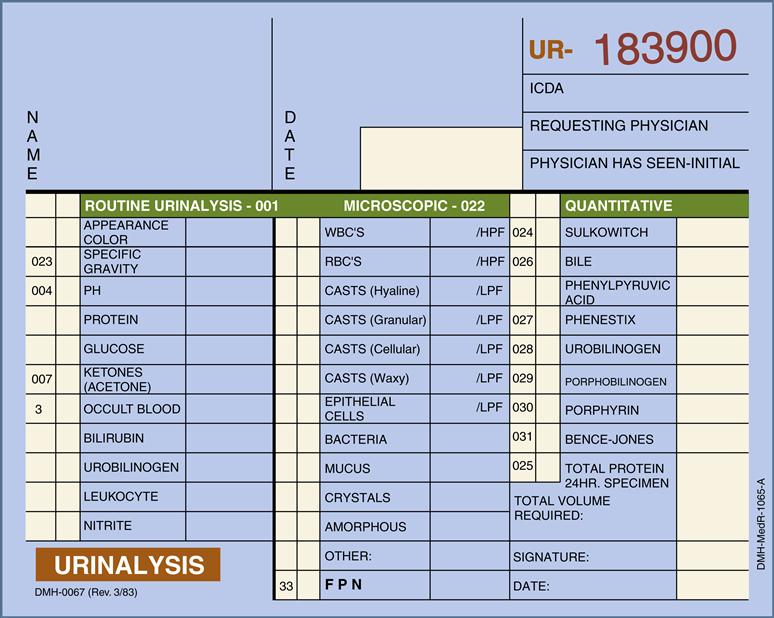
Urinalysis is the description and measurement of the substances found in urine. It is the most common test performed in the medical office. The specimen is easily obtained, and the testing is not difficult to perform. Urinalysis can be used for screening in a physical exam, to assist the physician in the diagnosis of pathological conditions, and to determine the effectiveness of a treatment. A routine urinalysis consists of three parts: physical analysis, chemical analysis, and microscopic analysis. Fig. 3-7 is an example of a urinalysis requisition/report form containing the test results for routine, microscopic, and quantitative analyses. NOTE: The quantitative tests in the right-hand column of the requisition are not CLIA waived and are generally performed on a 24-hour collected specimen in which the total volume of the urine has been measured and recorded.
Fresh or preserved urine can be used when performing a routine urinalysis. Preservatives are usually used for specimens being sent a long distance and requiring prolonged storage. Nonpreserved urine is preferred because some preservatives can interfere with the chemicals used in the testing. Urine should be tested within 1 hour of voiding, but if this is not possible, the urine should be refrigerated. Before the testing the urine must be brought to room temperature and mixed.
Urine that stands at room temperature for more than 1 hour may undergo the following changes:
• Glucose that could be present in the urine decreases as it is metabolized by microorganisms.
• Cells in the urine will lyse (break open).
Physical Routine Urinalysis
The physical part of a urinalysis consists of observing the color, odor, and appearance (transparency) of a urine specimen. To determine the color and appearance, the urine must be viewed through a clear container. NOTE: In the past, the urine would also be tested for pH and specific gravity during the physical analysis. These two tests are now included in the chemical analysis of urine because they are measured using the same test strips as the chemical analytes.
Color
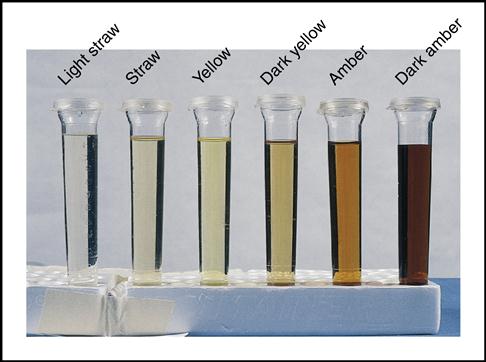
The color of normal urine (Fig. 3-8) is typically described as straw colored (light yellow), to yellow, to amber (dark yellow). Varying amounts of a normal pigment called urochrome give the urine its characteristic shades of yellow. Concentrated urine with less water is dark yellow to amber, whereas a more diluted urine is a lighter yellow or straw color. The first morning specimen is most concentrated (dark yellow); the urine becomes more dilute (lighter in color) as the day progresses and more fluid is consumed.
Sometimes additional substances may cause a change in the color of urine, but this is not necessarily associated with disease. Such color changes may be caused by food dyes, some medications, and vitamins.
The colors in the following list, however, may be indications of a pathological condition. The following are abnormal urine colors and their possible causes:
• Yellow-brown—caused by bilirubin resulting from excessive RBC destruction or bile duct obstruction
• Green—caused by biliverdin resulting from the oxidation of bilirubin
Stay updated, free articles. Join our Telegram channel

Full access? Get Clinical Tree


