CHAPTER 23. Peripheral Venous Access Devices
Roxanne Perucca, MSN, CRNI®∗
Preparation of Patient and Equipment, 456
Vascular Assessment, 457
Peripheral Intravenous Administration, 458
Monitoring, 463
Catheter Care, 465
Changing Therapy, 466
Complications, 467
Patient Outcomes, 478
Summary, 478
When nurses first began to administer infusion therapy, the sole requisite was the ability to perform a venipuncture skillfully. Today, with the technological development of venous access devices, the use of multiple delivery systems, and the administration of highly specialized treatment modalities, the nurse must be knowledgeable and clinically competent to ensure the safe delivery of infusion therapy. The nurse must be committed to the delivery of safe, cost-effective, quality infusion care.
PREPARATION OF PATIENT AND EQUIPMENT
VERIFICATION OF PRESCRIBED THERAPY
The initiation of infusion therapy requires an order by the physician or other authorized prescriber, in the patient’s medical record. The order must be complete and consist of the name of the solution or medication to be used; the dosage; the volume to be infused; and the rate, frequency, and route of administration. The nurse must assess and ensure that the order is appropriate for the patient. If the order is incomplete, unclear, or inappropriate, the prescriber should be contacted for clarification.
COMPATIBILITY CHECK
After the order has been verified, the nurse assesses the order and its implications for the patient. Particular attention is given to identifying allergies to medications, iodine, latex, and tape. The patient’s status is evaluated, and the outcome goal is reviewed.
When multiple solutions or medications are to be infused, consideration must be given to compatibility. More than one infusion site may be required if the medications to be infused are incompatible. A pharmacist or pharmaceutical compatibility reference guide should be consulted to determine compatibilities.
If the compatibility of the solution or medications is not known, the IV system must be flushed with a compatible solution. The IV administration set or device can be flushed by using a syringe filled with 0.9% sodium chloride or by establishing a 0.9% sodium chloride or 5% dextrose and water administration system that is used before and after the administration of incompatible medications. Some facilities have established flushing policies that take into consideration the number of medications to be administered per day. For example, if two or fewer medications are administered per day, the sodium chloride syringe method can be used to flush the IV line. If more than two medications are to be administered per day, a separate administration system to flush the IV line must be established.
EQUIPMENT CHECK
After the orders have been verified and the type of infusion system has been determined, the nurse gathers the equipment. The solution container is examined to verify that the type and volume of parenteral solution match the order, taking note of any medications that are to be added. The container is checked for leaks, and the expiration date is verified. The solution is observed for clarity and particulate matter. If there are any doubts regarding the suitability of the parenteral fluid, it must be returned to the dispensing department.
INITIATING THE INTRAVENOUS SETUP
If the venous access device (VAD) is to be inserted for intermittent therapy, a syringe of 0.9% sodium chloride and an injection cap/needleless device must be collected. The remaining venipuncture equipment is gathered. IV start kits are advantageous because they can contain all the necessary insertion equipment except the catheter. When equipment is gathered separately, an item may be forgotten and therefore unavailable when needed. Many start kits are available that provide any combination of the following venipuncture equipment: 70% isopropyl alcohol, antimicrobial solution, sterile gauze, transparent dressing, tape, tourniquet, and label. The organization’s policies and procedures for IV catheter insertion determine the required venipuncture equipment for use.
PROCEDURE FOR PREPARING A SOLUTION CONTAINER AND ADMINISTRATION SET
1. Verify order.
2. Gather administration set, electronic infusion device if needed, and labels.
3. Perform hand hygiene.
4. Remove container outer wrap.
5. Examine container and solution, checking for particulate matter, cloudiness, and leaks.
6. Close roller clamp on administration set.
7. Remove protective cap from the solution container.
8. Remove protective cap from spike of administration set. Caution must be taken to avoid touch contamination of the spike. If it is accidentally contaminated, a new administration set must be obtained.
9. Insert administration set spike into container.
10. Hang container on IV pole.
11. Squeeze chamber to at least ⅓ to ½2 full.
12. Open clamp slightly and allow administration set to fill slowly.
13. If electronic infusion device is used, purge air from administration set according to manufacturer’s recommendations.
14. Close roller clamp.
15. Write date and time initiated on a time strip, and tape it to solution container.
PATIENT IDENTIFICATION AND ORIENTATION
Before the venous access device is inserted, the patient’s identity must be confirmed using at least two identifiers. The patient should be asked to state his or her name. The nurse should verbally repeat the patient’s name to ensure accuracy and confirm patient identification. A patient’s identity can be verified by comparing information on the identification bracelet (patient name, medical record number, or date of birth) with the physician’s order, request form, or patient label.
After verifying the patient’s identification, the nurse identifies himself or herself to the patient. Next, the nurse assesses the patient’s psychological preparedness while explaining the following: the purpose of therapy, possible duration of therapy, method of administration, insertion procedure, expected side effects, care and maintenance of the device, and any limitations or restrictions on mobility.
It is essential for the nurse to establish trust. The patient should be approached in a calm and reassuring manner. Encouraging the patient to ask questions provides information that helps alleviate fear and anxiety. When answering a patient’s questions, the nurse must be honest and forthright. The nurse should always convey self-assurance and appear confident. The nurse can reduce the patient’s anxiety by encouraging him or her to be an active participant in the placement process; active participation communicates that the patient’s concerns are important and that the nurse is interested in the whole person and not just in performing the technical procedure. The patient should also be encouraged to report any discomfort experienced during or after the insertion procedure.
Occasionally, despite appropriate patient teaching and reassurance, the patient may remain uncooperative. These situations require careful nursing assessment and judgment. The patient has the right to refuse treatment. When the patient refuses to cooperate with the ordered medical intervention, the rationale for therapy should be explained again and the patient’s physician notified. Possible alternative routes of medication administration should be assessed with the physician and the patient. The nurse’s actions and the physician’s orders are recorded in the patient’s medical record.
VASCULAR ASSESSMENT
PATIENT PREPARATION
After the patient has been properly identified, the nurse must provide privacy by pulling the curtain around the patient’s bed, asking visitors to step outside the room, and closing the door to the patient’s room. In addition, adequate lighting of the environment is essential for performing accurate venous assessment and catheter insertion. If the lighting in the patient’s room is inadequate, the patient may be transported to a treatment room that has adequate lighting.
The nurse should ensure that the patient is comfortable. The patient should be able to extend and stabilize his or her arm on a firm, flat surface. Sometimes, it is helpful to place a pillow or roll a blanket or towel under the extended arm. Attention must also be given to the comfort of the nurse. The height of the bed can be adjusted, if necessary, to prevent unnecessary bending.
In alternative care settings, particularly the home, the nurse may have to adapt to poor lighting, not having an adjustable bed, and lack of privacy. In the home setting, the kitchen table is often a good setting for catheter placement because usually there is good lighting above the table. Creative thinking and forethought will often allow the nurse to change a given situation to provide patient comfort, privacy, and safety. For example, if a patient lives in a one-room apartment with another individual, the caregiver may want to take a walk or run an errand while care is being given. The patient is provided privacy and the caregiver has the opportunity to complete an errand. A large flashlight can provide better visibility when lighting is poor. Regardless of the circumstances, the nurse should be creative and manipulate the environment as needed to provide quality infusion care.
After ensuring privacy and comfort, the nurse performs hand hygiene before proceeding with an overall assessment of the patient’s upper extremities. As venous access of the patient is evaluated, the nurse needs to consider the following questions regarding the prescribed therapy: What is the anticipated duration of the prescribed therapy? What clinical procedures are to be performed? What extremity or location does the patient prefer? Which arm is dominant? Prior consideration of these factors often determines the success of the infusion, which ultimately results in preserving the patient’s veins. To determine which arm should be selected, the nurse performs an overall assessment of the patient’s upper extremities taking into consideration the purpose of the insertion and, if possible, the patient’s dominant side. Any injury or absence of sensation to the arm restricts the use of the extremity for venipuncture.
An extremity with an arteriovenous (AV) fistula or graft is never used for routine peripheral catheter insertion. An AV fistula or graft is inserted usually for dialysis only and requires special consideration for catheter placement. The cannulation of grafts and AV fistulas should be established within organizational policies and procedures.
The nurse should avoid placing a catheter into the affected extremity of a patient who has undergone a cerebrovascular accident because of the extremity’s decreased or absent neurological sensation. If the infusion device infiltrates or develops phlebitis, the patient might be unable to detect these problems. Often, because of decreased mobility, the affected extremity has limited venous access potential.
Catheter placement in the arm of a patient who has undergone a mastectomy or axillary node removal is contraindicated. In some cases (e.g., bilateral mastectomy, chest wall issues), a peripheral VAD may need to be placed. This should be a careful decision based on collaboration between the infusion nurse, the physician, and the patient.
Cannulation of the lower extremities in adults should be avoided because of the increased risk of phlebitis (INS, 2006a). The cannulation of lower extremity veins is acceptable in children until they are of walking age. If a catheter is inserted in the lower extremity of an adult patient, it should be changed as soon as a central venous access device or an appropriate site in an upper extremity can be established. Institutional policy should define the authorization and approval process for cannulation of a lower extremity. Another area contraindicated for venipuncture includes the palm side of the wrist because the radial nerve is located near the vein, causing excessive pain during insertion and potentially resulting in nerve damage. See Table 10-5 for advantages and disadvantages of the various peripheral IV sites.
Applying a tourniquet promotes venous distention. The tourniquet should be applied snugly enough to impede the venous, but not the arterial, flow. To prevent the spread of health care–associated infection, tourniquets are for single-patient use. The tourniquet is applied 5 to 6 inches above the intended insertion site to promote the dilation of the veins. A blood pressure cuff may also be used to distend veins. The cuff should be inflated and the pressure released to just below the diastolic pressure. When a patient has extremely fragile veins, the tourniquet must be applied very loosely. Sometimes, nurses elect not to apply a tourniquet if a patient bruises easily.
After the tourniquet has been applied, the veins must be given time to fill. Another method for promoting venous distention is lowering the extremity below the level of the heart and having the patient open and close his or her fist. Lightly tapping the vein promotes venous distention; however, caution must be taken when using this method. If a vein is tapped too hard, pain may occur and cause vasoconstriction, or the vein may rupture, creating a hematoma. When these methods fail to promote venous distention, warm, moist compresses may be applied to the extremity for 10 to 15 minutes before insertion. The compresses increase blood flow to the area, which promotes venous filling.
With an edematous patient or an individual who has extremely limited venous access, the nurse may be able to locate a vein by its anatomic location. For example, the cephalic vein is located on the lateral wrist extending along the radial forearm and the lateral aspect of the antecubital fossa and biceps; the nurse, by assessment and palpation, may be able to find it. Several commercial products (e.g., ultrasound or hand-held vein finder devices) may also help identify the location of veins.
Veins that are tender, phlebitic, sclerotic, or located in a previously infiltrated area are unacceptable for venipuncture. If damaged veins are used for venipuncture, greater injury to the skin tissue and vascular system will occur. Also, if previous phlebitic or infiltrated areas are used for cannulation, accurate site assessments cannot be performed.
Palpation of the vein is an important assessment technique used to evaluate the condition of a vessel. By always using the same finger to palpate veins, one develops the sensitivity required for accurate assessment. Usually, the index finger and the third forefinger of the nondominant hand have the most sensitivity for palpating veins. A hard, cordlike feeling can identify a sclerosed vein. Successful venipuncture requires a healthy vein that feels soft and bouncy as one palpates over and across the vessel. Valves can be detected by a hard lump or knotlike feeling. Resilient veins, which are easily depressed, are required for venipuncture. Palpation helps determine whether the vein is located in the superficial fascia or deep tissues. Stroking the vessel downward and observing the venous refill is helpful in determining the condition of the vein. Performing venipuncture in areas where valves are palpated or where two veins bifurcate should be avoided. The insertion site should be proximal to a valve or a bifurcation.
Palpation also helps differentiate arteries and veins. The selected vein must not pulsate; aberrant arteries pulsate and are located superficially in an unusual location. Often, aberrant arteries occur bilaterally on the hand or wrist, usually on a thin, emaciated person. An aberrant artery should not be used for peripheral catheter insertion.
PERIPHERAL INTRAVENOUS ADMINISTRATION
SHORT PERIPHERAL CATHETERS
Site selection
The most distal site on the extremity should be selected for peripheral catheter insertion. Peripheral infusion therapy can be maintained longer by starting at the lowest point on the arm and working upward with future catheter insertions. Sites located below previous insertion sites, as well as phlebitic, infiltrated, or bruised areas, should be avoided as medications or solutions infused through the potentially damaged site can result in further infiltration. Areas of flexion, such as the wrist or antecubital fossa, are also not recommended. The antecubital veins should be preserved for as long as possible and are not used for routine IV therapy. A short peripheral catheter inserted into an antecubital fossa vein is at greater risk for the occurrence of mechanical phlebitis and infiltration. The metacarpal, cephalic, basilic, and median veins are recommended for venipuncture because of their size and location.
Site preparation
Health care personnel must perform hand hygiene before and immediately after all clinical procedures and before donning and after the removal of gloves. The Centers for Disease Control and Prevention (CDC) guidelines for hand hygiene (2002a) recommend the use of an alcohol-based hand rub or antibacterial agent to decontaminate hands before the insertion of a peripheral catheter.
Standard precautions are used for catheter placement. Nonsterile gloves are worn to prevent contact with blood and to provide protection for the patient and the health care worker. When splashing of blood is likely to occur, protective eyewear must be used.
If the patient is unusually dirty, the selected extremity should be washed with soap and water before the insertion site is prepared. If hair removal is necessary, it should be clipped with scissors; surgical clippers with disposable clipper heads are also acceptable (INS, 2006a). To prevent cross-contamination, the clipper heads should be changed after each patient use. Shaving can be harmful to the skin because it can cause microabrasions, which can harbor bacteria. Depilatories or hair removal agents are not recommended because of allergic reactions, which can cause skin eruptions.
The CDC’s Guidelines for the Prevention of Intravascular Catheter-Related Infections (2002b) state that a 2% chlorhexidine-based preparation is preferred; 1% to 2% tincture of iodine, iodophor (povidone-iodine), and 70% alcohol can also be used. A meta-analysis, which included 8 studies involving 1361 peripheral IV catheters, found that chlorhexidine gluconate, as compared to povidone-iodine solution, was associated with a significant reduction in bloodstream infections (Chaiyakunapruk, Veenstra, Lipsky et al, 2002).
Chlorhexidine-based solutions should be applied with friction using repeated back-and-forth strokes for a minimum of 30 seconds. The prepped area should be 2 to 3 inches in diameter. Applicators are intended for single-patient, one-time use only. For the antimicrobial solution to be effective, it should be allowed to air-dry for a minimum of 30 seconds. Fanning, blowing, or blotting the prepared area is contraindicated.
Pain management during IV insertion
For every patient, an assessment of pain, feelings and fear about IV-related procedures, and preferences for pain control is essential and should be incorporated into the care plan. Infusion Nursing Standards of Practice (INS, 2006a) recommends consideration and use of anesthetic agents in general and encourage their use with children. The importance of nursing competency and knowledge about their use are also emphasized. Research studies have demonstrated that a variety of anesthetic methods, both topical and injectable drugs, reduce pain. Patients who have experienced an anesthetic before venipuncture prefer it for future IV insertions.
A physician’s order should be obtained if local anesthesia is utilized; some organizations include this in standardized order sets or allow it as a nursing order. Note that there are a variety of interventions (topical, injection) that can be used. The infusion nurse must act as a patient advocate to manage pain and use the most appropriate intervention to manage pain associated with peripheral IV insertion (Gorski, 2008).
Catheter selection
The overall goal of infusion therapy is to obtain a positive patient outcome. Selecting the venous access device that best meets the patient’s needs is essential in achieving this goal. The increased availability of different catheter designs and configurations adds complexity to the selection process. The duration and composition of the infusion, clinical condition and age of the patient, and size and condition of the vein are some of the factors to consider when selecting the best device for the patient.
FOCUS ON EVIDENCE
Pain Management for Peripheral IV Insertion—Adults
• A meta-analysis of 20 studies analyzing the effectiveness of a topical anesthetic (2.5% lidocaine and prilocaine mixture, EMLA cream) concluded that the use of EMLA significantly decreases venipuncture and IV insertion pain in 85% of the population (Fetzer, 2002).
• A randomized, double-blinded study involving surgical adult patients (N = 47) compared use of intradermal injection either of lidocaine hydrochloride 1% with sodium bicarbonate or of sodium chloride 0.9% with benzyl alcohol. The researcher found no significant difference between the anesthetic effects; both were effective in reducing pain and were safe (Brown, 2004).
• A randomized, double-blinded study involving adult inpatients on medical units (N = 33) compared use of subcutaneous injection of buffered lidocaine 1%, subcutaneous injection of sodium chloride 0.9% with benzyl alcohol, or no injection. The researchers found a significantly improved pain rating associated with use of lidocaine hydrochloride 1% and no significant difference between patients receiving no treatment and those injected with sodium chloride with benzyl alcohol (Hattula, McGovern, and Neumann, 2002).
• A quasi-experimental study involving surgical adult patients (N = 30) compared use of intradermal injection of lidocaine or topical application of EMLA cream with delivery of the Numby Stuff system (i.e., local anesthetic Iontocaine with use of mild electrical current to deliver the medication through the skin). The study found the Numby Stuff® superior to the other methods in decreasing IV insertion pain (Miller, 2001).
• A descriptive study involving adult medical-surgical patients (N = 180) was designed to determine patient preferences regarding the use of intradermal lidocaine before peripheral insertions; significant findings included that subjects who had any type of experience with lidocaine would prefer to have it used for future IV insertions and that the pain associated with lidocaine injection was less than the pain associated with IV insertion (Brown, 2003).
Over-the-needle catheter-type devices are the most commonly used peripheral venous access devices. Dual-lumen peripheral catheter devices are available for multiple infusions. Catheter composition has evolved from polyvinyl chloride and polytetrafluoroethylene (Teflon®) to various polyurethane materials, and there is still controversy over the advantages and disadvantages of the available catheter materials. Ongoing research in polymer technology seeks to develop a catheter material that further decreases thrombogenicity. To promote patient safety, IV catheters are radiopaque. Safety-enhancing designs of over-the-needle catheters prevent accidental needlesticks and exposure to blood and body fluids, and promote the safety of health care workers.
The smallest gauge and the shortest length of catheter that will accommodate the prescribed therapy should be selected (Table 23-1) (INS, 2006a). A small-gauge catheter results in less trauma to the vessel, promotes proper hemodilution of the infusate, and allows adequate blood flow around the catheter wall. All of these factors promote increased catheter dwell time and improve patient outcomes. The diameter of the vein and the ordered therapy to be delivered determine the size of the catheter inserted. Small veins should not be used for vesicants or irritants. If a large-gauge catheter is required, a larger vein should be selected. Increased osmolality of the solution increases venous irritation. Hyperosmotic solutions must be administered through veins with large blood volume to dilute the IV solution and to reduce vein wall irritation. Fluids with a greater viscosity, such as packed red cells, require a larger catheter. An 18- or 20-gauge catheter has a larger inner lumen, which permits the flow of viscous components. A smaller-gauge catheter may be used in children.
| Catheter size (Gauge) | Clinical applications |
|---|---|
| 14, 16, 18 | Trauma, surgery, blood transfusion |
| 20 | Continuous or intermittent infusions, blood transfusion |
| 22 | Intermittent general infusions, children and elderly patients |
| 24 | Fragile veins for intermittent or continuous infusions |
In emergency situations, larger catheters are necessary to accommodate the rapid infusion of solutions. Catheters inserted in emergency situations should be removed and replaced as soon as the patient has stabilized, but within 24 hours of the emergency. This is because one cannot ensure that the site was adequately prepared or that aseptic technique was maintained during an emergency catheter insertion.
Catheter placement
Before the venipuncture is performed, the patient is educated about the need for a peripheral IV catheter and what to expect from the procedure. The bevel of the catheter is inspected for product integrity. Skin stabilization is an important element of successful venipuncture. Veins are stabilized by applying traction to the side of the insertion site with the nondominant hand to prevent the vein from rolling. Traction may be applied to the forearm by the palm of the nondominant hand, which is holding the whole forearm while the index finger and the thumb pull the skin away from the insertion site.
With the bevel up, the catheter is held at a 10- to 30-degree angle as it penetrates the skin (Figure 23-1). The angle used to enter the skin varies slightly with catheters from different manufacturers. The depth of the vein in the subcutaneous tissue also determines the angle used to enter the skin. A vein located superficially requires a small angle (10 to 20 degrees). However, a vein located deeper in the subcutaneous tissue requires a greater angle (20 to 30 degrees). A direct or an indirect approach can be used to insert a catheter into a vein. Using the direct method, the catheter enters the skin directly into the vein. An advantage of the direct method is that the vein is entered immediately. The disadvantage of this method is that with small, fragile veins, direct insertion can cause the vein to bruise more easily or can pierce the opposite side of the vein wall. With the indirect method, the catheter is inserted through the skin, the vein is relocated, and the catheter is then advanced into the vein. An advantage of this method is that a small tunnel space exists between the area of entry through the skin and the vein. When small, fragile veins are cannulated by the indirect method, bruising is less likely to occur because the catheter is inserted with a gentle entry into the vein.
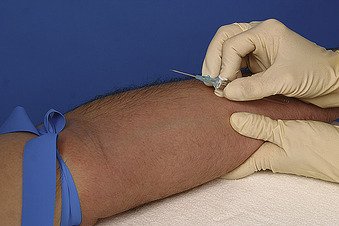 |
| FIGURE 23-1 Peripheral IV catheter insertion, bevel up. (From Elkin MK, Perry AG, Potter PA: Nursing interventions & clinical skills, ed 4, St Louis, 2007, Mosby.) |
After the skin has been penetrated, the angle of the needle is decreased to prevent puncturing the posterior wall of the vein (Figure 23-2). Obtaining a blood return in the flashback chamber confirms the catheter has entered the vein (Figure 23-3). With small-gauge catheters or hypotensive patients, a slow or minimal blood return may be obtained. If a blood return is obtained, the catheter should be advanced an additional  inch before the stylet is withdrawn. The catheter is advanced gently into the vein. The catheter can be threaded into the vein by use of a one-handed or a two-handed technique. With the one-handed technique, the same hand that performs the venipuncture also withdraws the stylet while advancing the catheter into the vein. This technique allows skin traction to be maintained while the catheter is advanced. It is also an advantage with the uncooperative patient because the skin traction and the hold on the patient are maintained. In the two-handed technique, one hand performs the venipuncture and the opposite hand grasps the catheter hub while the hand performing the venipuncture withdraws the stylet and advances the catheter with the dominant hand. This method requires the release of skin traction to activate the safety mechanism of the needle, and potentially increases the possibility of contamination from the hand grasping the catheter hub.
inch before the stylet is withdrawn. The catheter is advanced gently into the vein. The catheter can be threaded into the vein by use of a one-handed or a two-handed technique. With the one-handed technique, the same hand that performs the venipuncture also withdraws the stylet while advancing the catheter into the vein. This technique allows skin traction to be maintained while the catheter is advanced. It is also an advantage with the uncooperative patient because the skin traction and the hold on the patient are maintained. In the two-handed technique, one hand performs the venipuncture and the opposite hand grasps the catheter hub while the hand performing the venipuncture withdraws the stylet and advances the catheter with the dominant hand. This method requires the release of skin traction to activate the safety mechanism of the needle, and potentially increases the possibility of contamination from the hand grasping the catheter hub.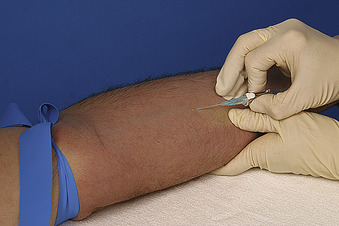 |
| FIGURE 23-2 After the skin has been penetrated, the angle of the needle is decreased as the catheter is advanced into the vein. (From Elkin MK, Perry AG, Potter PA: Nursing interventions & clinical skills, ed 4, St Louis, 2007, Mosby.) |
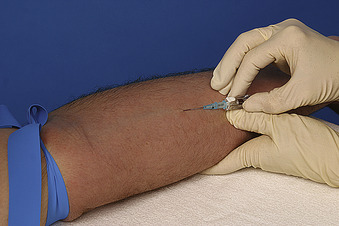 |
| FIGURE 23-3 Blood return in flashback chamber. (From Elkin MK, Perry AG, Potter PA: Nursing interventions & clinical skills, ed 4, St Louis, 2007, Mosby.) |
Once the catheter is totally advanced into the vein, the tourniquet is removed. If any bruising occurs while the venipuncture is performed, the tourniquet is removed immediately to prevent a hematoma from forming. A stylet is never reinserted into a catheter; doing so can puncture or sever the catheter wall, possibly resulting in catheter fragmentation and catheter embolism. Sometimes, the stylet is removed from the catheter and the solution in a syringe or administration set is used to advance the catheter into the vein. If any difficulty is encountered advancing the catheter or if it cannot be advanced in its entirety, the insertion should be discontinued and a new attempt should be made.
To reduce the risk of infection and phlebitis, it is important to maintain aseptic technique during the insertion of the catheter. Sterility of the catheter should not be violated by laying the catheter on the skin during insertion or by touching the catheter with the fingers. Only one catheter is used for each venipuncture attempt because catheters that have penetrated the skin are contaminated. Once a catheter has been used, it is contaminated. As the catheter enters the skin, it acquires any microorganisms that are on the skin. Also, once a catheter has been used to puncture the skin, fraying of the catheter tip is likely to occur. No more than two attempts at catheter insertion are recommended by any one nurse (INS, 2006a). If a nurse has made two unsuccessful insertion attempts, the nurse with the most advanced IV skills should evaluate the patient’s venous access. Further insertion attempts should be made only if the venous access is deemed adequate. Multiple unsuccessful attempts limit future vascular access and cause unnecessary trauma to the patient. If the patient has limited venous access and the veins cannot be cannulated successfully, the patient’s physician should be notified; another type of vascular access device should be established or alternative routes for medication administration need to be evaluated.
Catheter securement and dressing
Peripheral catheters may be secured using securement devices or taping methods. Research is supporting the importance of catheter securement in reducing peripheral IV-related complications. Stabilization of the catheter may reduce the risk of phlebitis, infiltration, infection, and catheter migration. By minimizing movement of the catheter, there is less mechanical irritation to the lining of the vein, reducing phlebitis risk. In a systematic review of three prospective studies comparing tape plus a transparent dressing to a manufactured catheter securement device with peripheral IV catheters, there was a reduction in overall complications up to 69%, reduction in catheter
PROCEDURE FOR INSERTION OF A PERIPHERAL IV CATHETER
1. Obtain and review order.
2. Ascertain allergies.
3. Gather equipment.
4. Verify patient’s identity using two patient identifiers.
5. Explain procedure, benefits, care management, and potential complications to patient.
6. Perform hand hygiene.
7. Assemble equipment.
8. Apply tourniquet.
9. Assess veins, keeping in mind the rationale for therapy and duration of therapy.
10. Apply nonsterile gloves.
11. Wash intended insertion site with antiseptic soap and water (as needed).
12. Remove excess hair from insertion site with clippers or scissors (as needed).
13. Clean intended insertion site with antiseptic solution, working outward using back-and-forth motion.
14. Allow site to air-dry.
15. Perform venipuncture while stabilizing skin with the nondominant hand.
16. Enter skin at a 10- to 30-degree angle. Decrease angle when the skin has been penetrated. When blood is obtained in the flashback chamber, advance catheter ½16 inch, and then slightly pull stylet back, advancing catheter gently into vessel. Continue to advance catheter into vein until the catheter hub is against the skin.
17. Release tourniquet.
18. Occlude tip of catheter by pressing finger of nondominant hand over vein to prevent blood spillage.
19. Activate needle safety device before removing stylet. Connect IV administration set or injection cap/needleless device. Begin infusing solutions slowly. Observe insertion site for any signs of swelling. If catheter is for intermittent therapy, flush slowly with 3 mL of 0.9% sodium chloride solution.
20. Stabilize catheter with securement device and/or apply transparent dressing.
21. Label dressing with date, time, gauge and length of catheter, and name of nurse inserting catheter.
22. Discard stylet in sharps container.
23. Remove gloves. Perform hand hygiene.
24. Document procedure in the patient’s medical record.
The use of catheter stabilization devices represents a significant change in practice. There are a growing number of commercially available manufactured stabilization devices. When evaluating potential products, desired qualities for securement devices as well as IV dressings include ease of application, viewing capacity, proper adhesion, appropriate size, moisture-proof characteristics, permeability, durability, patient comfort, ability to immobilize the catheter, ease of removal, and cost-effectiveness.
If the chevron tape method is used instead of a securement device to anchor a catheter, the sterility of the tape must be maintained. Care should be taken to avoid tearing the tape and sticking it to contaminated overbed tables and side rails before insertion. Any microorganisms present on an inanimate object will be transmitted on the tape. When the contaminated tape is placed on the skin-catheter junction site, it may be a potential source of infection. Anchor tape should be applied only to the wings-catheter hub so that the insertion site remains visible and assessment and monitoring of the skin-catheter junction site are not interrupted. Tape should never be placed over the insertion site.
A sterile dressing is applied over the catheter insertion site to prevent the introduction of microorganisms into the intravascular system. The Infusion Nursing Standards of Practice (2006a) recommends that sterile gauze or a transparent semipermeable membrane (TSM) dressing be aseptically applied over the insertion site. The most commonly used dressing materials are gauze or a transparent semipermeable membrane. Because it is nonocclusive, a Band-Aid dressing is not recommended unless all four edges are sealed. If gauze is used, the entire surface and all edges must be secured with tape to ensure that the dressing is closed and intact.
Transparent dressings are popular because they allow direct observation of the insertion site. Using only a transparent dressing allows the nurse to visualize and assess the insertion site. The transparent dressing is applied over the insertion site and hub to prevent the catheter from moving (Figure 23-4). If a gauze dressing is used, all the edges must be taped to occlude air flow. The dressing is labeled with the date, time, and gauge and length of the catheter inserted.
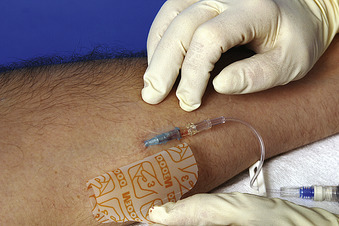 |
| FIGURE 23-4 Apply transparent dressing over insertion site. (From Elkin MK, Perry AG, Potter PA: Nursing interventions & clinical skills, ed 4, St Louis, 2007, Mosby.) |
After the catheter stylet is disposed in the sharps container, the nurse removes gloves and performs hand hygiene. The nurse should document in the patient’s medical record the anatomical location of the insertion site, the gauge and length of the catheter, the number of attempts, evaluation of the placement (e.g., blood return obtained, flushes easily), and the patient’s response to the procedure.
Postinsertion verification
The insertion of venous access devices requires verification that the placement is correct. The presence of a blood return does not always provide absolute verification. If the tip of the IV catheter punctures the posterior wall of the vein, leaving the greater part of the catheter in the vessel, a blood return may be obtained, but at the same time, the fluid could be infiltrating into the tissue. It is important to assess the insertion site for swelling, hardness, coolness, and any patient discomfort. Comparing the infusion site with the same area on the opposite extremity helps determine whether any swelling is present. To ascertain whether an infiltration has occurred, a tourniquet can be applied proximally to the insertion site. When a tourniquet is applied, the venous flow is restricted. However, if the infusion continues regardless of the applied venous obstruction, infiltration of the fluid is confirmed. Arterial placement can be verified by observing the pulsation of bright red blood into the administration set or syringe without applying any traction on the syringe. If there are any questions regarding the patency or placement of the device, the site should be discontinued immediately and a new catheter restarted.
MIDLINE CATHETER
A midline catheter is indicated for patients who require frequent restarts of their peripheral IV catheters, depending on the type of therapy they are receiving. Consideration should be given to the composition of the infusate to be administered. Midline catheters may be appropriate for the infusion of IV solutions, electrolytes, and osmotic or near-osmotic medications that are appropriate for infusion into a peripheral vein. Midline catheters should be inserted by persons who have clinical expertise in IV insertion or their insertion should be supervised by someone who is skilled in such insertion.
Site selection
When the therapy is anticipated to be a few weeks, the placement of a midline catheter may be indicated. The insertion of a midline catheter for the administration of vesicants, long-term antibiotic therapy, solutions with a final glucose concentration greater than 10%, and solutions with a protein concentration greater than 5% is contraindicated.
The basilic and cephalic antecubital veins are the preferred sites for the insertion of a midline catheter. The basilic vein is the largest and recommended as the preferred vein. The cephalic vein is smaller in diameter and more superficial. Because of the risk of additional injury to the vessel and surrounding tissue, previously damaged, sclerotic veins should not be used for the insertion of a midline catheter; an increase in the occurrence of complications, such as phlebitis and infection, could result. An extremity affected by a mastectomy or axillary node removal, an AV graft, or a fistula is also not recommended for the insertion of a midline catheter.
Site preparation
The insertion of a midline catheter is a sterile procedure requiring the use of a mask, sterile gloves and gown, a surgical scrub, and sterile drapes.
Catheter insertion
Only nurses who have validated competency and clinical proficiency in the insertion of short peripheral catheters should insert midline catheters. There is some controversy regarding the necessity of obtaining informed consent signed by the patient or the legally authorized representative for this procedure. Some agencies require a physician’s order because of the increased dwell time of the catheter; other agencies do not require a physician’s order because the catheter is not entering the central venous system. Each organization should have a written policy regarding the necessity of obtaining documentation of informed consent before the insertion of a midline device.
The insertion procedure varies slightly depending on the midline catheter used. The midline catheter may be inserted through an introducer catheter. With this design, an over-the-needle plastic catheter is used as the introducer for the catheter. After a blood return is obtained and the catheter enters the vein, the needle is removed, leaving the introducer catheter in place. The midline catheter is advanced through the plastic catheter into the vein.
Catheter securement and dressing
Sterile tape and a securement device may be used to secure a midline catheter. Several catheters are available with wings, which snap and lock to a securement device that adheres to the patient’s skin. After the catheter is secured, it is covered with a sterile transparent dressing. Junctions on the IV administration set must be secured, preferably with Luer-Lok™ connections, clasping devices, or tape. Accidental tubing separations can cause air embolism, hemorrhage, and contamination of the infusion system.
EXTERNAL JUGULAR PERIPHERAL INTRAVENOUS CATHETER (EJ PIV)
In emergent situations or when no other veins can be accessed, the external jugular vein may be used for the insertion of a peripheral IV catheter (Bernatene, Mason, Rudnick et al, 2007). Only a registered nurse who has validated competency and clinical proficiency in the insertion of short peripheral catheters should insert external jugular catheters (INS, 2008). Qualifications for the insertion of peripheral external jugular catheters must be consistent with federal and state laws as well as organizational policies. It is recommended that the insertion of an external jugular peripheral IV catheter be limited to the acute care setting.
Although the external jugular vein is easy to visualize and locate, it is difficult to cannulate because of its tortuous path and valves and tendency to roll. The insertion, care, maintenance, and monitoring of an EJ PIV are the same as those for a peripheral IV catheter. Peripheral EJs can be secured with a manufactured securement device and transparent tape. The dwell time of a peripheral EJ PIV is limited to 72 to 96 hours. If long-term venous access is required, consideration should be given to the insertion of a central venous access device.
MONITORING
The following aspects of the IV administration system should be monitored: solution container, administration set and flow rate, electronic infusion device, IV site dressing, vascular access device, and insertion site. The frequency for monitoring a peripheral IV site is determined by the prescribed therapy, the condition and age of the patient, and the practice setting. IV insertion sites in acute care settings are often monitored at 4-hour intervals. The pediatric, geriatric, or critically ill patient requires more frequent site assessments. A thorough assessment of the insertion site should be performed when the dressing is changed. The patient receiving care in the home should be taught how to assess his or her venous access device and insertion site several times daily. If administering any medications, the patient should be taught to assess the insertion site before the catheter is flushed or any medication is administered. The home care nurse must provide frequent follow-up and supervision.
A systematic and organized assessment of the IV administration system begins with the solution container and progresses down the tubing to the venous access device and insertion site. The type of solution and medications added are verified against the physician’s or other authorized prescriber’s order, as is the information printed on the solution container label. The container must be labeled with the date and time that it was hung. Several types of flow strips are available that can be used to identify the time the container was hung and have
PROCEDURE FOR INSERTION OF A MIDLINE CATHETER
1. Obtain and review order.
2. Ascertain allergies.
3. Gather supplies and equipment.
4. Verify patient’s identity using two patient identifiers.
5. Explain procedure, benefits, care management, and potential complications to patient.
6. Perform hand hygiene.
7. Assemble equipment; prepare work area.
8. Fully extend patient’s arm; abduct the arm at a 45-degree angle.
9. Position protective covering under the patient’s arm.
10. Place tourniquet on the mid-upper arm for final vein assessment. Insertion site should be 1 to 1½2 inches above or below the antecubital fossa.
11. Remove excess hair from insertion site with clippers or scissors (as needed).
12. Don sterile gloves.
13. Flush catheter with 0.9% sodium chloride solution.
14. Cleanse intended insertion site with antiseptic solution. Apply in a back-and-forth motion, working outward to an area 4 to 5 inches in diameter.
15. Allow to air-dry.
16. Remove and discard gloves.
17. Apply tourniquet.
18. Don second pair of sterile gloves.
19. Drape arm with a fenestrated drape, leaving an opening for the venipuncture. The venipuncture should be two to three fingerbreadths above the bend of the arm or one fingerbreadth below the bend of the arm.
20. Perform venipuncture with the introducer, using the technique recommended by the manufacturer.
21. Withdraw stylet.
22. Slowly continue to advance the catheter via the introducer to the desired insertion length. Intermittently flush with 0.9% sodium chloride, alternating with aspiration for a blood return. Caution: If resistance is met during advancement, stop immediately. Techniques that can be used if resistance is met include changing the angle of the arm, rotating the wrist, or having the patient open and close his or her fist. Catheter may be slightly withdrawn, until blood return is aspirated, and slowly advanced while continuing to flush with 0.9% sodium chloride. If resistance continues to be met, catheter insertion must be discontinued.
23. Release tourniquet.
24. Remove guidewire slowly.
25. Remove peel-away introducer.
26. Attach injection cap and/or needleless device.
27. Flush with a 3 syringe of 0.9% sodium chloride.
28. Stabilize catheter with securement device.
29. Cover with sterile transparent dressing.
30. Label dressing with date, time, catheter gauge and length, and inserter’s initials.
31. Discard stylet in sharps container.
32. Remove gloves and perform hand hygiene.
33. Document procedure in patient’s medical record.
The next monitoring criterion to note is the amount of solution remaining in the container. The nurse determines how much solution should remain in the solution container based on the prescribed flow rate and the indicated time. The appearance of the solution remaining in the container is noted: the solution should be clear—free from cloudiness and particulate matter.
The correct type of administration set should be hanging with the solution container and the electronic infusion device. Infusates contained in glass bottles require vented administration sets. Most electronic infusion devices require the use of a dedicated administration set as specified by the specific manufacturer. If an infusion is being administered by gravity at a very slow infusion rate, a microdrop administration set should be used.
Arm boards may be used when an insertion site is located near an area of flexion. Care must be taken when an extremity is placed on an arm board to ensure that it remains in a functional position. Contractures, unnecessary discomfort, skin tears, and neural injuries to the extremity can occur if an arm board is applied incorrectly. Tape or gauze may secure the arm board. If tape is used, it should be back-strapped (tape placed back-to-back) to avoid placing tape directly on the patient’s skin. Tape should never encircle an extremity because such practice impairs circulation. If gauze is used to secure an arm board, a window should be left to allow easy observation of the insertion site.
< div class='tao-gold-member'>
Only gold members can continue reading. Log In or Register to continue
Stay updated, free articles. Join our Telegram channel

Full access? Get Clinical Tree


Get Clinical Tree app for offline access
