Health Care Adaptations for the Child and Family
Objectives
1. Define each key term listed.
2. List five safety measures applicable to the care of the hospitalized child.
3. Illustrate techniques of transporting infants and children.
4. Plan the basic daily data collection for hospitalized infants and children.
5. Identify the normal vital signs of infants and children at various ages.
6. Devise a nursing care plan for a child with a fever.
7. Discuss the techniques of obtaining urine and stool specimens from infants.
8. Position an infant for a lumbar puncture.
9. Calculate the dosage of a medicine that is in liquid form.
10. Demonstrate techniques of administering oral, eye, and ear medications to infants and children.
11. Compare the preferred sites for intramuscular injection for infants and adults.
13. Demonstrate the appropriate technique for gastrostomy tube feeding.
14. Summarize the care of a child receiving supplemental oxygen.
15. Recall the principles of tracheostomy care.
16. List the adaptations necessary when preparing a pediatric patient for surgery.
Key Terms
auscultation (ăw-skŭl-TĀ-shŭn, p. 493)
body surface area (BSA) (p. 515)
Broviac catheter (BRŌ-vē-ăk KĂTH-ă-tŭr, p. 508)
dimensional analysis (p. 517)
fever (p. 495)
gastrostomy (găs-TRŎS-tŏ-mē, p. 519)
hyperthermia (p. 494)
informed consent (ĭn-FŎRMD kŏn-SĔNT, p. 487)
intramuscular (IM) injection (ĭn-tră-MŬS-kyū-lăr ĭn-JĔK-shŭn, p. 505)
low-flow oxygen (p. 524)
lumbar puncture (LŬM-băhr PŬNK-chŭr, p. 500)
mist tent (p. 522)
mummy restraint (p. 489)
nomogram (NŌM-ŏ-grăm, p. 515)
parenteral (pă-RĔN-tŭr-ŭl, p. 509)
phototoxicity (fō-tō-tŏk-SĬS-ĭ-tē, p. 517)
saline lock (SĀ-lēn LŎK, p. 507)
subcutaneous (SubQ) injection (sŭb-kyū-TĀ-nē-ŭs ĭn-JĔK-shŭn, p. 504)
total parenteral nutrition (TPN) (TŌT-ŭl pă-RĔN-tŭr-ŭl nū-TRĬ-shŭn, p. 508)
tracheostomy (trā-kē-ŎS-tō-mē, p. 519)
tympanic thermometer (tĭm-PĂN-ĭk thŭr-MŎM-ă-tŭr, p. 495)
 http://evolve.elsevier.com/Leifer
Admission to the Pediatric Unit
Specific pediatric skills can be found in chapters that discuss related diagnoses or conditions.
Informed Consent
When the child is admitted to the pediatric unit, a written informed consent is obtained for treatments that are given. An informed consent implies that the parent or legal guardian is capable of understanding information given to him or her, including the purpose and risks of the procedure, and voluntarily agrees to that procedure. The consent must be signed by the parent, the health care provider who provides the information, and a witness. The nurse acts as a patient advocate by ensuring that the proper consent has been signed before a procedure and that the child is also given age-appropriate information concerning the procedure and its possible outcomes.
Identification
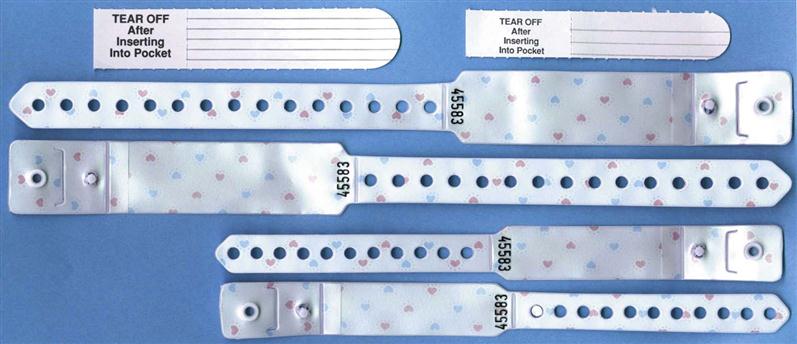
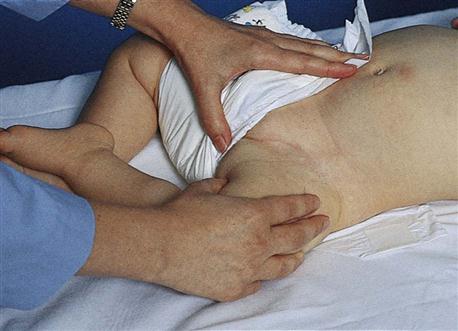
Every child admitted to the pediatric unit must have an identification (ID) bracelet applied. The ID bracelet of the patient should be checked before medications are administered or treatments are carried out. If a bracelet applied on admission is taken off by the child or falls off, identification should be verified and a new bracelet reapplied (Figure 22-1). The bracelet should be snug enough to prevent voluntary removal by the child. Many hospitals attach a security chip to the identification band that will activate an alarm if the child leaves the unit.
Essential Safety Measures in the Hospital Setting
The nurse must be especially conscious of safety measures in the children’s unit of the hospital. Accidents are a major cause of death among infants and children. By demonstrating concern about safety regulations, the nurse not only reduces unnecessary accidents but also sets a good example for parents. Although the physical layout of each institution cannot be altered by personnel, many simple safety measures can be carried out by the entire hospital team. The following lists of positive (Do’s) and negative (Do Not’s) measures are applicable to the children’s unit:
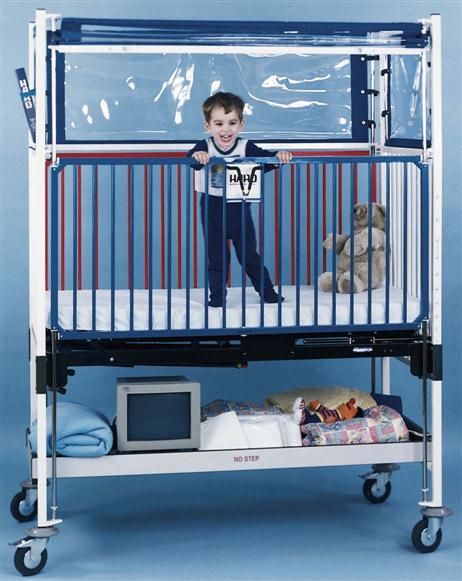
• Keep crib sides up and locked in place at all times when the child is unattended in bed (Figure 22-2).
• Identify a child by ID bracelet, not room number.
• Use a bubble-top or plastic-top crib for infants and children capable of climbing over the crib rails (Figure 22-3).
• Place cribs so that children cannot reach sockets and appliances.
• Inspect toys for sharp edges and removable parts.
• Keep medications and solutions out of reach of the child.
• Identify the child properly before giving medications.
• Remain with the child who uses the bathtub or shower.
• Apply a safety belt to the child in a high chair.
• Take proper precautions when oxygen is in use.
• Do not prop nursing bottles or force-feed small children. There is a danger of choking.
• Do not allow ambulatory patients to use wheelchairs or stretchers as toys.
• Do not leave an active child in a baby swing, feeding table, or high chair unattended.
• Do not leave a small child unattended when out of the crib.
Many other safety measures must be carried out as the nurse becomes more familiar with the hazards of individual units. Nurses must use their eyes to scrutinize, not just to look at, and then must take the necessary precautions.
 Safety Alert!
Crib Safety
• The mattress must fit securely into the crib.
• Blankets should not be tucked in.
• Soft or contour pillows should not be placed in cribs.
• The distance between crib slats should be no more than 6 cm ( inches).
• Decorative extensions on the corners of cribs can become caught on clothing and strangle the child.
• A bubble top or extension should be in place if the child is capable of climbing over the crib side.
Preparation Steps for Performing Procedures
Nurses must take specific steps to prepare for performing any procedure on any patient. A simple explanation and discussion with the parent or an age-appropriate explanation to the child should precede any nursing intervention. The parent can be allowed to assist whenever possible, and the child should be familiarized with the equipment to be used or even allowed to assist in the simple aspects of the procedure when appropriate. Common nursing actions before the actual skill is performed include checking the written order of the health care provider, gathering equipment, identifying the patient, explaining the procedure to the parent and the child, providing privacy, performing hand hygiene, and using standard precautions or transmissions-based precautions as needed. These preparatory steps appear as icons within each skill as appropriate.
Transporting, Positioning, and Restraining
The means by which the child is transported within the unit and to other parts of the hospital depends on age, level of consciousness, and how far the child must travel. Older children are transported in the same way as adults. Younger children are often transported in their cribs, in a wagon or wheelchair, or on a stretcher. The side rails on a stretcher are raised during transport. The nurse ensures that the child’s ID band is secured before leaving the unit. A notation is made describing where the child is being taken, for what purpose, and who is accompanying the child.
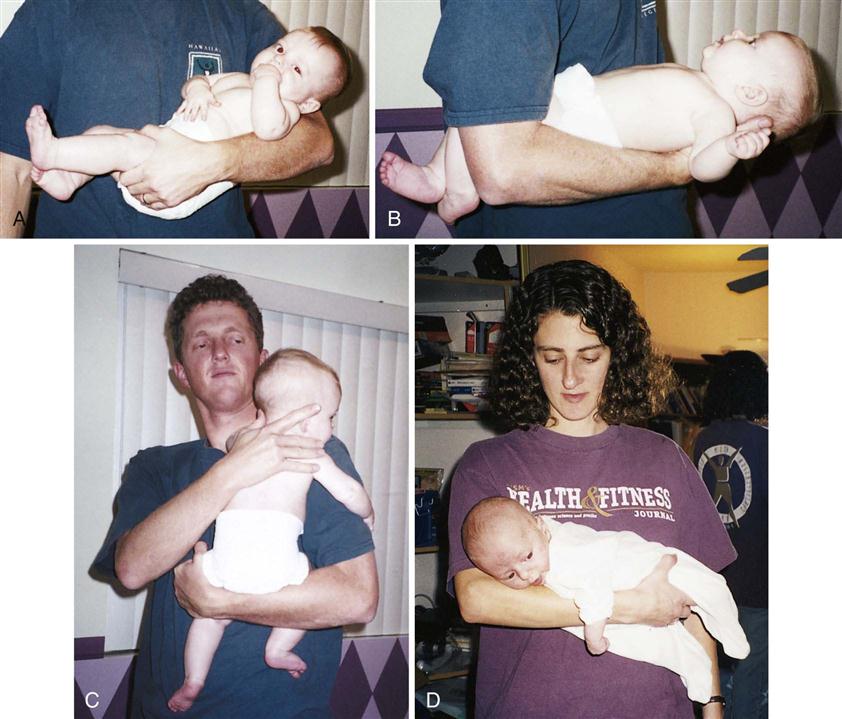
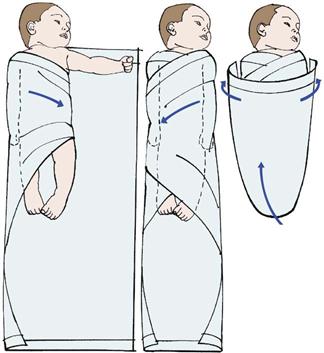
Figure 22-4 depicts four safe methods for holding an infant. Head and back support are necessary for young infants. The movements of small children are often random and uncoordinated; therefore they must be held securely. The football hold is useful when one hand needs to be free, such as for bathing the infant’s head. The mummy restraint is a short-term restraint that might be necessary for examination or treatments such as a venipuncture or placement of a nasogastric tube. This restraint effectively controls the child’s movements and can be modified to expose an arm, a leg, or the chest as needed (Rushing, 2009). Swaddling of the newborn infant is accomplished by the same technique. Many young infants respond positively to snug wrapping with a light baby blanket. Skill 22-1 describes the application of a mummy restraint (swaddling) for infants and children.
Skill 22-1
The Mummy Restraint (Swaddling)


Purpose
To promote comfort or confine movements for procedure
Steps
Restraints may be used for infants and children to facilitate examinations or treatments and to maintain safety. The reason for the restraint must be explained to the parents and the child. Restraints are used only when necessary. They are not a substitute for close observation, and should involve the fewest joints possible in order to enable free movement, which is necessary for growth and development. Excessive restraints can result in the infant or child fighting the restraint, thereby wasting energy and increasing oxygen consumption needs. Parents should be taught the importance of fastening safety straps on infants who are in high chairs, shopping carts, and infant seats. The colic carry is a position that can be used for infants when they are irritable because it typically confers a calming effect.
Assessment and Basic Data Collection
Children are different from adults both anatomically and physiologically. Basic data collection is done to determine the level of wellness, the response to medication or treatment, and any need for referral.
Organizing the Infant Assessment
In order to obtain accurate results, the organization of the infant assessment is important:
1. Select an area that is warm and not stimulating for the infant.
2. Expose only those areas of the body to be examined to prevent heat loss.
3. Without touching the infant, observe the following:
• Position
• Attitude
• Flexion
• Color
• Measure head, chest, abdomen, and length
• Assess reflexes and blood pressure
6. Talk softly.
7. Utilize pacifier to comfort infant.
8. Swaddle and hold after assessment is complete.
9. Utilize parent teaching opportunities.
Basic Data Collection
Basic data collection involves casual observation without touching. The child’s general appearance will indicate if his or her condition is serious or within normal limits. In general, serious illness may be suspected if the child is not alert and responsive to the environment. If the child is lethargic, prompt intervention by a health care provider is essential. Applying knowledge of basic growth and development will enable the nurse to determine whether the activities and behavior of the child are age appropriate. A child who has not mastered age-appropriate milestones should be referred for follow-up care. The presence of bruises on the body of the child that may be in different stages of healing, the lack of body cleanliness or appropriate dress, and the interaction or lack of interaction between parent and child are also areas that may require prompt referral for follow-up care. Is the child tipping his head or rubbing the ears? Is the child maintaining a rigid body position to breathe? If stridor or grunting sounds are heard during respiration, prompt referral should be made.
The History Survey
The personal history survey affords the nurse the opportunity to teach parents about the child’s needs and prevention of injury and illness. The admission history should include information concerning the child’s usual health habits and practices regarding eating, sleeping, toileting, activity patterns, and use of special words or gestures. Information concerning coping patterns, siblings, and family values is helpful. Questions concerning the use of complementary and alternative medicine (CAM) and over-the-counter medications should be included in every history data collection. This information can be used to formulate a nursing diagnosis in the plan of care for the individual child. The immunization record should be reviewed and plans for future immunizations discussed. Encouraging safe environments that include the use of car seats and protective gear for sports activities should be part of every teaching plan.
The Physical Survey
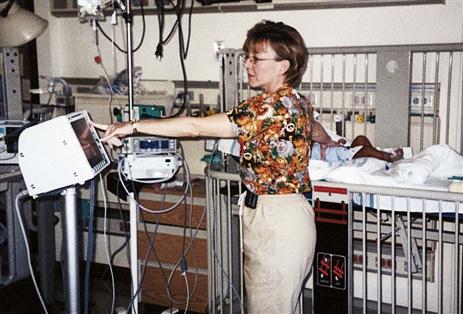
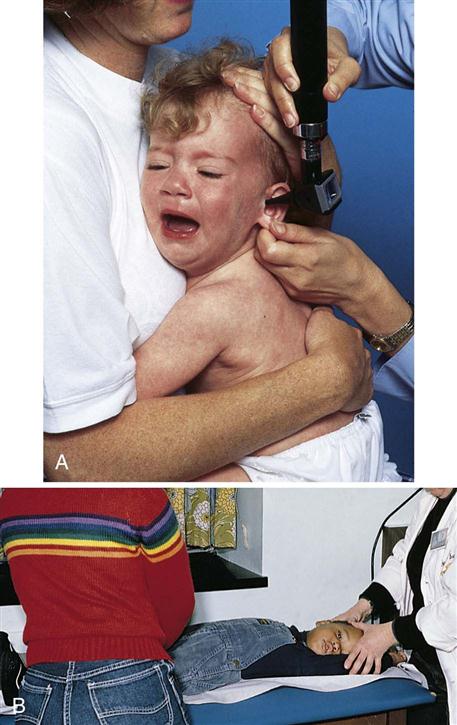
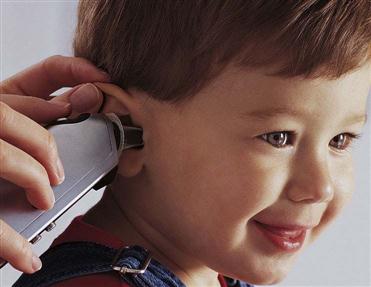
The physical survey includes a head-to-toe review that should be completed, at minimum, once each shift or once each clinic visit, even if the clinic visit is for a specific problem. The nurse may assist with an ear examination by properly restraining the child in a position that will enable safe and quick assessment by the health care provider (Figure 22-5). Obtaining vital signs is a priority. Often the first sign of shock or body stress in infants or children is tachycardia (a rapid heartbeat). However, a drop in blood pressure may be a late sign of shock in children because of a compensatory mechanism that is activated early. Therefore hypotension in an infant or child is considered an acute emergency. Extreme irritability or pupils that are unequal in response to light should be reported immediately. The anterior fontanelle, which is usually open until age 18 months, should be palpated. A sunken fontanelle may indicate dehydration, whereas a bulging fontanelle indicates increased intracranial pressure (ICP). A fontanelle that feels flat to the contour of the head is normal. Increased ICP in the older child and adult is manifested by an increase in systolic blood pressure and a widening pulse pressure, irregular respirations, and bradycardia. In the infant, however, the open fontanelles allow brain swelling to occur without these classic signs, and a decreased level of consciousness may be the only manifestation of increased ICP.
Bradycardia (a slow heartbeat) is always treated as a medical emergency in infants and young children. Unlike adults, infants and children cannot increase the stroke volume of their heart for a more effective cardiac output when the heart slows; instead, they must rely on increased heart rate alone to increase output. Therefore fatigue and heart failure may result. Mottling of the skin of the extremities may be normal in infants because of their immature temperature control mechanisms. Maintaining warmth during observation is essential for infants. Because of their large body surface area and high metabolic rate, they are prone to fluid loss and hypothermia as well as cold stress.
An accurate weight should be recorded (see Figure 12-11) because the dosage of medications for infants and children is based on milligrams per kilogram of body weight. The temperature of infants may be taken via the axilla or in the ear (see Skill 22-3). The lungs should be clear to auscultation, and the chest should move symmetrically. Bowel sounds should be active in all four quadrants, and the abdomen should not be distended or tender to palpation. The skin should be observed for rashes or lesions.
Pulse and Respirations
The nurse counts a pulse rate by placing the finger pads over the site and feeling the wave of blood as it is forced through the artery. The pulse rate varies considerably in different children of the same age and size. The pulse rate and respiratory rate of the newborn are high (Tables 22-1 and 22-2). Both pulse rate and respiratory rate gradually slow down with age until adult values are reached.
Table 22-1
| AGE | AVERAGE (beats/min, awake) | UPPER LIMITS OF NORMAL (beats/min) |
| Newborn | 125 | 190 |
| 1-11 months | 120 | 160 |
| 2 years | 110 | 130 |
| 4 years | 100 | 120 |
| 6 years | 100 | 115 |
| 8 years | 90 | 110 |
| 10 years | 90 | 110 |
| GIRLS | BOYS | GIRLS | BOYS | |
| 12 years | 90 | 85 | 110 | 105 |
| 14 years | 85 | 80 | 105 | 100 |
| 16 years | 80 | 75 | 100 | 95 |
| 18 years | 75 | 70 | 95 | 90 |
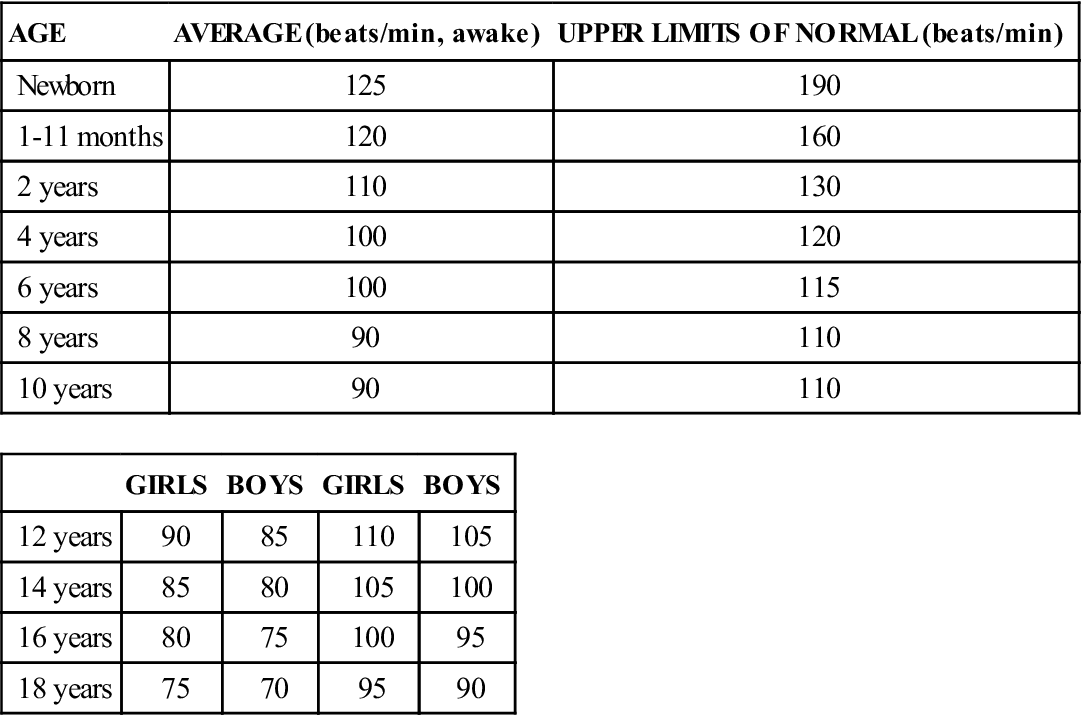
Modified from Kliegman, R., Behrman, R.E., Jenson, H.B., & Stanton, K. (2007). Nelson’s textbook of pediatrics (18th ed.). Philadelphia: Saunders.
Table 22-2
Normal Respiratory Ranges for Children
| AGE | RATE (breaths/min) |
| Birth–1 month | 30-40 |
| 1 month–1 year | 26-40 |
| 1-2 years | 20-30 |
| 2-6 years | 20-30 |
| 6-10 years | 18-24 |
| Adolescent | 16-24 |
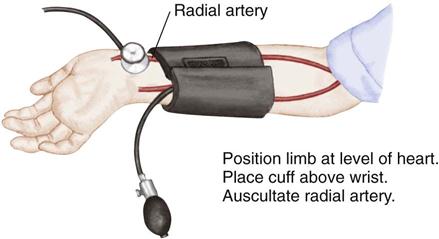
The pulse of the older child is taken just like that of an adult. Apical pulses are advised for children under 5 years of age (see Figure 12-10). The apical pulse is heard through a stethoscope at the apex of the heart. The nurse counts the rate for 1 full minute. Another common site is the radial pulse (at the thumb side of the wrist just above the radial artery). Actually, the pulse may be assessed in any area where a large artery lies close to the skin, especially if the artery runs across a bone and has little soft tissue around it. The following are the most common sites: radial, temporal (just in front of the ear), mandibular (on the lower jawbone), femoral (in the groin), and carotid (on each side of the front of the neck). The carotid pulse may not be appropriate to use in infants with chubby necks.
The child’s respirations are counted in the same way as for an adult. The nurse notes the number of times the chest or abdomen rises and falls for 1 minute. The rate and character of respirations are important in determining the patient’s general condition. The relationship of the pulse rate to the temperature and the respiratory rate should be assessed; the pulse rate will increase as the temperature increases because of the increased cardiac output and increased oxygen consumption needs that occur with an elevated temperature. When taking the vital signs in infants, the respirations are often taken first because they are the least invasive and once the infant cries, it is difficult to obtain an accurate respiratory rate.
Blood Pressure
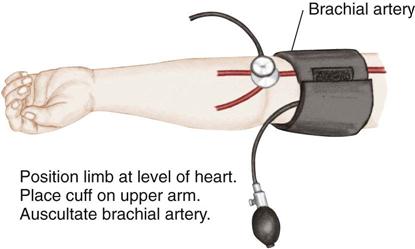
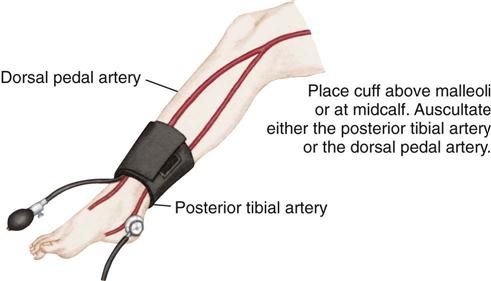
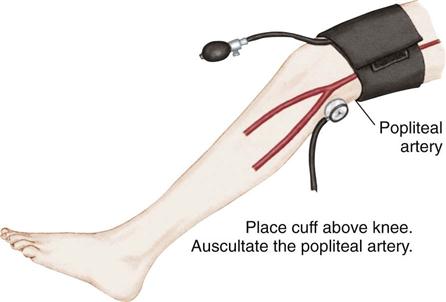
Blood pressure is defined as the pressure of the blood on the walls of the arteries. It is an index of elasticity of arterial walls, peripheral vascular resistance, efficiency of the heart as a pump, and blood volume. Common sites for measuring blood pressure in children are the brachial artery, popliteal artery, and posterior tibial artery. The 50th percentile is the midpoint of the normal range of blood pressure for children. Blood pressure readings in the 90th percentile are defined as prehypertension. Readings in the 90th percentile are considered stage 1 hypertension, and those in the 99th percentile are considered stage 2 hypertension (see Appendix J).
All children over 3 years of age should have their blood pressure checked and recorded (Brady et al., 2008). Children under 3 years of age who require blood pressure readings include children with a history of the following:
• Prematurity, low birth weight (LBW), or neonatal intensive care unit (NICU) admission
• Congenital heart or genitourinary anomaly
• Family history of kidney disease
• Recurrent urinary tract infection (UTI), hematuria, or proteinuria
Auscultation.
Auscultation of blood pressure is done the same way as for an adult but with a pediatric stethoscope and blood pressure cuff. The cuff should be long enough to encircle the extremity. The width of the cuff should cover two thirds of the upper arm. The following sizes are suggested: birth to 1 year, 3.8 cm ( inches); 2 to 8 years, 7.6 cm (3 inches); and 8 to 12 years, 11.4 (
 inches). Pressure is normally slightly higher in the lower extremities. The American Heart Association designates the muffled tone as the most accurate index of diastolic pressure but recommends recording both that and the final distinct sound as the complete record; thus 120/80/78 mm Hg. Nurses should clarify this with the physician or institution to ensure uniformity. To determine pulse pressure, the diastolic reading is subtracted from the systolic reading. This usually varies from 20 to 50 mm Hg. Widening pulse pressure may be a sign of increased ICP. The American Medical Association has recommended that mercury manometers not be used when taking the blood pressure of patients. Digital manometers are environmentally safer (Skill 22-2).
Skill 22-2
Blood Pressure Measurement in Children


Common sites for measuring blood pressure in children are the radial artery, brachial artery, popliteal artery, and posterior tibial artery. Blood pressure may be taken with a manometer and stethoscope or by an electronic machine using a cuff with a sensor that provides a digital readout of the blood pressure. A stethoscope is not necessary when this method is used.
Purpose
To assess blood pressure
Steps
Radial Artery
Brachial Artery
Posterior Tibial Artery
1. Place cuff above malleoli or at midcalf.
2. Auscultate either the posterior tibial artery or the dorsal pedal artery.
Popliteal Artery
Palpation.
Palpation is one of the oldest methods of measuring blood pressure. The cuff is applied and inflated above the expected pressure. The fingers are placed over the brachial or radial artery. The systolic pressure is recorded at the point when the pulse reappears. Diastolic pressure is unobtainable. This method is useful in newborns.
Electronic or Ultrasonographic Measurement.
This is a noninvasive type of blood pressure monitoring that ultrasonically detects motion of the arterial wall. A transducer with an attached cuff is secured over an artery, usually the brachial, femoral, or popliteal artery. The cuff is inflated above systolic pressure and is then gradually deflated. The transducer transmits vascular sounds, and the measurement appears on a digital readout. Both systolic and diastolic pressures are recorded. Electronic blood pressure machines do not require auscultation with a stethoscope. A cuff is applied, the machine is turned on, and a digital reading is obtained, usually in less than 1 minute.
The nurse should explain what is about to happen; for example, “This will hug your arm and feel tight for a few seconds.” The child is allowed to examine the sphygmomanometer and cuff.
Blood pressure is lower in children than in adults. If a patient needs blood pressure measurements throughout hospitalization, the nurse observes the previous readings before charting the current one. Many factors account for variations in blood pressure measurements, including time of day, sex, age, exercise, pain, and emotion. A blood pressure reading taken when a child is frightened or crying is not accurate. If a significant change is observed, the blood pressure should be rechecked. Abnormal readings are charted and reported to the nurse in charge. See Appendix J for blood pressure readings in infants and children.
Temperature
Pathogenesis of Fever and the Use of Antipyretics.
An infection from bacteria or other toxins stimulates immune substances to work along with prostaglandins in the body and stimulate the hypothalamus to raise the body temperature. This triggers a body response of vasoconstriction, shivering, and decreased peripheral perfusion that decreases body heat loss while maintaining homeostasis, and therefore the body temperature rises. Antipyretic medications such as ibuprofen or acetaminophen inhibit prostaglandin production, thereby preventing shivering, vasoconstriction, and alteration in perfusion, resulting in heat loss and lowering of body temperature.
Fever differs from hyperthermia. Hyperthermia is an increase in core body temperature occurring with central nervous system impairment. Prostaglandins are not involved, and the homeostasis mechanism is bypassed. Hyperthermia can result from a drug reaction, trauma, or environmental overheating, such as when a baby is bundled and left in a hot automobile. Treatment of hyperthermia involves vigorous cooling measures such as cold blankets and intravenous (IV) fluids.
Fever results in an increased metabolic demand on the heart and lungs, and children with cardiopulmonary disease require antipyretics to minimize the increase in oxygen consumption that causes an increased demand on the heart. Antipyretics also provide comfort and may aid in enabling the child to consume fluids, lessening the risk of dehydration. Antipyretics may also be recommended for children with a history of febrile seizures to prevent a second seizure. Excessive use of antipyretics should be avoided because these drugs can burden the kidneys and liver. Fever is thought to be a protective mechanism that aids in the recovery from infection.
Temperature Measurement.
Fever is most often defined as a rectal temperature above 38° C (100.4° F), a tympanic temperature above 38° C (100.4° F), an oral temperature above 37.8° C (100° F), or an axillary temperature above 37.2° C (99° F) (Crocetti & Serwirt, 2005).
When evaluating the degree of illness in a febrile child, the response of the child to cuddling, alertness, hydration, sociability, and quality of cry should be assessed and recorded. A quiet, lethargic child who does not respond readily to the environment may be acutely ill. Because dehydration is a common problem in infants and children, skin turgor should be assessed (see Figure 12-13). Measures to reduce fever may promote comfort for the child.
There are several types of thermometers available to measure body temperature. The American Medical Association has recommended that thermometers containing mercury not be used. Temperatures are most often measured using the axillary technique. An oral temperature technique may be used in children over 5 years of age if the child can keep his or her mouth closed and has not ingested hot or cold fluids before measurement. Rectal temperatures are not recommended for pediatric patients. The electronic thermometer, the plastic strip thermometer, and the tympanic membrane sensor are commonly used in the pediatric unit. The electronic thermometer works quickly and is ideal because the plastic sheath is replaceable. The plastic strip changes color according to sensed temperature changes. Tympanic thermometers have a blunt tip that is covered with a disposable cover and can be inserted into the ear. They record temperature from the tympanic membrane (eardrum) by an infrared emission. This site is of importance because the hypothalamus (temperature-regulating center) and the eardrum are perfused by the same circulation. Table 22-3 shows normal temperature ranges. The documentation of the patients temperature should indicate the method used, such as “O” for oral; “Ax” for axillary; or “T” for tympanic.
Table 22-3
Normal Temperature Ranges for Children
| METHOD | RANGE |
| Oral | 36.4°-37.4° C (97.6°-99.3° F) |
| Rectal | 37.0°-37.7° C (98.6°-100.0° F) |
| Axillary | 35.8°-36.6° C (96.6°-98.0° F) |
| Tympanic | 36.9°-37.5° C (98.4°-99.5° F) |
Oral temperature.
The procedure is the same as for adults and may be appropriate for older children.
Axillary temperature.
Axillary temperatures are usually taken for newborns and/or according to unit policy (Skill 22-3).


Temporal artery temperature.
The temporal artery thermometer measures infrared emissions over the temporal artery by rolling the transducer over the child’s forehead.
Tympanic temperature.
The tympanic thermometer measures core body temperature by detecting the infrared energy emitted from the tympanic membrane. (Core body temperature is the estimated temperature of the internal body organs.) The tympanic technique is accurate for all ages. However, some brands of tympanic thermometers have ear probes that do not fit well into the auditory canal of infants under age 3 months. These thermometers should be used only for infants over 3 months of age (Skill 22-4).
Skill 22-4
Tympanic Temperature Technique


Purpose
To assess body temperature
Steps
2. Aim the probe of the thermometer at the opposite eyebrow.
4. Document the temperature and route used in the medical record.
The accuracy of the tympanic temperature is not affected by illness such as otitis media. A table of Celsius and Fahrenheit temperature equivalents appears in Appendix H. Nursing Care Plan 22-1 reviews the care of a child with a fever.
22-1
 Nursing Care Plan
The Child with a Fever
Patient Data
A 6-year-old child is admitted with a diagnosis of dehydration and a fever of 39.6° C (103.3° F) and is unable to retain food because of nausea and vomiting.
Selected Nursing Diagnosis
Deficient fluid volume, potential for dehydration due to increased metabolic rate
Critical Thinking Question
Pain
Pain is a fifth vital sign that must be addressed in the plan of care. See Chapter 12 for pain in the newborn and Chapter 21 for pain in the child or adolescent.
Weight
Weight must be accurately recorded on admission (see Figure 12-11). The weight of a patient provides a means of determining progress and is necessary to determine the dosage of certain medications. The way in which the nurse weighs the child depends on the age.
The infant is weighed completely naked in a warm room. A fresh absorbent pad or scale paper is placed on the scale. This prevents cross-contamination (the spread of germs from one infant to another). The scale is balanced to compensate for the weight of the pad. The infant is placed gently on the scale. The nurse’s hand is held slightly above the infant to prevent falling. Once the exact weight appears on the digital readout, the infant is removed from the scale, wrapped in a blanket, and soothed. The weight is immediately recorded. The scale paper is disposed of in the proper receptacle.
The older child is weighed in the same manner as an adult. A paper towel is placed on the scale for the patient to stand on. The patient is generally weighed in a hospital gown. The shoes are removed. If the child is unable to stand on the scales, it may be necessary for the nurse to hold the child and read the combined weights. The nurse is then weighed and that number subtracted from the combined weight to obtain the patient’s weight. Occasionally a child is weighed while wearing a cast. The nurse records this; for example, “weight 34 lb with cast on right arm.” It is often desirable to record the weight in pounds as well as kilograms. Some parents find pounds a more familiar term. Kilograms are used to calculate safe dosages of medications.
Height
The child’s height is measured along with weight. The infant’s height must be measured while the infant is lying on a flat surface alongside a metal tape measure or yardstick. The knees should be pressed flat on the table. The measurement is taken from the top of the head to the heels and recorded (see Skill 15-1).
Head Circumference
Head circumference increases rapidly during infancy as a result of brain growth. It is generally measured on infants and toddlers and on all children with neurological defects. The tape measure is placed around the head slightly above the eyebrows and ears and around the occipital prominence of the skull (see Skill 12-1). The measurement is recorded.
Specimen Collection
Urine Specimens
A urine specimen is usually obtained from the newly admitted patient. There are certain general principles of collecting specimens:
• Explain the procedure to the child (as age appropriate).
• Use a clean container or urine collection device.
• Check frequently for results.
• Label all specimens clearly and attaching the proper laboratory slip.
• Send specimen to laboratory according to hospital policy.
• Record in nurses’ notes and on intake and output (I&O) sheet.
The procedure for collecting a urine specimen from an infant is described in Skill 22-5.
Skill 22-5
Collecting a Urine Specimen in Infants


Purpose
To obtain a specimen for clinical laboratory assessment
Steps
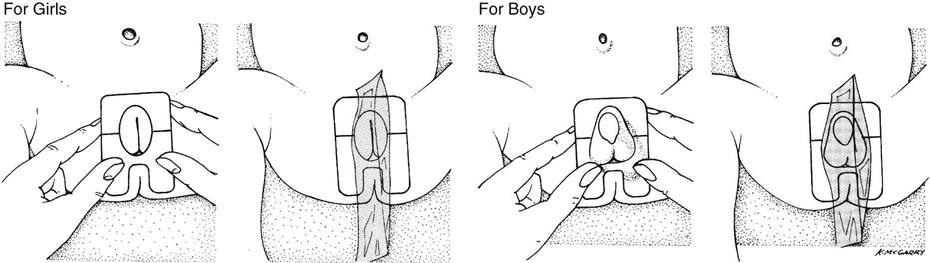
4. Place the collector with specimen into a plastic bag.
6. Replace infant’s clean diaper, position in crib, and raise side rails.
7. Remove gloves and perform hand hygiene.
8. Label specimen container for transport to laboratory according to hospital protocol.
9. Document in medical record amount of urine collected and time sent to laboratory.
Urine collected directly from ultra-absorbent disposable diapers may yield inaccurate protein, pH, and specific gravity measurements because of the chemicals in the diaper.
Obtaining a Clean-Catch Specimen.
Special sterile containers are available for clean-catch specimens; the manufacturer’s directions should be followed. The procedure necessitates cleansing of the perineum with an antiseptic. Rinsing and drying the perineum are important to prevent contamination of urine from the antiseptic. Wiping is done from front to back. After the urine stream has started, the midstream specimen is caught in the sterile container. The nurse’s participation is either direct or supervisory depending on the child’s age or the availability of a parent. Adolescents, who may be embarrassed by carrying a urine specimen through the halls, may be given a bag or other suitable camouflage. The specimen should be sent to the laboratory promptly.
Obtaining a 24-Hour Specimen.
At times a 24-hour urine specimen may be requested to determine the rate of urine production and measure the excretion of specific chemicals from the body. The nurses on each shift must closely supervise this test to maintain its accuracy, because lost specimens necessitate restarting the test. Problems can arise if the collection device does not adhere to the skin properly; therefore the nurse must be alert for this occurrence. Diversions suitable to the child’s age are used. A sign is attached to the infant’s crib to alert personnel of a 24-hour urine collection. The average daily amount of urine excreted, by age, is given in Table 22-4.
Table 22-4
Average Daily Excretion of Urine
| AGE | FLUID OUNCES | MILLILITERS (mL) |
| 1st and 2nd days | 1-2 | 30-60 |
| 3rd to 10th days | 3-10 | 100-300 |
| 10th day to 2 months | 9-15 | 250-450 |
| 2 months to 1 year | 14-17 | 400-500 |
| 1-3 years | 17-20 | 500-600 |
| 3-5 years | 20-24 | 600-700 |
| 5-8 years | 22-34 | 650-1000 |
| 8-14 years | 27-47 | 800-1400 |
Testing for Albumin.
The nurse working in a physician’s office or clinic may also be requested to test urine for albumin (protein). Normally, little or no albumin is found in the urine of a healthy child. Reagent strips especially intended for this purpose are available. The nurse dips the end of the strip into urine and compares the strip with a special color chart. Specific instructions accompany test materials.
Stool Specimens
Stool specimens are obtained from older children in the same manner as from adults. This is embarrassing for most children, who are “turned off” by the suggestion. The ambulatory child can use a bedpan or “hat” placed beneath a toilet seat. It is difficult for a child to tell the nurse that the sample has been collected. The nurse can acknowledge these feelings by giving the child permission to express them without being critical; for example, the nurse could say, “I know this must be embarrassing for you. It is for grown-ups too, but we need this specimen.” An infant’s stool specimen can be obtained from the infant by scraping the specimen from the diaper with a tongue depressor and placing it in the specimen container. Some specimen containers contain a portion of liquid. The label indicates a “fill line.” The amount of infant stool needed for a specimen is the amount which, when placed into the container, results in the fluid level rising to the fill line.
Some specimens must be sent to the laboratory while they are warm. The specimen container is labeled properly and placed in a plastic bag, and the laboratory slip is attached. The nurse charts the time; color, amount, and consistency of the stool; the purpose for which it was collected (e.g., blood, ova, parasites, or bacteria); and any related information.
Blood Specimens
Positioning the Child.
Positioning the child for blood drawing is extremely important. The nurse is often asked to assist in these procedures. Figure 22-6 depicts how to position the patient for a femoral venipuncture. Both the jugular and the femoral veins are large; therefore the patient is frequently checked to ensure that there is no bleeding afterward. These sites are used mainly when other areas have been exhausted. Therefore the infant is soothed, because crying and thrashing may precipitate oozing. The nurse charts the site used, the name of the blood test, and any untoward developments.
Lumbar Puncture
The nurse often assists the physician with a lumbar puncture, which is also referred to as a spinal tap. It is done to obtain spinal fluid for examination or to reduce pressure within the brain in conditions such as hydrocephalus or meningitis. Disposable lumbar puncture sets are used.
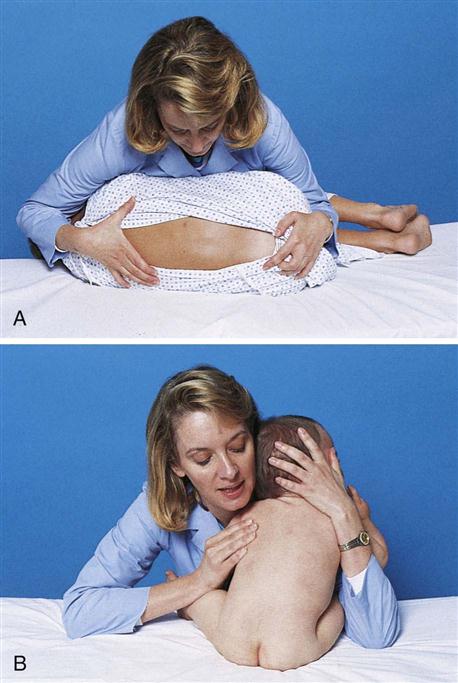
Normal spinal fluid is clear like water. The opening pressure ranges from 60 to 180 mm Hg. It is somewhat lower in infants. The procedure for children is essentially the same as that for adults. The main difference lies in the patient’s ability to cooperate with positioning. The nurse explains that the child must lie quietly and will be helped to do this. Sensations during a lumbar puncture include a cool feeling when the skin is cleansed and a feeling of pressure when the needle is inserted. The way in which the child is held can directly affect the success of the procedure.
The child lies on the side with the back parallel to the side of the treatment table. The knees are flexed, and the head is brought down close to the flexed knees. The nurse can keep the child in this position by placing the child’s head in the crook of one arm and the knees in the crook of the other arm. The nurse’s hands are then clasped together or placed as shown. The nurse leans forward, gently placing the chest against the patient (Figure 22-7).
Once the child is positioned, the physician prepares the lower back using sterile technique. A vial of local anesthetic may be necessary unless this is provided in the sterile setup. The top of the vial is cleansed according to hospital protocol. Once the area has been locally anesthetized, the physician inserts a special hollow needle into the patient’s lower back and collects the spinal fluid in two or three test tubes. When the procedure is completed, a sterile bandage is placed over the injection site, and the child is comforted. Specimens are labeled and taken to the laboratory with the appropriate requisition form.
The adolescent may avoid post–lumbar puncture headache by lying flat for some time. The nurse charts the date and time of the lumbar puncture and the name of the attending physician. Also charted are the amount of fluid obtained and its character (e.g., cloudy or bloody), whether or not specimens were sent to the laboratory, and the patient’s reaction to the procedure.
Physiological Responses to Medications in Infants and Children
Medication administration is a primary responsibility of the nurse. It is important for the nurse to understand that the responses of infants differ from those of children and that the responses of infants and children differ from those of adults. These concepts must also be communicated to the parents, who often administer over-the-counter medications to their growing child. The most common over-the-counter medication administered by parents to infants and children is acetaminophen (Tylenol). A health care provider may advise the parents to “give a teaspoon of acetaminophen” to their young child. However, the parents who purchase the medication may choose acetaminophen in the form of drops instead of an elixir. The 1-teaspoon dose of acetaminophen elixir is the intended dose ordered. However, if the parent gives the child 1 teaspoon of acetaminophen in the form of drops, it would be a massive overdose that can harm the young child. These types of accidents can be prevented by parent education.
Understanding the differences in drug absorption, distribution, metabolism, and excretion between children and adults is essential to provide safe pediatric medication administration. Age is the most important variable in predicting response to any drug therapy. The functions of various organs in the body mature as the child grows and develops.
Absorption of Medications in Infants and Children
Gastric Influences
In the neonate there is an absence of free hydrochloric acid in the stomach. The acid content of the stomach reaches adult levels by age 2 years. Therefore medications that require an acid medium in the stomach for absorption may not be completely absorbed if the child is under 2 years of age. The administration of such medications near the time of formula feedings will further decrease the acid content of the stomach. After 2 years of age, the ingestion of orange juice increases gastric acidity, causing more effective absorption of medication that requires an acid medium to absorb.
Intestinal Influences
Children under 5 years of age have a more rapid intestinal transit time than adults. Medication may move out of the small intestines before it is completely absorbed. Therefore delayed or timed-release oral medication may not be fully absorbed by children younger than 5 years of age. There may be a low amount of pancreatic enzymes under 1 year of age. Some medications depend on pancreatic enzymes to help absorb the drug.
Topical Medications (Ointments)
Pediatric patients have a thin stratum corneum that allows topical medications to be absorbed. The larger skin surface area also increases the amount of absorption of topical medication as compared to adults. The use of a plastic diaper can also cause increased absorption of a topically applied medication in the diaper area of the skin. Hydrocortisone and hexachlorophene may produce adverse systemic responses when applied to the buttocks and covered with a plastic diaper.
Parenteral Medications
Poor peripheral perfusion in the young infant will slow intramuscular (IM) drug absorption. IM drugs administered to infants and children under 4 years of age should be water soluble to prevent precipitation. In neonates, medication may pass through the blood-brain barrier more easily than in older children and adults. Therefore medications that depress respiration may have a more powerful effect on neonates than in adults.
Metabolism of Medications in Infants and Children
Most medications are metabolized in the liver. Because the liver and its enzymes do not function at a mature level until 2 to 4 years of age, drugs generally metabolize more slowly in the infant and young child compared to the adult. Medications given at frequent intervals to infants and children may result in toxic levels and responses.
Excretion of Medications in Infants and Children
Many medications such as penicillin and digoxin depend on the kidneys for excretion. The immature kidney function prevents effective excretion of drugs from the body in infants under 1 year of age.
The combination of slow stomach emptying (delays medication from being absorbed), rapid intestinal transit time (may prevent the full amount of medication from being absorbed), unpredictable liver function (may impair metabolism of the drug), and inability to effectively excrete medications via the kidney can result in altered responses to medication and a high risk for toxicity.
Nursing Responsibilities in Administering Medications to Infants and Children
It is a legal and ethical responsibility of the nurse to understand that growing children differ in their ability to respond to medications. Nurses must observe for toxic symptoms whenever medications are administered and document positive and negative responses. Close attention must be paid to pediatric dose calculations. Every medication administered should have the safety of the dose prescribed calculated before administration. Official sources for safe dosage levels for various age-groups are provided by the manufacturer’s pocket insert, the Physician’s Desk Reference (PDR), or other current drug reference books. See Box 22-2 for one method of determining safe dosage for infants and children.
Parent Teaching
Parent teaching is essential to ensure compliance when the child is sent home. Instructions should cover the following six areas:
1. The importance of administering the medicine.
2. The importance of completing the prescribed course of treatment.
4. Techniques of administering medications to the infant or child:
• Using a dropper, a syringe, or a measured cup
• Not mixing medication with formula, food, or water
• Shaking medication before administering
• Refrigerating unused portions of medication if indicated
5. Techniques of encouraging child compliance:
• Providing praise for cooperation and perhaps a chart of stars or stickers for compliance
Stay updated, free articles. Join our Telegram channel

Full access? Get Clinical Tree


