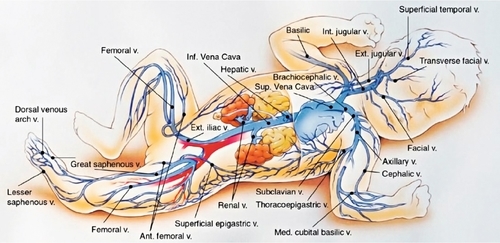
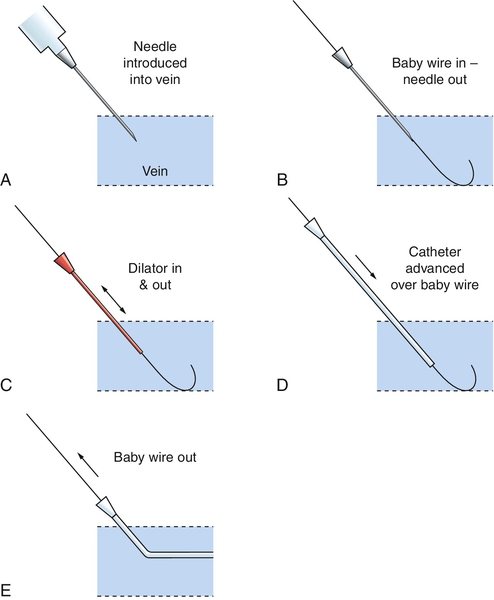
CHAPTER 15 2. Know the equipment and supplies needed to perform common fundamental and advanced invasive procedures in the neonate. 3. Identify pertinent anatomic landmarks for commonly performed invasive procedures in the NICU. 4. Describe the precautions and contraindications for each invasive procedure. 5. Describe potential complications associated with each invasive procedure. Approximately 250,000 to 350,000 newborn infants are admitted into the NICU in the United States annually and undergo hundreds of diagnostic and/or therapeutic procedures during their hospitalization. This chapter incorporates many of the diagnostic and therapeutic interventions that are commonly performed in the NICU. These procedures are crucial to the infant’s survival; however, they expose the infant to pain and stress that can result in harmful long-term consequences. Therefore, pain management is essential when performing interventions in the NICU. In many NICUs today, qualified registered nurses or advanced practice nurses, rather than physicians, perform many invasive procedures. Prior to performing any procedure, it is essential that one have knowledge of the indications, precautions, and complications associated with each procedure. Infants are extremely vulnerable; therefore, the ability to perform the procedure proficiently is a major requirement to prevent harm. The details pertaining to each of the covered procedures comprise this chapter. Aspects that are common to each include the crucial issues listed below. ■ Know your institution’s protocols about the qualifications needed to perform any procedure. ■ Know your institution’s protocols about any specific ways in which procedures differ from the descriptions included here. ■ Obtain informed consent whenever required for an invasive procedure. Discussion with family is key, even if signed informed consent is not required. ■ Always use standard infection control precautions and implement aseptic technique whenever indicated. ■ Provide for pain and comfort control before, during, and after the procedure. ■ Monitor the patient’s clinical status during the procedure. Minimally, monitoring will include oxygenation, ventilation, temperature, and reaction to the procedure, including pertinent vital signs. ■ Make written documentation about pertinent aspects of the procedure and enter this into the medical record. ■ Perform time out before procedure to ensure patient safety. 1. Facilitate oxygenation and ventilation. 2. Maintain patent airway. 3. Clearance of tracheobronchial secretions. 4. Obtain tracheal aspirate specimens. B. Contraindications. 1. Recent surgical procedure to area. 2. Recent surfactant administration. 3. Pulmonary hemorrhage—suction only if needed to maintain tube patency. C. Precautions. 1. Suctioning should be done only when the infant needs it and not on a routine schedule. 2. Maintain aseptic technique. 3. Monitor vital signs and for adverse responses to procedure, such as bradycardia and oxygen desaturations. 4. Avoid hyperoxygenation, hyperinflation, and hyperventilation techniques if possible. Hyperoxygenation in preterm neonates is discouraged owing to risk of retinopathy of prematurity (ROP). If the infant easily becomes hypoxic or oxygenation status is critical, oxygen can be increased by 10% to 20% above baseline to maintain adequate oxygenation. Hyperinflation should be avoided as this places the neonate at risk for air leaks. The effect of hyperventilation alone in neonates is unclear and therefore discouraged (Davis and Rosenfeld, 2005). 5. Loss of lung volume can occur with suctioning. Increased loss of lung volume and hypoxia are associated with open catheters versus closed “in-line” catheters (Tingay et al., 2007). 6. Keep infant’s head midline during suctioning to prevent jugular vein distention, which can increase intracranial pressure (ICP). 7. Pulmonary hemorrhage may be exacerbated by suctioning. However, suctioning may be needed to clear the blood from the airway or tube. 8. Always suction ETT before suctioning mouth. 9. When feasible, use two caregivers to perform endotracheal suctioning if the closed (in-line) system is not in use. This may minimize adverse responses and shorten procedure time. D. Equipment and supplies. 2. Choose the appropriate-sized catheter. Catheter should be no larger than half the inside diameter of the ETT. b. Use 6 F for ETT less than 3.5 mm. 3. Resuscitation bag with 100% oxygen source and oxygen blender. 4. Suction source with vacuum control setting. 5. Manometer. 6. Stethoscope. 7. Specimen trap (if applicable). E. Procedure. 1. Determine the need to suction and suction only when indicated. Suctioning should be individualized based on changes in the patient’s physical assessment and not on a routine schedule (Gardner et al., 2011). The following situations may warrant suctioning: a. Falling oxygen saturations. b. Increasing oxygen requirements. c. Diminished breath sounds. d. Changes in vital signs. e. Changes in blood gases. f. Changes in respiratory rate and pattern. g. Agitation. h. Visible secretions in ETT. i. Pattern change in ventilator graphics. j. Loss of or poor chest wall excursion with ventilator breaths. 2. Wash hands and ensure that equipment is in working order. 3. Shallow suctioning technique is the preferred method. Deep suctioning should be avoided as this has been shown to cause tissue damage and inflammation. a. Determine suction catheter insertion depth by summing the length of the ETT and its adapter. The catheter should not be inserted more than 1 cm beyond the total distance determined (Hagler and Traver, 1994). 4. Gather supplies. a. Commercially prepared suction catheter kit or sterile suction catheter and sterile gloves. Closed-system (in-line) suction catheter kits are available that remain attached to the ETT adapter and should be used per manufacturer’s recommendations. The closed-system suction technique is preferred as it allows the infant to be suctioned without being removed from the ventilator. Closed-system suction devices may decrease respiratory contamination and pulmonary infections and have been shown to have decreased physiologic consequences such as bradycardia and desaturation (Choong et al., 2003; Kalyn et al., 2003; Tan et al., 2005). b. Appropriate-sized suction catheter with measurement markings. c. If using a commercially prepared suction kit, open package and maintain sterility of contents. Remove and don sterile gloves, then remove catheter. If using separate gloves and catheter supplies, open suction catheter package, maintaining sterility of catheter, then open and don gloves. Continue to maintain aseptic technique and remove catheter from package. 5. While maintaining aseptic procedure, attach suction catheter to suction tubing with nondominant hand (now considered contaminated). With sterile dominant hand, hold suction catheter and maintain sterility of catheter. 6. Release suction tubing from nondominant hand and remove infant from ventilator. Provide oxygen and ventilation at necessary levels to maintain the heart rate and provide adequate oxygen saturation. Infant may be ventilated by hand or by providing manual breaths from ventilator. If manual breaths are provided by the ventilator, use caution to avoid hyperinflation and to allow adequate exhalation times. 7. Suction at 60 to 100 mm Hg or with just enough suction to extract secretions through catheter. 8. Advance catheter only to a predetermined distance. If a cough reflex is initiated, catheter distance is too far. 9. Apply suction only when withdrawing catheter and limit suction duration to 5 to 10 seconds. Allow patient to recover between suction passes while monitoring vital signs, oxygen saturation, and chest wall movement. 10. Routine normal saline (NS) irrigation is not recommended as this may dislodge viable bacteria from colonized ETT into the lower airway (Gardner et al., 2011). 11. Limit the number of suction passes. Suction until secretions are removed or infant shows signs of intolerance. Clear suction catheter with NS between suction passes. Most secretions can be cleared in one or two passes. 12. If obtaining tracheal specimen, attach sterile specimen trap to suction catheter and suction tubing for specimen prior to general suctioning. 13. Return infant to previous oxygen requirement as tolerated, if applicable. 14. Label and send tracheal specimen to laboratory, if applicable. 15. Document patient’s tolerance, character of secretions (amount, color, and consistency), and breath sounds. 16. If using a closed-system (in-line) catheter device, change per manufacturer’s recommendation or per institution’s policy if sooner. F. Complications. 2. Bradycardia. 3. Apnea. 4. Accidental extubation or malpositioning of tube. 5. Trauma to trachea or bronchi. 6. Hemorrhage. 7. Loss of lung volume. 8. Atelectasis. 9. Infection/pneumonia. 10. Pneumothorax. 11. Increased ICP. 12. Granular tissue formation. 13. Bronchial stenosis. 14. Tracheal laceration. 2. Bag-and-mask ventilation is ineffective or undesirable. 3. Need for mechanical ventilation. 4. Tracheal suctioning or lavage is required, such as to remove meconium from the trachea. 5. To obtain sterile tracheal aspirate specimen. 6. Protection of the airway is required. 7. Diaphragmatic hernia is present. 8. Administration of exogenous surfactant. 9. To relieve critical upper airway obstruction. B. Precautions. 2. Hypoxia during the procedure should be minimized. 3. Use free-flow oxygen held near the mouth and nose of any infant with respiratory effort, to maximize oxygenation during the procedure. 4. Limit intubation attempts to 20 seconds. The infant’s condition should be stabilized with bag-and-mask ventilation between attempts. 5. Have all equipment necessary for intubation prepared and in working order prior to initiating procedure. 6. For nonemergent intubations, infant pain management is recommended prior to procedure using institutional protocol (Allen, 2012). 7. Maintain thermal homeostasis and developmental care. C. Equipment and supplies. 1. Pediatric laryngoscope handle. 2. Laryngoscope blade with functioning secure bulb. a. Size 00 blade for preterm infants weighing less than 1000 g. b. Size 0 blade for infants weighing 1000 to 3000 g. Most infants weighing 3000 to 4000 g can be successfully intubated with a size 0 blade. However, if unable to visualize landmarks, a size 1 blade may be necessary. c. Size 1 blade for infants weighing more than 4000 to 5000 g. d. Types of blades: (2) Macintosh curved blade. 3. ETT size: b. ID 3 mm for 1000- to 2000-g infants or infants with a gestational age of 28 to 34 weeks. c. ID 3.5 mm for 2000- to 3000-g infants or infants with a gestational age of 34 to 38 weeks. d. ID 3.5 to 4 mm for infants weighing more than 3000 g or greater than 38 weeks of gestation. 4. Stylet (though use is optional, it should be available). 5. Suction catheters (size 5 F to 10 F) and suction source set at 60 to 100 mm Hg of negative pressure. 6. Resuscitation bag and mask of appropriate sizes. Alternatively, availability of infant ventilation device, such as a T-piece resuscitator (i.e., NeoPuff). 7. 100% oxygen source with blender providing an appropriate FiO2 for the patient, minimally at a flow rate of 5 to 10 L/min, with attached manometer. 8. Tape and other supplies to secure ETT according to hospital policy. 9. Cardiorespiratory monitor and oxygen saturation monitor. 10. Stethoscope. 11. Meconium aspirator, if applicable. 12. End-tidal CO2 (EtCO2) detector, colorimetric device such as the Pedi-Cap to confirm intubation. a. Limitations of neonatal colorimetric EtCO2 detection devices (DeBoer and Seaver, 2004). (2) False-positive readings—verify ETT placement after at least 6 breaths have been given via ETT with attached EtCO2 device. (3) Detector contamination—detector may be contaminated with bodily fluids or medication and limit ability to display color change. False-positive color change has been reported with atropine, epinephrine, calfactant (Infasurf), and naloxone (Narcan) (Hughes et al., 2007). (4) Limited time accuracy—sufficient exhalation time must be allowed for device to detect CO2 and display color change (may take up to six ventilations with a resuscitation bag), device is good for up to 24 hours of intermittent use or 2 hours of continuous use. 13. Devices for difficult intubation—ideally, a difficult airway should be identified prior to intubation. The following devices should only be used by personnel with extensive training and experience, such as a neonatologist, otolaryngologist, or anesthesiologist. If this is not possible, arrangements should be made for transfer to a center where personnel and equipment are available (Kumar et al. and Committee on Fetus and Newborn, Section on Anesthesiology and Pain Medicine, 2010). a. Laryngeal mask airway (LMA) should be available at all intubations in the event intubation is unsuccessful (Kumar et al. and Committee on Fetus and Newborn, Section on Anesthesiology and Pain Medicine, 2010). (1) All personnel who are trained in neonatal intubation should also be trained in the use of LMA. (2) This is not an acceptable long-term airway; however, it may be used while preparations are made for a secure airway. b. Specialized stylets such as lighted and fiberoptic stylets, intubating introducers such as the gum elastic bougie, and fiberoptic flexible bronchoscopes. c. Indirect rigid laryngoscopes. d. Video laryngoscopes. D. Procedure. 2. Wash hands and verify patient and procedure to be performed. 3. It is recommended that an analgesic be given prior to all nonemergent intubation, and use of a vagolytic be considered. Premedication can decrease adverse effects of intubation, such as bradycardia, hypoxia, and increased intracranial pressure, by treating pain and calming a patient during an uncomfortable procedure (Kumar et al. and Committee on Fetus and Newborn, Section on Anesthesiology and Pain Medicine, 2010). When writing a unit policy for preintubation medications, consider use of agents that are rapid onset with the shortest possible duration of action. See Table 15-1 for common medications used in intubation (adapted from Allen, 2012; Kumar et al. and Committee on Fetus and Newborn, Section on Anesthesiology and Pain Medicine, 2010): b. Sedative–hypnotic (optional): Due to limited data and side effect profile, there are no AAP-preferred sedative–hypnotic agents. Acceptable agents are thiopental and propofol in preterm and term infants, and midazolam is acceptable in term infants. A sedative alone without analgesia should not be used (Kumar et al. and Committee on Fetus and Newborn, Section on Anesthesiology and Pain Medicine, 2010). c. Neuromuscular blocking agents (optional): Muscle relaxants are contraindicated in situations where intubation may be difficult, such as micrognathia and cleft lip/palate or with health care providers with limited neonatal intubations. Sensation remains intact with neuromuscular blockade, and thus, analgesia must be used in combination. d. Vagolytics: These drugs may help prevent reflex bradycardia during intubation. Atropine is the AAP-preferred vagolytic, but glycopyrrolate may be used as a second option. 4. Select ETT of the appropriate size. 5. Insert stylet (optional) and shape the ETT as desired. The stylet must be secured so that its tip does not extend below the tip of the ETT and also so the stylet cannot advance during the procedure. Keep the tube and stylet as clean as possible. 6. Determine ETT insertion depth. A variety of methods has been reported for predicting insertional length such as nasal–tragus length, sternal length, foot length, and weight. The American Heart Association (AHA) Neonatal Resuscitation Program use the 7-8-9 Rule (AAP and AHA, 2011). (1) The 7-8-9 Rule has been associated with overestimated depth insertion in infants weighing less than 750 g (Peterson et al., 2006). 7. Aspirate gastric contents and suction the oropharynx. 8. Position the patient supine on a flat surface, with the head midline and the neck slightly extended (optional: place a soft flat roll under neck) in a “sniffing” position. The person performing intubation must have easy access to the airway and equipment while positioned at the patient’s head. 9. Hold the laryngoscope in the left hand between the thumb and first finger, with the blade pointing away. The laryngoscope is designed to be held with the left hand only. 10. Open the patient’s mouth with the fingers of the right hand and gently slide the blade into the right side of the mouth. 11. Stabilize the left hand against the left side of the patient’s face, advance the blade tip to the base of the tongue, and move the blade to the midline, pushing the tongue to the left. 12. Expose the pharynx by lifting the entire blade upward in the direction in which the handle is pointing. Do not rock the tip of the blade upward or use the upper gum as a fulcrum. 13. If unable to see the glottis, apply gentle external tracheal pressure (cricoid pressure) with the fifth finger of the left hand or have an assistant perform this and withdraw the blade slowly until the glottis is visible. 14. Remove any secretions that interfere with visualization by suctioning. Direct suctioning under laryngoscopy is ideal. 15. Identify anatomic landmarks. b. Glottis is anterior, with vocal cords closing side to side. c. Esophagus is posterior. 16. After identifying the vocal cords, and with the cords in clear view, place the ETT into the right side of the patient’s mouth with the right hand. 17. Keeping the cords in view, pass the ETT between the cords 1 to 2 cm into the trachea on inhalation (level of the vocal cord guide mark on the ETT). This should position the tip of the tube midway between the thoracic inlet and the carina, approximately at the second and third thoracic vertebrae. If the vocal cords are closed or will not open, wait for spontaneous breath, or stimulate a breath by stroking the soles of the feet. 18. With the right index finger, firmly hold the ETT against the roof of the mouth, stabilize the right hand against the patient’s face, and carefully remove the laryngoscope with the left hand. 19. Carefully remove the stylet, if used, from the ETT. 20. Attach the resuscitation bag and EtCO2 detector if applicable and assess tube placement. a. Auscultate both sides of the chest for the presence and intensity of breath sounds. b. Assess chest movement with inflationary breaths. c. Auscultate over the epigastrium and visually assess for distention. d. Check for condensation in tube during exhalation. e. Check for color change on CO2 detector, if available. 21. Following confirmation of successful intubation, attach ETT to bag or special ventilation device such as a T-piece resuscitator and deliver breaths. 22. If the tube is in too far and placed in a right or left mainstem bronchus, auscultation may reveal unilateral or unequal breath sounds. The tube should be withdrawn very gradually and assessed until equal bilateral breath sounds are auscultated. If the tube is in the esophagus: a. Air may be heard entering the stomach with inflationary breaths. b. The stomach may become distended. c. A strong cry or cough may be noted. d. No breath sounds will be heard on auscultation of the chest during inflationary breaths, though air movement may be heard, especially over the lower portion of the chest. e. No color change with EtCO2 detector. f. Remove the ETT and discard it and hand ventilate with bag and appropriate-sized mask. 23. In very small infants, breath sounds may seem audible even with an ETT in the esophagus. 24. When the tube is assessed to be in good position, note the markings and secure the tube according to hospital policy. 25. Position of the tube must be confirmed by chest radiograph. b. Tip of ETT should lie approximately 0.5 to 1 cm above the carina. 26. After confirming tube placement by chest radiograph, any length of tube that extends more than 4 cm beyond the lip should be cut off to limit dead space and to prevent kinking. 27. Document according to hospital policy: date, time, ETT size, centimeter marking at lip, EtCO2 results, chest radiograph, and patient’s tolerance of procedure. Medications given, if any, should also be documented. E. Complications. b. Due to misplacement of tube. 2. Bradycardia. b. Due to vagal stimulation from the laryngoscope, ETT, or suction catheter. 3. Infection. 4. Perforation of esophagus or trachea. 5. Trauma/edema to oropharyngeal and laryngeal tissues. 6. Vocal cord injury. 7. Subglottic stenosis associated with long-term (> 3 to 4 weeks) intubation. 8. Palatal grooves from prolonged intubation. 9. Misplacement of tube into esophagus or bronchus. 10. Interference of oral development caused by oral ETT. 11. Abnormal dentition. 12. Ingestion/aspiration of laryngoscope bulb. 13. Tube obstruction or kinking. 14. Pain, agitation, or discomfort. 1. Emergency evacuation of pneumothorax. 2. Emergency evacuation of pleural fluid. B. Equipment and supplies. 1. Skin antiseptics according to hospital policy. 2. Large-bore over-the-needle intravenous (IV) catheter (14 to 22 gauge). 3. Three-way stopcock. 4. Syringe, 20 to 35 mL. 5. Local anesthetic, tuberculin (TB) syringe with small-bore needle, if medical condition permits. C. Procedure. 1. Position the infant supine and restrain limbs if necessary. 2. Provide pharmacologic pain management if medical condition permits. 3. Identify entry site. Use second or third intercostal space along the midclavicular line. 4. Prepare skin with antiseptic as per hospital policy. 5. Infiltrate the area with 1 mL of local anesthetic using a TB syringe and 25- to 27-gauge needle. 6. Puncture skin at 45-degree angle, angling over third or fourth rib, and advance needle/catheter at a 90-degree angle. Inserting the catheter over the top of the rib will avoid blood vessels and nerves that run along the bottom of the rib. If thoracentesis is being done because of pleural fluid or effusion, the thorax should be punctured between the fifth and sixth intercostal spaces, midaxilla. 7. Remove needle from IV catheter while sliding the catheter into the pleural space. 8. Attach catheter hub to stopcock and syringe. The stopcock allows for aspiration of free air or fluid into the syringe and emptying of the syringe while maintaining a closed system. 9. When free air or fluid is obtained, stabilize the catheter and continue to aspirate until preparation for chest tube insertion is complete, or until the air leak or fluid accumulation is evacuated. 10. Document according to hospital policy: date, time, catheter size, location, amount of air/fluid evacuated, patient’s tolerance of procedure. Pharmacologic interventions performed should also be documented. D. Complications. 2. Infection. 3. Needle injury to lung or adjacent structures. 4. Damage to breast tissue. 5. Pain. 1. Administration of medications. 2. Administration of fluids, volume expanders, or blood products. 3. Administration of parenteral nutrition. B. Precautions. 1. Avoid areas of infection or loss of skin integrity near selected puncture site. 2. Use caution in infants with coagulation disorders, which may result in bleeding into surrounding tissues. 3. Padded armboard is to be used only if necessary to maintain line placement and must be of an appropriate size for gestational age. 4. Choose an access site based on patient’s condition, prescribed therapy, and inserter’s experience (Alexander and Infusion Nurses Society (INS), 2011). b. The inserter should be familiar with anatomic characteristics and acceptable venipuncture sites. c. Recommended for short-term IV therapy (< 1 week). d. Avoid infusion of hyperosmolar fluids (< 600 mOsm/L) and acidotic (pH < 5) or alkalotic (pH > 9) fluids because of the risk of injury. C. Equipment and supplies. 1. 22- to 24-gauge over-the-needle safety catheter. 2. Tape and dressing supplies as per hospital policy. a. Catheter stabilization device if available. b. Transparent semipermeable membrane to allow visualization of insertion site. 3. Skin antiseptics as per hospital policy. 4. Tourniquet (a sanitized rubber band will suffice). 5. NS flush solution in a 3-mL syringe. 6. Transilluminator, if necessary to visualize vessels. 7. Small scissors or safety razor, if necessary. 8. Appropriately sized padded armboard, if necessary. 9. Nonsterile gloves. 10. Additional tubing and infusate as indicated per hospital policy. 11. Pain/developmental management: pacifier, sucrose pacifier, blankets for developmental swaddling, eye protection from bright lights. D. Procedure. 1. Verify order from licensed health care provider for placement of a vascular access device. 2. Gather supplies, use hand hygiene as indicated by hospital policy, and don gloves. 3. Provide pain management such as pacifier for nonnutritive sucking, sucrose pacifier, and/or developmental care with facilitated tucking or swaddling. Shield eyes from bright lights. 4. Flush connecting tubing with NS flush solution. 5. Determine vein for cannulation (Fig. 15-1). Accomplish distention of the vessel by applying a gentle tourniquet proximal to the selected insertion site. Alternatively, an assistant may encircle the proximal extremity with hand/fingers and apply direct pressure for the same effect. b. Apply warm compress for 5 minutes if needed to help dilate veins and make them more visible. c. If a scalp vein will be cannulated, trim hair with scissors rather than shaving to help visualize and secure IV tubing. 6. Choose appropriate-sized catheter for patient’s size and vein. 7. Prepare skin at selected puncture site with antiseptic as per hospital policy, using aseptic technique. 8. Position and stabilize puncture site, keeping skin taut. 9. Beginning a few millimeters distal to the anticipated site of the vessel puncture, insert the needle bevel-up, at a 10- to 20-degree angle, depending on location of vein. Puncture skin in the direction of blood flow and advance needle in 1- to 2-mm increments. 10. If resistance is met or vein is not punctured, withdraw needle slowly to just below the level of the skin, relocate vein, and advance the needle again. 11. If a hematoma develops or bleeding occurs, occlude the vessel with pressure just proximal to the puncture site, remove tourniquet, withdraw the needle or catheter, and apply pressure until hemostasis has occurred. 12. If cannulation appears to be successful (i.e., flashback of blood in hub), remove the tourniquet and catheter needle (if using over-the-needle catheter), connect the tubing to the catheter hub, and inject some of the flush solution gently to evaluate patency of the catheter. If flush solution infiltrates the tissues surrounding the catheter tip, occlude the vessel with pressure just proximal to the puncture site, withdraw the needle or catheter, and apply pressure until hemostasis has occurred. 13. Each inserter should attempt access no more than two times to limit damage to future access sites and patient pain (Alexander and INS, 2011). Access attempts should be limited with considerable thought given to alternative treatments or access should attempts continue to be unsuccessful. 14. If cannulation was successful and flush solution infuses without complications, connect T-connector and IV tubing with appropriate fluid to catheter, if applicable. 15. Tape catheter in position that is developmentally appropriate and per hospital policy. Tape, dressing, and restraint must allow for easy inspection of insertion site, circulation of the distal extremity, and patency of the IV tubing. Avoid occlusion of the IV tubing with the tape or dressing. 16. Activate safety device upon removal of needle and dispose of needle(s) in appropriate sharps container. 17. Document date, time, catheter size, site location, and patient’s tolerance of procedure, according to hospital guidelines. Pain management interventions should also be documented. 18. Monitor for tissue infiltration or device dislodgment. If signs of infiltration are present, stop infusion immediately. Adverse signs may include the following: a. Redness, blanching, or discoloration at or near IV insertion site. b. Edema or swelling of extremity. c. Blistering at site. d. Pain with flushing. e. Resistance with flushing. f. Leaking at site. g. Coolness of skin around insertion site/extremity. 19. Treatment for infiltration/extravasation (Fox, 2011; Sawatzky-Dickson and Bodnaryk, 2006; Thigpen, 2007): a. Immediately stop all infusion of fluids and/or medications. b. Remove any constricting bands that may interfere with blood flow. c. Consider elevation of affected extremity. d. Use of cold or warm compresses is controversial; further evidence is needed to demonstrate benefit. e. Notify physician or advanced practice nurse immediately. f. Assess and document appearance of infiltrated area, including size, areas of blanching or erythema, pulses, perfusion, and estimated amount of infusate. Determine stage of extravasation (Sawatzky-Dickson and Bodnaryk, 2006; Thigpen, 2007): (1) Stage 1: IV difficult to flush, pain at site without redness or swelling. (2) Stage 2: Slight swelling and redness at site, pain, good pulse and normal perfusion below site. (3) Stage 3: Moderate swelling and blanching at site, pain, good pulse and normal perfusion below site, skin cool to touch. (4) Stage 4: Severe swelling and blanching at site, pain, decreased pulse and prolonged or absent capillary refill below site, skin cool to touch with evidence of breakdown or necrosis. g. Pharmacologic intervention: (2) Phentolamine (Regitine)—indicated for treatment of infiltration of α-adrenergic drugs such as dopamine, epinephrine, norepinephrine, and phenylephrine. For best results, use within 12 hours of infiltration. Dilute the available 5-mg/mL product to a concentration of 0.5 mg/mL. Inject subcutaneously into the area of infiltration using multiple small injections of 0.2 mL with a 25- to 27-gauge needle, changing the needle between each skin entry. Use cautiously in hemodynamically unstable infants. Monitor for hypotension. (3) Nitroglycerin 2%—apply 4 mm/kg to affected area. Use with caution in neonates ≤ 34 weeks’ postmenstrual age who are not greater than 21 days of age because of enhanced absorption through the thin immature skin, which may put them at risk for overdosage and toxicity. Apply only to intact skin. Monitor heart rate and blood pressure as it may cause tachycardia and hypotension. h. Multiple puncture technique. (2) Prepare skin at site with antiseptic technique as per hospital policy. (3) Provide pain management with swaddling, sucrose pacifier, and/or pain medication. (4) Use a large-bore (18-gauge) sterile needle and make multiple perforations over the greatest area of swelling with strict aseptic technique. (5) Allow for free flow of infiltrated fluid. May gently massage affected area. (6) Cover skin with room-temperature saline-soaked dressing and elevate affected extremity. E. Complications. 2. Infection. 3. Air, clot, or particle embolus. 4. Tissue injury (phlebitis, infiltration) and possible necrosis after infiltration of infused solutions and/or medications. 5. Injury to extremity from restraint. 6. Compromised distal circulation. 7. Pressure necrosis over bony areas. 8. Limb deformity after prolonged immobilization. 9. Pressure injury of peripheral nerves. 10. Inadvertent arterial line placement. 11. Blood loss from inadvertent catheter or tubing dislodgment. 12. Pain from infiltration or ruptured blood vessel from unsuccessful cannulation. A midline catheter (MLC) is a peripherally inserted catheter that dwells deeper in the vein than those used for standard peripheral IV therapy but never enters the abdominal–thoracic cavity. Midline catheters are a form of intermediate IV therapy and should not be used in infants who require the use of a peripherally inserted central catheter (PICC). The Centers for Disease Control and Prevention (CDC) recommends insertion of an MLC or PICC if IV therapy is expected to exceed 6 days (CDC, 2011). Insertion of an MLC is the same as for a PICC (i.e., equipment, use of strict aseptic technique, need for continuous heparinized carrier fluid); however, their use is strictly that of a peripheral IV device. An MLC can remain in place for 2 to 4 weeks. MLC studies in neonates have reported MLC mean dwell times from 4 to 11 days (Leike-Rude and Haney, 2006; Pettit and Wyckoff, 2007; Wyckoff, 1999). The longer MLC dwell time therefore minimizes the frequent painful IV insertions associated with standard peripheral IV lines. It is important to note that, while MLCs have established safety, there are indications that catheters that dwell in near-central veins, past the head of the humerus or femur, have significantly higher rates of complications (Colacchio et al., 2012; Jain et al., 2013). These veins include the subclavian, internal jugular, axillary, and common iliac veins. The cephalic vein diameter may be too small to adequately accommodate an MLC (Alexander and INS, 2011). If a central placement is not possible, the catheter should be retracted and position confirmed outside the abdominal–thoracic cavity. NOTE: Catheters with a stylet are available. A stylet may make advancing a catheter easier, and there is no evidence to support concerns that the stylet will damage or perforate vessels when used with care (Paulson and Miller, 2008). Hospital stock choice of catheter size, lumen, and manufacturer should be based on the evidence, patient population need, and cost-effectiveness. The stylet should not extend past the tip of the catheter, and should never be trimmed. Follow manufacturer’s recommendations regarding trimming and flushing catheters with stylets prior to insertion. 1. Intermediate or long-term IV therapy (> 6 days). 2. Parenteral nutrition (strongly consider use of PICC, especially if anticipated dextrose or osmolarity requires central placement). 3. Antibiotic or other medicinal therapy. 4. Difficult venous access. 5. Irritating drug therapy (strongly consider central placement). 6. Strongly consider use of PICC in very low birth weight infant (< 1500 g). B. Contraindications. 2. Inadequate vessel for cannulation. 3. Anatomic irregularities in infant’s extremities or chest that could interfere with proper insertion. 4. Avoid insertion in the right arm of infants with congenital heart defects resulting in decreased blood flow to the subclavian artery. 5. The infant can be adequately treated with a peripheral IV access. 6. Parental refusal. C. Precautions. 1. Avoid areas of infection or loss of skin integrity near selected puncture site. 2. Avoid placement of a PICC in an extremity with inadequate or poor circulation. 3. Obtain parental informed consent for PICC insertion prior to the procedure per institutional policy. 4. Use caution in infants with coagulation disorders. 5. Use caution with high-frequency ventilation as pressure changes within the chest may lead to catheter migration, particularly with upper body insertions. 6. Do not measure blood pressure or perform venipuncture on the extremity containing the PICC/MLC. 7. Use aseptic technique during insertion and care of PICC/MLC. 8. Ensure attention to pain management, developmental care, and thermal homeostasis. 9. Infuse medication via medication infusion pump; avoid “pushes.” 10. Use larger-bore syringes (> 10 mL) that generate less pressure. 11. Avoid tension on catheter and tubing. 12. Never pull the catheter back through hollow needle introducer because of the risk of damage or shearing of catheter. 13. Monitor for bradycardia and hypoxia during procedure. 14. Follow manufacturer’s recommendations regarding infusion of blood products or obtaining blood specimens from PICC or MLC. 15. When infusing fluids via MLC, follow the same precautions as with peripheral IV to avoid damage to noncentral vessels. D. Equipment and supplies. 1. Commercially prepared catheter insertion kit, or the following: a. Antiseptic per hospital policy. Chlorhexidine gluconate is recommended by the CDC; however, it is only approved by the U.S. Food and Drug Administration for use in infants over 2 months of age due to lack of evidence on absorption and safety. In infants under 2 months of age, use of povidone–iodine is still the best practice (Alexander and INS, 2011; Chapman et al., 2012). If institutional policy, use with care in premature infants or infants under 2 months of age as these products may cause irritation or chemical burns (U.S. Food and Drug Administration, 2012). b. Nontoothed forceps. c. Sterile measuring tape. d. Sterile gown and gloves, mask, and surgical cap. e. Sterile flush solution per institutional policy. f. Sterile gauze pads. g. Sterile drapes and towels. h. Sterile tourniquet (optional with preterm infants). (1) Sterile 5- to 10-mL syringes, as recommended by manufacturer. i. Transparent, semipermeable dressing. j. Sterile adhesive strips. k. Extension set per hospital policy. l. Select a neonatal percutaneous catheter of appropriate size. Catheter sizes include single-lumen 1.2 F and single- or double-lumen 1.9 F to 5 F (Alexander and INS, 2011). Usually lumens up to 3 Fr. are used in neonates. m. Select an introducer of appropriate size to accommodate catheter. (1) Different types of catheter introducers are available, depending on manufacturer: (b) Peel-away plastic cannula—the vessel is punctured and the needle is removed, leaving the plastic cannula in the vessel for catheter insertion. Advance the catheter to the premeasured distance, then retract the plastic cannula from the vessel and pull the catheter apart along its longitudinal axis and discard. (c) A device with a safety needle retractor should be used to avoid needle-stick injury. n. Catheter trimming device per manufacturer’s recommendation. E. Procedure. 2. Check to ensure informed consent is obtained per institutional policy. 3. Gather equipment and supplies. 4. Provide pain management (Pettit and Wyckoff, 2007). a. Developmentally supportive positioning, swaddling, and pacifier use. b. Consider premedication with an analgesic and sedative. c. Consider use of topical lidocaine cream if appropriate. 5. Maintain thermoregulation, provide environmental support by protecting infant’s eyes from bright lights. 6. Select vein (see Fig. 15-1). Most common sites for neonates include the cephalic, basilic, and greater saphenous. A right-sided basilic or cephalic approach is preferred because of the shorter distance between the insertion site and the superior vena cava. Other sites include popliteal, temporal, and axillary veins. 7. Position infant so selected vein is accessible. Restrain infant if necessary to prevent contamination of sterile field. 8. Measure length of catheter to be inserted. a. For PICC (central venous access) insertion (Pettit and Wyckoff, 2007): (1) Upper body insertion: Tip should be in the superior vena cava. (2) Lower body insertion: Tip should be in the inferior vena cava above the L4-L5 vertebrae or iliac crest and below the right atrium. (a) Measure from insertion site to xiphoid process for lower extremity placement. b. For MLC (peripheral venous access) insertion: (1) Upper body insertion: Tip should end in the upper arm, distal to the head of the humerus. (a) Measure from the insertion site to the desired site of catheter tip. (2) Lower body insertion: Tip should end in the upper leg distal to the head of the femur. (a) Measure from the insertion site to the desired site of catheter tip. 9. Don mask and cap and perform a 3-minute scrub. 10. Don sterile gown and gloves. Set up sterile field and open catheter kit, maintaining sterility of contents. Assemble equipment using an aseptic technique. 11. Trim catheter to predetermined length per manufacturer’s recommendations and institution’s policy. 12. Attach flush-syringe and prime catheter. 13. Prepare insertion site with antiseptic per hospital policy and allow to dry. 14. Change into new sterile gloves if contamination occurs. 15. Drape infant with sterile towels. 16. Apply sterile tourniquet (optional) and stabilize vein. 17. Take introducer and puncture vessel at an approximately 5- to 15-degree angle for shallow veins and approximately 15 to 30 degrees for deeper veins. After skin puncture, pause and let infant relax to prevent vasoconstriction. Entry into the vessel is signaled by blood leaking from puncture site or from the introducer needle/cannula. 18. Loosen tourniquet (if applicable) after advancing catheter a short distance. Remove needle, leaving peel-away plastic cannula in place if using this method. 19. Advance flushed catheter with forceps in 0.5- to 1-cm increments to predetermined distance. Catheter should advance smoothly and slowly to avoid vasospasm. 20. Once catheter is advanced 7 to 8 cm or to the predetermined distance, remove introducer. Catheter may be pulled out slightly during splitting technique and may need to be advanced slightly when complete. Gentle pressure with finger distal to puncture site may reduce blood loss. 21. Remove stylet (if present) slowly. 22. Aspirate on catheter to confirm blood return. If blood is obtained, flush catheter. 23. Temporarily secure catheter with sterile adhesive strips and obtain chest radiograph for catheter placement while maintaining sterile field and aseptic technique. 24. Radiographically confirming placement is central prior to any infusions. Pull back or advance catheter, if necessary, to appropriate distance. Check for blood return and obtain another chest radiograph to confirm satisfactory position. 25. If a lower extremity PICC is placed, consider performing a lateral abdominal radiograph in addition to AP view to verify that the catheter is in the inferior vena cava and not the ascending lumbar vein. As an alternative, 0.3 mL of contrast medium may be injected into the catheter with the AP view to verify central venous placement and avoid an additional radiograph (Sharpe et al., 2013; Trotter, 2009). 26. Remove antiseptic from surrounding skin with sterile water. 27. Secure and dress catheter per hospital policy. a. Use of skin closure or Steri-Strips over the body of the catheter is contraindicated, due to risk of catheter shearing (Sharpe et al., 2013). b. INS recommends a product-specific catheter securement device, if available (Alexander and INS, 2011). 28. Document procedure, including: b. Parental education and consent. c. Site preparation. d. Catheter size, manufacturer, and lot number. e. Catheter length if trimmed. f. Presence of stylet. g. Location and insertion distance. h. Location of catheter tip on radiograph. i. Pain management provided and patient tolerance. j. Complications. k. Type of dressing. l. Name of clinician. F. Modified Seldinger technique—this technique provides for central catheter placement using a peripheral IV catheter of smaller gauge than a standard PICC introducer (Fig. 15-2). Use of a smaller gauge may allow the inserter to access a smaller vessel, and minimizes vessel and surrounding nervous tissue trauma and hematoma formation. This procedure is now standard of practice in adult and pediatric patients, recommended by the INS to minimize damage to vessels (Alexander and INS, 2011; Pettit, 2007). a. All supplies previously described for PICC insertions. b. 24-gauge peripheral IV catheter. c. Guidewire: (2) 15 to 20 cm. d. No. 11 scalpel blade or straight needle. 2. Procedure. b. Apply tourniquet as needed. c. Perform venipuncture with 24-gauge peripheral IV catheter. d. When flashback of blood is noted, advance catheter into vein and remove inner needle. e. Thread guidewire through catheter into the vein, approximately 3 cm beyond the tip of the catheter. (1) Take caution to advance gently; do not apply force, as this may perforate the vessel. (2) Do not advance the guidewire past the infant’s shoulder if placed in the arm. f. Remove the IV catheter while holding the guidewire in place. Take care to firmly stabilize the guidewire to prevent removal or embolization. g. Enlarge the insertion site by 1 to 2 mm. (2) Use forceps to gently dilate the insertion site, or (3) Thread a 20-gauge needle over the guidewire, and move side to side in the insertion site, or (4) Use a scalpel blade to make a dermatotomy, or small nick in the insertion site, taking care to avoid damaging the vessel. h. Slowly thread a plastic peel-away PICC introducer over the guidewire past the insertion site into the vessel. If the introducer cannot be advanced into the vein, the insertion site may need to be further dilated. i. Remove the guidewire, leaving the introducer in the vein. j. Remove tourniquet if applicable. k. Thread the catheter into the vein as previously described, to premeasured depth. l. Follow steps described for PICC placement above to verify blood return, assess proper placement of catheter, and apply dressing. m. Document procedure, including method of insertion, any additional steps taken, catheter length, patient tolerance, and any complications.
Common Invasive Procedures
AIRWAY PROCEDURES
Endotracheal Tube Suctioning: Fundamental Procedure
Oral Endotracheal Intubation: Advanced Practice Procedure
Thoracentesis: Advanced Practice Procedure
CIRCULATORY ACCESS PROCEDURES
Peripheral Intravenous Line Placement: Fundamental Procedure
Peripherally Inserted Central Catheter and Midline Catheter: Advanced Practice Procedure
![]()
Stay updated, free articles. Join our Telegram channel

Full access? Get Clinical Tree


15: Common Invasive Procedures

FIGURE 15-1 ■ The major veins that may be used for peripheral intravenous line placement in young infants. (Courtesy and copyright Becton Dickinson and Company.)
FIGURE 15-2 ■ The modified Seldinger technique for PICC insertion. (From Al-Shaikh, B. and Stacey, S.: Essentials of anaesthetic equipment [4th ed.]. London, 2013, Churchill Livingstone.)
