Parenteral Administration
Intradermal, Subcutaneous, and Intramuscular Routes
Objective
Key Terms
intradermal ( ) (p. 157)
erythema ( ) (p. 159)
anergic ( ) (p. 159)
 http://evolve.elsevier.com/Clayton
Administration of Medication by the Intradermal Route
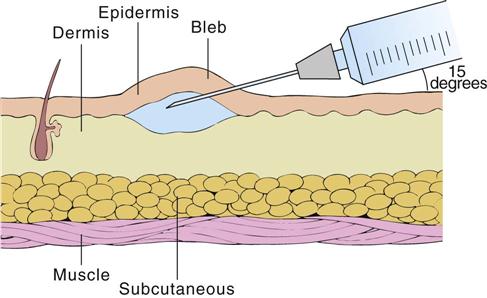
Intradermal injections are made into the dermal layer of skin just below the epidermis (Figure 11-1). Small volumes, usually 0.1 mL, are injected. The absorption from intradermal sites is slow, thereby making it the route of choice for allergy sensitivity tests, desensitization injections, local anesthetics, and vaccinations.
Perform premedication assessments. See individual drug monographs.
Equipment
 -inch, or 28-gauge,
  -inch needle, or a special needle and syringe for allergens
Sites
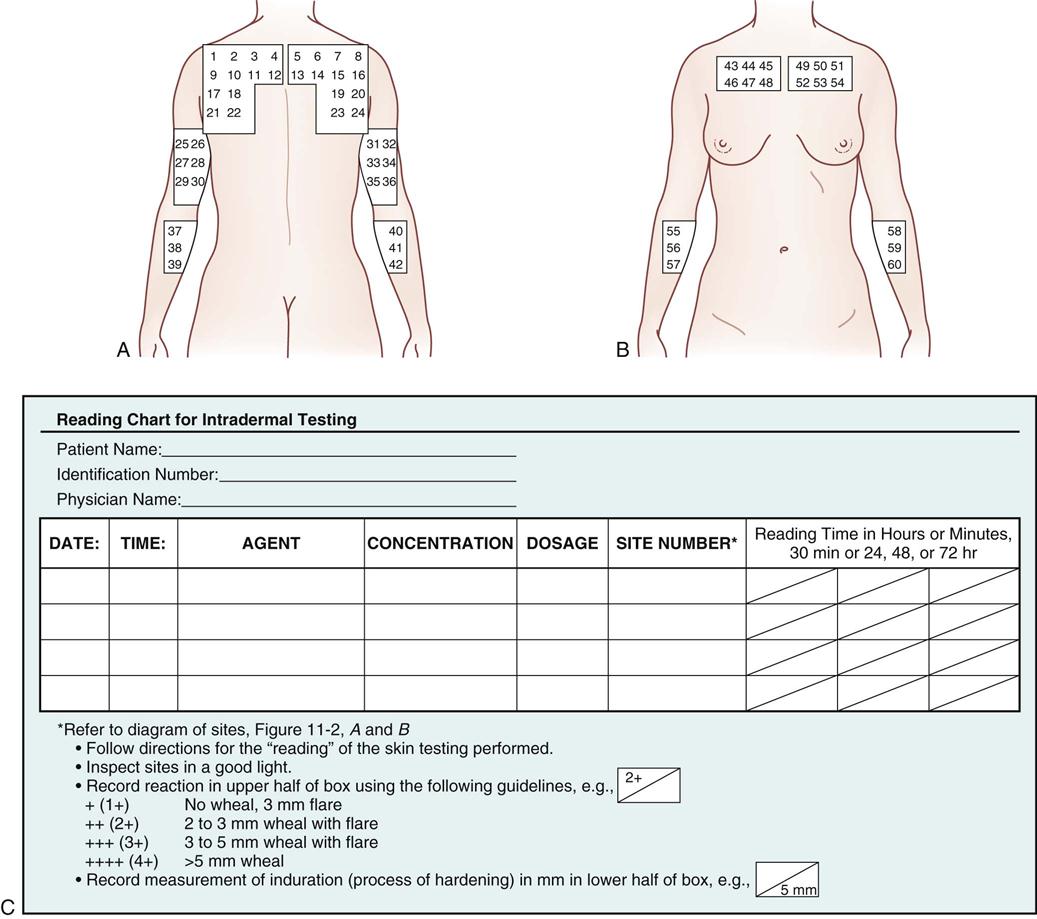
Intradermal injections may be made on any skin surface, but the site should be hairless and receive little friction from clothing. The upper chest, the scapular areas of the back, and the inner aspect of the forearms are the most commonly used areas (Figure 11-2, A and B).
Technique
This example of an intradermal injection technique involves allergy sensitivity testing. (CAUTION: Do not start any type of allergy testing unless emergency equipment is available in the immediate area in case of an anaphylactic response. Nurses should be familiar with the procedure to follow if an emergency does arise.)
Intradermal Injection Method
1 Perform hand hygiene, and don gloves.
3 Insert the needle at a 15-degree angle with the needle bevel upward. (NOTE: There is a controversy regarding whether the needle bevel should be upward or downward. Check the procedure manual for facility policy.) The solution being injected is deposited in the space immediately below the skin; remove the needle quickly. A small bleb will appear on the surface of the skin as the solution enters the intradermal area (see Figure 11-1). Be careful not to inject into the subcutaneous space, and do not wipe the site with alcohol after injection.
Skin Prick Test Method
1 Perform hand hygiene, and don gloves.
2 Make a grid of at least four squares, more if needed, on the test site at 2-cm intervals with a pen.
5 Gently blot the excess allergen off of the site.
6 The skin prick test can be read 10 to 20 minutes after administration, depending on protocol.
7 Remove gloves, and dispose of them in accordance with institutional policy. Thoroughly wash hands.
8 Chart the times, agents, concentrations, and amounts administered (see Figure 11-2, C). Make a diagram in the patient’s chart, and number each location. Record what agent at what concentration was injected at each site. (Subsequent readings of each area are then performed and charted on this record.)
The injection technique can easily be modified for desensitization injections and vaccinations.
Patient Teaching
Tell the patient the time, date, and place to return to have the test sites read, if necessary. Tell the patient not to wash or scrub the area until the injections have been read. If the patient develops an area of severe burning or itching, he or she should try not to scratch it. Tell the patient to report immediately the development of any breathing difficulty, severe hives, or rashes and to go to the nearest emergency department if he or she is unable to reach the health care provider who prescribed the skin tests.
Documentation
Provide the RIGHT DOCUMENTATION of the medication administration and the patient’s responses to drug therapy.
1 Chart the date, time, drug name (including agent, concentration, and amount), dosage, and site of administration (see Figure 11-2).
3 Chart and report any signs and symptoms of adverse drug effects.
The following is a list of commonly used readings of reactions and their appropriate symbols:
| + (1+) | No wheal, 3-mm flare |
| ++ (2+) | 2- to 3-mm wheal with flare |
| +++ (3+) | 3- to 5-mm wheal with flare |
| ++++ (4+) | >5-mm wheal |
Generally, a positive reaction to delayed hypersensitivity skin testing (to evaluate in vivo cell-mediated immunity) requires an induration of at least 5 mm in diameter.
Administration of Medication by the Subcutaneous Route
Objective
Key Term
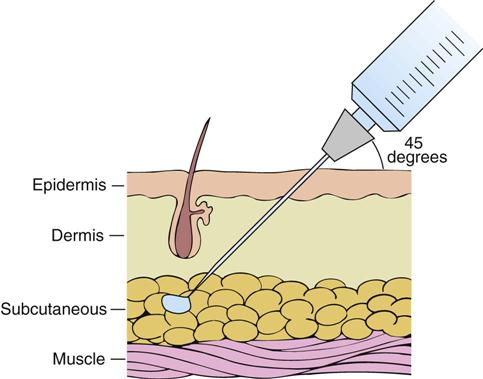
Subcutaneous (subcut) injections are made into the loose connective tissue between the dermis and the muscular layer (Figure 11-3). Absorption is slower and drug action is generally longer with subcut injections as compared with intramuscular or intravenous injections. If the patient’s circulation is adequate, then the drug is completely absorbed from the tissue.
Many drugs cannot be administered by this route, because no more than 2 mL can ordinarily be deposited at a subcut site. The drugs must be quite soluble and potent enough to be effective in a small volume without causing significant tissue irritation. Drugs commonly injected into the subcut tissue are heparin, enoxaparin, and insulin.
Perform premedication assessments. See the individual drug monographs.
Equipment
Syringe Size
Choose a syringe that corresponds with the volume of drug to be injected at one site. The usual amount injected subcutaneously at one site is 0.5 to 2 mL. Correlate the syringe size with the size of the patient and the tissue mass.
Needle Length
Assess each patient so that the needle length selected will deposit the medication into the subcut tissue rather than the muscle tissue. Needle lengths of  -,
-,  -, and
  -inch are routinely used. It is prudent to leave an extra
  -inch of needle extending above the skin surface in case the needle breaks.
Needle Gauge
Commonly used gauges for subcut injections are 25 to 29 gauge.
Sites
Common sites used for the subcut administration of medications include the upper arms, the anterior thighs, and the abdomen (Figure 11-4). Less common areas are the buttocks and the upper back or scapular region.
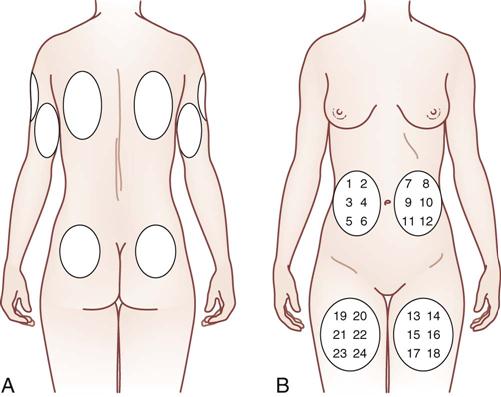
A plan for rotating injection sites should be developed for all patients who require repeated injections (see Figure 11-4). The anterior view (see Figure 11-4, B) illustrates areas that are easily accessible for self-administration. The posterior view (see Figure 11-4, A) illustrates less commonly used areas that may be used by other people who are injecting the medication into the patient.
When administering insulin subcutaneously, it is important to rotate the injection sites to prevent lipohypertrophy or lipoatrophy, which slows the absorption rate of the insulin. The American Diabetes Association Clinical Practice Recommendations state that insulin injection sites should be rotated systematically within one area before progressing to a new site for injection (see Figure 11-4); it is thought that this will decrease variations in insulin absorption. Absorption is known to be fastest when the insulin is administered in the abdomen; this is followed by the arms, thighs, and buttocks. Because exercise is also known to affect the rate of insulin absorption, site selection should take this factor into consideration.
Technique
1 Follow the procedure protocol (see p. 106).
5 Explain carefully to the patient what to expect.
6 Provide for the patient’s privacy, and position the patient appropriately.
8 Expose the selected site, and locate the landmarks.
Stay updated, free articles. Join our Telegram channel

Full access? Get Clinical Tree


