Surgical Asepsis and Assisting with Surgical Procedures
Learning Objectives
1. Define, spell, and pronounce the terms listed in the vocabulary.
2. Apply critical thinking skills in performing the patient assessment and patient care.
3. Define the concepts of aseptic technique.
4. Explain the differences among sanitization, disinfection, and sterilization.
5. Summarize tips for improving autoclave techniques.
6. Demonstrate how to wrap instrument packs for autoclave sterilization.
7. Explain the types and uses of sterilization indicators.
8. Summarize the correct methods of loading, operating, and unloading an autoclave.
9. Demonstrate how to operate an autoclave.
10. Summarize common minor surgical procedures.
11. Detail the medical assistant’s role in minor office surgery.
12. Perform a skin prep for surgery.
13. Perform a surgical hand scrub.
14. Outline the rules for setting up and maintaining a sterile field.
15. Open a sterile pack to create a sterile field.
16. Transfer sterile instruments and pour solutions into a sterile field.
17. Put on sterile gloves without contaminating them.
18. Demonstrate how to assist with a minor surgical procedure and suturing.
19. Summarize postoperative instructions and care of wounds.
20. Demonstrate how to remove sutures and the technique for removing surgical staples.
21. Explain the process of wound healing.
22. Properly apply dressings and bandages to surgical sites.
23. Conduct patient education in aseptic technique and surgical procedures.
24. Discuss the legal and ethical concerns regarding surgical asepsis and infection control.
Vocabulary
cicatrix Early scar tissue that appears pale, contracted, and firm.
dehiscence The separation of wound edges or rupture of a wound closure.
infection Invasion of body tissues by microorganisms, which then proliferate and damage tissues.
sterilization Complete destruction of all forms of microbial life.
Scenario
Melissa Gelbart, CMA (AAMA), works for a dermatologist, Dr. Susan Armstrong, who frequently performs minor surgical procedures in the office. Melissa was hired to work as an administrative medical assistant at the front desk, but one of the clinical medical assistants has unexpectedly quit, and the office manager has offered Melissa her position. Melissa is excited about this opportunity, but she also is concerned about her skill level in sterile procedures. At least she is familiar with a number of the patients, most of the staff, and the types of outpatient surgeries performed in the facility. Surgical asepsis and assisting with surgery were her favorite topics when she was in medical assisting school. However, before she can assist with surgeries, Melissa must demonstrate her ability to set up a sterile field without contaminating the site. She also must show that she can apply a sterile dressing properly and change sterile bandages.
While studying this chapter, think about the following questions:
• What are the crucial steps Melissa must follow to set up and maintain a sterile field?
• How will Melissa know whether surgical trays processed in the autoclave are actually sterile?
• What techniques must Melissa follow to prepare for and assist with a surgical procedure?
• What are common surgical procedures performed in an ambulatory care facility?
• What bandaging techniques should Melissa be prepared to perform?
Asepsis is the condition of being free of infection or infectious material. Medical asepsis is the destruction of organisms after they leave the body. The principles of medical asepsis are implemented to prevent reinfection of a patient and cross-infection of another patient or ourselves. To prevent cross-contamination, potential microorganisms and pathogens must be isolated by following standard blood and body fluid precautions and by disinfecting or sterilizing objects as soon as possible after they become contaminated. As discussed in Chapter 27, medical asepsis is the process of either reducing the number of pathogens or destroying them; this creates an environment that is clean but not sterile (free of microorganisms).
Surgical asepsis is the complete destruction of organisms on instruments or equipment that will enter the patient’s body. This technique is mandatory for any procedure that invades the body’s skin or tissues, such as surgery. Everything that comes in contact with the patient must be sterile, including surgical gowns, drapes, and instruments, in addition to the gloved hands of the surgeon and surgical assistants. Anytime the skin or a mucous membrane is punctured or pierced, as in venipunctures or injections, aseptic techniques must be practiced. Urinary catheterizations, biopsies, and dressing changes on open wounds are performed using sterile technique.
A medical assistant must develop an inner sense of sterile procedures. It is important that these techniques be performed on such a routine basis that they become an unbreakable habit. Conscientious attention must be given to sterilizing all items at all times. Frequent checking and rechecking of procedures helps ensure that they are effective and are used without any “breaks” in technique. Single-use, disposable items offer the best method of infection control, and they are being used more frequently in medical offices. However, when disposable equipment is used, the assistant must know the specific disposal guidelines for contaminated instruments and supplies.
Sterilization
Before an instrument or piece of equipment can be used in a surgical procedure, it first must be sanitized, then disinfected, and finally sterilized to remove all forms of microorganisms. Sanitization and disinfection were described in Chapter 27. It is essential that you understand these two concepts, so review them if necessary before learning sterilization methods.
Instruments and other items used in office surgery, examination, or treatment must be carefully cleaned before proceeding with the steps of disinfection or sterilization. Sanitization is the cleansing process that reduces the number of microorganisms to a safe level as dictated by public health guidelines. This cleansing process removes debris such as blood and other body fluids from instruments or equipment. Blood and debris must be removed so that later disinfection with chemicals or sterilization with steam, heat, or gases can penetrate to all the instrument’s surfaces (see Procedure 27-5). The procedure should be completed immediately after the instruments are used. If this is not possible, rinse the used items under cold water immediately after the surgical procedure and place them in a low-sudsing, rust-inhibiting, enzyme-containing, detergent solution. Never allow blood or other substances that can coagulate to dry on an instrument.
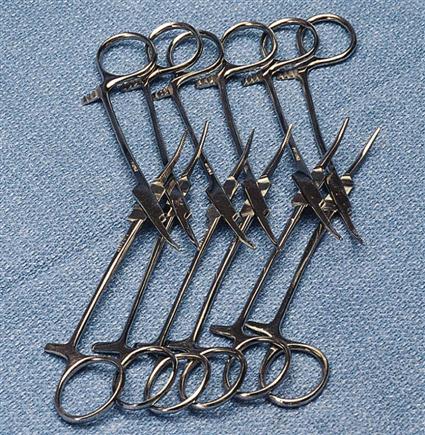
The medical assistant should always wear gloves while performing sanitization (thick utility gloves if the instruments have sharp or pointed edges) to prevent possible personal contamination with potentially infectious body fluids that may be present on the articles being cleaned. When you are ready to sanitize instruments, drain off the soak solution and rinse each instrument in cold, running water. Separate the sharp instruments from the others, because metal instruments may damage the cutting edges, and sharp instruments may damage the other instruments or injure you. Clean all sharp instruments at one time, when you can concentrate on preventing injury to yourself. Open all hinges and scrub serrations and ratchets with a small scrub brush or toothbrush. Rinse the instruments in hot water, then check them carefully for proper working order before they are disinfected or sterilized. The items should be hand dried with a towel to prevent spotting.
Disinfection is the process of killing pathogenic organisms or of rendering them inactive. However, it is not always effective against spores, the tubercle bacilli, and certain viruses. Disinfectant chemicals may kill microbes within a short time but are usually very hard on instruments. Some chemicals, such as Cidex, are effective enough to kill all organisms, but the usual immersion time for these sterilants is 10 hours or longer. Many types of disinfecting agents are available and have varying degrees of effectiveness. It is important to follow the manufacturer’s guidelines on the proper use of each product and also to understand the product’s advantages and disadvantages and the possible sources of error.
To ensure proper sterilization for surgical aseptic procedures, an area (usually a utility room) should be set aside in each office for just this purpose. The area should be divided into two sections, one dirty and one clean. The dirty section is used for receiving contaminated instruments and other materials at the conclusion of surgical procedures. This area should have a sink, receiving basins, proper cleaning agents, brushes, utility gloves, autoclave wrapping paper or cloth, autoclave envelopes and tape, sterilizer indicators, and disposable gloves. Designated biohazardous waste containers are needed for gloves worn when handling contaminated items. Personal protective equipment (PPE) for autoclave procedures includes:
• Heat-resistant autoclave gloves for loading and unloading
• Fluid-resistant gloves to prevent contact with contaminants
• A laboratory coat or impervious gown, if needed, to protect against splashes
The clean section of the utility room should be reserved for receiving the sterile items after they have been removed from the sterilizer. Clear, clean plastic bags in which to store sterile packs may be kept in the clean area. Both areas should be spotlessly clean and well organized. Sterilization can be achieved by moist heat in an autoclave, by gas, or with chemicals. Most medical offices use the autoclave method. A written sterilization procedure should be in place for each workplace.
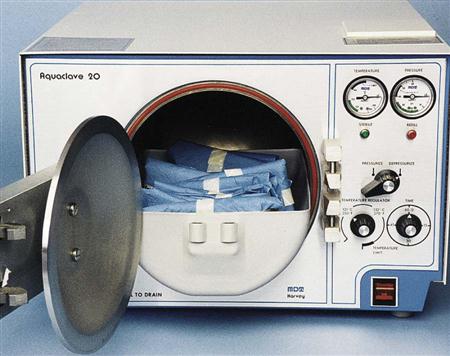
Autoclave
Steam under pressure in the autoclave (Figure 57-1) is the best method of sterilization, because it kills all pathogens and spores. Pressurized steam is fast, convenient, and dependable. The pressure allows for heat higher than the boiling point, and when combined with moisture, these two factors create a very effective mechanism for killing all microorganisms. When steam is admitted into the autoclave chamber, it simultaneously heats and wets the object, coagulating the proteins present in all living organisms. When the cycle is complete and the chamber has cooled, the steam condenses and explodes the cells of microorganisms, thus destroying them. To be effective, the steam moisture must come in contact with all surfaces being sterilized. Steam under pressure is capable of much faster penetration of fabrics and textiles than dry heat, but its use has definite limitations if the proper techniques are not followed.
The recommended temperature for sterilization in an autoclave is 121° to 123° C (250° to 255° F). Unwrapped items should be sterilized for 20 minutes, small wrapped items for 30 minutes (Table 57-1), and large or tightly wrapped items for 40 minutes. Processing time starts after the autoclave reaches normal operating conditions of 121° C (250° F) and 15 pounds per square inch (psi) pressure.
TABLE 57-1
| ARTICLE | METHOD | TEMPERATURE (° F) | TIME |
| Gauze, small, loosely packed | Autoclave | 250° | 30 min |
| Gauze, large, loosely packed | Autoclave | 270° | 30 min |
| Gauze, small, tightly packed | Autoclave | 250° | 40 min |
| Gauze, large, tightly packed | Autoclave | 270° | 40 min |
| Gauze, tightly packed | Dry heat | 320° | 3 hr |
| Gauze, loosely packed | Dry heat | 320° | 2 hr |
| Glass syringes in tubes | Autoclave | 250° | 30 min |
| Glass syringes in muslin | Dry heat | 320° | 1 hr |
| Instruments on tray, muslin under and over | Dry heat | 320° | 1 hr |
| Instruments on tray, muslin under and over | Autoclave | 250° | 15 min |
| Solutions in flasks with gauze plug | Autoclave | 250° | 30 min |
| Glassware unwrapped | Dry heat | 320° | 1 hr |
| Glassware wrapped | Autoclave | 250° | 30 min |
| Petroleum jelly, 1-ounce jar | Dry heat | 340° | 1 hr |
| Petroleum jelly, 2-ounce jar | Dry heat | 320° | 2 hr |
| Petroleum gauze in instrument tray | Dry heat | 320° | 150 min |
| Powder, 1-ounce jar | Dry heat | 320° | 2 hr |
| Powder, small glove packs | Autoclave | 250° | 15 min |
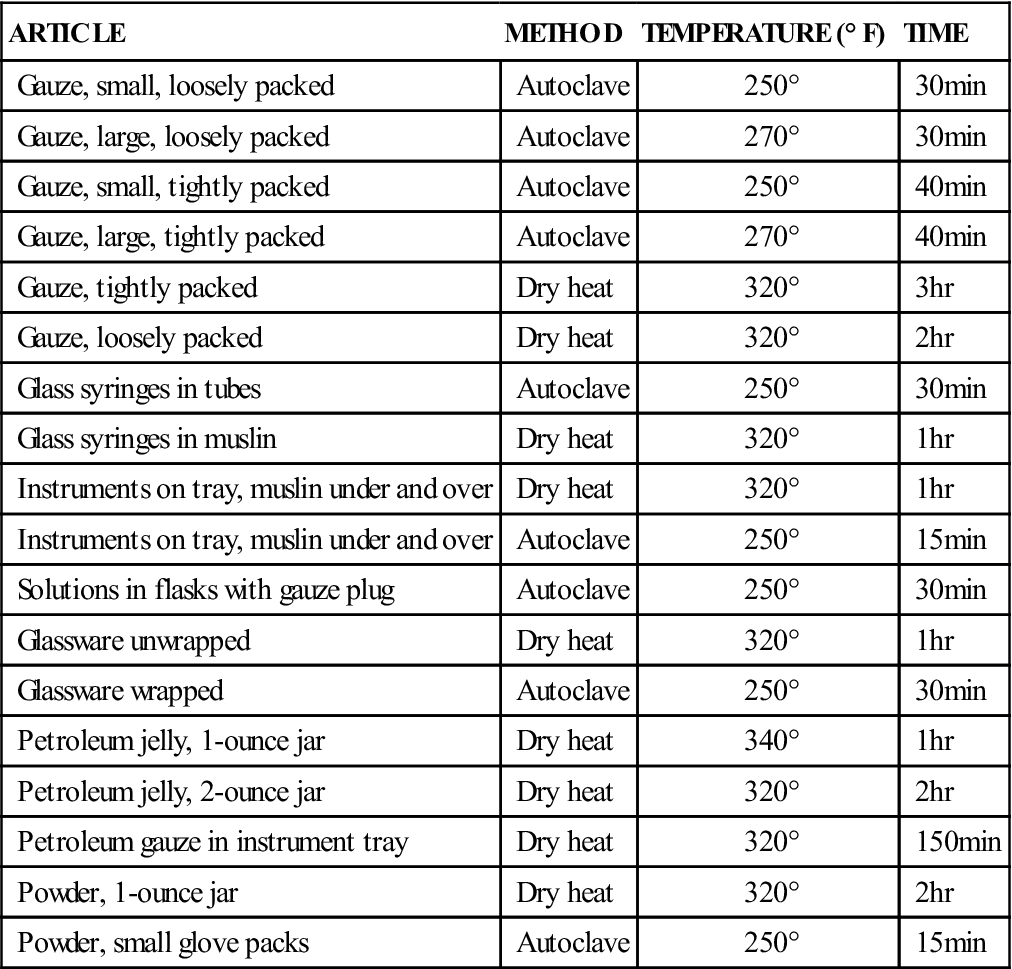
*Remember always to place a sterilization indicator in areas where there is doubt the steam will penetrate. Do not assess effectiveness by chamber pounds per square inch; a thermometer and sterilization indicator are the reliable methods of judging a killing temperature.
The three basic autoclave cycles are as follows:
Incorrect operation of an autoclave may result in superheated steam. If steam is brought to too high a temperature, it is literally dried out, and the advantage of a higher heat is diminished. Wet steam is another cause of incomplete sterilization. Wet steam results from failing to preheat the chamber, which causes excessive condensation in the interior of the chamber. Condensation is necessary, but too much prevents the sterilization process from being completed properly. It can be compared with taking a hot shower in a cold bathroom, which results in heavily steamed mirrors, walls, and towels. If packs become too saturated to dry during the drying cycle, the packs pick up and absorb bacteria from the air or any surface on which they are placed after removal from the autoclave. Placing cold instruments in a hot chamber also increases condensation. Other causes of wet steam include opening the door too wide at the end of the cycle or allowing a rush of cold air into the chamber. Overfilling the water reservoir may produce this same effect.
The main cause of incomplete sterilization in the autoclave is the presence of residual air. Without the complete elimination of air, an adequately high temperature cannot be reached. Air and steam do not mix. Because air is heavier than steam, it pools wherever possible. One tenth of 1% (0. 1%) residual air trapped around an instrument prevents complete sterilization. This is especially dangerous in older autoclaves that do not have a chamber thermometer separate from the pressure gauge. Adequate chamber pressure does not guarantee a proper chamber temperature. Table 57-2 provides tips for improving autoclave techniques.
TABLE 57-2
Tips for Improving Autoclave Techniques
| PROBLEM | CAUSES | CORRECTION |
| Damp linens | Clogged chamber drain; goods removed from chamber too soon after cycle; improper loading | Remove strainer; free openings of lint. Allow goods to remain in sterilizer an additional 15 min with door slightly open. Place packs on edge; arrange for least possible resistance to flow of steam and air. |
| Stained linens | Dirty chamber | Clean chamber with Calgonite solution; never use strong abrasives, such as steel wool; rinse thoroughly after cleaning. |
| Corroded instruments | Poor cleaning; residual soil; exposure to hard chemicals (e.g., iodine, salt, and acids); inferior instruments | Improve cleaning; do not allow soil to dry on instruments; sanitize first. Do not expose instruments to these chemicals; if exposure occurs, rinse immediately. Use only top-quality instruments. |
| Spotted or stained instruments | Mineral deposits on instruments; residual detergents from cleaning; mineral deposits from tap water | Wash with soft soap and detergent with good wetting properties. Rinse instruments thoroughly with distilled water. |
| Instruments with soft hinges or joints | Corrosion or soil in joint; instrument parts out of alignment | Clean with warm, weak acid solutions (10% nitric acid solution); rinse thoroughly. Have instrument realigned by qualified instrument repair professional. |
| Ebullition, or caps that blow off solutions | Too rapid exhausting of chamber | Use slow exhaust, cool liquids, or turn autoclave off and let cool on its own; that is, let the pressure drop at its own rate. |
| Steam leakage | Worn gasket; door closes improperly | Replace gasket; reopen door and shut carefully; have serviced if unable to close door properly. |
| Chamber door does not open | Vacuum in chamber (check chamber pressure gauge) | Turn on controls to starting steam pressure; wait until equalized, then vent and open door. |
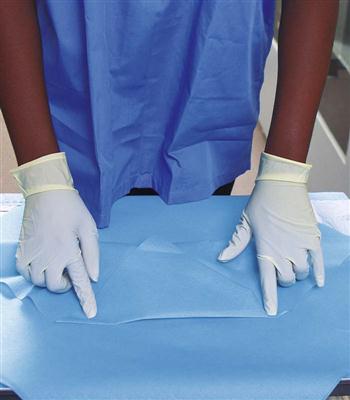
Wrapping Materials
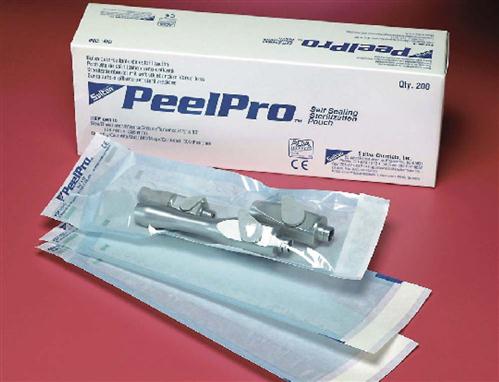
Maintenance of sterility depends completely on the wrapper and method of wrapping (Procedure 57-1). The wrapping material must be permeable to steam but impervious to contaminants. Acceptable wrapping materials for autoclaving should be made of a substance that allows the steam to penetrate while preventing pathogens from entering during storage and handling. A wrapper should not be used if it is torn or has a hole in it. Clean muslin, disposable autoclave paper, and polypropylene bags are examples of autoclave instrument wraps (Figure 57-2).
Procedure 57-1
Prepare Items for Autoclaving
Wrap Instruments and Supplies for Sterilization in an Autoclave
GOAL: To place dry, checked, sanitized, and disinfected supplies and instruments inside appropriate wrapping materials for sterilization and storage without contamination.
EQUIPMENT and SUPPLIES
Procedural Steps
2. Place the wrapping material on a clean, flat surface.
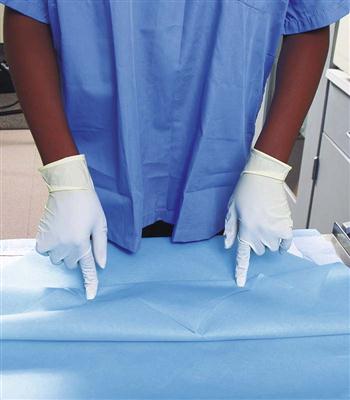
3. Place the item (or items) diagonally at the approximate center of the wrapping material. Make sure the size of the square is large enough for the items (Figure 1).
4. With the squares that are cloth fabric, use two pieces if the cloth is single layered; follow the manufacturer’s recommendation when using commercial autoclave wrapping paper.
PURPOSE: To ensure sterility until the sterile item is needed for use.
5. Open any hinged instruments. If the instrument is sharp, its teeth or tip should be shielded with cotton or gauze.
PURPOSE: To prevent puncture of the package or injury to the operator.
6. If the package is to contain several items, place a commercial sterilization indicator inside the package at the approximate center.
PURPOSE: To ensure that the autoclave is reaching effective levels of heat and pressure.
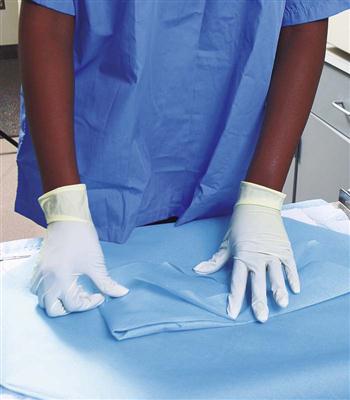
7. Bring up the bottom corner of the wrap and fold back a portion of it.
PURPOSE: This folded-back flap is the only part of each wrapper corner that can be touched when a sterile package is opened (Figure 2).
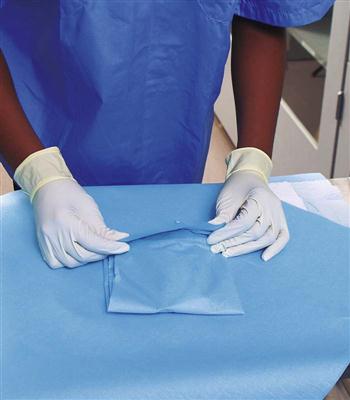
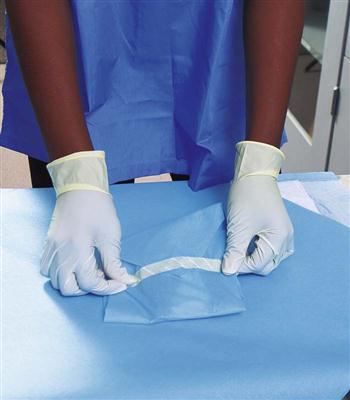
8. Repeat the above step with each corner, making sure to turn back a portion each time (Figures 3 and 4).
9. Fold the last flap over (Figure 5).
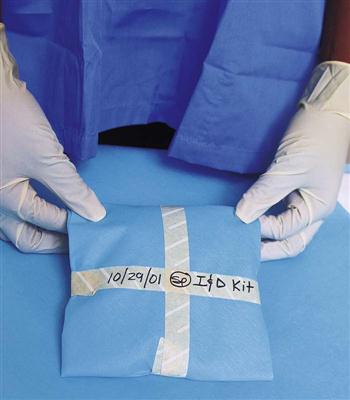
10. Secure with autoclave tape (Figure 6).
11. Secure with autoclave tape and label the package with the date, including the year, contents, and your initials (Figure 7).
Wrapping Instruments
The method used to wrap instruments for autoclave sterilization must allow the pack to be opened without becoming contaminated. The rules for protecting package contents include the following:
• Inspect muslin wrappers for holes before each use and discard if any holes are found.
• Wrap all hinged instruments in the open position to allow full steam penetration of the joint.
Sterilization Indicators
Sterilization is achieved only when steam reaches the optimum temperature for a designated length of time and has penetrated to the center of the articles. Sterilization indicators must be used routinely to determine whether all microorganisms have been destroyed. The two basic types of sterilization indicators are chemical indicators (autoclave tape) and biologic indicators (bacterial spore strips).
Chemical Sterilization Indicators.
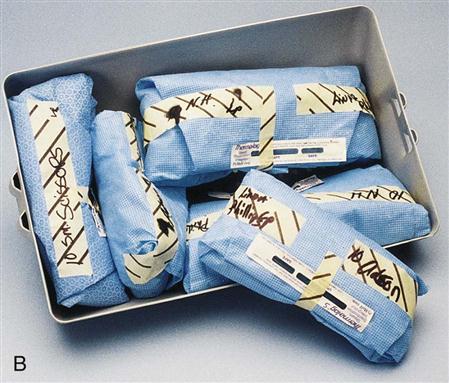
Autoclave tape, a commonly used sterilization indicator, contains a chemical dye that changes color when exposed to steam (Figure 57-3). The tape is not an absolute indication that the proper sterilization time, temperature, and steam have been maintained; it merely indicates that a high temperature was reached while the article was in the autoclave. The strip must completely change color (colors vary by manufacturer) or reveal the word “autoclaved” to ensure effective operation. The main function of autoclave tape, besides holding the wrapping material together or closing a sterilization bag, is to verify that the package has been autoclaved.

Biologic Sterilization Indicators.
The facility should have a policy for how frequently the autoclave is tested using biologic methods. One type, a spore strip indicator, contains a temperature-sensitive dye that changes color when the proper combination of steam, temperature, and time has been achieved. An indicator strip should be placed in the center of the largest pack that typically would be autoclaved in the facility to determine the accuracy of the autoclave and autoclave procedures. Test indicator kits are available that use ampules of Bacillus stearothermophilus, which is destroyed at 121° C (250° F). On completion of the cycle, the ampule is sent to the laboratory for analysis of any type of microbial growth, which would indicate that the autoclave is not sterilizing properly.
Quality Assurance Records for Office Sterilization
Every office should have specific protocols to follow for quality-assurance evaluations of the autoclave. This is done at specified intervals, depending on the volume and frequency of autoclave use. A log must be kept of the type of control test done, when it was performed, and the testing results. If the testing results indicate that sterilization was inadequate, a report must be made and filed. The report should identify the nature of the problem and how and when it was corrected. The report also should contain proof of correction by indicating the date and time of a first, subsequent, and successful sterilization run.
Loading the Autoclave
Prepare all packs and arrange the load in a way that allows maximum circulation of steam and heat (Procedure 57-2). Articles should be resting on their edges and should not be crowded. Placing the packs in stainless steel racks prevents packing of the autoclave too tightly. Jars, bottles, and trays must be wrapped and placed on their sides if they are to be used to store sterile items. Covers on jars and containers should be put to one side or left open to allow steam to penetrate. Extreme care must be taken not to contaminate jars when replacing their lids after autoclaving.
Instruments may be autoclaved unwrapped if they do not need to be sterile when used later. For example, although vaginal speculums do not need to be sterilized for use (the vagina is a body cavity that is naturally open to the external environment), they must be sanitized, disinfected, and sterilized to prevent cross-contamination among patients. They can be placed unwrapped on a perforated stainless steel tray in the autoclave and then stored in a clean area for future use.
Unloading Guidelines
When the autoclave’s sterilization cycle is complete, release the pressure according to the manufacturer’s guidelines. Once the pressure gauge reads “0,” stand back from the door and, with heat-resistant gloves, open the door approximately ¼ inch. Allow the load to dry for at least 15 minutes (this time varies according to the type of autoclave and the size of the load). Capillary attraction is the action that draws moisture through the surface of materials. Packs can act like a sponge, attracting outside moisture and microorganisms. Touching a wet pack allows microorganisms on your hands to penetrate the wrappings, making the contents of the pack nonsterile. Dry, wrapped packs may be removed with clean, dry hands, but it is safer to wear heat-resistant gloves to reduce the possibility of burns from the hot instruments inside the packs. If possible, allow all packs to cool in the autoclave with the door open. Place the packs on a dry, dust-free surface inside an enclosed cupboard or drawer for storage. Do not place the packs on cold surfaces, because hot packs may cause condensation, and moisture will contaminate the contents.
Guidelines for unloading an autoclave include the following:
• Stand behind the door when opening it to prevent accidental steam burns.
• If for any reason the integrity of the sterilization process is in question, the load should be considered contaminated and autoclaved again. Reasons for concern include the following:
 Any load that fails to convert a sterilization indicator strip
 Any loads processed after a biologic test indicates that the autoclave is not working properly
Shelf Life of Sterilized Packs.
Each office has its own guidelines for the shelf life of sterile packs. Generally, muslin and autoclave paper packs are considered sterile for up to 28 days from the date of sterilization. Polypropylene autoclave bags are sterile for up to 6 months from the sterilization date. All sterile packs should be stored on dry, dust-free, covered shelves or in drawers. Fabric wrappers must be inspected for holes and laundered after each use. A damaged pack or a broken seal renders the package nonsterile; spills of any fluid onto a package also contaminate it. When a pack is no longer sterile for any reason, including the expiration date, the contents must be reprocessed as if the pack had been used for surgery. The contents must be sanitized, disinfected, wrapped, and sterilized as usual.
Gas Sterilization
A variety of gas sterilizers are available. Each has its own very specific operating guidelines to ensure operator safety. Because of the long processing times, the very specific requirements for gas ventilation established by the Occupational Safety and Health Administration (OSHA), and the hazards of reproductive organ damage and cancer associated with gas sterilization, it is unrealistic to use gas sterilization in the physician’s office.
Chemical Sterilization
In the medical office, chemical sterilization is used for instruments that cannot be exposed to the high temperatures of steam sterilization. The sterilizing chemical solution must be mixed exactly according to the instructions on the bottle. The solution must be marked with the date of preparation and expiration. Materials to be sterilized must be submerged in this chemical bath with a closed lid for 8 hours or longer. Items are removed with sterile forceps and must be rinsed with sterile water to remove all traces of the chemical before the items are used on a patient. Removed items are then dried with a sterile towel. You must avoid skin contact with the sterilizing solution because it is very caustic.
Surgical Procedures
Common surgical procedures that are routinely performed in the primary care office include suturing, cyst removal, incision and drainage (I&D) of abscesses, and collection of biopsy specimens. The medical assistant should be proficient in explaining each of these procedures to the patient, preparing the patient and the room, assisting the physician with the surgery, and applying a sterile dressing and bandage after the procedure is finished.
Each surgical procedure requires appropriate skin preparation and draping with a fenestrated drape, also called an eye sheet. This is a surgical drape with an opening in the center. The size of the opening depends on the size of the surgical field. The opening is placed directly over the surgical site after the site has been suitably prepared (or “prepped,” as it is called in healthcare practice). A minor surgery tray is opened, and a sterile field is created on a Mayo instrument stand. Sutures, scalpel, and any other instruments needed are added to the field, according to the surgeon’s preference. Have a local anesthetic ready, also according to the physician’s preference.
After achieving suitable local anesthesia, the physician opens the skin with an incision. If a cyst is being removed, the physician dissects around it and usually tries to “deliver” it from the wound intact. If the procedure is an I&D, foul matter will start oozing from the wound immediately after the skin is incised. The wound is drained completely and flushed with copious amounts of sterile saline solution. A drain may be placed in the wound and left for several days. If the procedure is a biopsy, a small amount of tissue is removed and placed in a specimen container with preservative. The specimen container must be carefully labeled with the appropriate patient information, the date, and specifics about the specimen type and location. It then is sent to the laboratory, where it is examined microscopically for changes or abnormalities.
Electrosurgery
Electrosurgery is also known as electrocautery. An electrosurgical unit (ESU) uses high-frequency current to cut through tissue and coagulate blood vessels. A small probe with an electric current running through it is used to cauterize (burn or destroy) the tissue. When the electric current comes in contact with tissue and blood cells, they are vaporized, producing carbon and steam. This process seals blood vessels, minimizing cellular oozing and bleeding. Electrosurgery may be used to destroy granulations and small polyps.
Necessary components are the ESU’s power source, the grounding cable and pad, and the active electrode (a pencil-like instrument with a tip and cord). Tips are disposable and are used according to the type of procedure performed. The two most commonly used tips are the needle and flat designs.
Holding the pencil-like instrument, the surgeon touches the tissue with the tip and activates the electric current with a switch on the instrument or a foot pedal. The electric current is delivered to the tissues, and tissue is vaporized at the site of contact.
Laser Surgery
Laser is an acronym for light amplification by stimulated emission of radiation. Because a laser beam is so small and precise, it can be used to safely treat specific tissue with minimal damage to surrounding tissues and limited scar formation. Lasers were first used in medicine to treat diseases of the retina, and they now are used for many procedures, including excision of lesions, cauterization of blood vessels, removal of warts or moles, and cosmetic surgical procedures.
Several types of lasers are used, including the carbon dioxide, yttrium-aluminum-garnet (YAG), and pulsed dye lasers. Each laser has a specific use. The color of the laser light beam is directly related to the type of surgery performed.
A medical assistant must be specially trained to operate a laser before assisting with laser surgery. Laser equipment requires very careful handling, care, and maintenance. Laser light destroys tissue and can harm the patient, the physician, and you if handled improperly. The medical assistant should complete a full laser safety program before assisting in laser procedures. Once trained, the medical assistant’s role during laser surgery includes:
Microsurgery
Microsurgery involves the use of an operating microscope to perform delicate surgical procedures. One of its major uses is in ophthalmologic surgery. It also is used in otologic, rhinologic and sinus, laryngologic, neurosurgical, microvascular, gynecologic, and genitourinary procedures. A medical assistant must acquire a basic knowledge of the operation and care of a microscope before becoming qualified to assist in these types of procedures.
The basic components of an operating microscope are the light source, eyepieces (also called the oculars), lenses, and cord. Accessory pieces include assistant and observer lenses, cameras, video recorders, television monitors, and printers. These are all valuable for documentation and teaching purposes. Disposable sterile drapes and handle covers are used on the microscope during surgical procedures.
Surgical microscopes are expensive, delicate instruments that require extreme care in handling and cleaning. All lenses and cords should be carefully inspected before and after each use.
Endoscopic Procedures
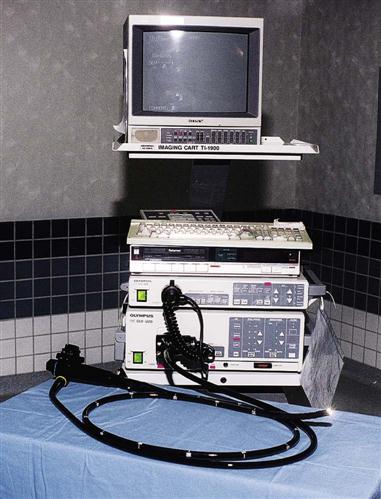
An endoscope is a medical device consisting of a miniature camera mounted on a flexible tube with an optical system and a light source that is used to examine the area inside an organ or cavity. Many types of endoscopes are used, and they are named according to the organs or areas they are used to explore, such as the urinary bladder, bronchus, larynx, colon (Figure 57-4), stomach, uterus, abdomen, and various joints. Small instruments can be used to take samples of suspicious tissues through the endoscope.
Direct visualization with an endoscope is used for diagnostic purposes or to perform surgical procedures. Endoscopes may be rigid (e.g., laparoscope or hysteroscope), semirigid, or flexible (colonoscopes, bronchoscopes, gastroscopes). All are delicate and expensive and require extreme care in handling to protect them from damage.
Accessory equipment used with endoscopes includes fiberoptic light cables and light source; irrigators for solution instillation and suction; and a camera, monitor, printer, and video recorder. The fiberoptic light cable consists of hundreds of glass fibers. It is important to protect it from being bent, dropped, kinked, squashed, or smashed. The light source can become very hot and must be kept out of contact with the patient, the physician, the staff, and any flammable material, such as surgical draping. All equipment must be checked before and after use. Always follow the manufacturer’s recommendations for use, care, and maintenance of equipment.
Cryosurgery
Cryosurgery involves the use of a very-low-temperature probe to destroy tissue by freezing it on contact. The probe’s temperature usually is below −20° C (4° F). This cold temperature is achieved by circulating liquid nitrogen through the tip of the probe. A local anesthetic usually is administered before cryosurgery. Cryosurgery is used to treat cancers of the skin, prostate, liver, pancreas, and kidney. In many situations, cryosurgery is less invasive than traditional surgery and therefore generally has fewer associated complications. Cryosurgery often is performed in an office setting or in an outpatient surgery center.
Assisting with Surgical Procedures
Surgery performed in a medical office is restricted to the management of minor problems and injuries. The medical assistant is expected to assist with preparing the patient and setting up the sterile field. The following procedures must be used without exception when assisting with minor surgery. Individual facilities may have specific guidelines for some of these procedures; however, the theory behind sterile technique is universal, regardless of where you work.
Preparation of the Patient
Whether minor surgery is performed because of an unforeseen accident or is a planned, elective procedure, the patient needs both psychological and physical support. A patient facing a surgical procedure may be concerned about pain, disfigurement, and a possible diagnosis of cancer. An injured patient may feel anxious about medical bills or possible loss of employment. Because surgery is a frightening experience, the medical assistant must take the time, both preoperatively and at the time of surgery, to help the patient deal with fears and anxieties. The best way to help is to make sure that the patient understands the details of the procedure, that all questions are answered by the physician, and that the patient has the opportunity to talk about the procedure and voice any concerns.
Questions should be answered directly, but you should answer only the questions that are within your scope of knowledge and the policies of the office. If you cannot answer a question, assure the patient that you will relay it to the physician before the procedure and then be sure to do so. What may seem to be a minor or unimportant question to you may be a very frightening concern to the patient. The minor surgery room can be intimidating, so unless the patient is sedated, try to make conversation with him or her while you prepare for the physician’s arrival.
Preoperative preparation may include blood and urine tests, completion of a consent form, and gathering of the current history concerning any recent illnesses, medications, and allergies. Patient preparations before surgery may include a shave prep, cleansing enemas, food intake restrictions, special bathing, and administration of a sedative medication. On the day of surgery, the patient is instructed to empty the bladder and undress and gown as requested. The vital signs are recorded in preparation for the procedure.
Preoperative Instructions
When office surgery is planned, certain procedures are followed before the appointment. These include the following:
• Having the necessary consent forms ready to sign
• Telling the patient to bring a relative or friend to drive him or her home after the surgery
• Instructing the patient to leave jewelry and other valuables at home
• Calling the patient the day before the scheduled surgery to confirm any special instructions
Informed Consent
The physician must have the patient’s written informed consent before beginning any surgical procedure. To sign an informed consent form permitting the physician to legally perform the surgery, the patient must understand what procedure will be performed, why it should be done, the potential risks and benefits of the surgery, alternative treatments (including no treatment), and the possible risks of any alternative treatment. This legal requirement is not met simply by having the patient sign an operative permit; a discussion must occur, during which the physician provides the patient or the patient’s legal representative with enough information to enable the person to decide whether to proceed with the proposed surgical treatment. After this discussion, the patient either consents to or refuses the surgery. The patient then signs or refuses to sign the consent form. If the patient signs with an X, the medical assistant should write “patient’s mark” beside the X and also should have a family member witness the signature. The discussion must be fully documented in the patient’s medical record. A copy of the signed form must also be included in the patient’s record. Treatment may not exceed the scope of the consent form.
The patient must not be under the influence of any sedative medication at the time he or she signs the consent form. This condition must never be violated.
Stay updated, free articles. Join our Telegram channel

Full access? Get Clinical Tree


