Specimen collection
Blood, fecal occult
♦ Used to detect occult blood (hidden GI bleeding) and for distinguishing between true melena and melena-like stools, which may result from certain drugs, such as iron supplements and bismuth compounds
♦ Two common screening tests: Hematest (an orthotolidine reagent tablet) and the Hemoccult slide (filter paper impregnated with guaiac)
♦ Easily performed on collected specimens or smears from a digital rectal examination
♦ A blue reaction in a fecal smear if occult blood loss exceeds 5 ml in 24 hours
♦ No fecal smear needed for Colo-CARE or EZ-Detect, two newer tests
♦ Important for early detection of colorectal cancer because 80% of affected patients test positive with Hemoccult slides, 24% with ColoCARE
♦ Three positive test results (with patient following prescribed diet) required to confirm GI bleeding
♦ Additional tests required to confirm cause, including colorectal cancer
Equipment
Test kit ♦ gloves ♦ glass or porcelain plate ♦ tongue blade or other wooden applicator
Implementation
♦ Explain the test to the patient including dietary guidelines. Tell him to maintain a high-fiber diet and to avoid red meat, poultry, fish, turnips, beets, and horseradish for 48 to 72 hours before the test as well as throughout the collection period because these substances may alter test results.
♦ As ordered, have the patient stop iron preparations, bromides, iodides, rauwolfia derivatives, indomethacin, colchicine, salicylates, potassium, phenylbutazone, oxyphenbutazone, bismuth compounds, steroids, and ascorbic acid for 48 to 72 hours before the test and during it to ensure accurate results and avoid possible bleeding, which some of these compounds may cause.
Hematest reagent tablet test
♦ Put on gloves and collect a stool specimen.
♦ Use a wooden applicator to smear a bit of the stool specimen on the filter paper supplied with the test kit. Or, after performing a digital rectal examination, wipe the finger you used for the examination on a square of the filter paper.
♦ Place the filter paper with the stool smear on a glass plate.
♦ Remove a reagent tablet from the bottle, and immediately replace the cap tightly.
♦ Place the tablet in the center of the stool smear on the filter paper.
♦ Add one drop of water to the tablet, and let it soak in for 5 to 10 seconds.
♦ Add a second drop, letting it run from the tablet onto the specimen and filter paper.
♦ If needed, tap the plate gently to dislodge any water from the top of the tablet.
♦ After 2 minutes, the filter paper will turn blue if the test is positive.
 Don’t read the color that appears on the tablet itself or that develops on the filter paper after the 2-minute period.
♦ Note the results and discard the filter paper.
♦ Remove and discard your gloves, and wash your hands thoroughly.
Hemoccult slide test
♦ Put on gloves and collect a stool specimen.
♦ Open the flap on the slide packet, and use a wooden applicator to apply a thin smear of the stool specimen to the guaiac-impregnated filter paper exposed in box A. Or, after performing a digital rectal examination, wipe the finger you used for the examination on a square of the filter paper.
♦ Apply a second smear from another part of the specimen to the filter paper exposed in box B because some parts of the specimen may not contain blood.
♦ Let the specimens dry for 3 to 5 minutes.
♦ Open the flap on the reverse side of the slide package, and place 2 drops of Hemoccult developing solution on the paper over each smear.
♦ A blue reaction will appear in 30 to 60 seconds if the test is positive.
♦ Record the results and discard the slide package.
♦ Remove and discard your gloves, and wash your hands thoroughly.
ColoCARE and EZ-Detect tests
♦ Drop the test paper in the toilet with the stool.
♦ After the manufacturer’s specified time period, check the test paper in the toilet for color change to blue or green. Record the results in the patient’s chart.
Special considerations
♦ Make sure the stool specimen isn’t contaminated with urine, soap solution, disinfectant, or toilet tissue, and test as soon as possible after collection.
♦ Test samples from several portions of the same specimen because occult blood from the upper GI tract isn’t always evenly dispersed throughout the formed stool; likewise, blood from colorectal bleeding may occur mostly on the outer stool surface.
♦ Check the condition of the reagent tablets and note their expiration date. Use only fresh tablets and discard outdated ones.
♦ Protect Hematest tablets from moisture, heat, and light.
♦ If repeat testing is needed after a positive screening test, re-explain the test to the patient and remind him to carefully follow the dietary guidelines.
♦ Report positive results to the physician.
Documentation
♦ Record the time and date of each test.
♦ Record the type of screening test used and the result of the test.
♦ Note any unusual characteristics of the stool tested.
Blood, venous
♦ Involves venipuncture—piercing a vein with a needle and collecting blood in a syringe or evacuated tube
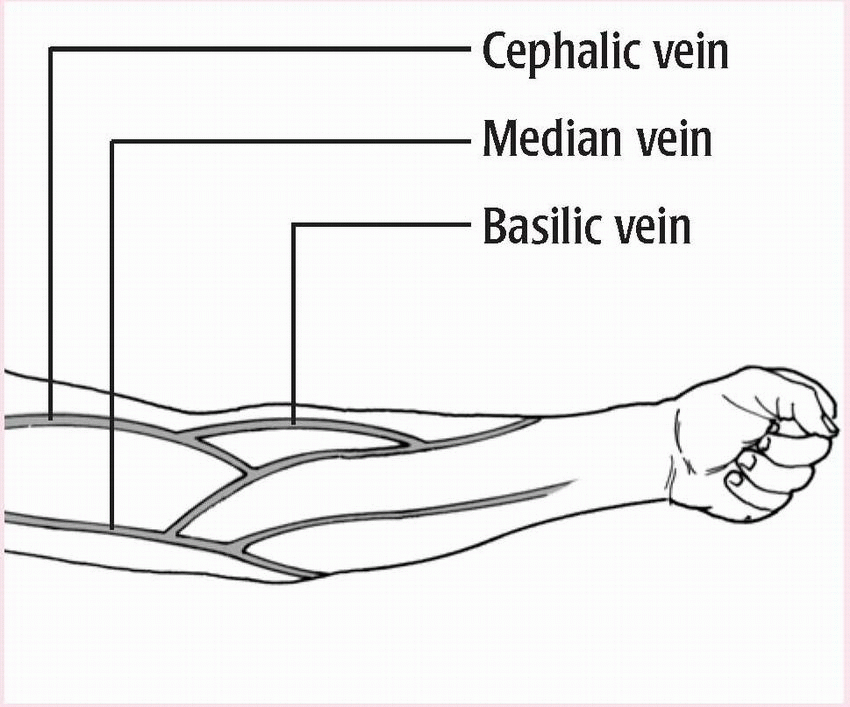
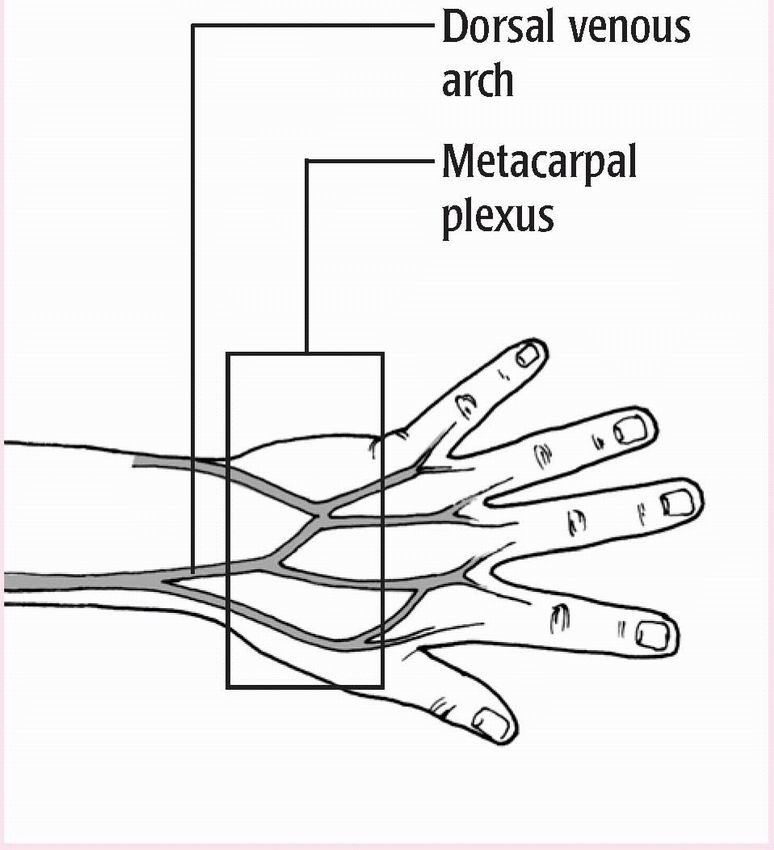
♦ Typically done in antecubital fossa
♦ May be done in a vein in the dorsal forearm, the dorsum of the hand or foot, or another accessible location
♦ Not done in inner wrist because doing so may damage underlying structures
♦ Usually obtained by laboratory staff but can also be obtained by medical assistants and nurses.
Equipment
Tourniquet ♦ gloves ♦ syringe or evacuated tubes and needle holder ♦ antiseptic pads ♦ 20G or 21G needle for the forearm or 25G needle for the wrist, hand, ankle, or a child ♦ color-coded collection tubes containing appropriate
additives ♦ labels ♦ laboratory request form and laboratory biohazard transportation bag ♦ 2″ × 2″ gauze pads ♦ adhesive bandage (see Guide to color-top collection tubes)
additives ♦ labels ♦ laboratory request form and laboratory biohazard transportation bag ♦ 2″ × 2″ gauze pads ♦ adhesive bandage (see Guide to color-top collection tubes)
Guide to color-top collection tubes
TUBE COLOR | DRAW VOLUME | ADDITIVE | PURPOSE |
Red | 2 to 20 ml | None | Serum studies |
Lavender | 2 to 10 ml | EDTA | Whole-blood studies |
Green | 2 to 15 ml | Heparin (sodium, lithium, or ammonium) | Plasma studies |
Blue | 2.7 or 4.5 ml | Sodium citrate and citric acid | Coagulation studies on plasma |
Black | 2.7 or 4.5 ml | Sodium oxalate | Coagulation studies on plasma |
Gray | 3 to 10 ml | Glycolytic inhibitor, such as sodium fluoride, powdered oxalate, or glycolyticmicrobial inhibitor | Glucose determinations on serum or plasma |
Yellow | 12 ml | Acid-citrate-dextrose | Whole-blood studies |
Preparation of equipment
♦ If you’re using evacuated tubes, open the needle packet, attach the needle to its holder, and select the appropriate tubes.
♦ If you’re using a syringe, attach the appropriate needle to it. Make sure the syringe can hold all the blood required for the test.
♦ Label all collection tubes clearly with the patient’s name and identification number, date of birth, the physician’s name, the date and time of collection, and initials of the person performing the venipuncture.
Implementation
♦ Wash your hands thoroughly, and put on gloves.
♦ Confirm the patient’s identity using two patient identifiers and tell him that you’re about to collect a blood sample.
♦ Explain the procedure to ease the patient’s anxiety and ensure cooperation.
♦ Ask if the patient has ever felt faint, sweaty, or nauseated when having blood drawn.
♦ If the patient is on bed rest, ask him to lie in a supine position with his head slightly elevated and his arms at his sides.
♦ If the patient is ambulatory, ask him to sit in a chair and support his arm securely on an armrest or a table.
♦ Examine the patient’s veins to determine the best puncture site.
(See Common venipuncture sites.) Look for the vein’s blue color, or palpate the vein to find a firm rebound sensation.
(See Common venipuncture sites.) Look for the vein’s blue color, or palpate the vein to find a firm rebound sensation.
♦ Tie a tourniquet 2″ (5 cm) proximal to the area chosen. By impeding venous return to the heart while still allowing arterial flow, a tourniquet produces venous dilation. If arterial perfusion remains adequate, you’ll be able to feel the radial pulse.
♦ Clean the venipuncture site with an antiseptic pad.
♦ Apply it with friction for 30 seconds or until the final pad comes away clean.
♦ Let the skin dry before performing the venipuncture.
♦ If the vein hasn’t dilated, have the patient open and close his fist a few times. Then ask him to close his fist as you insert the needle and to open it again when the needle is in place.
♦ Immobilize the vein by pressing just below the venipuncture site with your thumb and drawing the skin taut.
♦ Position the needle holder or syringe with the needle bevel up and the shaft parallel to the path of the vein, at a 30-degree angle to the arm.
♦ Insert the needle into the vein.
♦ If you’re using a syringe, venous blood will appear in the hub. Withdraw the blood slowly, pulling the plunger of the syringe gently to create steady suction until you obtain the required sample.
 Pulling the plunger too forcibly may collapse the vein.
♦ If you’re using a needle holder and an evacuated tube, grasp the holder securely to stabilize it in the vein, and push down on the collection tube until the needle punctures the rubber stopper. Blood will flow into the tube automatically.
♦ Remove the tourniquet as soon as blood flows adequately to prevent stasis and hemoconcentration, which can impair test results.
♦ If the flow is sluggish, leave the tourniquet in place longer, but always remove it before withdrawing the needle. Don’t leave the tourniquet on for more than 3 minutes.
♦ Continue to fill the required tubes, removing one and inserting another.
♦ Gently rotate each tube as you remove it to help mix the additive with the sample.
♦ After you’ve drawn the sample, place a gauze pad over the puncture
site and slowly and gently remove the needle from the vein.
site and slowly and gently remove the needle from the vein.
 When using an evacuated tube, remove it from the needle holder to release the vacuum before withdrawing the needle from the vein.
♦ Apply gentle pressure to the puncture site for 2 to 3 minutes or until bleeding stops. This prevents extravasation into the surrounding tissue, which can cause a hematoma.
♦ After bleeding stops, apply an adhesive bandage.
♦ If you’ve used a syringe, transfer the sample to the collection tubes. Place the specimen tubes inside the biohazard transport bag, being careful to avoid foaming, which can cause hemolysis.
♦ Finally, check the venipuncture site to see if a hematoma has developed. If it has, apply pressure until you’re sure bleeding has stopped (about 5 minutes), after which you may apply warm soaks to the site.
♦ Discard syringes, needles, and used gloves in the appropriate containers.
Special considerations
♦ Many manufacturers make safetyengineered blood collection sets; their use is recommended to prevent needle sticks.
♦ Never collect a venous sample from an arm or a leg that’s already being used for I.V. therapy or blood administration because this may affect test results.
♦ Don’t collect a venous sample from an infection site because this may introduce pathogens into the vascular system.
♦ Avoid collecting blood from edematous areas, arteriovenous shunts, an arm on the same side as a previous lymph node dissection, and sites of previous hematomas or vascular injury.
Stay updated, free articles. Join our Telegram channel

Full access? Get Clinical Tree


