Physical Assessment of Children
Learning Objectives
After studying this chapter, you should be able to:
• Apply principles of anatomy and physiology to the systematic physical assessment of the child.
• Describe the major components of a pediatric health history.
• Identify the principal techniques for performing a physical examination.
• Use a systematic and developmentally appropriate approach for examining a child.
• Describe normal physical examination findings.
• List common terms used to describe the findings on physical examination.

http://evolve.elsevier.com/McKinney/mat-ch
Nurses perform physical assessments of infants and children in various settings—the clinic, the hospital, the school, and the home. The physical examination may be part of a well-child assessment, it may be the admission examination when a child enters the hospital, or it may be part of an initial assessment for home health care. The physical examination provides objective and subjective information about the child. The ability to perform a physical examination is fundamental to nursing care of the child. Findings from a thorough physical examination help to determine a child’s health status, which is the basis of all nursing interventions.
General Approaches to Physical Assessment
As when providing any nursing care for infants and children, the nurse applies knowledge of growth and development when preparing the child and parents for performance of the physical examination. Involving parents as much as possible in the examination and allowing the child to handle safe, clean instruments, such as the stethoscope, reduce anxiety and increase the likelihood of examining a cooperative child.
The physical examination is often the first direct contact between the nurse and the child. Establishing a trusting relationship between the child and the examiner is important. Throughout the examination the nurse should be sensitive to the cultural needs of and differences among children. Providing a quiet, private environment for the history and physical examination is important. The classic systematic approach to the physical examination is to begin at the head and proceed through the entire body to the toes. When examining a child, however, the examiner tailors the physical assessment to the child’s age and developmental level.
Infants from Birth to 6 Months
Infants ages birth to 6 months are responsive to human faces, are increasingly interested in their environment, and do not mind being undressed (see Chapter 6). Their examination should therefore be relatively easy. If the infant is nursing or asleep in the parent’s arms, auscultate the heart, lungs, and abdomen without waking the baby. Even if the infant is awake, effective examination can still be accomplished with the infant laying or sitting in the parent’s arms or on the lap. As body parts are examined, incorporate evaluation of the primitive reflexes—palmar grasp, plantar grasp, placing, stepping, and tonic neck reflexes. Leave all uncomfortable procedures, such as abduction of the hips, speculum examination of the tympanic membranes, and elicitation of the Moro reflex, until last. Before beginning the examination, undress the infant, leaving the diaper on a male child. Refocus an unhappy infant by calmly talking in a soft voice, distracting with a rattle, or offering a pacifier.
Infants from 6 to 12 Months
For an older infant, follow the same procedures used for the infant from birth to 6 months, but keep in mind that infants 6 months and older feel stranger anxiety and so are more difficult to examine. Distracting a child of this age with a toy or object may be useful. It is easier to do as much of the examination as possible with the child held on the parent’s lap. Leave ear, oral, and other uncomfortable procedures until last.
 NURSING QUALITY ALERT
Adapting the Physical Examination to the Child
The classic systematic approach to the physical examination is to begin at the head and proceed to the toes. For children, painful or frightening procedures should be left until last. Involving parents by asking them to hold or stand by the child can decrease children’s anxiety and assist them in relaxing.
Toddlers
Toddlers are the most challenging to examine because they are least likely to cooperate (see Chapter 7). To form a supportive relationship with the parent and toddler, the examiner begins by sitting or standing next to the parent (Figure 33-1). To facilitate relaxation, the examiner can provide a few toys and books and encourage the child to explore. Allowing the child to handle objects used during the examination can decrease fears. Communicating with the child, using age-appropriate words to describe what is about to be done, can also help decrease fear.
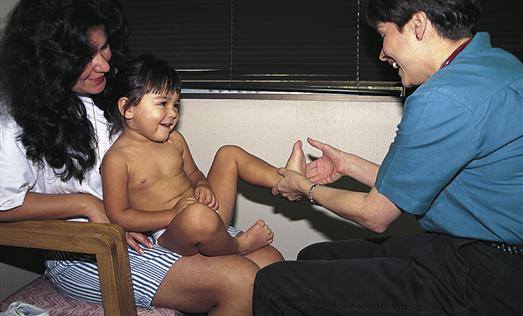
Portions of the examination can be done before the child is totally undressed. The order of the examination is flexible, proceeding from least to most invasive procedures. Resistance and crying are common with toddlers. The nurse assures the parent that the child’s response to the examination is normal. The parent is the best resource for gaining the child’s cooperation during the examination. Parents’ use of approaches to soothing and comforting that are familiar to a child can do much to facilitate examination.
Preschoolers
Preschool children are usually more cooperative than toddlers but still like to have their parents nearby (see Chapter 7). Preschool children are happy to show nurses that they can undress themselves. They can also be expected to cooperate. The nurse may proceed with the examination from the head to the toe but should still save the more invasive procedures, such as the speculum ear examination and the oral examination, until last. The examiner can reinforce the child’s interest by allowing the child to participate in the examination and by praising the child for cooperating.
School-Age Children
To establish trust with the school-age child, the examiner asks the child questions the child can answer. Children in elementary school will talk about school, favorite friends, and activities (see Chapter 8). Older school-age children may have to be encouraged to talk about their school performance and activities. The examiner encourages the parent to support and reinforce the child’s participation in the examination.
The examination proceeds from head to toe. Children of this age prefer a simple drape over their underpants or a colorful examination gown, and the examiner should be sensitive to the child’s modesty. The examination is a wonderful opportunity to teach the child about the body and personal care. The nurse answers questions openly and in simple terms.
Adolescents
Adolescents are most comfortable with a straightforward, noncondescending approach (see Chapter 9). Decisions about who should be present during the examination should be openly discussed with the adolescent. In most cases adolescents should be examined without the parent present. However, the parent should be given the opportunity to talk to the nurse about any concerns. The order of the examination is the same as for the school-age child.
It is best to incorporate the genital examination into the middle of the examination. If possible, proceed from the abdominal examination to the genital examination, to allow ample time for questions and discussions about this part of the examination. The physical examination provides the opportunity to assure the pubertal child about normal developmental stages and to answer concerns children this age frequently have about what is happening to their bodies. The adolescent is expected to undress and wear a gown. The adolescent is draped appropriately during the examination.
Techniques for Physical Examination
When performing the physical assessment, the nurse uses the four basic techniques of inspection, palpation, percussion, and auscultation, generally in that order. During the abdominal examination, the sequence is altered; inspection is performed first, and then auscultation, percussion, and palpation. The sequence of the abdominal examination is changed so as not to alter bowel sounds before determining their presence and characteristics. Percussion is performed to determine the size of abdominal organs before palpation.
Inspection
Most information is gathered during the physical examination by systematic and deliberate visual observations. The nurse first surveys an entire area of the body and then focuses on specifics, such as color, shape, size, and movement. Inspection can be both direct and indirect. Direct inspection relies on the examiner’s senses of sight and hearing. Indirect inspection is accomplished with the use of special equipment, such as an otoscope, to examine a specific body area.
Palpation
During palpation, the nurse uses the sense of touch to make judgments about pulsations and vibrations and to locate structures and masses. Palpation allows the nurse to determine characteristics such as size, texture, warmth, mobility, and tenderness of various areas of the body.
Different parts of the hands are used to detect different characteristics. The finger pads are used to palpate the breast, while fingertips are used to palpate the lymph nodes and pulses. The back of the hand is used to assess temperature. The palm of the hand is used to detect vibrations.
The type of palpation used is governed by the structure to be examined and the need to avoid any unnecessary discomfort to the child. Light palpation is accomplished by gently applying fingertip pressure to depress the skin surface approximately ½ to ¾ inch and then moving the fingertips in a circular motion.
 NURSING QUALITY ALERT
Deep palpation identifies abdominal structures such as the liver, spleen, and kidneys and detects abdominal masses. Deep palpation follows light palpation. The surface is depressed approximately 1½ to 2 inches to identify underlying masses and abdominal structures. Bimanual palpation is performed with both hands. The examiner superimposes one hand over the other to increase pressure or places one hand near the other to capture and trap a mass or structure between them, such as a kidney or the spleen.
Percussion
To percuss, the nurse uses quick, sharp tapping of the fingers or hands to produce sounds. Percussion is performed to locate the position, size, and density of underlying structures. The three basic methods are as follows:
The method used depends on the area to be percussed. The nurse uses quick, light blows to create vibrations that penetrate approximately 2 inches below the surface. Sounds identified by percussion are classified as flat, dull, resonant, hyperresonant, or tympanic (Box 33-1).
Auscultation
Auscultation entails eliciting and listening to body sounds created in the lungs, heart, blood vessels, and abdominal viscera. The most common way to auscultate is to use a stethoscope. Most auscultated sounds result from air or fluid movement within the body. The diaphragm of the stethoscope is most effective in assessing high-pitched sounds, such as heart and breath sounds. The bell of the stethoscope is most effective in hearing low-pitched sounds, such as blood pressure and vascular sounds. Auscultation requires a quiet environment. The nurse places the stethoscope on the skin in the appropriate area. Sounds heard are described according to pitch, intensity, duration, and quality.
Smell
While examining the child, the nurse uses the sense of smell to detect general body odors, common in children who are neglected or dirty. Odor may also indicate infection. Odors from the mouth, urine, or feces can be important. In particular, some diseases are characterized by odors coming from the mouth (Seidel, Ball, Dains, et al., 2010).
Sequence of Physical Examination
General Appearance
During the first contact with the child and parent, the examiner forms an initial impression by making a general survey. The nurse determines the child’s age, sex, and race, and identifies clues concerning the child’s behavior and health status. Because each child is a unique human, individual differences in behavior and health status related to growth and development will be evident. During the general survey, the examiner continually notes the parent-child interaction and the way the parent responds to the child’s needs and behavior. Physical and emotional neglect, as well as inadequate parental supervision for the child’s age, may be subtle or overt. These observations, together with other indicators of the child’s health status, may provide clues to distress or abuse (Box 33-2).
History Taking
Taking an accurate history is the single most important component of the physical examination. Practitioners obtain three different types of health histories: the complete, or initial, history; the well, interim history; and the episodic, or problem-oriented, history.
In the complete or initial history (Box 33-3), data are gathered about the child from the time of conception to the child’s current status. The well, interim history includes data gathered about the child from the last well visit to the current visit. When doing a well, interim history, the examiner assumes that a database is in place. In a problem-oriented or episodic history (Box 33-4), information is gathered about a current problem. Information about the specific problem is then added to the existing database.
 CRITICAL THINKING EXERCISE 33-1
Ann Maloney, a 17-year-old single mother, brings her 6-month-old daughter, Kerrie, to the clinic. This is Kerrie’s first visit. Ms. Maloney made several earlier appointments for Kerrie but was always unable to keep them. She states, “I am very busy trying to work and care for Kerrie. I had to miss work because Kerrie has lots of colds. I hate to take time off when she is well. My supervisor at work said that it is important for her to have her immunizations and a physical examination. I guess I messed up.”
Recording Data
The information gathered during the history is documented concisely to provide all necessary information from pregnancy to the child’s current status. Milestones in growth and development, immunizations, and family status are always included in the child’s history.
Vital Signs
Vital signs are taken for every child during every visit in ambulatory care settings and are monitored throughout the day in a hospitalized child. Assessment of vital signs (temperature, pulse, respirations, and blood pressure) is an important way to measure and monitor vital body functions. Measuring vital signs provides the basis for decisions concerning the child’s overall health and illness. In children, changes in vital signs are important signs of changes in health status. Table 33-1 describes normal vital signs by age, and Chapter 37 details the procedure for taking vital signs in children.
TABLE 33-1
| AGE | TEMPERATURE∗ | PULSE RATE (BEATS/MIN) | RESPIRATORY RATE (BREATHS/MIN) | BLOOD PRESSURE RANGE (mm Hg)+ | |
| DEGREES FAHRENHEIT | DEGREES CELSIUS | ||||
| Newborn | 97.7-99.1 (axillary) | 36.5-37.3 (axillary) | 120-160 | 30-60 | Systolic: 65-95† |
| Diastolic: 30-60† | |||||
| 4 yr | 97.5-98.6 (axillary) | 36.4-37 (axillary) | 80-125 | 20-30 | Girls |
| Systolic: 91-104 | |||||
| Diastolic: 52-66 | |||||
| Boys | |||||
| Systolic: 93-107 | |||||
| Diastolic: 50-65 | |||||
| 10 yr | 97.5-98.6 (oral) | 36.4-37 (oral) | 70-110‡ | 16-22 | Girls |
| Systolic: 102-115 | |||||
| Diastolic: 60-74 | |||||
| Boys | |||||
| Systolic: 102-115 | |||||
| Diastolic: 61-75 | |||||
| 16 yr | 97.5-98.6 (oral) | 36.4-37 (oral) | 55-90 | 15-20 | Girls |
| Systolic: 111-124 | |||||
| Diastolic: 66-80 | |||||
| Boys | |||||
| Systolic: 116-130 | |||||
| Diastolic: 65-80 | |||||

∗The normal range of the child’s temperature depends on the method used. Temperatures exhibit circadian rhythms at all ages.
+Blood pressures represent values for the 50th and 90th percentiles at age and average height.
†Taken by Doppler measurement.
‡After age 12 yr, a boy’s pulse is 5 beats/min slower than a girl’s.
Temperature
The method for measuring children’s temperature may vary from one setting to another. Some parents are comfortable taking a rectal or axillary temperature. Health care providers may use a tympanic membrane or temporal artery sensor or an electronic, digital thermometer. Currently, parents are encouraged to take axillary rather than rectal temperatures. Reasons for the recommendation are the invasive nature of rectal temperature measurements, the risk of injury, and their questionable accuracy with febrile children because feces retain body heat for hours after a fever has diminished. Axillary temperatures, when taken correctly, provide accurate information concerning changes in the child’s health status.
Tympanic temperature measurements are frequently used in health care agencies because they can be performed quickly and involve less cross contamination; however, studies have shown mixed results as to their accuracy in determining fever (Devrim, Kara, Ceyhan, et al., 2007; Holzhauer, Reith, Sawin, et al., 2009). When recording a tympanic temperature, the nurse notes the side on which the temperature was elicited. Variation can occur from one ear to the other in the same child.
An oral thermometer may be used with older children, usually starting at 5 or 6 years old. For oral temperature measurements, an electronic thermometer is unbreakable and registers quickly.
A temporal artery thermometer (Temporal Scanner, Exergen Corporation, Watertown, MA) is a noninvasive system with advanced infrared technology. It measures temperatures with a gentle stroke across the forehead and then down to the ear. This thermometer can be used with infants, children, or adolescents. As the probe crosses over the temporal artery, the sensor inside the probe measures ambient temperatures, mathematically replaces the small temperature loss from cooling at the skin, and displays an accurate arterial temperature (Exergen Corporation, 2005). (See Chapter 37 for a discussion of various methods of assessing temperature.)
Pulse
Apical pulse rates are measured in children younger than 2 years and in any child who has an irregular heart rate or known congenital heart disease. Radial pulse rates may be taken in children older than 2 years. To compensate for normal irregularities, the nurse counts the pulse for 1 full minute. Chapter 37 details the procedure for measuring the pulse rate.
Arterial pulses are palpated to determine pulse rate and rhythm and to evaluate blood flow, arterial wall elasticity, and vessel patency. To determine the position of the heart in the anterior precordium, the nurse palpates the apical impulse in infants and children younger than 6 years. In the acute care setting, an apical impulse is always palpated in every child, and the location of the apical impulse is noted. Simultaneously, the examiner palpates and compares femoral, radial, and carotid pulses in children of any age. The nurse may also compare a carotid pulse with a femoral or radial pulse for equality of pulses. In infants, the nurse notes the pulsating anterior fontanel. The pulse may be increased significantly above normal in infants and children with anxiety, fever, exercise, inflammatory illnesses, shock, or heart disease. The resting heart rate changes with increasing age.
The rhythm of the heartbeat is assessed for equal spacing between consecutive beats. Irregular cardiac rhythms are not uncommon in children and are often related to changes in rhythm that occur in response to respiratory inspiration and expiration.
Respirations
The nurse observes the rate, depth, and ease of respiration in the child. Respirations vary with age. The respiratory rate, like the heart rate, is significantly influenced by emotion and exercise. In infants, the rate may be determined by observing abdominal excursion. In toddlers and older children, the nurse observes thoracic excursion. Because the movements are irregular, the rate should be assessed for 1 minute in infants and young children. Respirations are best counted when the child is not paying attention to the examiner. Respirations should be counted while the examiner continues to keep fingers on a pulse or the stethoscope on the chest, as though checking the pulses. This effort will ensure that the child is unaware that the examiner is counting respirations.
The depth and rhythm of respirations are determined subjectively and compared with norms for a particular age-group. The ease or difficulty of respirations is a somewhat subjective observation. Respirations should be quiet and appear effortless. Stridor, a crowing noise heard on inspiration and heard louder over the neck, is worrisome in a child and may be a sign of croup or a late sign in epiglottitis (Roosevelt, 2011) (see Chapter 45). Inspiratory stridor indicates a partial obstruction of the airway. Continuous inspiratory and expiratory stridor may be related to delayed development of the cartilage in the tracheal rings or to a relatively small larynx.
Blood Pressure
The American Academy of Pediatrics (AAP) recommends that all children beginning at age 3 years routinely have their blood pressure checked (2012). Blood pressure measurements are taken for all children at every ambulatory visit; in an acute-care setting, blood pressure is measured at least daily, and often more frequently, depending on the child’s condition. The appropriate-size cuff must be used in order to obtain an accurate blood pressure. Blood pressure measurements in healthy ambulatory children are compared with standard norms (see Table 33-1 for the effects of age on vital signs). An auscultated blood pressure measurement that is equal to or exceeds the 90th percentile for the child’s sex, height, and age must be confirmed before the child is described as being hypertensive (see http://www.nhlbi.nih.gov/guidelines/hypertension/child_tbl.pdf). An average of at least three abnormal blood pressure measurements taken on separate occasions requires further evaluation. If an adolescent’s blood pressure is greater than 120/80 mm Hg, the adolescent is considered to be prehypertensive even if this value is below the 90th percentile (American Academy of Pediatrics [AAP], National High Blood Pressure Education Program Working Group on High Blood Pressure in Children and Adolescents, 2004).
The size of the cuff is important. Cuffs that are too small will cause falsely elevated values; those that are too large will cause inaccurate low values (see Chapter 37 for determining appropriate cuff size). Several determinations may be needed to obtain values unaffected by anxiety (Feld & Corey, 2007). Instructing the child that the “balloon” will gently squeeze the arm or give the arm a “hug” will usually decrease anxiety. To alleviate anxiety, the child can also assist with taking a blood pressure on a doll, a stuffed animal, or the parent.
Pain Assessment
For children in acute and ambulatory care settings, the initial and ongoing assessment of pain is essential (see Chapter 39). The American Pain Society introduced the phrase “pain as the 5th vital sign” to emphasize the importance of assessing pain along with the standard four vital signs (American Pain Society, n.d.). The Joint Commission standards include requirements that all health care providers identify patients in pain using methods that are consistent with the patient’s age, condition, and ability to understand (2010). Use of a pain assessment tool that is developmentally appropriate for the pediatric patient is recommended (Jarvis, 2012). See Table 39-2 for a list of pain assessment tools.
Anthropometric Measurement
Anthropometrics entails measuring the human body and assessing nutritional status, as well as growth and development. Weight, height, and head circumference are always measured in children and are compared with averages for age-group and gender. The amount of body fat should be measured on the basis of the body mass index (BMI), which is calculated according to a simple formula:

See http://www.cdc.gov/growthcharts/clinical_charts.htm for BMI charts for children. Midarm muscle circumference, skinfold thickness, and weight provide information about three body tissues (subcutaneous tissue, muscle, and fat) altered by nutrition. Because children’s body fat varies with age and gender, anthropometric measurements are most valuable when they are plotted on a growth curve and evaluated serially so that trends can be monitored.
Measuring height and weight are routine procedures that provide valuable information about a child’s health. Children grow and develop rapidly, and this growth and development must be constantly evaluated. A child’s serial physical measurements reflect the rate of growth. A failure in growth, an acceleration in growth, or any change in growth pattern may be the first clue to serious health problems. When a child’s weight or height stops following the child’s own growth curve, this is the most significant indicator of a change in health status. Measurements must be correct and accurate and are taken at every visit from birth to adulthood.
Height
The methods of measuring a child’s stature vary with the child’s age. Infant and toddler length is best measured with the child lying down on a flat measuring board. This method is used until the child is able to stand independently. The child’s head is held securely to the headboard, and the movable footboard is stretched to touch the child’s heel. If a measuring board is not available for the infant and young child, it is possible to position the child’s body on a flat surface, mark the point where the heel touches the surface, and then mark the point where the top of the head is lying on the surface, taking care to ensure that the child’s legs and body are straight on the surface. The examiner then removes the child and measures the distance between the two points with a measuring tape. Measuring the length of the child in this manner is not as accurate as using a measuring board.
 NURSING QUALITY ALERT
Importance of Anthropometric Measurements
Anthropometric measurements reflect any change in the growth pattern and may be the first clue to a serious problem. Measurements must be taken at every health care visit from birth to adulthood. If a child’s weight or height stops following the child’s own growth curve, this is a significant indicator of a change in health status.
When a child is able to cooperate and stand without support, around age 2 years, the examiner stands the child in stocking feet next to a standard measuring tape that begins at the child’s heel and is not displaced by room molding. A flat, hard surface is used to reach from the top of the child’s head to the tape so that the examiner does not guess or add height because of the hair. If this is the first standing measurement, there may be a slight discrepancy from the lying measurement.
Once the measurement is taken, it must be plotted on a standardized growth chart appropriate for length or height measurement (see http://www.cdc.gov/growthcharts). Height and weight are evaluated by determining whether the child is following a predictable percentile curve on a growth chart. Height and weight are related to hereditary factors and will vary from child to child.
Weight
The method and equipment for weighing vary with the child’s age. All scales must be balanced or zeroed first before weight is measured. Infants are placed in a lying position on a regular baby scale with all their clothing removed. Older children who are able to stand or walk without support may be weighed on the adult standing scale. On the older child, remove all clothing except underwear. Like height, weight is plotted on a standardized growth chart (see http://www.cdc.gov/growthcharts).
Head Circumference
Head circumference is measured in all children from birth to age 36 months and is plotted on a standard growth chart on all visits. In the child older than 3 years with any questionable head size, macrocephaly or microcephaly, the head circumference should be measured at every visit. To measure the head circumference, a nonstretching measuring tape is wrapped above the supraorbital ridges and over the most prominent part of the occiput (Figure 33-2).

The head circumference is plotted on a standardized growth chart. During the first year of life, the head circumference normally increases by 1.2 cm (0.5 inch) each month. Head circumference can reflect an abnormal rate of development, give some indication of nutritional status, and possibly indicate tumor growth or an abnormal accumulation of cerebrospinal fluid (CSF) known as hydrocephalus.
Chest Circumference
Chest circumference is routinely measured only in the newborn infant. The newborn’s head circumference is larger than the chest circumference. Chest circumference is almost equal to head circumference after age 1 year. To measure chest circumference, the measuring tape is wrapped around the chest at the nipple line. The measurement is taken between inspiration and expiration.
Midarm Circumference
Midarm circumference reflects muscle mass and fat. To measure midarm circumference, the midpoint on the arm between the acromial process and the olecranon process is determined. Then, with the arm hanging loosely at the side, the child’s arm is measured at the midpoint with a tape measure. The measurement is recorded in centimeters. With a decrease in fat or muscle atrophy, the midarm circumference decreases. It will increase with weight gain.
Triceps Skinfold
Triceps skinfold thickness indicates total body fat because at least half of body fat is directly below the skin. Metal calipers are used to obtain this measurement. On the nondominant arm, the midpoint of the arm is determined with the same method that is used for measuring midarm circumference. With the arm hanging loosely at the side, a fold of skin at the midpoint on the posterior aspect of the arm is grasped. To avoid error, the child is asked to flex the arm muscle after the examiner grasps the skin. If contraction is felt, muscle as well as fat has been grasped. The examiner applies the caliper and takes a reading after waiting 3 seconds. Fat stores decrease with long-term undernutrition and malnutrition.
Use of Growth Charts
An accurate record of a child’s overall pattern of growth is best determined by measurements over months or years. The Centers for Disease Control and Prevention (CDC) provides growth charts; a series of percentile curves for selected measurements, which are used to assess body size and monitor growth in infants, children, and adolescents in the United States (CDC, 2010).
The CDC recommends that health care providers use the World Health Organization (WHO) growth standards to monitor growth for infants and children ages 0 to 2 years of age and the CDC growth charts for children age 2 years and older (CDC, 2010). The reason is that the data collected for the WHO growth charts represent infants and children who were breastfed during their first year of life; this is considered optimal nutrition and the standard to which all infants and children should be compared (Grummer-Strawn, Reinold, & Krebs, 2010).
There are separate sets of growth charts for girls and boys. WHO growth charts for ages birth to age 2 years, plot length, weight, and head circumference measurements for age. They also plot the weight to length relationship, which can be used as an indicator of overweight or obesity in children. The CDC charts for ages 2 through 20 years, plot measurements of stature (height), weight, and BMI for age (http://www.cdc.gov/growthcharts). BMI is used primarily to screen for children who are overweight, though it may also be used to describe children who are underweight (CDC, 2010). Special growth charts for premature, very-low-birth-weight infants (<1500 g) and children with specific conditions that may affect size and growth (such as Down syndrome) are available, although most of these were developed from limited data (Kuczmarski, Ogden, Guo, et al., 2002; Rosenbloom, McGregor, Chen, et al., 2010).
Plotting on a growth chart proceeds as follows: The exact age of the child is located on the chart’s horizontal axis. The corresponding measurement is noted on the chart’s vertical axis. The chart is marked where the two lines intersect. The percentile lines on these charts indicate the number of children whose measurements are expected to fall above and below the child’s measurement.
Weight and height measurements above the 97th percentile or below the 3rd percentile on a standard growth chart may indicate a growth disturbance and need further investigation. Brain growth can be assessed by serial head circumference measurements (see Chapter 52). BMIs from the 85th to below the 95th percentile indicate a risk for being overweight; BMIs at or above the 95th percentile in children older than 2 years indicate overweight (CDC, 2010).
Skin, Hair, and Nails
Skin
Skin assessment includes inspection and palpation. The entire skin surface is examined for color, texture, turgor, and presence of lesions. This examination may be combined with assessment of other areas of the body.
Inspection
The nurse observes the color and pigmentation of the skin. Skin color reflects the amount of melanin and can range from pink to black (Box 33-5). In dark-skinned infants and children, erythema appears dusky red or violet, cyanosis appears black, and jaundice appears diffusely darker. In dark-skinned infants and children, it is best to determine the normal skin color and then compare any color change with the normal color. Increased pigmentation and thickening of the skin on the posterior neck, the armpits, and behind the knees and elbows (acanthosis nigricans) can be an indication of type 2 diabetes mellitus in children (Morelli, 2011). Skin color changes may be related to sun exposure or tattooing.
 NURSING QUALITY ALERT
Palpation
The examiner palpates the skin to assess moisture, temperature, texture, turgor, edema, and lesions, as follows:
Turgor is assessed by grasping the skin between the thumb and index finger and quickly releasing it (see Figure 40-1). The skin normally returns to place without excessive skin markings. Skin that “tents” when released indicates dehydration. The abdomen and upper arm are the best places to test for tissue turgor on a child.
Hair
Hair normally covers the entire body except for the palms, soles, and parts of the genitalia. Hair is examined for texture, changes in color, unusual distribution, and cleanliness.
Scalp hair has a wide range of normal textures, including straight, curly, and kinky. The hair is usually shiny, silky, and strong. The examiner should keep in mind the child’s age and development. Fine, downy hair is normal for a newborn infant, whereas in an older child it would lead the examiner to consider nutritional and endocrine abnormalities. Brittle hair, identified when the hairs break off easily when bent between the fingers, also might indicate endocrine and nutritional abnormalities.
The color of the hair is genetically determined and may be anything from pale blond to black. Changes in color may be caused by depigmentation, hereditary factors, or chemicals applied to the hair. Hair texture varies widely with race.
The distribution of the hair over the head is identified. In most children, the hair begins in a whorl and then is distributed over the head. Some children may have more than one whorl. Scalp hair does not grow beyond the nape of the neck or down to the eyebrows. Hirsutism is defined as excessive hair growth; alopecia is unusual hair loss.
The hair is separated and examined for cleanliness, signs of trauma, lesions, and scaling. The scalp should be clean and free of any infestations. Most cases of head lice (Pediculosis capitis) are first detected when one or more children are seen scratching the head. Closer observation may reveal nits adhering to the hairs. Depending on their distance from the scalp, these usually are the whitish to sand-colored empty shells of eggs that have hatched (see Chapter 49 for further discussion of the integumentary system).
Nails
Nails are inspected and palpated for shape and contour. The nail surface is normally flat or slightly convex. The edges of the nails should be smooth, rounded, and clean. Clubbing of fingernails can be identified by looking at the index finger to see if the nail bulges upward. If the angle between the nail base and the fingertip is greater than 160 degrees, clubbing is present. On palpation, the base of the fingernail should be firm. On touching the index fingernails back to back, a diamond of light below the knuckle and above where the fingernails touch will be present. In early clubbing, the diamond shape is decreased or not apparent (see Chapter 45).
Press and release on the nail edge to assess capillary refill; the nail will blanch, and then color will normally return to the nail within 1 to 2 seconds. A capillary refill time of more than 2 seconds may be caused by anemia, peripheral edema, vasoconstriction, or decreased cardiac output as a result of hypovolemia, shock, or congestive heart failure (Jarvis, 2012).
Lymph Nodes
Lymph nodes are inspected and palpated. Lymph tissue is found all over the body and must be evaluated as the examiner assesses body systems. The examiner should always assess for enlarged lymph nodes in the head and neck, the supraclavicular area, the axillary region, the arms, and the inguinal region (Figure 33-3). At the time these areas are examined, the lymph nodes are assessed as well. When an enlarged lymph node or a mass is found during examination, its characteristics should be described (Box 33-6).
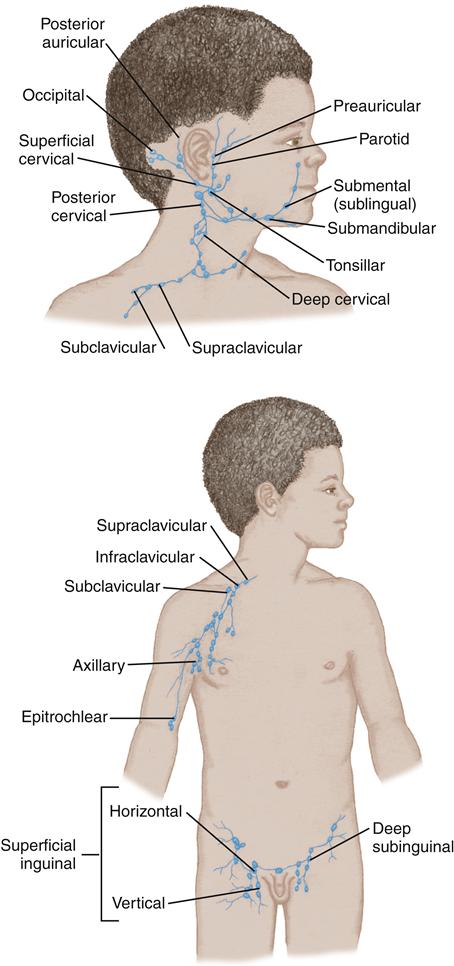
To palpate for most lymph nodes, the examiner uses the distal portion of the fingers and gently but firmly moves the fingers in a circular motion to determine the node’s characteristics and mobility.
Lymph nodes that are enlarged, warm, firm, and fluctuant indicate infection. Lymph nodes that are small, firm, and shotty (freely palpable and very small) are often palpable in healthy infants and children, in the cervical, axillary, and inguinal areas (Tower & Camitta, 2011). An enlarged supraclavicular lymph node on the left in young children is called the sentinel node because it may suggest a Wilms tumor or other neoplastic disease.
Head, Neck, and Face
Head
The head is inspected and palpated. To examine the head, the examiner must see and feel. The head is evaluated from the front, the back, and the sides. The head is examined for symmetry, paralysis, weakness, and movement (Box 33-7).
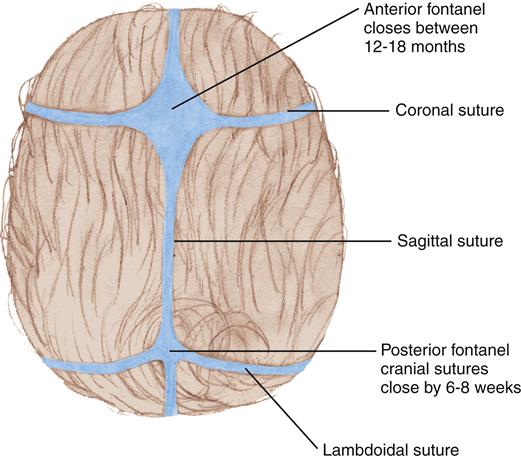
Symmetry is assessed by looking at and feeling the entire head. If any lumps or bumps are seen or felt, the examiner notes their exact location, size, and density. The suture lines in infants should be palpated. Sutures are felt as prominent ridges in the neonate but usually flatten by 6 months of age.
Paralysis and weakness of the head are directly related to the condition of the neck muscles. That is, paralysis and weakness of the head occur with paralysis or weakness of the neck muscles.
Head movement is evaluated by observing the child’s spontaneous head movement. Head control is observed with the infant in a supine position and while the examiner grasps the infants hands and pulls the infant into a sitting position. An infant younger than 4 months may show some head lag, but the infant in an upright position should be able to maintain the head upright for several seconds. Head lag after age 6 months may indicate poor muscle development. However, increased neck extensor and axial tone in the young infant may make head control appear better than it actually is and may be suggestive of neuromuscular problems such as cerebral palsy, a form of static encephalopathy (Lee & Johnston, 2010). The head should be put through a full range of motion by asking the older child to look up, down, and sideways. After age 4 months, inability to move the head or to hold the head in an upright position may be related to paralysis or weakness of the neck muscles.
The fontanels are inspected and palpated for size, tenseness, and pulsation (Figure 33-4). The posterior fontanel is closed by age 2 to 3 months. The anterior fontanel should be soft and flat when the child is sitting. Measure the width and length of an open anterior fontanel. The anterior fontanel should be less than 5 cm in length and width after age 12 months and should be completely closed by age 12 to 24 months (Jarvis, 2012). A sunken fontanel is associated with dehydration, and a bulging fontanel can be associated with increased intracranial pressure. A bulging fontanel is normally seen when an infant cries, coughs, or vomits. Inability to palpate the anterior fontanel may be an indicator of premature closure known as craniosynostosis (see Chapter 52).
Stay updated, free articles. Join our Telegram channel

Full access? Get Clinical Tree


