chapter 10
Emergency Preparedness
After studying this chapter, the student should be able to:
1 Identify emergent interventions for a patient with respiratory compromise.
2 Recognize the common signs of poor circulatory perfusion.
3 Describe the basic steps of cardiac resuscitation.
4 List three abnormal findings observed with an inadequate cerebral blood flow.
5 List data to be included in the nursing assessment of a patient with an emergent digestive disorder.
 http://evolve.elsevier.com/Mosby/comprehensivePN
BASIC LIFE SUPPORT
ARTIFICIAL RESPIRATION
A Simultaneously shake victim and shout to check for response; look for signs of breathing.
B After determining unresponsiveness, look for signs of breathing (do not listen for breaths or feel for breaths).
C If no response (breathing is absent or inadequate [gasping]) call for help (even if you do not see anyone in the immediate vicinity). Activate the emergency medical system (EMS) (call 911) and get automated external defibrillator (AED) if available.
1. Do so immediately if the victim is an adult, if the victim is a child (1 year to puberty), or if the victim is an infant (birth to 1 year) who experiences sudden witnessed collapse.
2. If you are alone and the victim is a child or infant whose arrest was not witnessed, provide 2 minutes (five cycles) of cardiopulmonary resuscitation (CPR) before activating EMS.
D Quickly place victim in supine position.
E Check for pulse; if present, begin rescue breathing.
1. If the victim is an adult, child, or infant and no pulse is detected, provide 2 minutes of CPR (five cycles).
2. If the victim is a child or infant and the pulse rate is less than 60 beats/min with signs of poor perfusion, begin CPR.
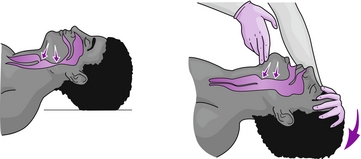
F Establish airway using the head tilt–chin lift maneuver (Figure 10-1) or jaw thrust maneuver. For patients with possible neck or spine injuries, use only the jaw-thrust maneuver; if unsuccessful, switch to head tilt–chin lift maneuver.

FIGURE 10-1 Head tilt–chin lift maneuver. One hand is on the person’s forehead. Pressure is applied to tilt the head back. The chin is lifted with the fingers of the other hand. (From Sorrentino SA, Remmert LN: Mosby’s textbook for nursing assistants, ed 8, St Louis, 2012, Mosby.)
1. Infant: Maintain neck in neutral position.
2. Child: Maintain neck slightly further back than neutral position.
G Begin rescue breathing by delivering one breath (delivered over 1 second) at the lowest possible pressure using the bag-mask technique. If a mask or bag is not available, begin mouth-to-mouth, mouth-to-nose, or mouth-to-stoma resuscitation.
1. Victim’s chest should rise with each ventilation provided.
2. In the adult victim, deliver one breath every 5 to 6 seconds (10 to 12 per minute).
3. In the child or infant victim, deliver one breath every 3 to 5 seconds (12 to 20 per minute).
H Pause between breaths to allow for victim’s exhalation.
I Check the carotid pulse (brachial pulse for infant) every 2 minutes for 5 to 10 seconds.
J If pulse is present, continue until breathing is restored (rescue breathing).
K If victim is child or infant and pulse is less than 60 beats/min with signs of poor perfusion, begin CPR.
L If pulse is absent, begin CPR.
M If breathing resumes, stay with victim until EMS arrives (American Heart Association Guidelines, 2011).
CARDIOPULMONARY RESUSCITATION
A Follow previously mentioned steps A to D. Be sure victim is supine and on a firm surface for the compression activities.
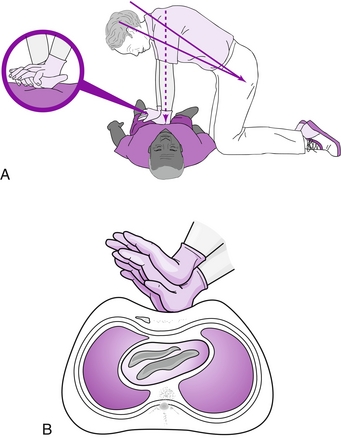
B In the absence of a pulse, place the heel of one hand in the center of the victim’s chest, toward the lower half of the breastbone, with the other hand on top (Figure 10-2).

FIGURE 10-2 Body and hand position for cardiopulmonary resuscitation. A, The rescuer should be kneeling, with knees slightly separated and elbows in straight, locked position over the hands. B, The rescuer’s fingers are extended or interlaced and kept off the chest. (From Sorrentino SA, Remmert LN: Mosby’s textbook for nursing assistants, ed 8, St Louis, 2012, Mosby.)
1. Child (age 1 year to puberty): Rescuer may use one hand with heel placed in the center of the chest toward the lower half of the breastbone and deliver at rate of at least 100 compressions per minute.
2. Infant (younger than 1 year) for one rescuer: Place two fingers in the center of the chest, just below the infant’s nipple line (do not compress bottom of breastbone) and deliver compressions at the rate of at least 100 compressions per minute.
3. Infant when two rescuers are available: Use the two thumb–encircling hand chest compression technique.
C Compress the adult sternum at least 2 inches for 30 compressions at the rate of at least 100 compressions per minute; then deliver two breaths.
D Complete approximately 2 minutes (five cycles of compressions and breaths); recheck carotid pulse and switch positions with second rescuer (if available).
E Compress the sternum of the child approximately 2 inches or one third the chest depth.
1. Single-rescuer child CPR: Compress the sternum for 30 compressions, then deliver two breaths.
2. Two-rescuer child CPR: Compress the sternum for 15 compressions, and deliver two breaths.
F Compress infant sternum approximately 11⁄2 inches or one third the depth of the chest.
1. Single-rescuer, infant CPR: compress sternum for 30 compressions and deliver two breaths.
2. Two-rescuer, infant CPR: compress the sternum for 15 compressions and deliver two breaths.
G For adult, child, and infant, push hard and fast (100 compressions per minute). Minimize interruptions in compressions (American Heart Association, 2011 guidelines).
HEIMLICH MANEUVER
A Conscious adult or child victim
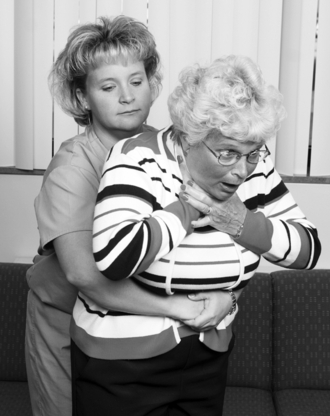
1. Stand or kneel behind the victim, encircle his or her waist with your arms, place the thumb side of your fist slightly above the umbilicus and well below the sternum. Place your other hand around your fist and apply pressure in a quick inward and upward motion (Figure 10-3).

FIGURE 10-3 Heimlich maneuver. Abdominal thrusts with the person standing. (From Sorrentino SA: Mosby’s textbook for nursing assistants, ed 6, St Louis, 2004, Mosby.)
2. Repeat the thrusts until the obstruction is expelled or the victim loses consciousness.
B Unconscious adult or child victim with FBAO or conscious victim who becomes unconscious
1. Place victim in supine position, call for help, and activate EMS.
2. Begin CPR; begin with compressions (do not check for pulse).
3. When preparing to deliver breaths using head tilt–chin lift, open victim’s mouth and inspect for obstruction. If obstruction can be easily removed, do so with your fingers. If you cannot see cause of obstruction, continue CPR.
4. Perform five cycles or 2 minutes of CPR.
5. Call EMS (911) if not already done.
6. Continue repeating chest compressions, airway check, and breathing attempts in rapid sequence (American Heart Association, 2011 guidelines).
1. Simultaneously shake victim and shout to establish unconsciousness.
3. Quickly place victim in supine position.
4. Begin CPR sequence (compressions followed by ventilations).
5. After first set of compressions, if unable to ventilate, reposition head and again attempt to deliver two breaths.
6. If still unable to deliver breaths, continue with compressions.
7. Repeat steps C1 to C6 for conscious adult victim who loses consciousness until effective.
E Obese victim and later stages of pregnancy
1. Conscious victim: deliver chest thrusts (place thumb side of fist on middle of breastbone) until foreign body is expelled or victim becomes unconscious.
1. Place infant in your lap while in a sitting or kneeling position.
2. Supporting head and neck, position infant face down with head lower than trunk along rescuer’s forearm. Forearm should be resting on your thigh for support.
3. With heel of hand, administer five back blows between the shoulder blades.
4. Continue to support head, turn infant over onto other forearm, keeping head lower than trunk. Infant will now be face up.
5. Using two fingers, administer five chest thrusts.
6. Compression location is directly below the point where the sternum is bisected by an imaginary line between the nipples.
7. Continue to administer back blows and chest thrusts until airway is cleared or infant becomes unconscious.
G Conscious infant who loses consciousness
1. Place in supine position and call for help; if someone responds, instruct that individual to activate EMS.
2. Begin steps of CPR (compressions and ventilations).
3. After each set of compressions, perform head tilt–chin lift in neutral position. Inspect airway. Remove object only if you see it (do not perform blind finger sweeps).
a. Airway inspection should occur after each set of compressions. If object can be seen and easily removed, remove it.
4. Establish airway using the head tilt–chin lift maneuver.
5. Attempt to deliver two breaths; if unable to ventilate, reposition head and repeat.
6. If second attempt to ventilate fails, continue with CPR.
7. After five cycles of CPR or approximately 2 minutes, activate EMS if not already done.
HEMORRHAGE
A Description: loss of a large amount of blood in a short period; may be external or internal
8. Alteration in level of consciousness (LOC)
10. If bleeding is internal (within a cavity or joint), pain develops because the cavity is stretched by increasing blood volume.
1. Remove any clothing covering the injury for direct visualization of hemorrhage.
2. If possible, place victim in supine position.
3. Apply firm, direct pressure to the injury (use gloves if available).
a. Apply pressure with heel of hand using a clean, thick bandage or cloth.
b. Pressure should be maintained for at least 10 minutes
c. Place cold compress over the bandage (not under) to further support vasoconstriction.
4. Elevate injured part above heart level.
5. If bleeding continues, apply more dressings to the first and apply more pressure.
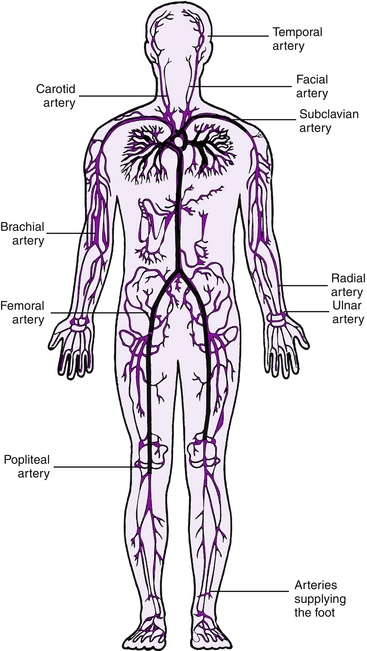
6. If arterial bleeding does not respond to direct pressure, attempt to control by applying direct pressure on supply artery (Figure 10-4).

FIGURE 10-4 Pressure points for bleeding control. (From Fultz J, Sturt PA: Mosby’s emergency nursing reference, ed 3, St Louis, 2005, Mosby.)
7. Tourniquets are not recommended unless bleeding is life-threatening and should be applied only by an experienced individual.
a. Leave tourniquet exposed (visible).
b. Apply approximately 2 inches above wound if possible.
c. Tourniquet should be tightened until bleeding is stopped.
d. Time tourniquet was applied should be noted.
e. Tourniquet should be removed only by someone with advanced training.
8. Cover victim to maintain body temperature; maintain supine position.
EPISTAXIS (NOSEBLEED)
A Description: bleeding from the nose caused by trauma, local irritation, violent sneezing, or chronic conditions such as hypertension
B Assessment: obvious bleeding from one or both nares (most often unilateral)
1. Sit victim upright, head slightly forward, to prevent aspiration of blood.
2. Apply firm, continuous pressure by using thumb and forefinger to pinch nose for 15 minutes.
3. Apply ice compress to nose.
ANAPHYLACTIC REACTION
A Description: type of vasogenic or distributive shock (see section on shock)
1. Ensure adequate airway and ventilation.
2. Elevate feet slightly (about 12 inches) unless contraindicated (e.g., head, neck, back, or leg injury)
SHOCK
A Description: condition in which organs of the body are not meeting metabolic demands because of insufficient blood supply.
B Three basic types (Box 10-1)
1. Hypovolemic: primarily a fluid problem caused by a loss of blood or fluid volume (e.g., hemorrhage, severe burns, trauma, dehydration)
2. Cardiogenic: reduced cardiac output that is the result of faulty pumping action (e.g., myocardial infarction, cardiomyopathy, diseases of the heart valves)
3. Vasogenic or distributive: a vascular problem or disturbance in tissue perfusion caused by alteration in circulating blood volumes (vascular dilation); may be one of three types
a. Septic: massive bacterial infection resulting in release of endotoxin that causes vasodilation (e.g., gram-negative organisms)
b. Neurogenic or spinal: disruption of arterioles and venules, resulting in a decrease of circulating blood volume (e.g., spinal cord injury)
c. Anaphylaxis: severe sensitivity reaction resulting in histamine release and increased capillary permeability with eventual dilation of arterioles and venules
C Assessment: Determination of the exact cause is vital to patient survival.
D Interventions: Order of priority may differ based on situation; therefore isolation of cause determines specific intervention strategies, which include the following:
1. Ensure adequate airway and ventilation.
2. Control bleeding if present.
3. Place in supine position with legs elevated unless contraindicated (e.g., head, neck, back, or leg injuries).
5. Cover victim to conserve body heat.
HEAD INJURIES
SKULL FRACTURE
A Simple: linear crack in surface of skull with no displacement of bone
1. Observation for alteration of respiration, vision, LOC, pupils (dilated, fixed, pinpoint), motor strength, and speech
B Depressed: skull fracture with depressed bone fragments, resulting in a concave appearance
a. Ensure adequate airway and ventilation.
e. Observe for alteration of respiration, vision, LOC, pupils (dilated, fixed, pinpoint), motor strength, and speech.
C Basilar: fracture located along base of skull
a. Periorbital ecchymoses (black eyes)
b. Cerebrospinal fluid (CSF) leak from nose or ear
c. Ecchymosis behind ears (Battle sign)
a. Observe for alterations of respiration, vision, LOC, pupils (dilated, fixed, pinpoint), motor strength, and speech. Monitor vital signs.
b. If CSF leak is noted, do not attempt to stop; apply a loose, bulky dressing over area. Protect cervical spine.
BRAIN INJURY
A Concussion: temporary alteration of neurological functioning caused by a blow to the head, which results in jarring of the brain
B Contusion: brain surface bruise resulting in structural alteration
C Intracranial bleeding: hemorrhage or bleeding within the cranial vault
a. Epidural (extradural) hematoma: bleeding between skull and dura mater; short period of unconsciousness followed by consciousness; severe headache, hemiparesis if conscious, bradycardia, increased blood pressure
b. Subdural hematoma: bleeding between dura mater and arachnoid membrane; can be acute or chronic; change of LOC from baseline; loss of consciousness, fixed dilated pupils, hemiparesis, positive Babinski sign
c. Subarachnoid hematoma: bleeding between arachnoid membrane and pia mater; severe headache, nausea and vomiting, delirium, syncope, or coma
a. Maintain adequate airway and ventilation.
e. Observe for alterations of respiration, vision, LOC, pupils (dilated, fixed, pinpoint), and decreased motor strength (signs of increased intracranial pressure [IICP]).
Cerebrovascular Accident
A Definition: abnormal condition of the blood vessels of the brain characterized by hemorrhage into the brain or formation of an embolus or thrombus that occludes a cerebral artery
1. Thrombolytics (for ischemic stroke)
2. Drugs to reduce intracranial pressure (dexamethasone [Decadron])
3. CT or magnetic resonance imaging (MRI)
Stay updated, free articles. Join our Telegram channel

Full access? Get Clinical Tree


