Drug administration
Administration guidelines
Precautions for drug administration
♦ Whenever you give a drug, observe these precautions to make sure you’re giving the right drug in the right dose, at the right time, to the right patient, by the right route.
Check the order
♦ Check the order on the patient’s medication record against the physician’s order.
Check the label
♦ Check the label on the drug three times before giving it to a patient to make sure you’re giving the prescribed drug in the prescribed dose.
– Check it when you take the container from the shelf or drawer.
– Check it right before pouring the drug into a medication cup or drawing it into a syringe.
– Check it before returning the container to the shelf or drawer.
♦ If you’re giving a unit-dose drug, check the label for the third time immediately after pouring it and again before discarding the wrapper.
♦ Don’t open a unit-dose drug until you’re at the patient’s bedside.
Confirm the patient’s identity
♦ Before giving the drug, confirm the patient’s identity by checking his name and a second identifier on his wristband. Remember to check a second identifying characteristic (such as address, identification number, date of birth) other than the patient’s room number. Then again make sure that you have the correct drug.
♦ Explain the procedure to the patient and provide privacy.
Have an order
♦ Make sure you have an order for every drug to be given.
♦ If the order is verbal, make sure that the physician signs for it within the specified time. Telephone orders must be read back and verified according to facility policy.
Give labeled drugs
♦ Don’t give drugs from poorly labeled or unlabeled containers.
♦ Also, don’t attempt to label drugs or reinforce drug labels yourself; a pharmacist must do that.
Monitor drugs
♦ Never give a drug that someone else has poured or prepared.
♦ Never leave the drug cart or tray unattended.
♦ Never return unwrapped or prepared drugs to stock containers. Instead, dispose of them and notify the pharmacy.
♦ Waste partial dose or unused narcotics according to facility policy; be sure to have someone witness the wasting of the narcotic.
Answer patient questions
♦ If the patient questions you about a drug or dosage, check his medication record again. If the drug is correct, reassure him that it’s correct.
♦ Make sure to tell him about changes in his drugs or dosages.
♦ Instruct him, as appropriate, about possible adverse reactions and encourage him to report any that he experiences.
Topical administration
Topical drugs
♦ Topical drugs, such as lotions and ointments, are applied directly to the patient’s skin.
♦ They’re commonly used for local, rather than systemic, effects.
♦ Typically, they must be applied two or three times daily to achieve a full therapeutic effect.
Equipment
Patient’s medication record and chart ♦ prescribed medication ♦ sterile tongue blades ♦ gloves ♦ sterile 4″ × 4″ gauze pads ♦ transparent semipermeable dressing ♦ adhesive tape ♦ solvent (such as cottonseed oil) ♦ optional: cotton-tipped applicators, cotton gloves, or terry cloth scuffs
Implementation
♦ Confirm the patient’s identity using two identifiers.
♦ Explain the procedure to the patient because, after discharge, he may have to apply the drug by himself.
♦ Wash your hands to prevent crosscontamination and glove your dominant hand.
♦ Help the patient into a comfortable position and expose the area to be treated.
♦ Make sure that the skin or mucous membrane is intact (unless the drug has been ordered to treat a skin lesion). Applying a drug to broken or abraded skin may cause unwanted systemic absorption and further irritation.
♦ If needed, clean debris from the skin. You may need to change your glove if it becomes soiled.
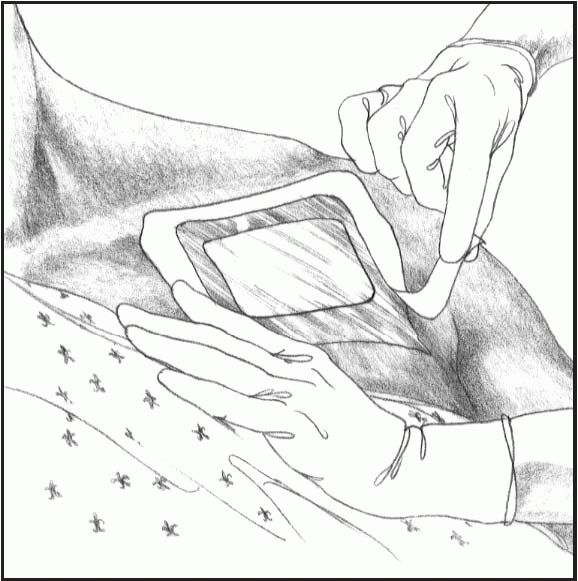
To apply a paste, a cream, or an ointment
♦ Open the container. Place the cap upside down to avoid contaminating its inner surface.
♦ Remove a tongue blade from its sterile wrapper and cover one end of it with drug from the tube or jar.
♦ Transfer the drug from the tongue blade to your gloved hand.
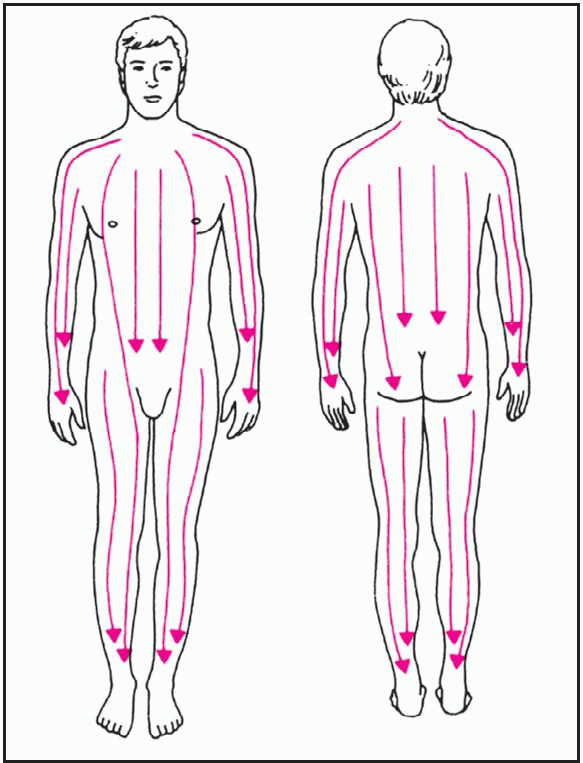
♦ Apply the drug to the affected area with long strokes that follow the direction of hair growth, as shown above right. This technique avoids forcing drug into the hair follicles, which can cause irritation and lead to folliculitis.
 |
♦ Avoid using excessive pressure when applying the drug because it could abrade the skin or cause patient discomfort.
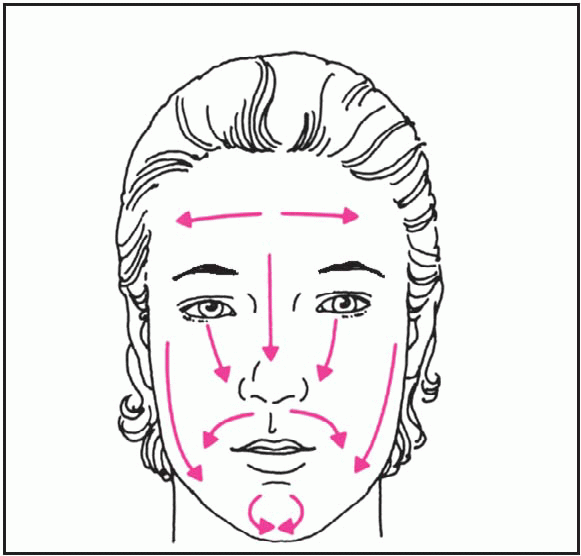
♦ When applying a drug to a patient’s face, use a cotton-tipped applicator for small areas such as under the eyes. For larger areas, use a sterile gauze pad and follow the directions shown below.
 |
♦ To prevent contamination of the drug, use a new sterile tongue blade each time you remove the drug from the container.
To remove an ointment
♦ Gently swab ointment from the patient’s skin with a sterile 4″ × 4″ gauze pad. If the ointment has hardened or crusted, and cleansing with normal saline solution or other cleansing solution is ineffective, dab a cotton ball with a small amount of mineral oil to soften the ointment.
♦ Remove remaining oil by wiping the area with a clean sterile gauze pad. Don’t wipe too hard because you could irritate the skin.
♦ Cleanse the area with normal saline solution or a prescribed wound care cleanser.
To apply other topical drugs
♦ To apply a medicated shampoo, follow package directions.
– Apply it with your fingertips, or instruct the patient to do so, as shown below.
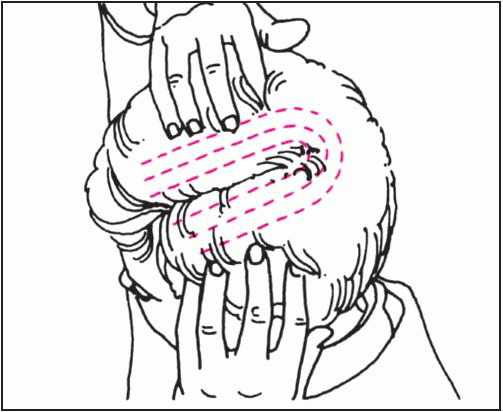 |
– Massage it into the scalp as directed.
♦ To apply topical antifungal creams, wash the affected area with soap and water.
– Apply cream and rub it gently into the affected area.
– If the patient has athlete’s foot, you can enhance absorption by applying the drug at night and covering the affected area with clean socks.
♦ To apply an aerosol spray, shake the container, if indicated, to mix the drug.
– Hold the container 6″ to 12″ (15 to 30.5 cm) from the skin or follow the manufacturer’s recommendation.
– Spray the drug evenly over the treatment area to apply a thin film.
♦ To apply a powder, dry the skin surface and apply a thin layer of powder over the treatment area.
♦ To protect applied drugs and keep them from soiling the patient’s clothes, tape a sterile gauze pad or a transparent semipermeable dressing over the treated area, if ordered. Avoid using an occlusive dressing, which may increase systemic absorption of the drug.
♦ If you’re applying a topical drug to the patient’s hands, cover them with cotton gloves.
♦ If you’re applying a topical drug to his feet, cover them with terry cloth scuffs or clean socks.
♦ Assess the patient’s skin for signs of irritation, allergic reaction, or breakdown.
Special considerations
♦ To prevent skin irritation from accumulated drug, remove residue from previous applications before each new application.
♦ Always wear gloves to prevent your skin from absorbing the drug.
♦ Never apply ointment to the eyelids or ear canal unless ordered. The ointment may congeal and occlude the tear duct or ear canal.
♦ Inspect the treated area often for adverse or allergic reactions.
Transdermal drugs
♦ Given through an adhesive patch or a measured dose of ointment applied
to the skin, transdermal drugs deliver constant, controlled medication directly into the bloodstream for a prolonged systemic effect.
to the skin, transdermal drugs deliver constant, controlled medication directly into the bloodstream for a prolonged systemic effect.
♦ Drugs available in transdermal form include:
– nitroglycerin, which is used to control angina
– scopolamine, which is used to treat motion sickness
– estradiol, which is used for postmenopausal hormone replacement
– clonidine, which is used to treat hypertension
– fentanyl, which is used to control chronic pain.
♦ Nitroglycerin ointment is used to dilate the arteries and veins, thus improving cardiac perfusion in a patient with cardiac ischemia or angina pectoris.
♦ Nitroglycerin ointment dilates the coronary vessels for 2 to 12 hours; a patch can produce the same effect for as long as 24 hours.
♦ The scopolamine patch can relieve motion sickness for as long as 72 hours.
♦ Transdermal estradiol lasts 72 hours to 1 week.
♦ Transdermal clonidine lasts 7 days.
♦ Transdermal fentanyl lasts up to 72 hours.
Equipment
For a transdermal patch
Patient’s medication record and chart ♦ prescribed drug ♦ marker ♦ optional: gloves
For transdermal ointment
Patient’s medication record and chart ♦ ointment ♦ ruled application strip or measuring paper ♦ plastic wrap or transparent semipermeable dressing ♦ adhesive tape ♦ sphygmomanometer ♦ marker ♦ optional: gloves
Implementation
♦ Confirm the patient’s identity using two identifiers.
♦ Wash your hands and put on gloves.
♦ Make sure that previously applied drug has been removed from the skin.
♦ Locate a new site for application, different from the previous site.
To apply a transdermal patch
♦ Open the package and remove the patch.
♦ Without touching the adhesive surface, remove the clear plastic backing.
♦ Apply the patch to a dry, hairless area—behind the ear, for example, as with scopolamine.
♦ Avoid areas that may cause uneven absorption, such as skin folds or scars, or irritated or damaged skin.
♦ Don’t apply the patch below the elbow or knee.
♦ Mark the date and time applied on the patch.
To apply transdermal ointment
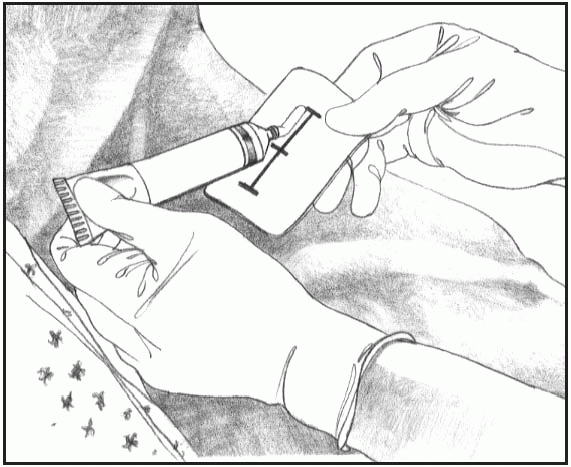
♦ Nitroglycerin ointment is prescribed by the inch and comes with a rectangular piece of ruled paper to use in applying the drug.
♦ Put on gloves (optional) to avoid contact with the drug.
♦ Start by taking the patient’s baseline blood pressure for comparison with later readings.
♦ Squeeze the prescribed amount of ointment onto the application strip or ruled paper, as shown below, taking care not to get any on your skin.
 |
♦ After measuring the correct amount of ointment, tape the paper, drug side down, directly to the patient’s skin on a dry, hairless area of the body.
♦ Don’t rub the ointment into the skin.
♦ Mark the date and time applied on the paper.
♦ For increased absorption, the physician may request that you cover the site with plastic wrap or transparent semipermeable dressing and tape it in place, as shown below.
 |
♦ Some health care facilities require you to use the paper to spread a thin layer of ointment over a 3″ (7.6-cm) area, usually on the patient’s chest or arm.
After applying transdermal drugs
♦ Store the drug, as ordered.
♦ Instruct the patient to keep the area around the patch or ointment as dry as possible.
♦ Wash your hands immediately after applying the patch or ointment.
Special considerations
♦ Apply daily transdermal drugs at the same time every day to ensure a continuous effect, but alternate the application sites to avoid skin irritation.
♦ Five minutes after applying nitroglycerin ointment, obtain the patient’s blood pressure reading.
– If his blood pressure has dropped significantly and he has a headache, notify the physician immediately.
– If his blood pressure has dropped but he has no symptoms, instruct him to lie still until his blood pressure returns to normal.
♦ Before reapplying nitroglycerin ointment, remove the plastic wrap, the application strip, and any ointment remaining on the skin at the previous site.
♦ When applying a scopolamine patch, instruct the patient not to drive or operate machinery until he knows how the drug affects him.
♦ If the patient is using a clonidine patch, encourage him to check with his physician before using over-thecounter cough preparations. They may counteract the effects of clonidine.
Eye drugs
♦ Eye drugs—drops or ointment— serve diagnostic and therapeutic purposes.
♦ During an eye examination, these drugs can be used to anesthetize the eye, dilate the pupil, and stain the cornea to identify anomalies.
♦ Therapeutic uses include lubrication of the eye and treatment of such conditions as glaucoma and infections.
Equipment
Patient’s medication record and chart ♦ prescribed eye drug ♦ sterile cotton balls ♦ gloves ♦ warm water or normal saline solution ♦ sterile gauze pads ♦ facial tissue ♦ optional: ocular dressing
Implementation
♦ Confirm the patient’s identity using two identifiers.
♦ Make sure the drug is labeled for ophthalmic use. Then check the expiration date. Remember to date the container after the first use.
♦ Inspect ocular solutions for cloudiness, discoloration, and precipitation, but remember that some eye drugs are suspensions and normally appear cloudy. Don’t use a solution that appears abnormal.
♦ Make sure that you know which eye to treat because different drugs or doses may be ordered for each eye.
♦ Put on gloves.
♦ If the patient has an ocular dressing, remove it by pulling it down and away from his forehead. Avoid contaminating your hands.
♦ To remove exudate or Meibomian gland secretions, clean around the eye with sterile cotton balls or sterile gauze pads moistened with warm water or normal saline solution.
– Have the patient close his eye and then gently wipe the eyelids from the inner to the outer canthus.
– Use a fresh cotton ball or gauze pad for each stroke.
♦ Have the patient sit or lie in the supine position.
♦ Instruct him to tilt his head back and toward his affected eye so that excess drug can flow away from the tear duct, minimizing systemic absorption through the nasal mucosa.
♦ Remove the dropper cap from the drug container and draw the drug into it.
♦ Before instilling eyedrops, instruct the patient to look up and away. This moves the cornea away from the lower lid and minimizes the risk of touching it with the dropper.
To instill eyedrops
♦ Steady the hand that’s holding the dropper by resting it against the patient’s forehead.
♦ With your other hand, pull down the lower lid of the affected eye and instill the drops in the conjunctival sac.
♦ Never instill eyedrops directly onto the eyeball.
 When teaching an older patient how to instill eyedrops, keep in mind that he may have trouble feeling the drops enter the eye. Suggest chilling the drug slightly to enhance the sensation.
To apply eye ointment
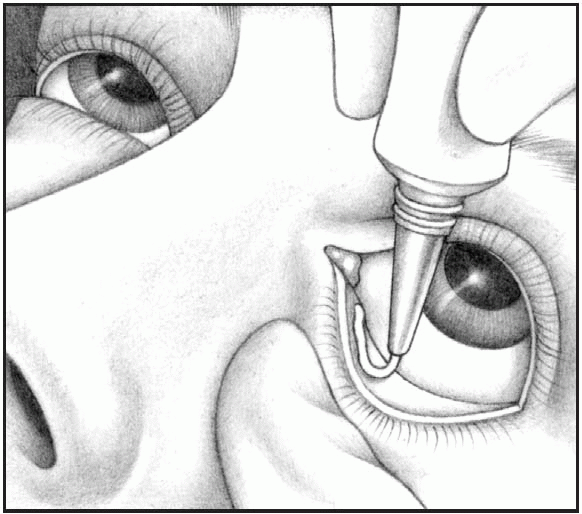
♦ Pull down the lower lid of the affected eye.
♦ Squeeze a small ribbon of drug along the edge of the conjunctival sac, from the inner to the outer canthus, as shown below. Cut the ribbon by turning the tube.
 |
After instilling eyedrops or applying ointment
♦ Instruct the patient to close his eyes gently, without squeezing the lids shut.
♦ If you instilled drops, tell the patient to place a finger at the inner canthus for 2 to 3 minutes to block the tear duct.
♦ If you applied ointment, tell him to roll his eyes behind closed lids to help to distribute the drug over the eyeball.
♦ Use a clean facial tissue to remove excess drug leaking from the eye. Use a fresh tissue for each eye to prevent cross-contamination.
♦ Apply a new ocular dressing, if needed.
♦ Remove and discard your gloves and wash your hands.
Special considerations
♦ To maintain the sterility of the drug container, never touch the tip of the dropper or bottle to the eye area.
 If the dropper or bottle tip becomes contaminated, discard it and use another sterile dropper.
♦ If any solution remains in the dropper, discard it before returning the dropper to the bottle.
♦ If another drug is ordered for the same eye at the same time, wait 3 to 5 minutes before delivering the second drug.
Eardrops
♦ Eardrops may be instilled to treat infection or inflammation, to soften cerumen for later removal, to produce local anesthesia, or to facilitate the removal of an insect trapped in the ear.
Equipment
Patient’s medication record and chart ♦ prescribed eardrops ♦ light source ♦ facial tissue or cotton-tipped applicator ♦ optional: cotton ball, bowl of warm water
Implementation
♦ Warm the drug to body temperature in the bowl of warm water or place it at room temperature for 30 minutes before giving it.
♦ If needed, test the temperature by placing a drop on your wrist. (If the drug is too hot, it may burn the patient’s eardrum.)
♦ To avoid injuring the ear canal, check the dropper before use to make sure that it isn’t chipped or cracked.
♦ Wash your hands.
♦ Confirm the patient’s identity using two identifiers.
♦ Confirm the correct drug.
– Compare the label on the eardrops with the order on the patient’s medication record.
– Check the label again while drawing the drug into the dropper.
– Check the label for the final time before returning the eardrops to the shelf or drawer.
♦ Have the patient lie on the side opposite the affected ear.
♦ Straighten the patient’s ear canal. For an adult, pull the auricle up and back.
 For an infant or a child younger than age 3, gently pull the auricle down and back— the ear canal is straighter at this age.
♦ Using a light source, examine the ear canal for drainage.
– If you find any, clean the canal with a facial tissue or cotton-tipped applicator.
– Drainage can reduce the drug’s effectiveness.
♦ To avoid damaging the ear canal with the dropper, gently rest the hand that’s holding the dropper against the patient’s head.
♦ Straighten the patient’s ear canal again and instill the ordered number of drops.
♦ To avoid patient discomfort, aim the dropper so that the drops fall against the sides of the ear canal, not on the eardrum.
♦ Hold the ear canal in position until you see the drug disappear down the canal.
♦ After instilling the drops, lightly massage the tragus of the ear or apply gentle pressure.
♦ Instruct the patient to remain on his side for 5 to 10 minutes to let the drug finish running down the ear canal.
♦ Tuck the cotton ball (if ordered) loosely into the opening of the ear canal to prevent the drug from leaking out.
♦ Be careful not to insert the cotton ball too deep into the canal because doing so would prevent drainage of secretions and increase pressure on the eardrum.
♦ Clean and dry the outer ear.
♦ If ordered, repeat the procedure in the other ear after 5 to 10 minutes.
♦ Help the patient into a comfortable position.
♦ Wash your hands.
Special considerations
♦ Some conditions make the normally tender ear canal even more sensitive, so be especially gentle when performing this procedure.
♦ To prevent injury to the eardrum when inserting a cotton-tipped applicator, always keep the cotton tip in view.
♦ After instilling eardrops to soften cerumen, irrigate the ear, as ordered, to facilitate its removal.
♦ If the patient has vertigo, keep the side rails of his bed up, and help him as needed during the procedure. Move slowly and unhurriedly to avoid worsening his vertigo.
♦ If needed, teach the patient to instill eardrops correctly so he can continue treatment at home. Review the procedure and let the patient try it himself while you observe.
Nasal drugs
♦ Nasal drugs may be instilled through drops, a spray (using an atomizer), or an aerosol (using a nebulizer).
♦ Drops can be directed at a specific area; sprays and aerosols diffuse drug throughout the nasal passages.
♦ Nasal drugs include vasoconstrictors, antiseptics, anesthetics, hormones, vaccines, and corticosteroids.
♦ Most nasal drugs produce local rather than systemic effects.
Equipment
Patient’s medication record and chart ♦ prescribed drug ♦ emesis basin (for nose drops) ♦ facial tissues ♦ optional: pillow, piece of soft rubber or plastic tubing, gloves
Implementation
♦ Confirm the patient’s identity using two identifiers.
♦ Wash your hands. Put on gloves, if needed.
♦ Have the patient blow his nose to clear secretions and enhance drug absorption.
To instill nose drops
♦ Draw some drug into the dropper.
♦ To reach the ethmoidal and sphenoidal sinuses, have the patient lie on his back with his neck hyperextended and his head tilted back over the edge of the bed. Support his head with one hand to prevent neck strain.
♦ To reach the maxillary and frontal sinuses, have the patient lie on his back, with his head toward the affected side and hanging slightly over the edge of the bed. Ask him to rotate his head laterally after hyperextension. Support his head with one hand to prevent neck strain.
♦ To relieve ordinary nasal congestion, help the patient into a reclining or supine position, with his head tilted
slightly toward the affected side. Aim the dropper upward, toward the patient’s eye, rather than downward, toward his ear.
slightly toward the affected side. Aim the dropper upward, toward the patient’s eye, rather than downward, toward his ear.
♦ Insert the dropper about 1/3″ (8 mm) into the nostril. Make sure it doesn’t touch the sides of the nostril to avoid contaminating the dropper or making the patient sneeze.
 For a child or an uncooperative patient, place a short piece of soft tubing on the end of the dropper to avoid damaging the mucous membranes.
♦ Instill the prescribed number of drops, observing the patient for signs of discomfort.
♦ Keep the patient’s head tilted back for at least 5 minutes. Have him breathe through his mouth to keep the drops from leaking out and to allow time for the drug to work.
♦ Keep an emesis basin handy so the patient can expectorate drug that flows into the oropharynx and mouth.
♦ Use facial tissues to wipe excess drug from the patient’s face.
♦ Instruct the patient not to blow his nose for several minutes after instillation.
♦ Return the dropper to the bottle and close it tightly.
To use a nasal spray
♦ Have the patient sit upright with his head erect.
♦ Remove the protective cap from the atomizer.
♦ Occlude one of the patient’s nostrils and insert the atomizer tip about ½″ (1.3 cm) into the open nostril.
♦ Position the tip straight up, toward the inner canthus of the eye.
♦ Depending on the drug, have the patient hold his breath or inhale.
♦ Squeeze the atomizer once quickly and firmly—just enough to coat the inside of the nose.
 Excessive force may propel the drug into the patient’s sinuses and cause a headache.
♦ Repeat the procedure in the other nostril, as ordered.
♦ Tell the patient to keep his head tilted back for several minutes, to breathe slowly through his nose, and not to blow his nose for several minutes to make sure the drug has time to work.
To use a nasal aerosol
♦ Insert the drug cartridge according to the manufacturer’s directions.
♦ Shake it well before each use and remove the protective cap.
♦ Hold the aerosol between your thumb and index finger, with the index finger on top of the cartridge.
♦ Tilt the patient’s head back slightly and carefully insert the adapter tip into one nostril.
♦ Depending on the drug, tell the patient to hold his breath or to inhale.
♦ Press your fingers together firmly to release one measured dose.
♦ Shake the aerosol and repeat the procedure to instill medication into the other nostril.
♦ Remove the cartridge and wash the nasal adapter daily in lukewarm water.
♦ Let the adapter dry before reinserting the cartridge.
♦ Tell the patient not to blow his nose for at least 2 minutes after receiving the drug.
Special consideration
♦ Calcitonin (Miacalcin), a hormone used for osteoporosis, should be given in only one nostril daily, the nostrils alternated each day. Make sure to document which nostril is used.
Vaginal drugs
♦ Vaginal drugs include suppositories, creams, gels, and ointments.
♦ Suppositories melt when they come in contact with the warm vaginal mucosa, and the drug diffuses topically— as effectively as creams, gels, and ointments.
♦ Vaginal drugs can be inserted as topical treatment for infection (particularly Trichomonas vaginalis and candidal vaginitis) or inflammation or as a contraceptive.
♦ Vaginal drugs usually come with a disposable applicator that allows placement of drug in the anterior and posterior fornices.
♦ Vaginal administration is most effective when the patient can remain lying down afterward, to retain the drug.
Equipment
Patient’s medication record and chart ♦ prescribed medication and applicator, if needed ♦ gloves ♦ water-soluble lubricant ♦ cotton balls ♦ soap and warm water ♦ small sanitary pad
Implementation
♦ Confirm the patient’s identity using two identifiers.
♦ To minimize drug leakage, give vaginal drugs at bedtime when the patient is lying down whenever possible.
♦ Wash your hands, explain the procedure to the patient, and provide privacy.
♦ Ask the patient to void.
♦ Ask the patient if she would rather insert the drug herself. If so, provide appropriate instructions. If not, proceed with the following steps.
♦ Help her into the lithotomy position.
♦ Expose only the perineum.
To insert a suppository
♦ Remove the suppository from the wrapper and lubricate it with a watersoluble lubricant.
♦ Put on gloves and expose the vagina by spreading the labia.
♦ If you see discharge, wash the area with several cotton balls soaked in warm, soapy water. Clean each side of the perineum and then the center, using a fresh cotton ball for each stroke. While the labia are still separated, insert the suppository 3″ to 4″ (7.5 to 10 cm) into the vagina.
To insert an ointment, a cream, or a gel
♦ Fit the applicator to the tube of drug and gently squeeze the tube to fill the applicator with the prescribed amount of drug.
♦ Lubricate the applicator tip.
♦ Put on gloves and expose the vagina.
♦ Insert the applicator about 2″ (5 cm) into the patient’s vagina and expel the drug by depressing the plunger on the applicator.
♦ Instruct the patient to remain in a supine position, with her knees flexed, for 5 to 10 minutes to let the drug flow into the posterior fornix.
After vaginal drug insertion
♦ Wash the applicator with soap and warm water and store or discard it, as appropriate. If it is to be reused, label it so it will be used for only one patient.
♦ Remove and discard your gloves.
♦ To keep drug from soiling the patient’s clothing and bedding, provide a sanitary pad.
♦ Help the patient to return to a comfortable position and advise her to remain in bed as much as possible for the next several hours.
♦ Wash your hands thoroughly.
Special considerations
♦ Refrigerate vaginal suppositories that melt at room temperature.
♦ If possible, teach the patient how to insert the vaginal drug because she
may need to do so herself after discharge.
may need to do so herself after discharge.
♦ Give her a patient-teaching sheet if one is available.
♦ Instruct the patient not to insert a tampon after inserting a vaginal drug because it will absorb the drug and decrease its effectiveness.
♦ Tell the patient that these drugs can weaken latex condoms and diaphragms if they’re used within 72 hours of drug application.
Respiratory administration
Handheld oropharyngeal inhalers
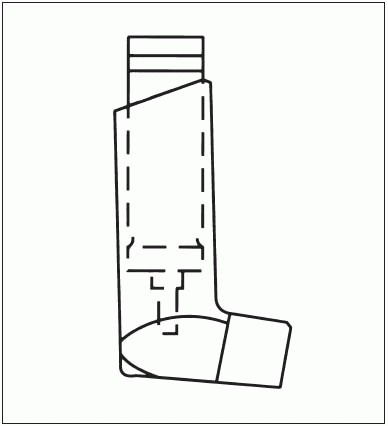
♦ Handheld inhalers include the metered-dose inhaler or nebulizer, the turbo-inhaler, and the dry-powder, multidose inhaler.
♦ These devices deliver topical drugs to the respiratory tract, producing local and systemic effects.
♦ The mucosal lining of the respiratory tract absorbs the inhalant almost immediately.
♦ Examples of inhalants are bronchodilators, which are used to improve airway patency and facilitate drainage of mucus, and mucolytics, which liquefy tenacious bronchial secretions.
Equipment
Patient’s medication record and chart
♦ metered-dose inhaler, turbo-inhaler, or dry-powder, multidose inhaler
♦ prescribed medications ♦ normal saline solution ♦ optional: spacer or extender
Implementation
To use a metered-dose inhaler
♦ Shake the inhaler bottle. Remove the cap and insert the stem into the small hole on the flattened portion of the mouthpiece, as shown below.
 |
♦ Have the patient exhale.
♦ Place the inhaler about 1″ (2.5 cm) in front of his open mouth.
♦ As you push the bottle down against the mouthpiece, instruct the patient to inhale slowly through his mouth and to keep inhaling until his lungs feel full.
♦ Compress the bottle against the mouthpiece only once.
Stay updated, free articles. Join our Telegram channel

Full access? Get Clinical Tree


Get Clinical Tree app for offline access
