Common proceduresPerforming them safely and accurately
Common procedures Performing them safely and accurately
Arterial pressure monitoring
Direct monitoring of arterial pressure permits continuous measurement of systolic, diastolic, and mean pressures and allows sampling of arterial blood. Direct measurement, which reflects systemic vascular resistance and blood flow, is generally more accurate than indirect methods, which are based on blood flow.
Direct monitoring is indicated when highly accurate or frequent blood pressure measurements are required—for example, in patients with low cardiac output and high systemic vascular resistance. It may be used for hospitalized patients if obesity or edema make indirect measurement difficult. It may also be used for patients who are receiving titrated doses of vasoactive drugs or who need frequent blood sampling.
Indirect monitoring, which carries few associated risks, is commonly performed by applying pressure to an artery (such as by inflating a blood pressure cuff around the arm or using an automated noninvasive system) to decrease blood flow. As pressure is released, flow resumes and can be palpated or auscultated. Korotkoff sounds presumably result from a combination of blood flow and vibrations of the arterial wall; with reduced flow, these vibrations may be less pronounced.
Sterile gloves ♦ 20G catheter (type and length depend on the insertion site, the patient’s size, and other anticipated uses of the line) ♦ preassembled preparation kit (if available) ♦ sterile drapes ♦ sterile towels ♦ prepared pressure transducer system ♦ ordered local anesthetic ♦ sutures ♦ syringe and 21G to 25G 1″ needle ♦ tubing and medication labels ♦ site-care kit (containing sterile dressing, antimicrobial ointment, and hypoallergenic tape) ♦ arm board and soft wrist restraint (for a femoral site, an ankle restraint) ♦ sterile marker and label ♦ optional: electric clippers (for femoral artery insertion)
For blood sample collection from an open system
Sterile 4″ × 4″ gauze pads ♦ Vacutainer ♦ needleless Vacutainer luer-lock adapter needle ♦ appropriate blood specimen collection tubes ♦ laboratory requests, labels and transport bag
For blood sample collection from a closed system
Syringes with attached cannulae of appropriate size and number for ordered laboratory tests ♦ laboratory requests, labels and transport bag ♦ alcohol swabs ♦ blood transfer unit ♦ Vacutainers
For arterial line tubing changes
Sheet protector ♦ preassembled arterial pressure tubing with flush device and disposable pressure transducer ♦ sterile gloves ♦ 500-ml bag of I.V. flush solution (usually normal saline solution) ♦ 500 or 1,000 units of heparin ♦ syringe and 21G to 25G 1″ needle ♦ I.V. pole ♦ alcohol swabs ♦ medication and tubing labels ♦ pressure bag ♦ site-care kit (containing a sterile dressing)
Before setting up and priming the monitoring system, wash your hands thoroughly. Maintain asepsis by wearing personal protective equipment throughout preparation. Label all medications, medication containers, and other solutions on and off the sterile field.
After you’ve prepared the equipment, set the alarms on the bedside monitor according to facility policy.
Implementation
♦ Confirm the patient’s identity using two patient identifiers.
♦ Explain the procedure to the patient and his family, including the purpose of arterial pressure monitoring and the anticipated duration of catheter placement. Verify that a consent form has been signed.
♦ Check the patient’s history for an allergy or a hypersensitivity to iodine, the ordered local anesthetic, or latex.
♦ Maintain asepsis by wearing personal protective equipment throughout all of the procedures described here.
♦ Position the patient for easy access to the catheter insertion site. Place a sheet protector under the site.
♦ If the catheter will be inserted into the radial artery, perform Allen’s test to assess collateral circulation in the hand.
Inserting an arterial catheter
♦ Using a preassembled preparation kit, the physician prepares and anesthetizes the insertion site. He covers the surrounding area with either sterile drapes or sterile towels. The physician inserts the catheter into the artery using sterile gloves and other protective equipment. Then the fluid-filled pressure tubing is attached.
♦ While the physician holds the catheter in place, activate the fast-flush release to flush blood from the catheter. After each fast-flush operation, observe the drip chamber to verify that the continuous flush rate is as desired. A waveform should appear on the bedside monitor.
♦ The physician may suture the catheter in place, or you may secure it with hypoallergenic tape. Apply antimicrobial ointment and cover the insertion site with a sterile dressing, as specified by facility policy.
♦ Immobilize the insertion site. With a radial or brachial site, use an arm board and a soft wrist restraint (if required by the patient’s condition). With a femoral site, assess the need for an ankle restraint. Keep the patient on bed rest, with the head of the bed raised no more than 15 to 30 degrees, to prevent the catheter from kinking. Level the zeroing stopcock of the pressure transducer with the phlebostatic axis. Then zero the system to atmospheric pressure.
♦ Activate the monitor alarms as appropriate.
Obtaining a blood sample from an open system
♦ Assemble the equipment, taking care not to contaminate the nonvented cap, stopcock, and syringes. Attach the needleless luer-lock adapter to the Vacutainer. Turn off or temporarily silence the monitor alarms, depending on facility policy. (Some facilities require that alarms be left on.)
♦ Locate the blood sampling port of the stopcock nearest the patient. Open a sterile 4″ × 4″ gauze pad. Remove the nonvented cap from the stopcock, and place it on the gauze pad.
♦ Connect the needleless adapter of the Vacutainer into the sampling port of the stopcock and turn the stopcock off to the flush solution. Attach a blood specimen collection tube for the discard sample into the stopcock. (This sample is discarded because it’s diluted with flush solution.) Follow facility policy on how much discard blood to collect. In most cases, you’ll withdraw 5 to 10 ml.
♦ Remove the discard-specimen blood collection tube from the Vacutainer.
♦ Next, attach each blood specimen collection tube to the Vacutainer, keeping the stopcock turned off to the flush solution. Because the Vacutainer is a nonvented system, there won’t be any backflow of blood from the patient.
♦ If the physician has ordered coagulation tests, obtain blood for this sample from the final syringe to prevent dilution from the flush device.
♦ After you’ve obtained blood for the final sample, turn the stopcock off to the sampling port and activate the fastflush release to clear the tubing. Turn off the stopcock to the patient and attach an empty blood specimen collection tube, or place a sterile 4″ × 4″ gauze pad beneath the sampling port of the stopcock and activate the fastflush release to clear the stopcock port of any remaining blood.
♦ Turn the stopcock off to the stopcock port, and remove the Vacutainer. Put a new sterile nonvented cap on the blood sampling port. Reactivate the monitor alarms. Label all blood specimen collection tubes with correct labels and send all samples to the laboratory in a laboratory transport bag with the laboratory request.
♦ Assemble the equipment, maintaining aseptic technique. Locate the closed-system reservoir and the bloodsampling site. Turn off or temporarily silence the monitor alarms, depending on facility policy. (Some facilities require that alarms be left on.)
♦ Holding the reservoir upright, grasp the flexures and slowly fill the reservoir with blood over 3 to 5 seconds. (This blood is the discard blood.) If you feel resistance, reposition the affected extremity and check the catheter site for obvious problems (such as kinking). Then withdraw the blood.
♦ Turn off the one-way valve to the reservoir by turning the handle perpendicular to the tubing. Clean the sampling site with an alcohol swab. Using a syringe with an attached cannula, insert the cannula into the sampling site. (Make sure that the plunger is depressed to the bottom of the syringe barrel.) Slowly fill the syringe. Then grasp the cannula near the sampling site, and remove the syringe and cannula as one unit. Repeat the procedure as needed to fill the required number of syringes. If the physician has ordered coagulation tests, obtain blood for those tests from the final syringe to prevent dilution from the flush solution.
♦ After you fill the syringes, turn the one-way valve to its original position, parallel to the tubing. Smoothly and evenly, push down on the plunger until the flexures lock in place in the fully closed position and all fluid has been reinfused. The fluid should be reinfused over a 3- to 5-second period. Then activate the fast-flush release to clear blood from the tubing and the reservoir.
♦ Clean the sampling site with an alcohol swab. Reactivate the monitor alarms. Using the blood-transfer unit, transfer blood samples to the appropriate Vacutainers, labeling them according to facility policy. Send all of the samples to the laboratory with the appropriate documentation.
Understanding the arterial waveform
Normal arterial blood pressure produces a characteristic waveform that represents ventricular systole and diastole. The waveform has five distinct components: the anacrotic limb, systolic peak, dicrotic limb, dicrotic notch, and end diastole.
The anacrotic limb marks the initial upstroke of the waveform, which results as blood is rapidly ejected from the ventricle through the open aortic valve into the aorta. The rapid ejection causes a sharp rise in arterial pressure, which appears as the highest point of the waveform (called the systolic peak).
As blood continues to flow into the peripheral vessels, arterial pressure falls and the waveform begins a downward trend. This part is called the dicrotic limb. Arterial pressure usually continues to fall until pressure in the ventricle is less than pressure in the aortic root. When this occurs, the aortic valve closes. This event appears as a small notch (dicrotic notch) on the downside of the waveform. When the aortic valve closes, diastole begins, and it progresses until the aortic root pressure gradually descends to its lowest point. On the waveform, this point is known as end diastole.
Normal arterial waveform
Changing arterial line tubing
♦ Wash your hands and follow standard precautions.
♦ Consult facility policy to determine the appropriate length of tubing to change.
♦ Inflate the pressure bag to 300 mm Hg, and check it for air leaks. Then release the pressure.
♦ Prepare the I.V. flush solution by adding the heparin to the flush solution as facility policy dictates and following physicians’ orders. If your patient has a history of bleeding or clotting problems, use heparin with caution. The heparin should be drawn up into the syringe with the needle attached and injected into the flush solutions after the port is swabbed with alcohol. Prime the pressure tubing and transducer system. Add medication and tubing labels. Apply 300 mm Hg of pressure to the system. Then hang the I.V. bag on a pole.
♦ Place the sheet protector under the affected extremity. Remove the dressing from the catheter insertion site, taking care not to dislodge the catheter or cause vessel trauma. Turn off or temporarily silence the monitor alarms, depending on facility policy. (Some facilities require that alarms be left on.)
♦ Turn off the flow clamp of the tubing segment that you’ll change. Disconnect the tubing from the catheter hub, taking care not to dislodge the catheter. Immediately insert the primed pressure tubing with the transducer system into the catheter hub. Secure the tubing, and activate the fast-flush release to clear it.
♦ Reactivate the monitor alarms. Apply an appropriate sterile dressing according to facility protocol.
♦ Level the zeroing stopcock of the transducer with the phlebostatic axis, and zero the system to atmospheric pressure.
Removing an arterial line
♦ Consult facility policy to determine whether you’re permitted to perform this procedure.
♦ Explain the procedure to the patient.
♦ Assemble all equipment. Wash your hands. Observe standard precautions, including wearing personal protective equipment.
♦ Record the patient’s systolic, diastolic, and mean blood pressures. If a manual, indirect blood pressure hasn’t been assessed recently, obtain one now to establish a new baseline. Check the patient’s coagulation studies before removing the catheter to determine if you’ll need to apply pressure for a longer time to achieve hemostasis.
♦ Turn off the monitor alarms and the flow clamp to the flush solution.
♦ Carefully remove the dressing over the insertion site. Remove any sutures, using the sterile suture removal set, and carefully check that all sutures have been removed.
♦ Withdraw the catheter with a gentle, steady motion. Keep the catheter parallel to the artery during withdrawal to reduce the risk of traumatic injury.
♦ Immediately after you withdraw the catheter, apply pressure to the site with a sterile 4″ × 4″ gauze pad. Maintain constant pressure for at least 15 minutes (longer if bleeding or oozing persists). Apply additional pressure if a femoral site was used or if the patient has coagulopathy or is receiving an anticoagulant. In some facilities, a compression device may be used to apply pressure to the femoral site.
♦ Cover the site with an appropriate dressing, and secure it with hypoallergenic tape. If stipulated by facility policy, make a pressure dressing by folding in half four sterile 4″ × 4″ gauze pads, and apply the dressing. Cover the dressing tightly with an adhesive bandage. For a patient with a femoral site, refer to your facility’s policy for maintaining bed rest after the procedure.
♦ Avoid raising the head of the bed higher than 30 to 45 degrees, and avoid flexing the affected hip during this time.
♦ If the physician has ordered a culture of the catheter tip to diagnose a suspected infection, culture the tip by swiping it across a solid growth medium such as an agar plate. (Don’t cut the catheter tip and send it to the laboratory in a sterile container because that method of organism isolation may be unreliable.)
♦ Observe the site for bleeding. Assess circulation in the extremity distal to the site by evaluating color, pulses, and sensation. Repeat this assessment every 15 minutes for the first 4 hours, every 30 minutes for the next 2 hours, and then hourly for the next 6 hours.
Special considerations
♦ Observing the pressure waveform on the monitor can enhance the assessment of arterial pressure. An abnormal waveform may reflect an arrhythmia (such as atrial fibrillation) or other cardiovascular problems, such as aortic stenosis, aortic insufficiency, alternating pulse, or paradoxical pulse. (See Recognizing abnormal arterial waveforms, page 270.)
Recognizing abnormal arterial waveforms
Understanding a normal arterial waveform is relatively straightforward. An abnormal waveform, however, is more difficult to decipher. Abnormal patterns and markings may provide important diagnostic clues to the patient’s cardiovascular status, or they may simply signal trouble in the monitor. Use this chart to help you recognize and resolve waveform abnormalities.
ABNORMALITY
POSSIBLE CAUSES
NURSING INTERVENTIONS
Alternating high and low waves in a regular pattern
Ventricular bigeminy Cardiac tamponade
♦ Check the electrocardiogram to confirm ventricular bigeminy. The tracing should reflect premature ventricular contractions every second beat.
♦ Assess the patient for signs of tamponade.
Flattened waveform
Overdamped waveform or a patient with hypotension
♦ Check the blood pressure with a sphygmomanometer. If the reading is high, suspect overdamping. Correct the problem by trying to aspirate the arterial line. If you succeed, flush the line. If the reading is very low or absent, suspect hypotension.
Slightly rounded waveform with consistent variations in systolic height
Patient on ventilator with positive endexpiratory pressure
♦ Check the systolic blood pressure regularly. The difference between the highest systolic pressure and the lowest systolic pressure should be less than 10 mm Hg. If the difference exceeds that amount, suspect paradoxical pulse, possibly from cardiac tamponade.
Slow upstroke
Aortic stenosis
♦ Check the heart sounds for signs of aortic stenosis. Also, notify the physician, who will document suspected aortic stenosis.
Diminished amplitude on inspiration
Paradoxical pulse, possibly from cardiac tamponade, constrictive pericarditis, or lung disease
♦ Note the systolic pressure during inspiration and expiration. If the inspiratory pressure is at least 10 mm Hg less than the expiratory pressure, call the physician.
♦ If you’re also monitoring pulmonary artery pressure, watch for a diastolic plateau. This occurs when the mean central venous pressure (right atrial pressure), mean pulmonary artery pressure, and mean pulmonary artery wedge pressure (pulmonary artery obstructive pressure) are within 5 mm Hg of one another.
♦ Following facility policy regarding frequency, change the pressure tubing (usually every 2 to 3 days) and change the dressing at the catheter site. Regularly assess the site for signs of infection, such as redness and swelling, and notify the physician immediately if you find any.
♦ Erroneous pressure readings may be caused by a catheter that’s clotted or positional or by loose connections, added stopcocks or extension tubing, inadvertent entry of air into the system, or improper calibration, leveling, or zeroing of the monitoring system. If the catheter lumen clots, the flush system may be improperly pressurized. Regularly assess the amount of flush solution in the I.V. bag, and maintain 300 mm Hg of pressure in the pressure bag.
♦ Monitor the patient for complications, such as arterial bleeding, infection, air embolism, arterial spasm, and thrombosis.
Documentation
Document the date of system setup. Document the systolic, diastolic, and mean pressure readings as well. Record circulation in the extremity distal to the site by assessing color, pulses, and sensation. Carefully document the amount of flush solution infused to ensure accurate assessment of the patient’s fluid status. Document the date and time the catheter was removed, how long pressure was held, the condition of the site, and any complications that occurred.
Document the patient’s position when obtaining blood pressure readings to help determine trends.
Automated external defibrillation
Automated external defibrillators (AEDs) are commonly used to meet the need for early defibrillation, which is considered the most effective treatment for ventricular fibrillation. Some facilities require an AED in every noncritical care unit. Their use is also common in such public places as shopping malls, sports stadiums, and airplanes. Instruction in using an AED is required as part of basic life support (BLS) and advanced cardiac life support (ACLS) training.
The 2005 American Heart Association guidelines for cardiopulmonary resuscitation (CPR) and emergency cardiovascular care recommend the integration of CPR with the use of an AED.
AEDs can be used in children ages 1 to 8. For this age-group, an AED with a pediatric dose attenuator system should be used, if available.
AEDs are used increasingly to provide early defibrillation, even when no health care provider is present. The AED interprets the victim’s cardiac rhythm and gives the operator step-bystep directions on how to proceed if defibrillation is indicated. Most AEDs have a “quick look” feature that allows you to see the rhythm with the paddles before the electrodes are connected.
The AED is equipped with a microcomputer that senses and analyzes a patient’s heart rhythm at the push of a button. Then it audibly or visually prompts you to deliver a shock. All models have the same basic function, but they operate differently. For example, all AEDs communicate directions through messages shown on a display screen, by voice commands, or both. Some AEDs display a patient’s heart rhythm simultaneously.
All devices record your interactions with the patient during defibrillation, either on a cassette tape or in a solidstate memory module. Some AEDs have an integral printer that allows immediate documentation of the event. Facility policy determines who’s responsible for reviewing all AED interactions; the patient’s physician always has that option. Local and state regulations govern who’s responsible for collecting AED case data for reporting purposes.
Equipment
AED ♦ two prepackaged electrodes ♦ electrode connector cables
Implementation
♦ After you discover that your patient is unresponsive to your questions, pulseless, and apneic, follow BLS and ACLS protocols. Ask a colleague to bring the AED into the patient’s room and set it up before the code team arrives.
♦ Firmly press the ON button, and wait while the machine performs a brief self-test. Most AEDs indicate their readiness by sounding a computerized voice that says “Stand clear” or by emitting a series of loud beeps. (If the AED isn’t functioning properly, it conveys the message “Don’t use the AED. Remove and continue cardiopulmonary resuscitation [CPR].”) Remember to report any AED malfunctions according to facility procedure.
♦ Open the foil packets that contain the two electrode pads. Attach the electrode cable to the AED.
♦ Expose the patient’s chest. Remove the plastic backing film from the electrode pads, and place one electrode pad on the right upper portion of the patient’s chest, just beneath his clavicle.
♦ Place the second pad to the left of the apex of the heart. (Placement for the electrode pads is the same for both manual defibrillation and cardioversion.)
♦ Now the machine is ready to analyze the patient’s heart rhythm. Ask everyone to stand clear, and press the ANALYZE button when you are prompted by the machine. Be careful not to touch or move the patient while the AED is in analysis mode. (If you get the message “Check electrodes,” make sure that the electrodes are correctly placed and that the patient cable is securely attached; then press the ANALYZE button again.)
♦ In 15 to 30 seconds, the AED will analyze the patient’s rhythm. When the patient needs a shock, the AED will display a “Stand clear” message and emit a beep that changes into a steady tone as it’s charging.
♦ When an AED is fully charged and ready to deliver a shock, it prompts you to press the SHOCK button. (Some fully automatic AED models automatically deliver a shock within 15 seconds after analyzing the patient’s rhythm. If a shock isn’t needed, the AED displays a “No shock indicated” message and prompts you to “Check patient.”)
♦ Make sure that no one is touching the patient or his bed, and call out “Stand clear.” Then press the SHOCK button on the AED. Most AEDs are ready to deliver a shock within 15 seconds.
♦ After the first shock, continue CPR, beginning with five cycles of chest compression for about 2 minutes. Don’t delay compressions to recheck rhythm or pulse. After five cycles of CPR, the AED should analyze the rhythm and deliver another shock, if indicated.
♦ If a nonshockable rhythm is detected, the AED should instruct you to resume CPR. Then continue the algorithm sequence until the code team leader arrives.
Special considerations
♦ AEDs vary from one manufacturer to another, so familiarize yourself with the equipment at your facility.
♦ The operation of the AED should be checked according to your facility’s policy.
♦ Defibrillation can cause accidental electric shock to those providing care.
Documentation
After the code, remove and transcribe the computer memory module or tape, or prompt the AED to print a rhythm strip with the code data. Follow facility policy for analyzing and storing the code data. Document the code on the appropriate form, including such information as the patient’s name, age, medical history, and reason for seeking care; the time that you found the patient in arrest; the time that CPR began; the time that the AED was applied; the number of shocks that the patient received; the time that the pulse was regained; the postarrest care that was given; and the findings of physical assessment.
Bladder irrigation, continuous
Continuous bladder irrigation can help to prevent obstruction of the urinary tract by flushing out small blood clots that form after prostate or bladder surgery. It may also be used to treat an irritated, inflamed, or infected bladder lining.
This procedure requires placement of a triple-lumen catheter. One lumen controls balloon inflation, one allows irrigant inflow, and one allows irrigant outflow. The continuous flow of irrigating solution through the bladder also creates a mild tamponade that may help to prevent venous hemorrhage. Although a catheter is typically inserted while the patient is in the operating room after prostate or bladder surgery, a catheter may be inserted at the bedside in nonsurgical patients.
Equipment and preparation
One 4,000-ml container or two 2,000- ml containers of sterile irrigating solution (usually normal saline solution) or the prescribed amount of medicated solution ♦ Y-type tubing made specifically for bladder irrigation ♦ alcohol or antiseptic pad ♦ I.V. pole or bedside pole attachment ♦ drainage bag and tubing
Normal saline solution is usually prescribed for bladder irrigation after prostate or bladder surgery. Large volumes of irrigating solution are usually required during the first 24 to 48 hours after surgery. Y-type tubing is used because it allows immediate irrigation with reserve solution.
Before you start continuous bladder irrigation, double-check the irrigating solution against the physician’s order. If the solution contains an antibiotic, check the patient’s chart to make sure that he isn’t allergic to the drug. Unless specified otherwise, the patient should remain on bed rest while receiving continuous bladder irrigation.
Implementation
♦ Confirm the patient’s identity using two patient identifiers.
♦ Wash your hands. Assemble all equipment at the patient’s bedside. Explain the procedure and provide privacy.
♦ Insert the spike of the Y-type tubing into the container of irrigating solution. (If you have a two-container system, insert one spike into each container.) (See Setup for continuous bladder irrigation, page 274.)
♦ Squeeze the drip chamber on the spike of the tubing.
♦ Open the flow clamp and flush the tubing to remove air, which could cause bladder distention. Then close the clamp.
Setup for continuous bladder irrigation
During continuous bladder irrigation, a triple-lumen catheter allows irrigating solution to flow into the bladder through one lumen and to flow out through another, as shown in the inset. The third lumen is used to inflate the balloon that holds the catheter in place.
♦ To begin, hang the irrigating solution on the I.V. pole.
♦ Clean the opening to the inflow lumen of the catheter with the alcohol or antiseptic pad.
♦ Insert the distal end of the Y-type tubing securely into the inflow lumen (third port) of the catheter.
♦ Make sure that the outflow lumen is securely attached to the tubing of the drainage bag.
♦ Open the flow clamp under the container of irrigating solution, and set the drip rate as ordered.
♦ To prevent air from entering the system, replace the primary container before it empties completely.
♦ If you have a two-container system, simultaneously close the flow clamp under the nearly empty container and open the flow clamp under the reserve container. This prevents reflux of irrigating solution from the reserve container into the nearly empty one. Hang a new reserve container on the I.V. pole and insert the tubing, maintaining asepsis.
♦ Empty the drainage bag about every 4 hours or as often as needed. Use sterile technique to avoid the risk of contamination.
♦ Monitor the patient’s vital signs at least every 4 hours during irrigation, increasing the frequency if the patient’s condition becomes unstable.
♦ Monitor urine output at least hourly for the first 4 hours. Check for bladder distention or abdominal pain.
Special considerations
♦ Check the inflow and outflow lines periodically for kinks to make sure that the solution is running freely. If the solution flows rapidly, check the lines frequently.
♦ Measure the outflow volume accurately. It should, allowing for urine production, exceed inflow volume. If the inflow volume exceeds the outflow volume postoperatively, suspect bladder rupture at the suture lines or renal damage, and notify the physician immediately.
♦ Assess outflow for changes in appearance and for blood clots, especially if irrigation is being performed postoperatively to control bleeding. If the drainage is bright red, irrigating solution is usually infused rapidly, with the clamp wide open, until the drainage clears. Notify the physician at once if you suspect hemorrhage. If the drainage is clear, the solution is usually given at a rate of 40 to 60 drops/minute. The physician typically specifies the rate for antibiotic solutions.
♦ Encourage oral fluid intake of 2 to 3 qt/day (2 to 3 L/day), unless contraindicated.
♦ Watch for interruptions in the continuous irrigation system; these can predispose the patient to infection.
♦ Check frequently for obstruction in the outflow lumen of the catheter. Obstruction can lead to bladder distention.
Documentation
Each time you finish a container of solution, record the date, the time, and the amount of fluid given on the intake and output record. Also, record the time and the amount of fluid each time you empty the drainage bag. Note the appearance of the drainage as well as any complaints that the patient reports.
Cardiac monitoring
Because it allows continuous observation of the electrical activity of the heart, cardiac monitoring is used for patients who have conduction disturbances and for those who are at risk for life-threatening arrhythmias. Like other forms of electrocardiography (ECG), cardiac monitoring uses electrodes that are placed on the patient’s chest to transmit electrical signals that are converted into a tracing of cardiac rhythm on an oscilloscope.
Two types of monitoring may be performed: hardwire or telemetry. With hardwire monitoring, the patient is connected to a monitor at his bedside, where the rhythm display appears; it may also be transmitted to a console at a remote location. With telemetry monitoring, the patient is connected to a small transmitter that sends electrical signals to a monitor in another location. Battery-powered and portable, telemetry frees the patient from cumbersome wires and cables. In addition to being able to walk around, the patient is safely isolated from the electrical leakage and accidental shock occasionally associated with hardwire monitoring. Telemetry is especially useful for monitoring arrhythmias that occur during sleep, rest, exercise, or stressful situations. However, unlike hardwire monitoring, telemetry can monitor only cardiac rate and rhythm.
Regardless of the type of monitor used, cardiac monitors can display the patient’s heart rate and rhythm, produce a printed record of the cardiac rhythm, and sound an alarm if the heart rate exceeds or falls below specified limits. Monitors also recognize and count abnormal heartbeats as well as changes. For example, a relatively new technique, ST-segment monitoring, helps to detect myocardial ischemia, electrolyte imbalance, coronary artery spasm, and hypoxic events. The ST segment represents early ventricular repolarization, and changes in this waveform component reflect alterations in myocardial oxygenation. Any monitoring lead that views an ischemic heart region will show ST-segment changes. The software establishes a template of the patient’s normal QRST pattern from the selected leads. Then the monitor displays ST-segment changes. Some monitors display these changes continuously, and others show them only on command.
Equipment and preparation
For hardwire monitoring
Cardiac monitor ♦ leadwires ♦ patient cable ♦ disposable pregelled electrodes (3-5 electrodes, depending on the patient’s needs) ♦ alcohol pad ♦ 4″ × 4″ gauze pads ♦ optional: clippers and washcloth
For telemetry monitoring
Transmitter ♦ pouch for transmitter ♦ telemetry battery pack, leadwires, and disposable pregelled electrodes
For hardwire monitoring, plug the cardiac monitor into an electrical outlet and turn it on to warm up the unit while you prepare the equipment and the patient. Insert the cable into the appropriate socket in the monitor. Connect the leadwires to the cable. In most systems, the leadwires are permanently secured to the cable. Each leadwire should indicate the location for attachment to the patient: right arm (RA), left arm (LA), right leg (RL), left leg (LL), and ground (C or V). This designation should appear on the leadwire —if it’s permanently connected— or at the connection of the leadwires and cable to the patient. Connect an electrode to each leadwire, checking carefully that each leadwire is in its correct outlet.
For telemetry monitoring, insert a new battery into the transmitter. Make sure that the poles on the battery match the polar markings on the transmitter case. Some units have a battery test feature. If this feature is available, test the unit to check that the battery is operational. If the leadwires aren’t permanently affixed to the telemetry unit, attach them securely. If they must be attached individually, make sure that you connect each one to the correct outlet.
Implementation
Hardwire monitoring
♦ Confirm the patient’s identity using two patient identifiers.
♦ Explain the procedure to the patient, provide privacy, and ask him to expose his chest. Wash your hands.
♦ Determine the positions of the electrodes on the patient’s chest, based on which system and lead you’re using. (See Positioning monitoring leads.)
♦ If the leadwires and patient cable aren’t permanently attached, verify that the electrode placement corresponds to the label on the patient cable.
♦ If necessary, clip an area about 4″ (10 cm) in diameter around each electrode site. Clean the area with an alcohol pad, and dry it completely to remove skin secretions that may interfere with electrode function. Gently abrade the dried area by rubbing it briskly until it reddens to remove dead skin cells and to promote better electrical contact with living cells. (Some electrodes have a small, rough patch for abrading the skin; otherwise, use a dry washcloth or a dry gauze pad.)
♦ Remove the backing from the disposable pregelled electrode. Check the gel for moistness. If the gel is dry, discard it and replace it with a fresh electrode.
Positioning monitoring leads
These illustrations show the correct electrode positions for the monitoring leads you’ll use most often. For each lead, you’ll see electrode placement for a five-leadwire system, a three-leadwire system, and a telemetry system.
In the two-hardwire systems, the electrode positions for one lead may be identical to those for another lead. In this case, you simply change the lead selector switch to the setting that corresponds to the lead you want. In some cases, you’ll need to reposition the electrodes.
In the telemetry system, you can create the same lead with two electrodes that you do with three, simply by eliminating the ground electrode.
The illustrations below use these abbreviations: RA, right arm; LA, left arm; RL, right leg; LL, left leg; C, chest; and G, ground.
FIVE-LEADWIRE SYSTEM
THREE-LEADWIRE SYSTEM
TELEMETRY SYSTEM
Lead I
Lead II
Lead III
Lead MCL1
Lead MCL6
Sternal lead
Sternal lead
♦ Apply the electrode to the site and press firmly to ensure a tight seal. Repeat with the remaining electrodes.
♦ When all of the electrodes are in place, check for a tracing on the cardiac monitor. Assess the quality of the ECG.
♦ To verify that the monitor is detecting each beat, compare the digital heart rate display with your count of the patient’s heart rate.
♦ If necessary, use the gain control to adjust the size of the rhythm tracing. Use the position control to adjust the position of the waveform on the recording paper.
♦ Set the upper and lower limits of the heart rate alarm, based on facility policy. Turn the alarm on.
Telemetry monitoring
♦ Confirm the patient’s identity using two patient identifiers.
♦ Wash your hands. Explain the procedure to the patient and provide privacy.
♦ Expose the patient’s chest, and select the lead arrangement. Remove the backing from one of the disposable pregelled electrodes. Check the gel for moistness. If it’s dry, discard the electrode and obtain a new one.
♦ Apply the electrode to the appropriate site by pressing one side of the electrode against the patient’s skin, pulling gently, and then pressing the other side against the skin. Press your fingers in a circular motion around the electrode to fix the gel and stabilize the electrode. Repeat this procedure for each electrode.
♦ Attach an electrode to the end of each leadwire.
♦ Place the transmitter in the pouch. Tie the pouch strings around the patient’s neck and waist, making sure that the pouch fits snugly but comfortably. If no pouch is available, place the transmitter in the patient’s bathrobe pocket.
♦ Check the patient’s waveform for clarity, position, and size. Adjust the gain and baseline as needed. (If necessary, ask the patient to remain resting or sitting in his room while you locate his telemetry monitor at the central station.)
♦ To obtain a rhythm strip, press the RECORD key at the central station. Label the strip with the patient’s name and room number, the date, and the time. Also, identify the rhythm. Place the rhythm strip in the appropriate location in the patient’s chart.
Special considerations
♦ Make sure that all electrical equipment and outlets are grounded to avoid electric shock and interference (artifacts). Ensure that the patient is clean and dry to prevent electric shock.
♦ Avoid opening the electrode packages until just before using them, to prevent the gel from drying out.
♦ Avoid placing the electrodes on bony prominences, hairy locations, areas where defibrillator pads will be placed, or areas where the chest will be compressed.
♦ If the patient’s skin is very oily, scaly, or diaphoretic, rub the electrode site with a dry 4″ × 4″ gauze pad before applying the electrode to help reduce interference in the tracing. Instruct the patient to breathe normally during the procedure. If his respirations distort the recording, ask him to hold his breath briefly to reduce baseline wander in the tracing.
♦ Assess the integrity of the patient’s skin, and reposition the electrodes every 24 hours or as needed.
If the patient is being monitored by telemetry, show him how the transmitter works. If applicable, show him the button that can produce a recording of his ECG at the central station. Teach him how to push the button whenever he has symptoms. Explain that pushing the button causes the central console to print a rhythm strip. Tell the patient to remove the transmitter if he takes a shower or bath, but explain that he should let you know before he removes the unit.
Documentation
Record in your nurses’ notes the date and time that monitoring begins and the monitoring lead used. Document a rhythm strip at least every 8 hours and if any changes occur in the patient’s condition (or as stated by facility policy). Label the rhythm strip with the patient’s name and room number, the date, and the time.
Cardiac output measurement
Cardiac output (CO)—the amount of blood ejected by the heart in 1 minute —helps to evaluate cardiac function. The most widely used method of calculating this measurement is the bolus thermodilution technique. Performed at the patient’s bedside, the thermodilution technique is the most practical method of evaluating the cardiac status of critically ill patients and those suspected of having cardiac disease. Other methods include the Fick method and the dye dilution test.
To measure CO, a quantity of solution that’s colder than the patient’s blood is injected into the right atrium via a port on a pulmonary artery (PA) catheter. This indicator solution mixes with the blood as it travels through the right ventricle into the pulmonary artery. A thermistor on the catheter registers the change in the temperature of the flowing blood. A computer plots the temperature change over time as a curve and calculates the flow based on the area under the curve.
Iced or room-temperature injectant may be used. The choice is based on facility policy as well as the patient’s status. The accuracy of the bolus thermodilution technique depends on the ability of the computer to differentiate the temperature change that the injectant causes in the pulmonary artery as well as the temperature changes in the artery. Because it’s colder than roomtemperature injectant, iced injectant provides a stronger signal and thus is more easily detected.
Typically, however, room-temperature injectant is more convenient to use and provides equally accurate measurements. Iced injectant may be more accurate for patients with high or low CO, hypothermic patients, or patients with volume restrictions.
Equipment and preparation
For the thermodilution method
Thermodilution PA catheter in position ♦ CO computer, temperature injectate probe, and cable (or a module for the bedside cardiac monitor) ♦ closed or open injectant delivery system ♦ 10-ml syringe ♦ 500-ml bag of I.V. solution (dextrose 5% in water or normal saline solution) ♦ crushed ice and water and Styrofoam container (if iced injectant is used)
Newer bedside cardiac monitors measure CO continuously, either invasively or noninvasively. If your bedside monitor doesn’t have this capability, you’ll need a freestanding CO computer.
Wash your hands thoroughly, and assemble the equipment at the patient’s bedside. Insert the closed injectant system tubing into the 500-ml bag of I.V. solution. Connect the 10-ml syringe to the system tubing, and prime the tubing with I.V. solution until all of the air is out. Then clamp the tubing. The steps that follow differ, depending on the temperature of the injectant.
For room-temperature injectant in a closed-delivery system
After you clamp the tubing, connect the primed system to the stopcock of the proximal injectant lumen of the thermodilution PA catheter. Next, connect the temperature probe from the CO computer to the flow-through housing device. Connect the CO computer cable to the thermistor connector on the PA catheter, and verify the blood temperature reading. Finally, turn on the CO computer and enter the correct computation constant, as provided by the catheter manufacturer. The constant is determined by the volume and temperature of the injectant as well as the size and type of catheter.
For children, you’ll need to adjust the computation constant to reflect a smaller volume and a smaller catheter size.
For iced injectant in a closed-delivery system
After you clamp the tubing, place the coiled segment into the Styrofoam container, and add crushed ice and water to cover the entire coil. Let the solution cool for 15 to 20 minutes. The rest of the steps are the same as those for room-temperature injectant in a closeddelivery system.
Implementation
♦ Confirm the patient’s identity using two patient identifiers.
♦ Place the patient in a supine position, with the head of the bed elevated not more than 20 degrees. Tell him not to move during the procedure.
♦ Explain to the patient that the procedure will cause him no discomfort.
For room-temperature injectant in a closed-delivery system
♦ Verify the presence of a PA waveform on the cardiac monitor.
♦ Unclamp the I.V. tubing, and withdraw exactly 10 ml of solution. Reclamp the tubing.
♦ Turn the stopcock at the catheter injectant hub to open a fluid path between the injectant lumen of the thermodilution PA catheter and the syringe.
♦ Press the START button on the CO computer, or wait for an INJECT message to flash.
♦ Inject the solution smoothly within 4 seconds, making sure that it doesn’t leak at the connectors.
♦ If available, analyze the contour of the thermodilution washout curve on a strip chart recorder. It should show a rapid upstroke and a gradual, smooth return to the baseline.
♦ Repeat these steps until three values are within 10% to 15% of the median value. Compute the average, and record the patient’s CO.
♦ Return the stopcock to its original position, and make sure that the injectant delivery system tubing is clamped.
♦ Verify the presence of a PA waveform on the cardiac monitor.
♦ Discontinue CO measurements when the patient’s condition is hemodynamically stable and the patient has been weaned from his vasoactive and inotropic medications. You can leave the PA catheter in place for pressure measurements.
♦ Disconnect and discard the injectant delivery system and the I.V. bag. Cover exposed stopcocks with air-occlusive caps.
♦ Monitor the patient for signs and symptoms of inadequate perfusion, including restlessness, fatigue, changes in the level of consciousness, decreased capillary refill time, diminished peripheral pulses, oliguria, and pale, cool skin.
For iced injectant in a closed-delivery system
♦ Unclamp the I.V. tubing and withdraw 5 ml of solution into the syringe.
With children, withdraw 3 ml or less.
♦ Inject the solution to flow past the temperature sensor while you observe the injectant temperature that registers on the computer. Verify that the injectant temperature is between 43° and 54° F (6.1° and 12.2° C).
♦ Verify the presence of a PA waveform on the cardiac monitor.
♦ Withdraw exactly 10 ml of cooled solution before you reclamp the tubing.
♦ Turn the stopcock at the catheter injectant hub to open a fluid path between the injectant lumen of the PA catheter and the syringe.
♦ Press the START button on the CO computer, or wait for the INJECT message to flash.
♦ Inject the solution smoothly within 4 seconds, making sure that it doesn’t leak at the connectors.
♦ If available, analyze the contour of the thermodilution washout curve. It should show a rapid upstroke and a gradual, smooth return to the baseline.
♦ Wait 1 minute between injections, and repeat the procedure until three values are within 10% to 15% of the median value. Compute the average, and record the patient’s CO.
♦ Return the stopcock to its original position, and make sure that the injectant delivery system tubing is clamped.
♦ Verify the presence of a PA waveform on the cardiac monitor.
Special considerations
♦ The normal range for CO is 4 to 8 L/minute. The adequacy of a patient’s CO is better assessed by calculating his cardiac index (CI), adjusted for his body size.
♦ To calculate the patient’s CI, divide his CO by his body surface area (BSA), which is a function of height and weight. For example, a CO of 4 L/minute might be adequate for a 5′5″, 120-lb (1.65-m, 54.4-kg) patient (normally a BSA of 1.59 and a CI of 2.5), but would be inadequate for a 6′2″, 230-lb (1.88-m, 104.3-kg) patient (normally a BSA of 2.26 and a CI of 1.8). The normal CI for adults ranges from 2.5 to 4.2 L/minute/m2; for pregnant women, it is 3.5 to 6.5 L/minute/m2.
The normal CI for infants and children is 3.5 to 4 L/minute/m2; for elderly adults, it’s 2 to 2.5 L/minute/m2.
♦ Add the fluid volume injected for CO determinations to the patient’s total intake. Injectant delivery of 30 ml/hour will contribute 720 ml to the patient’s 24-hour intake.
♦ After CO is measured, make sure that the clamp on the injectant bag is secured to prevent inadvertent delivery of the injectant to the patient.
Documentation
Document your patient’s CO, CI, and other hemodynamic values and vital signs at the time of measurement. Note the patient’s position during measurement as well as any other unusual occurrences, such as bradycardia or neurologic changes.
Cardiopulmonary resuscitation, adult
Cardiopulmonary resuscitation (CPR) aims to restore and maintain the patient’s respirations and circulation after his heartbeat and breathing have stopped. A basic life support procedure performed on patients in cardiac arrest, CPR should be performed according to the 2005 American Heart Association (AHA) guidelines.
Most adults in sudden cardiac arrest develop ventricular fibrillation and require defibrillation, and CPR alone doesn’t improve survival rates. However, early activation of emergency medical services (EMS), CPR, and defibrillation as well as early advanced cardiac life support (ACLS) all contribute to an improved survival rate.
Basic CPR consists of assessing the patient, calling for help, and then following the ABC protocol: open the airway, restore breathing, and restore circulation. After the patient’s airway has been opened and his breathing and circulation restored, defibrillation, drug therapy, and diagnosis by electrocardiogram may follow. If possible, find out if the patient has a Do Not Resuscitate order before beginning CPR.
Equipment
♦ A hard surface on which to place the patient ♦ optional: protective equipment such as a disposable airway device
Implementation
♦ Follow these step-by-step CPR guidelines as currently recommended by the AHA.
One-person rescue
♦ Assess the patient to determine if he’s unconscious. To ensure you don’t start CPR on a person who’s conscious, shake his shoulders and shout, “Are you okay?” If there’s no response, check whether the patient has an injury, particularly to the head or neck.
If you suspect a head or neck injury, move the patient as little as possible to reduce the risk of paralysis.
♦ Call out for help, send someone to activate EMS, or call a code as appropriate. Get the automated external defibrillator (AED). If no one is available, activate EMS or call a code yourself, get the AED, and return to the patient.
♦ Put the patient in the supine position on a hard, flat surface. When moving him, roll his head and torso as a unit. Avoid twisting or pulling his neck, shoulders, or hips.
♦ Kneel near the patient’s shoulders to gain easy access to his head and chest.
Open the airway: head-tilt, chin-lift maneuver
♦ If the patient doesn’t appear to have a neck injury, use the head-tilt, chin-lift maneuver to open his airway. To do this, place one hand on his forehead and apply pressure to tilt his head back. Be aware that, frequently, the muscles controlling the patient’s tongue will be relaxed, causing the tongue to obstruct the airway; this maneuver opens the airway.
♦ Place the fingertips of your other hand under the bony part of his lower jaw near his chin. Lift his chin while keeping his mouth partially open. Don’t place your fingertips on the soft tissue under his chin because this maneuver may obstruct the airway.
Open the airway: jaw-thrust maneuver
♦ If you suspect a neck injury, use the jaw-thrust maneuver instead of the head-tilt, chin-lift maneuver.
♦ Kneel at the patient’s head with your elbows on the ground.
♦ Rest your thumbs on the patient’s lower jaw near the corners of the mouth, pointing your thumbs toward his feet. Place your fingertips around the lower jaw.
♦ To open the airway, lift the lower jaw with your fingertips.
Check for breathing
♦ While maintaining the open airway, place your ear over the patient’s mouth and nose. Listen for air moving, and note whether his chest rises and falls. You may also feel for airflow on your cheek.
♦ If the patient starts to breathe, keep the airway open and continue checking breathing until help arrives.
♦ If he doesn’t start breathing within 10 seconds after you open his airway, begin rescue breathing. Pinch his nostrils shut using the hand you had on his forehead.
♦ Take a regular (not deep) breath and place your mouth over his, creating a tight seal.
♦ Give 2 full breaths that have enough volume to produce a visible chest rise. Each ventilation should last over 1 second.
♦ If your first attempt at ventilation isn’t successful, reposition the patient’s head and try again. If you still aren’t successful, the patient may have a foreign-body obstruction. Check for dentures or another foreign-body airway obstruction. If you see dentures or any other object blocking the airway, remove the object.
Assess circulation
♦ Keep your hand on the patient’s forehead so that his airway remains open.
♦ Palpate the carotid artery closest to you. To do this, place your index and middle fingers in the groove between the trachea and the sternocleidomastoid muscle.
♦ Palpate for 10 seconds to detect a pulse, and observe for signs of circulation.
If you detect a pulse, don’t start chest compressions. Instead, do rescue breathing, giving 10 to 12 breaths (one for every 5 to 6 seconds). After 2 minutes, recheck the pulse. You should give each breath over 1 second, and the breath should cause the chest to rise visibly. After 2 minutes, recheck the patient’s pulse, but spend no more than 10 seconds doing so.
♦ If the patient has no pulse, start giving chest compressions. Make sure that the patient is lying on a hard surface and that your knees are far enough apart to provide you with a wide base of support.
♦ Put the heel of one hand on the center of the patient’s chest at the nipple line. Place the other hand directly on top of the first hand, making sure your fingers aren’t on his chest. This position will keep the compression force on the sternum and reduce the risk of rib fracture, lung puncture, or liver laceration.
♦ With elbows locked, arms straight, and shoulders directly over your hands, you’re ready to give chest compressions. Compress the sternum 1½″ to 2″ (3.8 to 5 cm), using your upper body weight and delivering pressure through the heels of your hands.
♦ After each compression, release pressure completely and allow the patient’s chest to return to a normal position so that the heart can fill with blood.
Don’t change hand position during compressions; you might injure the patient.
♦ Give 30 chest compressions at a rate of about 100 per minute. Push hard and fast.
♦ Open the airway and give 2 ventilations. Find the proper hand position again and give 30 more compressions.
♦ Continue chest compressions until EMS arrives or another rescuer arrives with the AED.
♦ Interrupt chest compressions as infrequently as possible, and make sure interruptions last no longer than 10 seconds, except for special interventions such as use of an AED or insertion of an airway.
Two-person rescue
♦ If another rescuer arrives and the EMS team hasn’t arrived, tell the second rescuer to repeat the call for help.
♦ If the second rescuer isn’t a health care professional, ask him to stand by. Then, after about 2 minutes or 5 cycles of compressions and ventilations, you can switch. The switch should occur within 5 seconds.
♦ If the rescuer is another health care professional, you can perform two-person CPR. He should start assisting after you’ve finished 5 cycles of 30 compressions, 2 ventilations, and a pulse check.
♦ The second rescuer should get into place opposite you. While you’re checking for a pulse, he should find the proper hand placement for delivering chest compressions.
♦ If you don’t detect a pulse, say, “No pulse, continue CPR,” and give 2 ventilations.
♦ The second rescuer should begin giving compressions at a rate of 100 per minute. Compressions and ventilations should be given at a ratio of 30 compressions to 2 ventilations. The “compressor” (at this point, the second rescuer) should count out loud so that the “ventilator” can anticipate when to give ventilations.
♦ To ensure ventilations are effective, make sure they cause a visible chest rise.
♦ As the “ventilator,” you must check for breathing and a pulse.
♦ The compressor role should switch after 5 cycles of compressions and ventilations. The switch should take no more than 5 seconds.
♦ Both rescuers should continue giving CPR until an AED or defibrillator arrives, the ACLS providers take over, or the patient starts to move.
Special considerations
♦ Some health care professionals may hesitate to give mouth-to-mouth breaths. For this reason, the AHA recommends that all health care professionals learn how to use disposable airway equipment.
♦ If you’re a single rescuer activating EMS, getting an AED, and returning to the patient to perform CPR, tailor your response to take into account the cause of the arrest. For instance, if you’re rescuing an unresponsive patient with a likely hypoxic arrest, perform 5 cycles of CPR before activating EMS and getting an AED.
♦ Lay rescuers should use the headtilt, chin-lift position for all patients, whether or not they appear injured, because the jaw thrust is difficult to perform. Lay rescuers are also taught to give 2 rescue breaths and immediately begin 30 chest compressions without stopping to check for a pulse. This is because research has shown they can’t reliably check for a pulse within 10 seconds or accurately assess for other signs of circulation
CPR can cause complications, especially if the compressor’s hands are placed improperly on the sternum. Such complications include fractured ribs, liver laceration, and punctured lungs. Gastric distention may result from giving too much air during ventilation.
Documentation
Note why you initiated CPR; report whether the patient suffered cardiac or respiratory arrest. Record when you found the patient and started CPR and how long the patient received CPR. Note the patient’s response and any complications. Also include any interventions taken to correct complications.
If the patient also received ACLS, document which interventions were performed, who performed them, when they were performed, and what equipment was used. Document if the patient was moved to an intensive care unit.
Central venous access device insertion and removal
A central venous access device (CVAD), also known as a central venous catheter, is a sterile catheter made of polyurethane or silicone rubber (Silastic). It’s inserted through a large vein, such as the subclavian vein, the jugular vein, or peripheral veins. The tip of the catheter must be placed in the superior vena cava for the catheter to be considered a CVAD.
By providing access to the central veins, central venous (CV) therapy offers several benefits. It allows monitoring of CV pressure, which indicates blood volume or pump efficiency, and permits aspiration of blood samples for diagnostic tests. It also allows administration of I.V. fluids (in large amounts, if needed) when an emergency arises; when decreased peripheral circulation makes peripheral vein access difficult; when prolonged I.V. therapy reduces the number of accessible peripheral veins; when solutions must be diluted (for large fluid volumes or for irritating or hypertonic fluids such as total parenteral nutrition solutions); and when a patient requires long-term venous access. Because multiple blood samples can be drawn without repeated venipuncture, the CVAD decreases the patient’s anxiety and preserves the peripheral veins.
A peripherally inserted central catheter (PICC) usually enters at the basilic vein and terminates in the superior vena cava. PICCs may be inserted by a specially trained nurse, radiologist, or surgeon. New catheters have longer needles and smaller lumens, facilitating this procedure. PICCs are typically used for long-term I.V. antibiotic therapy and can be safely used in the home care and long-term care settings. They may also be used in a patient who has a chest injury; neck, chest, or shoulder burns; compromised respiratory function; or a surgical site that’s close to a CV line placement site.
CV therapy increases the risk of certain life-threatening complications, such as pneumothorax, sepsis, thrombus formation, and perforation of blood vessels and adjacent organs. Also, a CVAD may decrease patient mobility, is difficult to insert, and is more expensive than a peripheral I.V. catheter.
At the end of therapy or at the onset of complications, a physician or nurse removes the CVAD. CVAD removal is a sterile procedure. A PICCtrained nurse may remove a peripherally inserted central line. If the patient has an infection, the removal procedure includes swabbing the catheter tip over an agar plate for culture.
Equipment and preparation
For inserting a CVAD
Cap, sterile gloves, and gowns ♦ blanket ♦ linen-saver pad ♦ sterile towel ♦ large sterile drape, marker, and labels ♦ masks ♦ alcohol pad ♦ chlorhexidine swab ♦ normal saline solution ♦ 3-ml syringe with 25G 1″ needle ♦ 1% or 2% injectable lidocaine ♦ dextrose 5% in water (D5W) ♦ syringes for blood sample collection ♦ suture material ♦ two 14G or 16G CVADs ♦ I.V. solution with administration set prepared for use ♦ infusion pump or controller as needed ♦ transparent semipermeable dressing ♦ 1″ adhesive tape ♦ sterile scissors ♦ heparin or normal saline flushes as needed ♦ portable X-ray machine ♦ optional: clippers
For flushing a catheter
Normal saline solution or heparin flush solution ♦ alcohol pad
For changing an injection cap
Alcohol pad ♦ injection cap ♦ padded clamp
For removing a CVAD
Clean gloves ♦ mask ♦ sterile suture removal set ♦ alcohol pad ♦ sterile 2″ × 2″ gauze pads ♦ forceps ♦ tape ♦ sterile, plastic adhesive-backed dressing or transparent semipermeable dressing ♦ agar plate, if needed for culture ♦ antimicrobial swab
The type of catheter (tunneled, implanted, or percutaneously inserted) selected depends on the type of therapy to be used. The Centers for Disease Control and Prevention recommends using antimicrobial-impregnated catheters in adults who expect to keep the catheter in place longer than 5 days to decrease the risk of catheter-related bloodstream infections. Some facilities have prepared trays containing most of the equipment needed for catheter insertion. Before insertion of a CVAD, confirm the catheter type and size with the physician; usually, a 14G or 16G catheter is selected. Set up the I.V. solution and prime the administration set using strict aseptic technique. Recheck all connections to make sure that they’re tight. As ordered, notify the radiology department that a chest X-ray is required.
Implementation
♦ Confirm the patient’s identity using two patient identifiers.
♦ Wash your hands thoroughly to prevent the spread of microorganisms.
Inserting a CVAD
♦ Reinforce the physician’s explanation of the procedure, and answer the patient’s questions. Make sure that the patient has signed a consent form, and check his history for hypersensitivity to iodine, latex, or the local anesthetic.
♦ Place the patient in Trendelenburg’s position to dilate the veins and reduce the risk of an air embolism.
♦ For subclavian access, place a rolled blanket lengthwise between the patient’s shoulders to increase venous distention. For jugular access, place a rolled blanket under the opposite shoulder to extend the neck, making anatomic landmarks more visible. Place a linen-saver pad under the patient to prevent soiling of the bed.
♦ Turn the patient’s head away from the site to prevent possible contamination from airborne pathogens and to make the site more accessible. Or if dictated by facility policy, place a mask on the patient unless this increases his anxiety or is contraindicated due to his respiratory status.
♦ Prepare the insertion site. Make sure that the skin is free from hair because hair can harbor microorganisms. Clip the hair close to the skin rather than shaving. You may also need to wash the skin with soap and water.
♦ Establish a sterile field on a table, using a sterile towel or the wrapping from the instrument tray. Label all medications, medication containers, and other solutions on and off the sterile field.
♦ Put on a mask and sterile gloves and gown (maximum barrier precautions). Clean the area around the insertion site with a chlorhexidine swab using a vigorous side-to-side motion.
♦ After the physician puts on a cap, mask, sterile gown, and sterile gloves and drapes the area with a large sterile drape to create a sterile field, open the packaging of the 3-ml syringe and the 25G 1″ needle. Give the syringe to the physician using sterile technique.
♦ Wipe the top of the lidocaine vial with an alcohol pad, and invert it. The physician then fills the 3-ml syringe and injects the anesthetic into the site.
♦ Open the catheter package, and give the catheter to the physician using aseptic technique. The physician then inserts the catheter.
♦ During this time, prepare the I.V. administration set for immediate attachment to the catheter hub. Ask the patient to perform Valsalva’s maneuver while the physician attaches the I.V. line to the catheter hub. This maneuver increases intrathoracic pressure, reducing the possibility of an air embolus.
♦ After the physician attaches the I.V. line to the catheter hub, set the flow rate at a keep-vein-open rate to maintain venous access. (Alternatively, the catheter may be capped and flushed with heparin.) The physician then sutures the catheter in place.
♦ After an X-ray confirms correct catheter placement in the superior vena cava, set the flow rate as ordered.
♦ Use antimicrobial solution to remove dried blood that could harbor microorganisms. Secure the catheter with a catheter securement device, sterile tape, or sterile surgical strips and use a transparent semipermeable dressing.
♦ Expect some serosanguineous drainage during the first 24 hours. Label the dressing with the date and time of catheter insertion and the length and gauge of the catheter.
♦ Place the patient in a comfortable position and reassess his status.
Flushing a catheter
♦ To maintain patency, flush the catheter routinely, according to facility policy. If the system is being maintained as a heparin lock and the infusions are intermittent, the flushing procedure will vary according to facility policy, the medication administration schedule, and the type of catheter.
♦ All lumens of a multilumen catheter must be flushed regularly. Verify that tip placement is in the superior vena cava. Flush vigorously, using only low-pressure 10-ml syringes. It’s important to be able to obtain 3 to 5 ml of free-flowing blood before each flush. If you can’t obtain 3 to 5 ml of blood, follow facility policy regarding catheter occlusion or malfunction. Most facilities use a heparin flush solution, available in premixed 10-ml multidose vials. Recommended concentrations vary from 10 to 100 units of heparin per milliliter. Use normal saline solution instead of heparin to maintain patency in two-way valve devices, such as the Groshong type. Research suggests that heparin isn’t always needed to keep the line open.
♦ The recommended frequency for flushing CVADs varies from once every 8 hours to once weekly.
♦ The recommended amount of flushing solution also varies. If the volume of the cannula and the add-on devices is known, Infusion Nurses Society standards require using twice that amount. All catheters have the same internal volume of less than 1 ml. Most facilities recommend using 3 to 5 ml of solution to flush the catheter, although some facility policies call for as much as 10 ml of solution.
♦ Before flushing, clean the cap with an alcohol pad. Allow the cap to dry. If you are using a needleless system when flushing, follow manufacturer guidelines.
♦ Access the cap, and aspirate 3 to 5 ml of blood to confirm the proper function and patency of the CVAD.
♦ Inject the recommended type and amount of flush solution.
♦ After you flush the catheter, maintain positive pressure by keeping your thumb on the plunger of the syringe while you withdraw the syringe. This prevents blood backflow and clotting in the line. If you are flushing a valved catheter, close the clamp just before the last of the flush solution leaves the syringe.
Changing an injection cap
♦ CVADs that are used for intermittent infusions have needle-free injection caps (short luer-lock devices similar to the heparin lock adapters that are used for peripheral I.V. therapy). These caps must be luer-lock types to prevent inadvertent disconnection and an air embolism. These caps contain a minimal amount of empty space, so don’t preflush the cap before you connect it.
♦ The frequency of cap changes varies according to facility policy and frequency of use. Changing the cap once weekly is recommended. Use strict aseptic technique when changing the cap.
♦ Clean the connection site with an alcohol pad.
♦ Instruct the patient to perform Valsalva’s maneuver while you quickly disconnect the old cap and connect the new injection cap using aseptic technique. If he can’t perform this maneuver, use a padded clamp or pinch off the catheter to prevent air from entering the catheter.
Removing a CVAD
♦ Before starting, check the patient’s record for the most recent placement (confirmed by X-ray) to trace the catheter’s path as it exits the body.
♦ Make sure that assistance is available if a complication (such as uncontrolled bleeding) occurs during catheter removal. Some vessels, such as the subclavian vein, can be difficult to compress. Before you remove the catheter, explain the procedure to the patient.
♦ Place the patient in a supine position to prevent an air embolism.
♦ Wash your hands, and put on clean gloves and a mask.
♦ Turn off all infusions and prepare a sterile field using a sterile drape.
♦ Remove and discard the old dressing, and change to sterile gloves.
♦ Inspect the site for signs of drainage and inflammation.
♦ Clip the sutures, and use forceps to remove the catheter in a slow, even motion. Have the patient perform Valsalva’s maneuver as the catheter is withdrawn to prevent an air embolism.
♦ Apply pressure with a dry sterile gauze pad immediately after you remove the catheter.
♦ Apply antiseptic ointment to the catheter exit site to seal the site and prevent an air embolism. Cover the site with a sterile 2″ × 2″ gauze pad, and place a transparent semipermeable dressing over the gauze. Write the date and time of removal and your initials on the dressing with indelible ink. Keep the site covered until epithelialization has occurred. Follow up with the patient’s family physician if the patient is discharged.
♦ Measure the length of the removed PICC catheter to ensure that the catheter has been completely removed. If you suspect that the catheter hasn’t been completely removed, notify the physician immediately and monitor the patient closely for signs of distress. If you suspect an infection, swab the catheter on a fresh agar plate and send the specimen to the laboratory for culture.
♦ Dispose of the I.V. tubing and equipment properly.
Special considerations
♦ While you’re awaiting chest X-ray confirmation of proper catheter placement, infuse an I.V. solution, such as D5W or normal saline solution, at a keep-vein-open rate, until correct placement is assured. Alternatively, use a heparin lock and flush the line.
Key steps in changing a central venous dressing
Appropriate dressing changes and site care are needed to remove Staphylococcus epidermidis, the major organism causing infection in central venous catheters. Expect to change your patient’s central venous dressing weekly. Many facilities specify dressing changes whenever the dressing becomes soiled, moist, or loose. The following illustrations show the key steps you’ll perform.
First, put on clean gloves and remove the old dressing by pulling it toward the exit site of a long-term catheter or toward the insertion site of a short-term catheter. This technique helps you to avoid pulling out the line. Remove and discard your gloves.
Next, put on sterile gloves and clean the skin around the site, using an antimicrobial solution. Start at the center and move outward, using a circular motion.
Allow the skin to dry. Use chlorhexidine swabs as recommended by the Centers for Disease Control and Prevention to clean the site using a vigorous side-toside motion. Don’t use circular motion.
After the solution has dried, cover the site with a dressing such as the transparent semipermeable dressing shown here. Write the time and date on the dressing.
♦ Watch for signs of air embolism, including sudden onset of pallor, cyanosis, dyspnea, coughing, and tachycardia that progresses to syncope and shock. If any of these signs occur, place the patient on his left side in Trendelenburg’s position and notify the physician. Make sure that the exit site is covered with an occlusive dressing.
♦ After the catheter is inserted, monitor the patient for signs and symptoms of pneumothorax, such as shortness of breath, uneven chest movement, tachycardia, and chest pain. Notify the physician immediately if these signs appear.
♦ If a gauze dressing is used, change it at least every 48 hours. If a transparent semipermeable dressing is used, change it every 7 days, according to facility policy, or whenever it becomes moist or soiled. Change the tubing every 72 hours and the solution every 24 hours. Dressing, tubing, and solution changes for a CVAD should be performed using aseptic technique. (See Key steps in changing a central venous dressing.) Assess the site daily for signs and symptoms of complications, such as discharge, inflammation, and tenderness, and document your observations.
♦ To prevent an air embolism, close the catheter clamp or have the patient perform Valsalva’s maneuver each time that the catheter hub is open to air. A Groshong catheter doesn’t require clamping because it has a closed, valved-tip catheter.
♦ Long-term use of a CVAD, such as a Hickman catheter, a Broviac catheter, a Port, or a PICC, allows patients to receive all types of infusion therapies at home. These catheters have a much longer life than short-term devices because they’re less thrombogenic and less prone to infection.
A candidate for home therapy may have a family member or friend who can safely and competently administer the I.V. fluids, a backup helper, a suitable home environment, transportation, and the ability to prepare, handle, store, and dispose of the equipment. The care procedures used in the home are the same as those used in the facility.
The overall goal of home therapy is patient safety, so patient teaching must begin well before discharge. Most patients who receive home therapy learn to care for the catheter themselves and infuse their own medications and solution.
♦ Complications can occur at any time during infusion therapy. Traumatic complications such as pneumothorax typically occur at the time of catheter insertion, but may not be noticed until after the procedure is completed. Systemic complications such as sepsis typically occur later, during infusion therapy. Other complications include thrombus formation and air embolism.
Documentation
Record the date and time of insertion, the length and location of the catheter, the solution infused, the physician’s name, and the patient’s response to the procedure. Also document the time of the X-ray, its results, and your notification of the physician.
Finally, record the date and time of catheter removal and the type of antimicrobial ointment and dressing applied. Note the condition of the catheter insertion site.
Central venous pressure monitoring
In central venous pressure (CVP) monitoring, the physician inserts a catheter through a vein and advances it until its tip lies in or near the right atrium. Because no major valves lie at the junction of the vena cava and the right atrium, pressure at end diastole reflects back to the catheter. When connected to a manometer, the catheter measures CVP, an index of right ventricular function.
CVP monitoring helps you to assess cardiac function, evaluate venous return to the heart, and indirectly gauge how well the heart is pumping. The central venous (CV) line also provides access to a large vessel for rapid, highvolume fluid administration and allows frequent blood withdrawal for laboratory samples.
CVP monitoring can be done intermittently or continuously. The catheter is inserted percutaneously or using a cutdown method. Typically, a singlelumen CVP line is used for intermittent pressure readings. To measure the patient’s volume status, a disposable plastic water manometer is attached between the I.V. line and the central catheter with a three- or four-way stopcock. CVP is recorded in centimeters of water (cm H2O) or millimeters of mercury (mm Hg) and read from manometer markings.
CVP is highly individualized but usually ranges from 5 to 10 cm H2O. Any condition that alters venous return, circulating blood volume, or cardiac performance can affect CVP. If the circulating volume increases (such as with enhanced venous return to the heart), CVP rises. If the circulating volume decreases (such as with reduced venous return), CVP drops.
Equipment
For intermittent CVP monitoring
Disposable CVP manometer set ♦ leveling device (such as a rod from a reusable CVP pole holder or a carpenter’s level or rule) ♦ stopcock (to attach the CVP manometer to the catheter) ♦ I.V. pole ♦ I.V. solution, drip chamber, and tubing
For continuous CVP monitoring
Pressure monitoring kit with disposable pressure transducer ♦ leveling device ♦ bedside pressure module ♦ continuous I.V. flush solution ♦ 1 unit/1 to 2 ml of heparin flush solution ♦ pressure bag
♦ Confirm the patient’s identity using two patient identifiers.
♦ Gather the necessary equipment. Explain the procedure to the patient to reduce his anxiety.
♦ Assist the physician as he inserts the CV catheter. The procedure is similar to that used for pulmonary artery pressure monitoring, except that the catheter is advanced only as far as the superior vena cava.
Monitoring CVP intermittently with a water manometer
♦ With the CV line in place, position the patient flat. Use a leveling device to align the base of the disposable CVP manometer with the previously determined zero reference point. Because CVP reflects right atrial pressure, you must align the right atrium (zero reference point) with the zero mark on the manometer. To find the right atrium, locate the fourth intercostal space at the midaxillary line; this is the phlebostatic axis. Mark the appropriate place on the patient’s chest so that all subsequent recordings are made using the same location.
♦ If the patient can’t tolerate a flat position, place him in semi-Fowler’s position. When the head of the bed is elevated, the phlebostatic axis remains constant, but the midaxillary line changes. Use the same degree of elevation for all subsequent measurements.
♦ Attach the manometer to an I.V. pole or place it next to the patient’s chest. Make sure that the zero reference point is level with the right atrium. (See Measuring CVP with a water manometer.)
♦ Verify that the manometer is connected to the I.V. tubing. Typically, the markings on the manometer range from -2 to 38 cm H2O. However, manufacturer’s markings may differ, so read the directions before setting up the manometer and obtaining readings.
♦ Turn the stopcock off to the patient. Slowly fill the manometer with I.V. solution until the fluid level is 10 to 20 cm H2O higher than the expected CVP value. Don’t overfill the tube because fluid that spills over the top can become a source of contamination.
♦ Turn the stopcock off to the I.V. solution and open to the patient. The fluid level in the manometer will drop. When the fluid level comes to rest, it will fluctuate slightly with respirations. Expect it to drop during inspiration and to rise during expiration.
Measuring CVP with a water manometer
To ensure accurate central venous pressure (CVP) readings, make sure that the base of the manometer is aligned with the patient’s right atrium (the zero reference point). The manometer set usually contains a leveling rod to allow you to determine this alignment quickly.
After you adjust the position of the manometer, examine the typical three-way stopcock. By turning it to any position shown below, you can control the direction of fluid flow. Four-way stopcocks are also available.
♦ Record CVP at the end of expiration, when intrathoracic pressure has a negligible effect. Depending on the type of water manometer used, note the value either at the bottom of the meniscus or at the midline of the small floating ball.
♦ After obtaining the CVP value, turn the stopcock to resume the I.V. infusion. Adjust the drip rate as needed.
♦ Place the patient in a comfortable position.
Monitoring CVP continuously with a water manometer
Follow the procedure as outlined for monitoring CVP intermittently with a water manometer, except that the CVP system will be continuously hooked up for use.
♦ Make sure that the stopcock is turned so that the I.V. solution port, the CVP column port, and the patient port are open. With this stopcock position, infusion of the I.V. solution increases CVP. Therefore, expect higher readings than those taken with the stopcock turned off to the I.V. solution. If the I.V. solution infuses at a constant rate, CVP will change as the patient’s condition changes, although the initial reading will be higher. Assess the patient closely for changes.
Monitoring CVP continuously with a pressure monitoring system
♦ Make sure that the CV line or the proximal lumen of a pulmonary artery catheter is attached to the system. If the patient has a CV line with multiple lumens, one lumen may be dedicated to continuous CVP monitoring and the other lumens used for fluid administration.
♦ Set up a pressure transducer system. Connect noncompliant pressure tubing from the CVP catheter hub to the transducer. Then connect the continuous I.V. flush solution to the pressure tubing.
♦ To obtain values, position the patient flat. If he can’t tolerate this position, use semi-Fowler’s position. Locate the level of the right atrium by identifying the phlebostatic axis. Zero the transducer, leveling the transducer air-fluid interface stopcock with the right atrium. Read the CVP value from the digital display on the monitor, and note the waveform. Make sure that the patient is still when the reading is taken to prevent artifact. (See Identifying hemodynamic pressure monitoring problems.) Use this position for all subsequent readings.
♦ Raise the monitor screen pressure range, if necessary.
♦ Rebalance and recalibrate the equipment.
♦ Tighten loose connections.
♦ Check and tighten the connection.
♦ Position the stopcock correctly.
♦ Use the fast-flush valve to flush the line, or try to aspirate blood from the catheter. If the line remains blocked, notify the physician and prepare to replace the line.
Drifting waveforms
♦ Improper warmup
♦ Electrical cable kinked or compressed
♦ Temperature change in room air or I.V. flush solution
♦ Allow the monitor and transducer to warm up for 10 to 15 minutes.
♦ Place the monitor’s cable where it can’t be stepped on or compressed.
♦ Routinely zero and calibrate the equipment 30 minutes after setting it up. This allows I.V. fluid to warm to room temperature.
Line that doesn’t flush
♦ Stopcocks positioned incorrectly
♦ Inadequate pressure from a pressure bag
♦ Kink in the pressure tubing
♦ Blood clot in the catheter
♦ Make sure that the stopcocks are positioned correctly.
♦ Make sure that the pressure bag gauge reads 300 mm Hg.
♦ Check the pressure tubing for kinks.
♦ Try to aspirate the clot with a syringe. If the line still won’t flush, notify the physician and prepare to replace the line, if necessary. Important: Never use a syringe to flush a hemodynamic line.
Artifact (waveform interference)
♦ Patient movement
♦ Electrical interference
♦ Catheter fling (tip of the pulmonary artery [PA] catheter moving rapidly in a large blood vessel or heart chamber)
♦ Transducer balancing port positioned below the patient’s right atrium
♦ Flush solution flow rate too fast
♦ Air in the system
♦ Catheter fling (tip of the PA catheter moving rapidly in a large blood vessel or heart chamber)
♦ Wait until the patient is quiet before taking a reading.
♦ Make sure that the electrical equipment is connected and grounded correctly.
♦ Notify the physician, who may try to reposition the catheter.
♦ Position the balancing port level with the patient’s right atrium.
♦ Check the flush solution flow rate. Maintain it at 3 to 4 ml/hour.
♦ Remove air from the lines and the transducer.
♦ Notify the physician, who may try to reposition the catheter.
False-high readings
♦ Transducer balancing port positioned above the right atrium
♦ Transducer imbalance
♦ Loose connection
♦ Position the balancing port level with the patient’s right atrium.
♦ Make sure that the flow system of the transducer isn’t kinked or occluded, and rebalance and recalibrate the equipment.
♦ Make sure that the stopcock positions are correct, tighten loose connections, replace cracked equipment, flush the line with the fast-flush valve, and replace the transducer dome if blood backs up into it.
♦ Make sure that the transducer is kept at the level of the right atrium at all times. Improper levels give false-high or false-low pressure readings.
Damped waveform
♦ Arterial catheter out of the blood vessel or pressed against the vessel wall
♦ Ruptured balloon
♦ Reposition the catheter if it’s against the vessel wall.
♦ Try to aspirate blood to confirm proper placement in the vessel. If you can’t aspirate blood, notify the physician and prepare to replace the line. Note: Bloody drainage at the insertion site may indicate catheter displacement. Notify physician.
♦ Notify physician immediately for catheter replacement.
♦ If you feel no resistance when injecting air, or if you see blood leaking from the balloon inflation lumen, stop injecting air and notify the physician. If the catheter is left in, label the inflation lumen with a warning not to inflate.
♦ Deflate the balloon. Check the label on the catheter for the correct volume. Reinflate slowly with the correct amount. To avoid rupturing the balloon, never use more than the stated volume.
♦ Notify the physician. Obtain a chest X-ray.
Removing a CV access device
♦ You may assist the physician in removing a CV access device. (In some states, a nurse is permitted to remove the catheter when acting under a physician’s order or under advanced collaborative standards of practice.)
♦ If the head of the bed is elevated, minimize the risk of air embolism during catheter removal—for instance, by placing the patient in Trendelenburg’s position if the line was inserted using a superior approach. If he can’t tolerate this position, position him flat.
♦ Turn the patient’s head to the side opposite the catheter insertion site. The physician removes the dressing and exposes the insertion site. If sutures are in place, he removes them carefully.
♦ Turn the I.V. solution off.
♦ The physician pulls the catheter out in a slow, smooth motion and then applies pressure to the insertion site.
♦ Apply pressure with a dry sterile gauze pad immediately after the catheter is removed. Apply antimicrobial ointment to the catheter exit site to seal the site and prevent air embolism. Cover the site with a sterile 2″ × 2″ gauze pad, and place a transparent semipermeable dressing over the gauze. Keep the site covered until epithelialization has occurred.
♦ Assess the patient for signs of respiratory distress, which may indicate an air embolism.
Special considerations
♦ As ordered, arrange for daily chest X-rays to check the placement of the catheter.
♦ Care for the insertion site according to facility policy. Typically, you’ll change the dressing weekly.
♦ Wash your hands before performing dressing changes, and use aseptic technique and sterile gloves when redressing the site. When removing the old dressing, observe the patient for signs of infection, such as redness, and note patient complaints of tenderness. Cover the site with a clear, transparent semipermeable dressing.
♦ After the initial CVP reading, reevaluate readings frequently to establish a baseline for the patient. Authorities recommend obtaining readings at 15-, 30-, and 60-minute intervals to establish a baseline. If the patient’s CVP fluctuates by more than 2 cm H2O, suspect a change in his clinical status and report this finding to the physician.
♦ Change the I.V. solution every 24 hours and the I.V. tubing every 96 hours, according to facility policy. Label the I.V. solution, tubing, and dressing with the date, the time, and your initials.
♦ Assess the patient for complications of CVP monitoring, including pneumothorax (which typically occurs on catheter insertion), sepsis, thrombus, puncture of a vessel or an adjacent organ, and air embolism.
Documentation
Document all dressing, tubing, and solution changes. Also document the patient’s tolerance of the procedure, the date and time of catheter removal, and the type of dressing applied. Note the condition of the catheter insertion site and whether a culture specimen was collected. Note any complications as well as actions taken.
Chest physiotherapy
Chest physiotherapy (PT) includes postural drainage, coughing and deepbreathing exercises, and chest percussion and vibration. Together, these techniques mobilize and eliminate secretions, reexpand lung tissue, and promote efficient use of the respiratory muscles. Of critical importance to the bedridden patient, chest PT helps to prevent or treat atelectasis and may also help to prevent pneumonia, two respiratory complications that can seriously impede recovery.
Postural drainage performed with percussion and vibration encourages peripheral pulmonary secretions to empty by gravity into the major bronchi or trachea and is accomplished by sequential repositioning of the patient. Usually, secretions drain best with the patient positioned so that the bronchi are perpendicular to the floor. Lower and middle lobe bronchi usually empty best with the patient in the head-down position; upper lobe bronchi, in the head-up position. Percussing the chest with cupped hands mechanically dislodges thick, tenacious secretions from the bronchial walls. Vibration can be used with percussion or as an alternative to it in a patient who is frail, is in pain, or is recovering from thoracic surgery or trauma.
Candidates for chest PT include patients who expectorate large amounts of sputum, such as those with bronchiectasis or cystic fibrosis. The procedure hasn’t proved effective in treating patients with status asthmaticus, lobar pneumonia, or acute exacerbations of chronic bronchitis when the patient has scant secretions and is being mechanically ventilated. Chest PT has little value in the treatment of patients with stable, chronic bronchitis.
Contraindications include active pulmonary bleeding with hemoptysis and the immediate posthemorrhage stage, fractured ribs or an unstable chest wall, lung contusions, pulmonary tuberculosis, untreated pneumothorax, acute asthma or bronchospasm, lung abscess or tumor, bony metastasis, head injury, and recent myocardial infarction.
Equipment and preparation
Stethoscope ♦ emesis basin ♦ facial tissues ♦ pillows or folded towels for positioning ♦ gloves, face shield, and gown ♦ suction equipment as needed ♦ equipment for oral care ♦ trash bag
Gather the equipment at the bedside. Set up suction equipment, if needed, and test its function.
Implementation
♦ Confirm the patient’s identity using two patient identifiers.
♦ Check the order.
♦ Explain the procedure to the patient, provide privacy, and wash your hands.
♦ Put on gloves, face shield, and gown, and follow standard precautions.
♦ Auscultate the patient’s lungs with a stethoscope to determine the patient’s baseline respiratory status.
♦ Position the patient as necessary using pillows. For patients with generalized disease, drainage usually begins with the lower lobes, continues with the middle lobes, and ends with the upper lobes. For patients with localized disease, drainage begins with the affected lobes and proceeds to the other lobes to avoid spreading the disease to uninvolved areas.
♦ Instruct the patient to remain in each position for 10 to 15 minutes. During this time, perform percussion and vibration as ordered. (See Performing percussion and vibration.)
♦ After you perform postural drainage, percussion, or vibration, instruct the patient to cough to remove loosened secretions. First, tell him to inhale deeply through his nose and then to exhale in three short huffs. Then instruct him to inhale deeply again and then to cough through a slightly open mouth. Three consecutive coughs are highly effective. An effective cough sounds deep, low, and hollow; an ineffective one, highpitched. Have the patient exercise for about 1 minute, then have him rest for 2 minutes. Gradually progress to 10- minute exercise periods done four times daily.
Performing percussion and vibration
To perform percussion, instruct the patient to breathe slowly and deeply, using the diaphragm, to promote relaxation. Hold your hands in a cupped shape, with your fingers flexed and your thumbs pressed tightly against your index fingers. Percuss each segment for 1 to 2 minutes by alternating your hands against the patient in a rhythmic manner. Listen for a hollow sound on percussion to verify that you’re performing the technique correctly.
To perform vibration, ask the patient to inhale deeply and then to exhale slowly through pursed lips. While the patient exhales, firmly press your fingers and the palms of your hands against the chest wall. Tense the muscles of your arms and shoulders in an isometric contraction to send fine vibrations through the chest wall. Vibrate during five exhalations over each chest segment.
♦ If coughing is ineffective, suction the patient.
♦ Provide oral hygiene because secretions may have a foul taste or a stale odor. Dispose of secretions with suction equipment or tissues and a trash bag. Provide an emesis basin if needed.
♦ Monitor the patient’s response to treatment, and auscultate his lungs to evaluate the effectiveness of therapy.
Special considerations
♦ For optimal effectiveness and safety, modify chest PT according to the patient’s condition. For example, initiate or increase the flow of supplemental oxygen, if indicated. Also, suction the patient who has an ineffective cough reflex. If the patient tires quickly during therapy, shorten the sessions. Fatigue leads to shallow respirations and increased hypoxia. Chest PT should be limited to 30 minutes or less, as tolerated. Drainage of different lobes may need to be done during separate PT sessions.
♦ If the patient is receiving chest PT to prevent dehydration of mucus and promote easier mobilization, make sure that he takes in plenty of fluids. Avoid performing postural drainage immediately before or within 1½ hours after meals to avoid nausea and aspiration of food or vomitus.
♦ Because chest percussion can induce bronchospasm, adjunct treatment (for example, intermittent positive-pressure breathing, aerosol, or nebulizer therapy) should precede chest PT.
♦ Don’t perform percussion over the spine, liver, kidneys, or spleen to avoid injury to the spine or internal organs. Also, avoid performing percussion on bare skin or on a female patient’s breasts. Percuss over soft clothing (but not over buttons, snaps, or zippers), or place a thin towel over the chest wall. Remove jewelry that might scratch or bruise the patient.
Explain coughing and deep-breathing exercises preoperatively so that the patient can practice them when he’s pain-free and can concentrate better. Postoperatively, splint the patient’s incision using your hands or, if possible, teach the patient to splint it himself to minimize pain during coughing.
♦ Observe the patient for complications. During postural drainage in head-down positions, pressure on the diaphragm by abdominal contents can impair respiratory excursion and lead to hypoxia or postural hypotension. The head-down position may also lead to increased intracranial pressure, which precludes the use of chest PT in a patient with acute neurologic impairment. Vigorous percussion or vibration can cause rib fracture, especially if the patient has osteoporosis. In a patient with emphysema and blebs, coughing can lead to pneumothorax.
Documentation
Record the date and time of chest PT. Note the positions used to drain secretions and the length of time that each position is maintained. Also record the chest segments that are percussed or vibrated; the color, amount, odor, and viscosity of secretions produced and the presence of blood; complications that occur and nursing actions that are taken; and the patient’s tolerance of treatment.
Colostomy and ileostomy care
A patient with an ascending or transverse colostomy or an ileostomy must wear an external pouch to collect emerging fecal matter, which is typically watery or pasty. In addition to collecting waste matter, the pouch helps to control odor and protect the stoma and peristomal skin. Most disposable pouching systems can be used for 2 to 7 days; some models last even longer.
All pouching systems must be changed immediately if a leak develops, and every pouch must be emptied when it’s one-third to one-half full. The patient with an ileostomy may need to empty his pouch four or five times daily.
Naturally, the best time to change the pouching system is when the bowel is least active, usually 2 to 4 hours after meals. After a few months, most patients can predict the best changing time.
The selection of a pouching system should take into consideration which system provides the best adhesive seal and skin protection for the individual patient. The type of pouch selected also depends on the location and structure of the stoma, the availability of supplies, the wear time, the consistency of effluent, personal preference, and cost.
Equipment
Pouching system ♦ stoma measuring guide ♦ stoma paste (if drainage is watery to pasty or stoma secretes excess mucus) ♦ scissors ♦ water or pouchcleaning solution ♦ washcloth and towel ♦ closure clamp ♦ toilet or bedpan ♦ gloves ♦ facial tissue ♦ optional: ostomy belt, paper tape, mild nonmoisturizing soap, electric clippers ♦ prepared skin barrier ♦ gauze pad
Pouching systems may be drainable or closed-bottomed, disposable or reusable, adhesive-backed, and one- or two-piece. (See Comparing ostomy pouching systems.)
Comparing ostomy pouching systems
Manufactured in many shapes and sizes, ostomy pouches are fashioned for comfort, safety, and easy application. For example, a disposable, closed-end pouch may meet the needs of a patient who irrigates, who wants added security, or who wants to discard the pouch after each bowel movement. Another patient may prefer a reusable, drainable pouch. Some commonly available pouches are described below.
Disposable pouches
The patient who must empty his pouch often (because of diarrhea or a new colostomy or ileostomy) may prefer a one-piece, drainable, disposable pouch with a closure clamp attached to a skin barrier (below left).
These transparent or opaque, odorproof, plastic pouches come with attached adhesive or karaya seals. Some pouches have microporous adhesive or belt tabs. The bottom opening allows for easy draining. This pouch may be used permanently or temporarily, until the stoma size stabilizes.
Also disposable and made of transparent or opaque, odor-proof plastic, a onepiece, disposable, closed-end pouch (below right) may come in a kit with an adhesive seal, belt tabs, a skin barrier, or a carbon filter for gas release. A patient with a regular bowel elimination pattern may choose this style for added security and confidence.
A two-piece, disposable, drainable pouch with a separate skin barrier (shown below) permits frequent changes and minimizes skin breakdown. Also made of transparent or opaque, odor-proof plastic, this style comes with belt tabs and usually snaps to the skin barrier with a flange mechanism.
Reusable pouches
Typically manufactured from sturdy, opaque, hypoallergenic plastic, the reusable pouch comes with a separate, custom-made faceplate and O-ring (as shown below). Some pouches have a pressure valve for releasing gas. The device has a 1- to 2-month life span, depending on how frequently the patient empties the pouch.
Reusable equipment may benefit a patient who needs a firm faceplate or who wishes to minimize cost. However, many reusable ostomy pouches aren’t odorproof.
Implementation
♦ Provide privacy and emotional support.
Fitting the pouch and skin barrier
♦ For a pouch with an attached skin barrier, measure the stoma with the stoma-measuring guide. Select the opening size that matches the stoma.
♦ For an adhesive-backed pouch with a separate skin barrier, measure the stoma with the measuring guide and select the opening that matches the stoma. Trace the selected size opening onto the paper back of the skin barrier. Cut out the opening. (If the pouch has precut openings, which can be handy for a round stoma, select an opening that’s 1/8″ [3 mm] larger than the stoma. If the pouch comes without an opening, cut the hole 1/8″ wider than the measured tracing.) The cut-to-fit system works best for an irregularly shaped stoma.
♦ For a two-piece pouching system with flanges, see Applying a skin barrier and pouch.
♦ Avoid fitting the pouch too tightly because the stoma has no pain receptors. A constrictive opening could injure the stoma or the skin without the patient feeling the warning of discomfort. Avoid cutting the opening too big because a large opening may expose the skin to fecal matter and moisture.
♦ A patient with a descending or sigmoid colostomy who has formed stools and whose ostomy doesn’t secrete much mucus may choose to wear only a pouch. In this case, make sure that the pouch opening closely matches the stoma size.
♦ Between 6 weeks and 1 year after surgery, the stoma will shrink to its permanent size. At that point, patternmaking preparations won’t be needed unless the patient gains weight, has additional surgery, or injures the stoma.
Applying or changing the pouch
♦ Collect all equipment.
♦ Wash your hands and provide privacy.
♦ Explain the procedure to the patient. As you perform each step, explain what you’re doing and why because the patient will eventually perform the procedure himself.
♦ Put on gloves.
♦ Remove and discard the old pouch. Wipe the stoma and the peristomal skin gently with a facial tissue.
♦ Carefully wash the stoma with mild nonmoisturizing soap and water, and dry the peristomal skin by patting it gently. Allow the skin to dry thoroughly. Inspect the peristomal skin and stoma. If necessary, clip the surrounding hair (in a direction away from the stoma) to promote a better seal and avoid skin irritation from hair pulling against the adhesive.
♦ If you are applying a separate skin barrier, peel off the paper backing of the prepared skin barrier, center the barrier over the stoma, and press gently to ensure adhesion.
♦ You may want to outline the stoma on the back of the skin barrier (depending on the product) with a thin ring of stoma paste to provide extra skin protection. Skip this step if the patient has a sigmoid or descending colostomy, formed stools, and little mucus.
♦ Remove the paper backing from the adhesive side of the pouching system, and center the pouch opening over the stoma. Press gently to secure.
♦ For a pouching system with flanges, align the lip of the pouch flange with the bottom edge of the skin barrier flange. Gently press around the circumference of the pouch flange, beginning at the bottom, until the pouch adheres securely to the barrier flange. (The pouch will click into its secured position.) Hold the barrier against the skin, and gently pull on the pouch to confirm the seal between flanges.
Applying a skin barrier and pouch
Fitting a skin barrier and an ostomy pouch properly can be done in a few steps. The commonly used, two-piece pouching system with flanges is shown below.
Measure the stoma using a measuring guide.
Trace the appropriate circle carefully on the back of the skin barrier.
Cut the circular opening in the skin barrier. Bevel the edges to prevent them from irritating the patient.
Remove the backing from the skin barrier and moisten it or apply barrier paste as needed along the edge of the circular opening.
Center the skin barrier over the stoma, with the adhesive side down, and gently press it to the skin.
Gently press the pouch opening onto the ring until it snaps into place.
♦ Encourage the patient to stay quietly in position for about 5 minutes to improve adherence. The patient’s body warmth also helps to improve adherence and to soften a rigid skin barrier.
♦ Attach an ostomy belt to secure the pouch further, if desired. (Some pouches have belt loops, and others have plastic adapters for belts.)
♦ Leave a small amount of air in the pouch to allow drainage to fall to the bottom.
♦ Apply the closure clamp, if needed.
♦ If desired, apply paper tape in a picture-frame fashion to the pouch edges for additional security.
Emptying the pouch
♦ Put on gloves.
♦ Tilt the bottom of the pouch upward, and remove the closure clamp.
♦ Turn up a cuff on the lower end of the pouch, and allow the pouch to drain into the toilet or bedpan.
♦ Wipe the bottom of the pouch with a gauze pad, and reapply the closure clamp.
♦ The bottom portion of the pouch can be rinsed with cool tap water. Don’t aim water up near the top of the pouch because the water may loosen the seal on the skin.
♦ A two-piece flanged system can also be emptied by unsnapping the pouch. Let the drainage flow into the toilet.
♦ Release flatus through the gas release valve, if the pouch has one. Otherwise, release flatus by tilting the bottom of the pouch upward, releasing the clamp, and expelling the flatus. To release flatus from a flanged system, loosen the seal between the flanges.
♦ Never make a pinhole in a pouch to release gas. The hole destroys the odorproof seal.
♦ Remove and discard gloves.
Special considerations
♦ After you perform the procedure and explain it to the patient, encourage the patient’s increasing involvement in self-care.
♦ Use adhesive solvents and removers only after patch testing of the patient’s skin is performed. Some products may irritate the skin or produce hypersensitivity reactions. Consider using a liquid skin sealant, if available, to give the skin added protection from drainage and adhesive irritants.
♦ Remove the pouching system if the patient reports burning or itching beneath it or purulent drainage around the stoma. Notify the physician or therapist of skin irritation, breakdown, rash, or unusual appearance of the stoma or peristomal area.
♦ Use commercial pouch deodorants, if desired. However, most pouches are odor-free, and odor should be evident only when you empty the pouch or if it leaks. Before the patient is discharged, suggest that he avoid odor-causing foods, such as fish, eggs, onions, and garlic.
♦ If the patient wears a reusable pouching system, suggest that he obtain two or more systems so that he can wear one while the other dries after it is cleaned with soap and water or a commercially prepared cleaning solution.
♦ Failure to fit the pouch properly over the stoma or improper use of a belt can injure the stoma. Be alert for a possible allergic reaction to adhesives or other ostomy products.
Documentation
Record the date and time of the pouching system change, and note the character of drainage, including color, amount, type, and consistency. Describe the appearance of the stoma and the peristomal skin. Document patient teaching, and describe the teaching content. Record the patient’s response to self-care, and evaluate his learning progress.
Colostomy irrigation
Irrigation of a colostomy can serve two purposes: It allows a patient with a descending or sigmoid colostomy to regulate bowel function, and it cleans the large bowel before and after tests, surgery, or other procedures.
Colostomy irrigation may begin as soon as bowel function resumes after surgery. However, most clinicians recommend waiting until the patient’s bowel movements are more predictable. Initially, the nurse or the patient irrigates the colostomy at the same time every day, recording the amount of output and any spillage that occurs between irrigations. Between 4 and 6 weeks may pass before colostomy irrigation establishes a predictable pattern of elimination.
Equipment and preparation
Colostomy irrigation set (contains an irrigation drain or sleeve, an ostomy belt [if needed] to secure the drain or sleeve, water-soluble lubricant, drainage pouch clamp, and irrigation bag with clamp, tubing, and cone tip) ♦ 1 L of tap water irrigant warmed to about 105° F (40.6° C) ♦ warmed normal saline solution (for cleansing enemas) ♦ I.V. pole or wall hook ♦ washcloth and towel ♦ water ♦ ostomy pouching system ♦ linen-saver pad ♦ gloves ♦ optional: bedpan or chair, mild nonmoisturizing soap, rubber band or clip, and small dressing, bandage, or commercial stoma cap
Depending on the patient’s condition, irrigation of the colostomy may be performed in bed using a bedpan or in the bathroom using the toilet or a chair. Set up the irrigation bag with tubing and a cone tip. For irrigation with the patient in bed, place the bedpan beside the bed and elevate the head of the bed to between 45 and 90 degrees, if allowed. For irrigation in the bathroom, have the patient sit on the toilet or on a chair facing the toilet, whichever he finds more comfortable.
Fill the irrigation bag with warmed tap water (or normal saline solution, if the irrigation is to clean the bowel). Hang the bag on the I.V. pole or a wall hook. The bottom of the bag should be at the patient’s shoulder level to prevent fluid from entering the bowel too quickly. Most irrigation sets also have a clamp that regulates the flow rate.
Prime the tubing with irrigant to prevent air from entering the colon and possibly causing cramps and gas pains.
Implementation
♦ Confirm the patient’s identity using two patient identifiers.
♦ Explain each step of the procedure to the patient because he’ll probably be irrigating the colostomy himself.
♦ Provide privacy, and wash your hands.
♦ If the patient is in bed, place a linen-saver pad under him to protect the sheets from getting soiled.
♦ Put on gloves.
♦ If the patient uses an ostomy pouch, remove it.
♦ Place the irrigation sleeve over the stoma. If the sleeve doesn’t have an adhesive backing, secure the sleeve with an ostomy belt. If the patient has a two-piece pouching system with flanges, snap off the pouch and save it. Snap on the irrigation sleeve.
♦ Place the open-ended bottom of the irrigation sleeve in the bedpan or toilet to promote drainage by gravity. If necessary, cut the sleeve so that it meets the water level inside the bedpan or toilet. Effluent may splash from a short sleeve or may not drain from a long sleeve.
♦ Lubricate your gloved small finger with water-soluble lubricant, and insert the gloved finger into the stoma. If you’re teaching the patient, have him do this to determine the bowel angle at which to insert the cone safely. Expect the stoma to tighten when the finger enters the bowel and then to relax in a few seconds.
♦ Lubricate the cone with watersoluble lubricant to prevent it from irritating the mucosa.
♦ Insert the cone into the top opening of the irrigation sleeve and then into the stoma. Angle the cone to match the bowel angle. Insert the cone gently, but snugly; never force it into place.
♦ Unclamp the irrigation tubing, and allow the water to flow slowly. If you don’t have a clamp to control the flow rate of the irrigant, pinch the tubing to control the flow. The water should enter the colon over a period of 5 to 10 minutes. (If the patient reports cramping, slow or stop the flow, keep the cone in place, and have the patient take a few deep breaths until the cramping stops.) Cramping during irrigation may result from a bowel that’s ready to empty, water that’s too cold, a rapid flow rate, or air in the tubing.
♦ Have the patient remain stationary for 15 to 20 minutes to allow the initial effluent to drain.
♦ If the patient is ambulatory, he can stay in the bathroom until all effluent empties, or he can clamp the bottom of the drainage sleeve with a rubber band or clip and return to bed. Explain that ambulation and activity stimulate elimination. Suggest that the nonambulatory patient lean forward or massage his abdomen to stimulate elimination.
♦ Wait about 45 minutes for the bowel to finish eliminating the irrigant and effluent. Then remove the irrigation sleeve.
♦ If the irrigation was intended to clean the bowel, repeat the procedure with warmed normal saline solution until the return solution appears clear.
♦ Using a washcloth, mild nonmoisturizing soap, and water, gently clean the area around the stoma. Rinse and dry the area thoroughly with a clean towel.
♦ Inspect the skin and stoma for changes in appearance. Although it’s usually dark pink to red, the color of the stoma may change with the patient’s status. Notify the physician of marked changes in stoma color. A pale hue may result from anemia. Substantial darkening suggests a change in blood flow to the stoma.
♦ Apply a clean pouch. If the patient has a regular pattern of bowel elimination, he may prefer a small dressing, bandage, or commercial stoma cap.
♦ If the irrigation sleeve is disposable, discard it. If the irrigation sleeve is reusable, rinse it and hang it to dry along with the irrigation bag, tubing, and cone.
Special considerations
♦ Irrigating a colostomy to establish a regular bowel elimination pattern isn’t successful in all patients. If the bowel continues to move between irrigations, try decreasing the volume of irrigant. Increasing the volume of irrigant won’t help, because it only stimulates peristalsis. Keep a record of results. Also consider irrigating every other day.
♦ Irrigation may help regulate bowel function in patients with a descending or sigmoid colostomy because this is the bowel’s stool storage area. However, a patient with an ascending or transverse colostomy won’t benefit from irrigation. A patient with a descending or sigmoid colostomy who’s missing part of the ascending or transverse colon may not be able to irrigate successfully, because his ostomy may function as an ascending or transverse colostomy.
♦ If diarrhea develops, discontinue irrigations until stools form again. Irrigation alone won’t achieve regularity for the patient. He must also observe a complementary diet and exercise regimen.
♦ If the patient has a strictured stoma that prohibits cone insertion, remove the cone from the irrigation tubing and replace it with a soft silicone catheter. Angle the catheter gently 2″ to 4″ (5 to 10 cm) into the bowel to instill the irrigant. Don’t force the catheter into the stoma, and don’t insert it farther than the recommended length because you may perforate the bowel.
♦ Observe the patient for complications. Bowel perforation may occur if a catheter is incorrectly inserted into the stoma. Fluid and electrolyte imbalances may result from using too much irrigant.
Documentation
Record the date and time of irrigation and the type and amount of irrigant used. Note the color of the stoma and the character of drainage, including its color, consistency, and amount. Record patient teaching. Describe the teaching content and the patient’s response to self-care instruction. Evaluate the patient’s learning progress.
Defibrillation
The 2005 American Heart Association guidelines identify defibrillation as the standard treatment for ventricular fibrillation after cardiopulmonary resuscitation (CPR). CPR prolongs the time that defibrillation can occur, but CPR alone isn’t likely to correct ventricular fibrillation, so early defibrillation is critical.
Defibrillation involves using electrode paddles to direct an electric current through the patient’s heart. The current causes the myocardium to depolarize, which in turn encourages the sinoatrial node to resume control of the electrical activity of the heart. The electrode paddles that deliver the current may be placed on the patient’s chest or, during cardiac surgery, directly on the myocardium.
Because ventricular fibrillation leads to immediate death if it isn’t corrected, the success of defibrillation depends on early recognition and quick treatment of this arrhythmia. In addition to treating ventricular fibrillation, defibrillation may be used to treat ventricular tachycardia that doesn’t produce a pulse.
Patients with a history of ventricular fibrillation may be candidates for an implantable cardioverter-defibrillator, a sophisticated device that automatically discharges an electric current when it senses a ventricular tachyarrhythmia. (See Understanding the ICD, page 308.)
Equipment
Defibrillator with electrocardiogram (ECG) monitor and recorder ♦ external paddles ♦ conductive medium pads ♦ oxygen therapy equipment ♦ handheld resuscitation bag ♦ emergency cardiac medications
Implementation
♦ Assess the patient to determine if he lacks a pulse. Call for help, and perform cardiopulmonary resuscitation (CPR) until the defibrillator and other emergency equipment arrive.
♦ If the defibrillator has “quick look” capability, place the external paddles on the patient’s chest to view his cardiac rhythm quickly. Otherwise, connect the monitoring leads of the ECG monitor with recorder to the patient, and assess his cardiac rhythm. If ventricular fibrillation or pulseless ventricular tachycardia occurs, prepare to defibrillate the patient.
♦ Expose the patient’s chest, and apply conductive medium pads at the paddle placement positions. For anterolateral placement, place one paddle to the right of the upper sternum, just below the right clavicle, and the other over the fifth or sixth intercostal space at the left anterior axillary line. For anteroposterior placement, place the anterior paddle directly over the heart at the precordium, to the left of the lower sternal border. Place the flat posterior paddle under the patient’s body, beneath the heart and immediately below the scapulae, but not under the vertebral column.
Understanding the ICD
The implantable cardioverter-defibrillator (ICD) has a programmable pulse generator and lead system that monitors the activity of the heart, detects ventricular bradyarrhythmias and tachyarrhythmias, and responds with appropriate therapies. The range of therapies includes antitachycardia and bradycardia pacing, cardioversion, and defibrillation. Newer defibrillators can also provide dual-chamber or biventricular pacing.
Implantation of an ICD is similar to that of a permanent pacemaker. The cardiologist positions the lead (or leads) transvenously in the endocardium of the right ventricle (and the right atrium, if both chambers require pacing). The lead connects to a generator box, which is implanted on the left or right side of the upper chest, near the clavicle.
Never place defibrillator paddles over an implanted pacemaker.
♦ Turn on the defibrillator. For external defibrillation in an adult patient, set the energy level to 360 joules, unless using a biphasic defibrillator, which utilizes lower energy settings. (See Biphasic defibrillators.)
♦ Charge the paddles by pressing the charge buttons, which are located either on the machine or on the paddles.
♦ Place the paddles over the conductive pads and press firmly against the patient’s chest, using 25 lb (11.3 kg) of pressure.
♦ Reassess the patient’s cardiac rhythm.
♦ If the patient remains in ventricular fibrillation or pulseless ventricular tachycardia, instruct all personnel to stand clear of the patient and the bed.
♦ Discharge the current by pressing both paddle charge buttons simultaneously.
♦ Resume CPR immediately. Perform five cycles of CPR and then reassess the patient’s rhythm.
♦ If necessary, prepare to defibrillate a second time. Instruct a colleague to set the energy level on the defibrillator to 360 joules. Announce that you’re preparing to defibrillate, and follow the procedure described earlier.
♦ Resume CPR immediately. Perform five cycles of CPR and reassess the patient. If defibrillation is needed again, instruct a colleague to set the energy level to 360 joules. Then follow the same procedure as before.
♦ If the patient still has no pulse after three initial defibrillations, resume CPR, give supplemental oxygen, and begin administration of appropriate emergency cardiac medications such as antiarrhythmics. Also, consider possible causes for failure of the patient’s rhythm to convert, such as acidosis or hypoxia.
♦ If defibrillation restores a normal rhythm, check the patient’s central and peripheral pulses and measure the patient’s blood pressure, heart rate, and respiratory rate. Assess the patient’s level of consciousness, cardiac rhythm, breath sounds, skin color, and urine output. Obtain baseline arterial blood gas values and a 12-lead ECG. Provide supplemental oxygen, ventilation, and medications as needed. Check the patient’s chest for electrical burns, and treat them as ordered with corticosteroid or lanolin-based creams. Also, prepare the defibrillator for immediate reuse.
Only gold members can continue reading. Log In or Register to continue
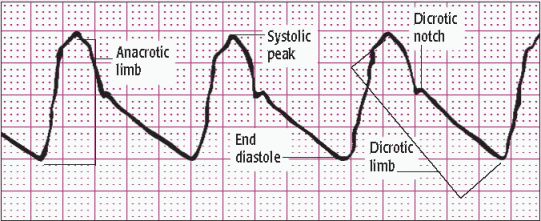
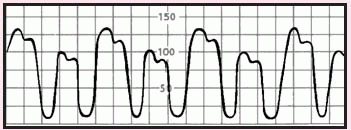
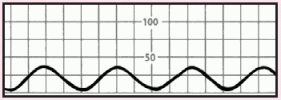
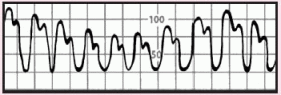
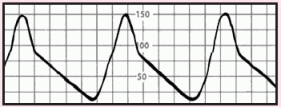
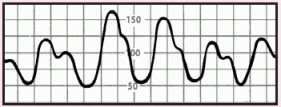
 AEDs can be used in children ages 1 to 8. For this age-group, an AED with a pediatric dose attenuator system should be used, if available.
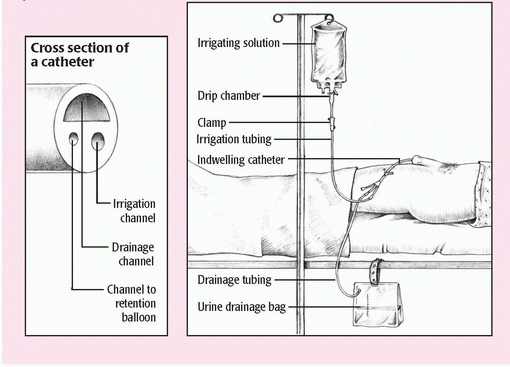
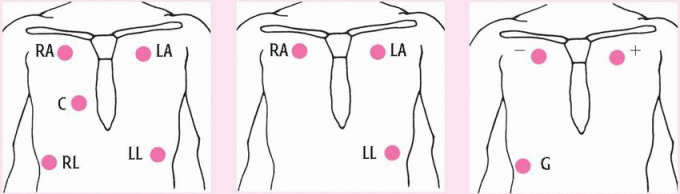
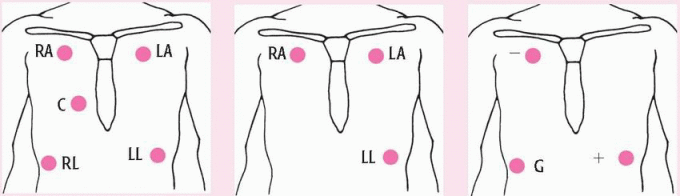
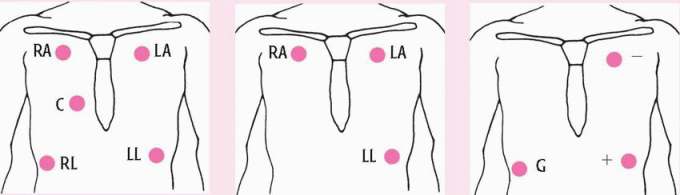
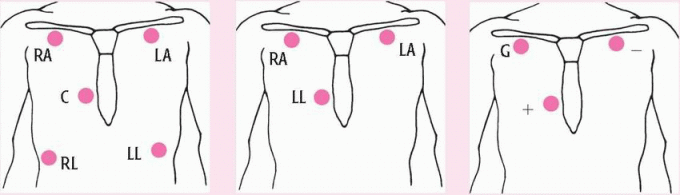
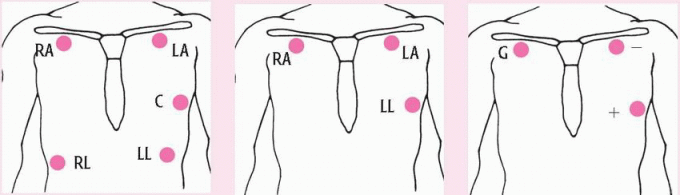
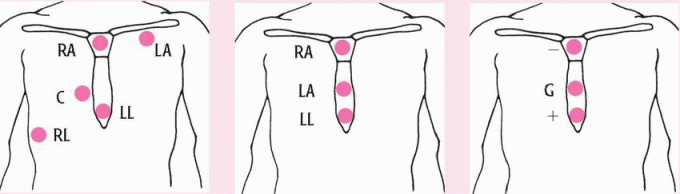
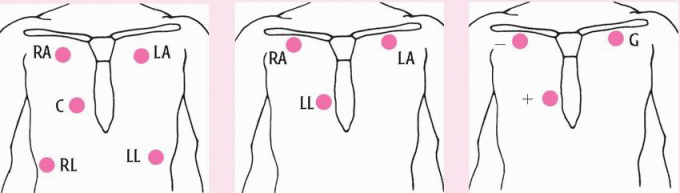
 If the patient is being monitored by telemetry, show him how the transmitter works. If applicable, show him the button that can produce a recording of his ECG at the central station. Teach him how to push the button whenever he has symptoms. Explain that pushing the button causes the central console to print a rhythm strip. Tell the patient to remove the transmitter if he takes a shower or bath, but explain that he should let you know before he removes the unit.
 For children, you’ll need to adjust the computation constant to reflect a smaller volume and a smaller catheter size.
 With children, withdraw 3 ml or less.
 The normal CI for infants and children is 3.5 to 4 L/minute/m2; for elderly adults, it’s 2 to 2.5 L/minute/m2.
 If you suspect a head or neck injury, move the patient as little as possible to reduce the risk of paralysis.
 If you detect a pulse, don’t start chest compressions. Instead, do rescue breathing, giving 10 to 12 breaths (one for every 5 to 6 seconds). After 2 minutes, recheck the pulse. You should give each breath over 1 second, and the breath should cause the chest to rise visibly. After 2 minutes, recheck the patient’s pulse, but spend no more than 10 seconds doing so.
 Don’t change hand position during compressions; you might injure the patient.
 CPR can cause complications, especially if the compressor’s hands are placed improperly on the sternum. Such complications include fractured ribs, liver laceration, and punctured lungs. Gastric distention may result from giving too much air during ventilation.
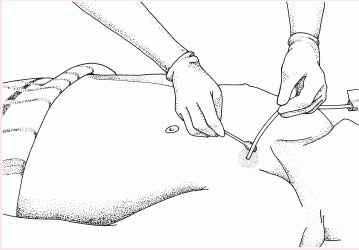
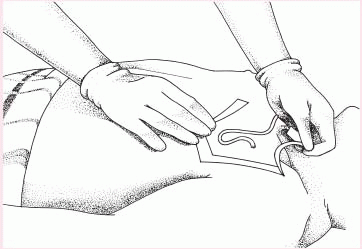
 A candidate for home therapy may have a family member or friend who can safely and competently administer the I.V. fluids, a backup helper, a suitable home environment, transportation, and the ability to prepare, handle, store, and dispose of the equipment. The care procedures used in the home are the same as those used in the facility.
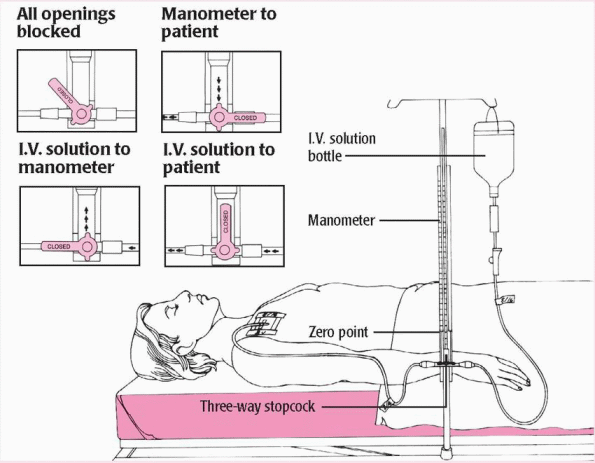
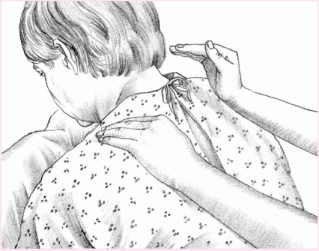
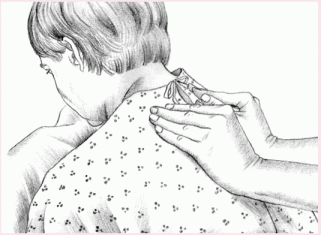
 Explain coughing and deep-breathing exercises preoperatively so that the patient can practice them when he’s pain-free and can concentrate better. Postoperatively, splint the patient’s incision using your hands or, if possible, teach the patient to splint it himself to minimize pain during coughing.
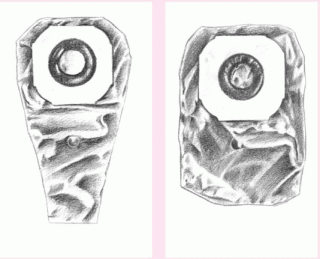
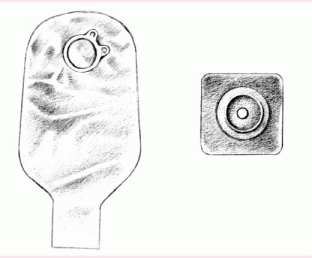
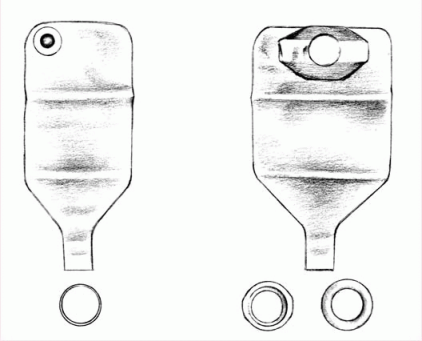
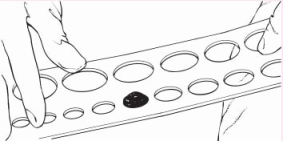
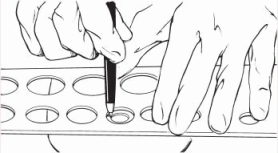
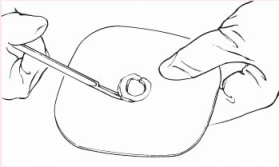

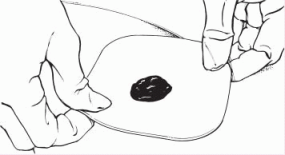
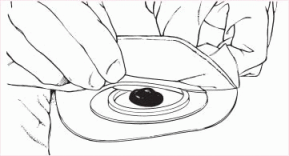
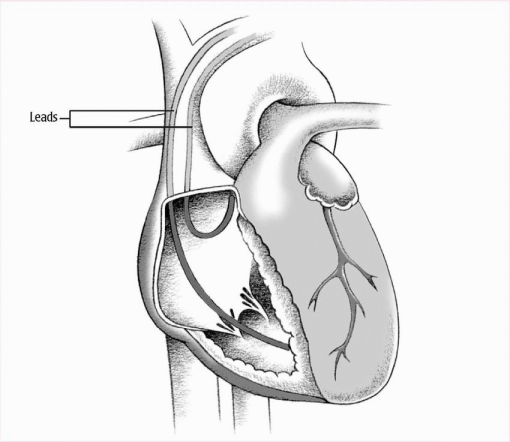
 Never place defibrillator paddles over an implanted pacemaker.


