Assessment
Reviewing the techniques
Reviewing the techniques
Reviewing assessment techniques
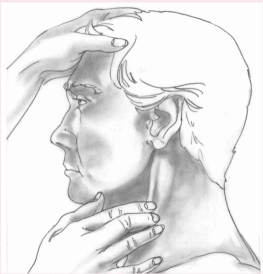
Performing a 10-minute assessment
You won’t always want or need to assess a patient in 10 minutes. However, rapid assessment is crucial when you must intervene quickly—such as when a hospitalized patient has a change in his physical, mental, or emotional status.
You may also perform a rapid assessment to confirm a diagnostic finding. For example, if arterial blood gas analysis indicates a low oxygen content, you’ll quickly assess the patient for other signs of oxygen deprivation, such as increased respiratory rate and cyanosis.
General guidelines
Assess the patient quickly and systematically. To save time, cover some of the assessment components simultaneously. For example, make your general observations while checking the patient’s vital signs or asking history questions.
Be flexible. You won’t necessarily use the same sequence each time. Let the patient’s chief complaint and your initial observations guide your assessment. You may be unable to obtain a quick history and instead will need to rely on your observations and the information on the patient’s chart.
Keep the patient calm and cooperative. If you don’t know him, first introduce yourself by name and title. Remain calm, and reassure him that you can help. If your demeanor can reduce his anxiety, he’ll be more likely to give you accurate information.
Avoid drawing quick conclusions. In particular, don’t assume that the patient’s current symptom is related to his admitting diagnosis.
When every minute counts, follow these steps.
Assess airway, breathing, and circulation
As your first priority, this assessment may consist of just a momentary observation. However, when a patient appears to be unconscious or has difficulty breathing, you’ll assess him more thoroughly to detect the problem and allow immediate intervention.
Make general observations
Note the patient’s mental status, general appearance, and level of consciousness (LOC) for clues about the nature and severity of his condition.
Assess vital signs
Take the patient’s body temperature, pulse, respiratory rate, and blood pressure. They provide a quick overview of his physiologic condition as well as valuable information about the heart, lungs, and blood vessels. The seriousness of the patient’s chief complaint and your general observations of his condition will determine how extensively you measure vital signs. Chief complaint is further discussed in chapter 2.
 A patient’s age, activity level, and physical and emotional condition may affect his vital signs. Compare with the patient’s baseline, if available.
Conduct the health history
Use pointed questions to explore the patient’s perception of his chief complaint. Find out what’s bothering him the most. Ask him to quantify the problem. For instance, does he feel worse today than he did yesterday? Such questions will help you to focus your assessment. If you’re in a hurry
or if the patient can’t respond, obtain information from other sources, such as family members, admission forms, the medical history, and the patient’s chart.
or if the patient can’t respond, obtain information from other sources, such as family members, admission forms, the medical history, and the patient’s chart.
Perform the physical examination
Begin by concentrating on areas related to the patient’s chief complaint—the abdomen, for example, if the patient complains of abdominal pain. Compare the results with baseline data, if available.
You may have to perform a complete head-to-toe or body systems assessment—for instance, if a patient is unresponsive (yet has no breathing or circulatory problems) or is confused and, thus, unreliable. However, in most cases, the patient’s chief complaint, your general observations, and your findings about the patient’s vital signs will guide your assessment.
Guidelines for an effective interview
When you have time for a full assessment, begin by interviewing the patient. Developing an effective interviewing technique will help you to collect pertinent health history information efficiently. Use these guidelines to enhance your interviewing skills.
Be prepared
♦ Before the interview, review all available information. Read the current clinical records and, if applicable, previous records. This will focus the interview, prevent the patient from tiring, and save you time.
♦ Review with the patient what you’ve learned to ensure that the information is correct. Keep in mind that the patient’s current complaint may be unrelated to his history.
Create a pleasant interviewing atmosphere
♦ Select a quiet, well-lit, and relaxing setting. Keep in mind that extraneous noise and activity can interfere with concentration, as can excessive or insufficient light. A relaxing atmosphere eases the patient’s anxiety, promotes comfort, and conveys your willingness to listen.
♦ Ensure privacy. Some patients won’t share personal information if they suspect that others can overhear. You may, however, let friends or family members remain if the patient requests it or if he needs their help.
♦ Make sure that the patient feels as comfortable as possible. If the patient is tired, short of breath, or frightened, provide care and reschedule the history taking.
♦ Take your time. If you appear rushed, you may distract the patient. Give him your undivided attention. If you have little time, focus on specific areas of interest and return later instead of hurrying through the entire interview.
Establish a good rapport
♦ Sit and chat with the patient for a few minutes before the interview. Standing may suggest that you’re in a hurry, leading the patient to rush and omit important information.
♦ Explain the purpose of the interview. Emphasize how the patient benefits when the health care team has the information needed to diagnose and treat a disorder.
♦ Show your concern for the patient’s story. Maintain eye contact, and occasionally repeat what he tells you. If you seem preoccupied or uninterested, he may choose not to confide in you.
♦ Encourage the patient to help you to develop a realistic plan of care that will serve his perceived needs.
Set the tone and focus
♦ Encourage the patient to talk about his chief complaint. This helps you to focus on his most troublesome signs and symptoms and provides an opportunity to assess the patient’s emotional state and level of understanding.
♦ Keep the interview informal but professional. Allow the patient time to answer questions fully and to add his own perceptions.
♦ Speak clearly and simply. Avoid using medical terms.
 Make sure the patient hears and understands you, especially if he’s elderly. If you think he misunderstands, ask him to restate what you’ve discussed.
♦ Pay close attention to the patient’s words and actions, interpreting not only what he says but also what he doesn’t say.
 If the patient is a child, direct as many questions as possible to him. Rely on the parents for information if the child is very young.
Choose your words carefully
♦ Ask open-ended questions to encourage the patient to provide complete and pertinent information. Avoid yes-or-no questions.
♦ Listen carefully to the patient’s answers. Use his words in your subsequent questions to encourage him to elaborate on his signs, symptoms, and other problems.
Take notes
♦ Avoid documenting everything during the interview, but make sure to jot down important information, such as dates, times, and key words or phrases. Use these to help you recall the complete history for the medical record.
♦ If you’re tape-recording the interview, obtain written consent from the patient.
Assessing overall health
For a quick look at the patient’s overall health, ask these questions:
♦ Has your weight changed? Do your clothes, rings, and shoes fit?
♦ Do you have nonspecific signs and symptoms, such as weakness, fatigue, night sweats, or fever?
♦ Can you keep up with your normal daily activities?
♦ Have you had any unusual symptoms or problems recently?
♦ How many colds or other minor illnesses have you had in the last year?
♦ What prescription and over-thecounter drugs and supplements do you take?
Assessing activities of daily living
For a comprehensive look at the patient’s health and health history, ask these questions:
Diet and elimination
♦ How would you describe your appetite?
♦ What do you normally eat in a 24-hour period?
♦ What foods do you like and dislike? Is your diet restricted at all?
♦ How much fluid do you drink during an average day?
♦ Are you allergic to any food?
♦ Do you prepare your meals, or does someone prepare them for you?
♦ Do you go to the grocery store, or does someone else shop for you?
♦ Do you snack and, if so, on what?
♦ Do you eat a variety of foods?
♦ Do you have enough money to purchase the groceries you need?
♦ When do you usually go to the bathroom? Has this pattern changed recently?
♦ Do you take any foods, fluids, or drugs to maintain your normal elimination patterns?
Performing palpation techniques
Palpation uses pressure to assess structure size, placement, pulsation, and tenderness. Ballottement, a variation, involves bouncing tissues against the hand to assess rebound of floating structures. Ballottement can be used to assess a mass in a patient with ascites.
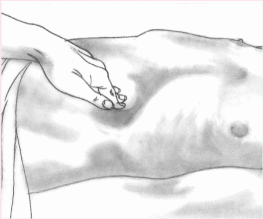
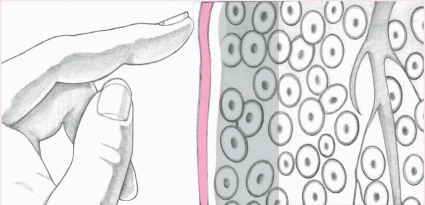
Light palpation
To perform light palpation, press gently on the skin, indenting it ½″ to ¾″ (1 to 2 cm). Use the lightest touch possible; too much pressure blunts your sensitivity. Close your eyes to concentrate on feeling.
|
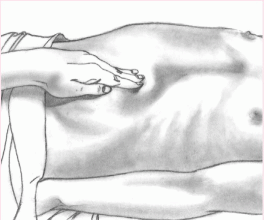
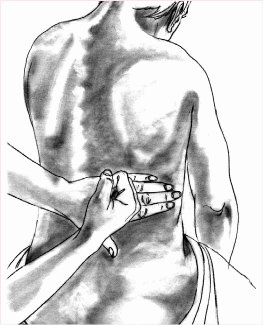
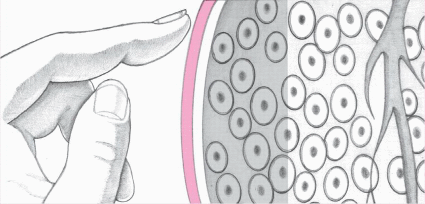
Deep palpation
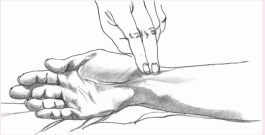
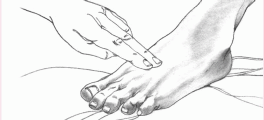
To perform deep palpation, indent the skin about 1½″ (4 cm). Place your other hand on top of the palpating hand to control and guide your movements. To perform a variation of deep palpation that allows you to pinpoint an inflamed area, push down slowly and deeply, then lift your hand away quickly. If the patient complains of increased pain as you release the pressure, you have identified rebound tenderness.
Use both hands (bimanual palpation) to trap a deep, hard-to-palpate organ (such as the kidney or spleen) or to fix or stabilize an organ (such as the uterus) while palpating with the other hand.
|

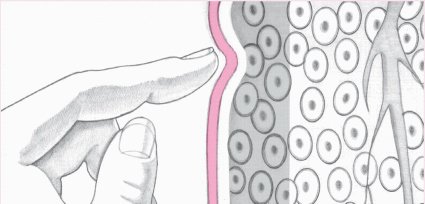
Light ballottement
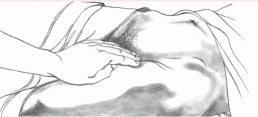
To perform light ballottement, apply light, rapid pressure from quadrant to quadrant of the patient’s abdomen. Keep your hand on the surface of the skin to detect tissue rebound.
|
Performing percussion techniques
Percussion has two basic purposes: to produce percussion sounds and to elicit tenderness. It involves three types: indirect, direct, and blunt percussion.
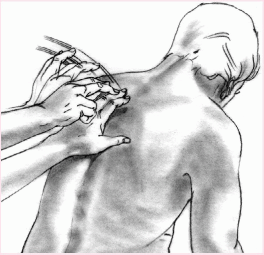
Indirect percussion
The most commonly used method, indirect percussion, produces clear, crisp sounds when performed correctly. To perform indirect percussion, use the second finger of your nondominant hand as the pleximeter (the mediating device used to receive the taps) and the middle finger of your dominant hand as the plexor (the device used to tap the pleximeter). Place the pleximeter finger firmly against a body surface, such as the upper back or abdomen. With your wrist flexed loosely, use the tip of your plexor finger to deliver a crisp blow just beneath the distal joint of the pleximeter. Make sure you hold the plexor perpendicular to the pleximeter. Tap lightly and quickly, removing the plexor as soon as you have delivered each blow.
|
Direct percussion
To perform direct percussion, tap your hand or fingertip directly against the body surface as shown at the top of the next column. This method helps assess an adult’s sinuses for tenderness.
|
Blunt percussion
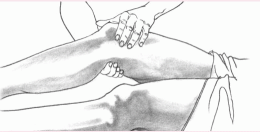
To perform blunt percussion, strike the ulnar surface of your fist against the body surface. Alternatively, you may use both hands by placing the palm of one hand over the area to be percussed and then making a fist with the other hand and using it to strike the back of the first hand. Both techniques aim to elicit tenderness— not to create a sound—over organs such as the kidneys. (Another blunt percussion method, used in the neurologic examination, involves tapping a rubber-tipped reflex hammer against a tendon to create a reflexive muscle contraction.)
|
Identifying percussion sounds | ||||||||||||||||||||||||||||||||||||||||||
|---|---|---|---|---|---|---|---|---|---|---|---|---|---|---|---|---|---|---|---|---|---|---|---|---|---|---|---|---|---|---|---|---|---|---|---|---|---|---|---|---|---|---|
| ||||||||||||||||||||||||||||||||||||||||||
Performing auscultation
Auscultation of body sounds—particularly those produced by the heart, lungs, blood vessels, stomach, and intestines—detects both high-pitched and low-pitched sounds. Although you can perform auscultation directly over a body area using only your ears, you’ll typically perform it indirectly, using a stethoscope.
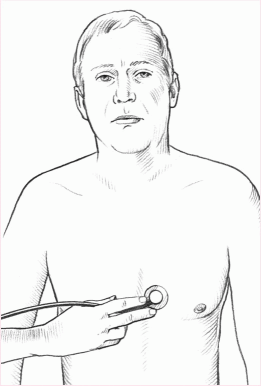
Assessing high-pitched sounds
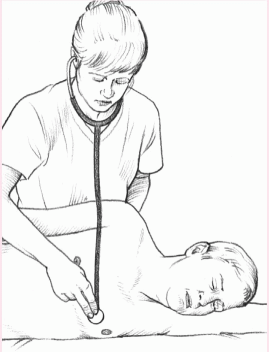
To assess high-pitched sounds properly, such as breath sounds and first and second heart sounds, use the diaphragm of the stethoscope. Make sure you place the entire surface of the diaphragm firmly on the patient’s skin. If the area is excessively hairy, you can improve diaphragm contact and reduce extraneous noise by applying water or water-soluble jelly to the skin before auscultating.
|
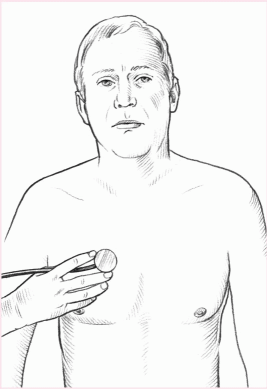
Assessing low-pitched sounds
To assess low-pitched sounds, such as heart murmurs and third and fourth heart sounds, lightly place the bell of the stethoscope on the appropriate area. Don’t exert pressure. If you do, the patient’s chest will act as a diaphragm and you will miss low-pitched sounds. If the patient is extremely thin or emaciated, use a stethoscope with a pediatric chest piece.
|
Exercise and sleep
♦ Do you have a special exercise program? What is it? How long have you been following it? How do you feel after exercising?
♦ How many hours do you sleep each day? When? Do you feel rested afterward?
♦ Do you fall asleep easily?
♦ Do you take any drugs or do anything special to help you to fall asleep?
♦ What do you do when you can’t sleep?
♦ Do you wake up during the night?
♦ Do you have sleepy spells during the day? When?
♦ Do you routinely take naps?
♦ Do you have any recurrent, disturbing dreams?
♦ Have you ever been diagnosed with a sleep disorder, such as narcolepsy or sleep apnea?
Recreation
♦ What do you do when you aren’t working?
♦ What kind of unpaid work do you do for enjoyment?
♦ How much leisure time do you have?
♦ Are you satisfied with what you can do in your leisure time?
♦ Do you and your family share leisure time?
♦ How do your weekends differ from your weekdays?
Tobacco, alcohol, and drugs
♦ Do you use tobacco? If so, what kind? How much do you use each day? Each week? When did you start using it? Have you ever tried to stop?
♦ Do you drink alcoholic beverages? If so, what kind (beer, wine, whiskey)?
♦ How much alcohol do you drink each day? Each week? What time of day do you usually drink?
♦ Do you usually drink alone or with others?
♦ Do you drink more when you’re under stress?
♦ Has drinking ever hampered your job performance or personal relationships?
♦ Do you or does anyone in your family worry about your drinking?
♦ Do you feel dependent on alcohol?
♦ Do you feel dependent on coffee, tea, or soft drinks? How much of these beverages do you drink in an average day?
♦ Do you use drugs that aren’t prescribed by a physician (marijuana, cocaine, heroin, steroids, sleeping pills, tranquilizers)?
Assessing the family
When assessing how and to what extent the patient’s family fulfills its functions, remember to assess both the family into which the patient was born (family of origin) and, if different, the patient’s current family.
Because the following questions target a nuclear family—that is, mother, father, and children—you may need to modify them somewhat for other types of families, such as single-parent families, families that include grandparents, patients who live alone, or unrelated individuals who live as a family. Remember, you’re assessing the patient’s perception of family function.
Affective function
To assess how family members regard each other, ask these questions:
♦ How do the members of your family treat each other?
♦ How do they feel about each other?
♦ How do they regard each other’s needs and wants?
♦ How are feelings expressed in your family?
♦ Can family members safely express both positive and negative feelings?
♦ What happens when family members disagree?
♦ How do family members deal with conflict?
♦ Do you feel safe in your environment?
Socialization and social placement
To assess the flexibility of family responsibilities, which aids discharge planning, ask these questions:
♦ How satisfied are you and your partner with your roles as a couple?
♦ How did you decide to have (or not to have) children?
♦ Do you and your partner agree about how to bring up the children? If not, how do you work out differences?
♦ Who is responsible for taking care of the children? Is this arrangement mutually satisfactory?
♦ How well do you feel your children are growing up?
♦ Are family roles negotiable within the limits of age and ability?
♦ Do you share cultural values and beliefs with your children?
Health care function
To identify the family caregiver and thus facilitate discharge planning, ask these questions:
♦ Who takes care of family members when they’re sick? Who makes physician appointments?
♦ Are your children learning about personal hygiene, healthful eating, and the importance of adequate sleep and rest?
♦ How does your family adjust when a member is ill and unable to fulfill expected roles?
Family and social structure
To assess the value the patient places on family and other social structures, ask these questions:
♦ How important is your family to you?
♦ Do you have any friends whom you consider family?
♦ Does anyone other than your immediate family (for example, grandparents) live with you?
♦ Are you involved in community affairs? Do you enjoy the activities?
Economic function
To explore money issues and their relation to power roles within the family, ask these questions:
♦ Does your family income meet the family’s basic needs?
♦ Who makes decisions about family money allocation?
♦ If you take prescription drugs, do you have enough money to pay for them?
Assessing the cardiovascular system
Initial questions
♦ Ask the patient about cardiac problems, such as palpitations, tachycardia or other irregular rhythms, chest pain, dyspnea on exertion, paroxysmal nocturnal dyspnea, and cough.
♦ Explore vascular problems. Does the patient experience pain, cyanosis, edema, ascites, intermittent claudication, cold extremities, or phlebitis? Has he ever had a stroke or symptoms of a stroke?
♦ Ask about postural hypotension, hypertension, rheumatic fever, varicose veins, and peripheral vascular diseases.
♦ Ask when, if ever, the patient had his last electrocardiogram.
Inspecting the precordium
♦ First, place the patient in a supine position, with his head flat or elevated for his respiratory comfort. If you’re
examining an obese patient or one with large breasts, have the patient sit upright. This position will bring the heart closer to the anterior chest wall and make pulsations more visible. If time allows, you can use tangential lighting to cast shadows across the chest. This makes it easier to see abnormalities.
examining an obese patient or one with large breasts, have the patient sit upright. This position will bring the heart closer to the anterior chest wall and make pulsations more visible. If time allows, you can use tangential lighting to cast shadows across the chest. This makes it easier to see abnormalities.
Positioning the patient for cardiac auscultation
During auscultation, you will typically stand to the right of the patient, who is in a supine position. The patient may lie flat or at a comfortable elevation.
If the heart sounds seem faint or undetectable, try repositioning the patient. Alternate positioning may enhance the sounds or make them seem louder by bringing the heart closer to the surface of the chest. Common alternate positions include the seated, forward-leaning position and the left-lateral decubitus position.
Forward-leaning position
The forward-leaning position is best for hearing high-pitched sounds related to semilunar valve problems, such as aortic and pulmonic valve murmurs. Aortic regurgitation is sometimes heard only in the forward-leaning position. To auscultate these sounds, help the patient into the forward-leaning position and place the diaphragm of the stethoscope over the aortic and pulmonic areas in the right and left second intercostal spaces.
|

Left-lateral decubitus position
The left-lateral decubitus position is best for hearing low-pitched sounds related to atrioventricular valve problems, such as mitral valve murmurs and extra heart sounds. A mitral stenosis murmur is sometimes heard only in the left-lateral position. A pericardial rub can be heard in this position and is an abnormal finding. To auscultate these sounds, help the patient into the left-lateral decubitus position and place the bell of the stethoscope over the apical area. If these positions don’t enhance the heart sounds, try auscultating with the patient standing or squatting.
|
Auscultating heart sounds
Using a stethoscope with 10″ to 12″ (25- to 30-cm) tubing, follow these steps to auscultate heart sounds:
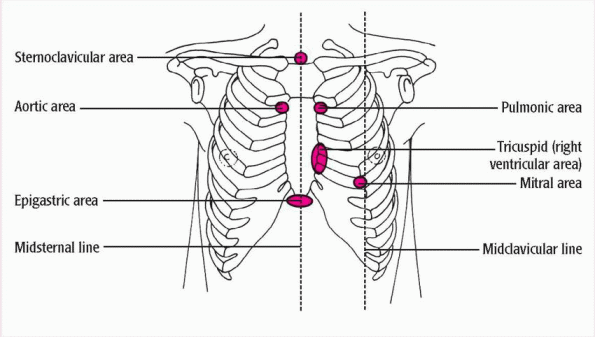
♦ Locate the four different auscultation sites, as illustrated at right.
In the aortic area, blood moves from the left ventricle during systole, crossing the aortic valve and flowing through the aortic arch. In the pulmonic area, blood ejected from the right ventricle during systole crosses the pulmonic valve and flows through the main pulmonary artery. In the tricuspid area, sounds reflect the movement of blood from the right atrium across the tricuspid valve, filling the right ventricle during diastole. In the mitral, or apical, area, sounds represent blood flow across the mitral valve and left ventricular filling during diastole.
♦ Begin auscultation in the aortic area, placing the stethoscope in the second intercostal space along the right sternal border.
♦ Then move to the pulmonic area, located in the second intercostal space at the left sternal border.
♦ Next, assess the tricuspid area, which lies in the fifth intercostal space along the left sternal border.
♦ Finally, listen in the mitral area, located in the fifth intercostal space near the midclavicular line.
Note: If the patient’s heart is enlarged, the mitral area may be closer to the anterior axillary line.
|
Palpating arterial pulses
To palpate the arterial pulses, you’ll apply pressure with your index and middle fingers positioned as shown here.
Radial pulse
Apply gentle pressure to the medial and ventral side of the wrist, just below the thumb.
|
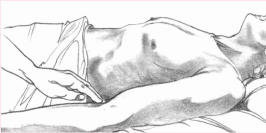
Femoral pulse
Press relatively hard at a point inferior to the inguinal ligament. For an obese patient, palpate in the crease of the groin, halfway between the pubic bone and the hip bone.
|
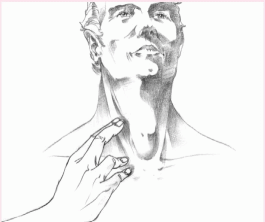
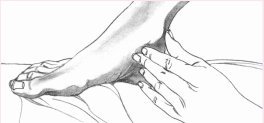
Posterior tibial pulse
Curve your fingers around the medial malleolus, and feel the pulse in the groove between the Achilles’ tendon and the malleolus.
|
Evaluating edema
To assess pitting edema, press firmly for 5 to 10 seconds over a bony surface, such as the tibia, fibula, sacrum, or sternum. Then remove your finger and note how long the depression remains. Document your observation on a scale of +1 (barely detectable depression) to +4 (persistent pit as deep as 1″ [2.5 cm]).
In severe edema, tissue swells so much that fluid can’t be displaced, making pitting impossible. The surface feels rock-hard, and subcutaneous tissue becomes fibrotic. Brawny edema may develop eventually.
+1 pitting edema
|
+4 pitting edema
|
Brawny edema
|
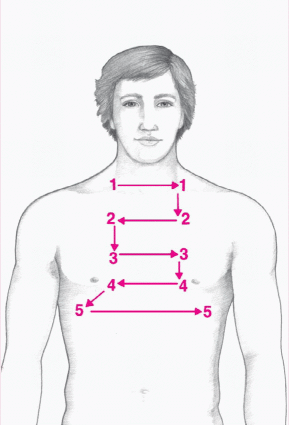
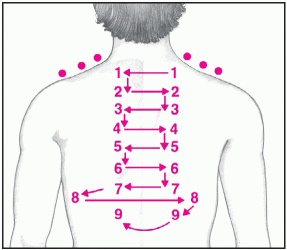
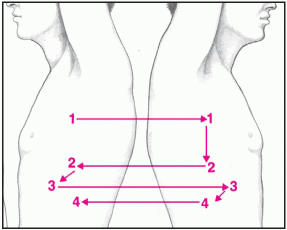
Palpating the thorax
Palpation of the anterior and posterior thorax can detect structural and skin abnormalities, areas of pain, and chest asymmetry. To perform this technique, use the fingertips and palmar surfaces of one or both hands to palpate systematically and in a circular motion. Alternate palpation from one side of the thorax to the other.
Anterior thorax
Begin palpation in the supraclavicular area (#1 in the diagram at right). Then palpate the anterior thorax in the following sequence: infraclavicular, sternal, xiphoid, rib, and axillary areas.
|
♦ Standing to the patient’s right (unless you’re left-handed), remove the clothing covering his chest wall. Quickly identify the following anatomic sites, named for their underlying structures: sternoclavicular, pulmonary, aortic, right ventricular, epigastric, and left ventricular areas.
♦ Make a visual sweep of the chest wall, watching for movement, pulsations, and exaggerated lifts or heaves (strong outward thrusts seen at the sternal border or apex during systole).
Measuring blood pressure
When you assess the patient’s blood pressure, you’re measuring the fluctuating force that blood exerts against arterial walls as the heart contracts and relaxes. To measure blood pressure accurately, follow these steps.
Preparing the patient
Before beginning, make sure that the patient is relaxed and warm and hasn’t eaten, smoked, or exercised in the last 30 minutes. The patient can sit, stand, or lie down during blood pressure measurement.
Applying the cuff and stethoscope
♦ To obtain a reading in an arm (the most common measurement site), first choose an appropriately sized cuff. (The width of the cuff should be at
least 20% greater than the diameter of the upper arm.) Then wrap the sphygmomanometer cuff snugly around the upper arm, above the antecubital area. Center the cuff bladder over the brachial artery.
least 20% greater than the diameter of the upper arm.) Then wrap the sphygmomanometer cuff snugly around the upper arm, above the antecubital area. Center the cuff bladder over the brachial artery.
 When measuring blood pressure in an infant or child, use an appropriate-sized cuff. Because blood pressure may be inaudible in children younger than age 2, consider using an electronic stethoscope or Doppler to obtain a more accurate measurement.
♦ Most cuffs have arrows that should be placed over the brachial artery.
♦ Keep the mercury manometer at eye level. If your sphygmomanometer has an aneroid gauge, place it level with the patient’s arm. Keep the patient’s arm level with the heart by placing it on a table or a chair arm or by supporting it with your hand. Rest a recumbent patient’s arm at his side. Don’t use the patient’s muscle strength to hold up the arm; tension from muscle contraction can elevate systolic pressure and distort the findings.
♦ Palpate the brachial pulse, just below and slightly medial to the antecubital area. Place the earpieces of the stethoscope in your ears, and position the stethoscope head over the brachial artery, just distal to the cuff or slightly beneath it.
|

Generally, you’ll use the easy-tohandle, flat diaphragm to auscultate the pulse. However, if the patient has a diminished or hard-to-locate pulse, you may need to use the bell to detect the low-pitched sound of arterial blood flow more effectively.
Obtaining the blood pressure reading
♦ Watch the manometer while you pump the bulb until the mercury column or aneroid gauge reaches about 20 to 30 mm Hg above the point at which the pulse disappears. Slowly open the air valve and watch the mercury drop or the gauge needle descend. Release the pressure at a rate of about 3 mm Hg/second, and listen for pulse sounds (Korotkoff’s sounds). These sounds, which determine the blood pressure measurement, are classified as follows:
Phase I
A clear, faint tapping starts and increases in intensity to a thud or a louder tap.
Phase II
The tapping changes to a soft swishing sound.
Phase III
A clear, crisp tapping sound returns.
Phase IV (first diastolic sound)
The sound becomes muffled and takes on a blowing quality.
Phase V
The sound disappears.
♦ As soon as you hear blood begin to pulse through the brachial artery, note the reading on the aneroid dial or mercury column. This sound reflects phase I (the first Korotkoff’s sound) and coincides with the patient’s systolic pressure. Continue to deflate the cuff, noting the point at which pulsations diminish or become muffled—phase IV (the fourth Korotkoff’s sound)—and the point at which they disappear— phase V (the fifth Korotkoff’s sound). For children and highly active adults, many authorities consider phase IV the most accurate reflection of blood pressure. For children younger than age 13, pregnant women, and highly active adults, record phases I, IV, and V.
The American Heart Association and the World Health Organization recommend documenting phases I and V in most adults. To avoid confusion and to make your measurements more useful, follow this format for recording blood pressure: systolic/disappearance (for example, 120/76).
Assessing the respiratory system
Initial questions
♦ Inquire about dyspnea or shortness of breath. Does your patient have breathing problems after physical exertion? Also ask him about pain, wheezing, paroxysmal nocturnal dyspnea, and orthopnea (for example, number of pillows used).
♦ Ask whether the patient has cough, sputum production, hemoptysis, or night sweats.
♦ Find out if he has emphysema, pleurisy, bronchitis, tuberculosis, pneumonia, asthma, or frequent respiratory tract infections.
Inspecting the chest
Position the patient to allow access to his posterior and anterior chest. If his condition permits, have him sit on the edge of a bed or examining table or on a chair, leaning forward with his arms folded across his chest. If this isn’t possible, place him in semi-Fowler’s
position for the anterior chest examination. Then ask him to lean forward slightly and use the side rails or mattress for support while you quickly examine his posterior chest. If he can’t lean forward, place him in a lateral position or ask another staff member to help him to sit up.
position for the anterior chest examination. Then ask him to lean forward slightly and use the side rails or mattress for support while you quickly examine his posterior chest. If he can’t lean forward, place him in a lateral position or ask another staff member to help him to sit up.
Systematically compare one side of the chest with the other.
♦ First, inspect the patient’s chest for obvious problems, such as draining, open wounds, bruises, abrasions, scars, and cuts. Also look for less obvious problems, such as rib deformities, fractures, lesions, or masses.
♦ Examine the shape of the patient’s chest wall. Observe the anteroposterior and transverse diameters.
♦ Note the patient’s respiratory pattern, watching for characteristics such as pursed-lip breathing.
♦ Observe the movement of the chest during respirations. The chest should move upward and outward symmetrically on inspiration. Factors that may affect movement include pain, poor positioning, and abdominal distention. Watch for paradoxical movement (possibly resulting from fractured ribs or flail chest) and asymmetrical expansion (atelectasis or underlying pulmonary disease).
♦ Check for use of the accessory muscles and retraction of the intercostal spaces during inspiration (possibly indicating respiratory distress). You may notice sudden, violent intercostal retraction (airway obstruction or tension pneumothorax); retraction of the abdominal muscles during expiration (chronic obstructive pulmonary disease and other obstructive disorders); inspiratory intercostal bulging (cardiac enlargement or aneurysm); or localized expiratory bulging (rib fracture or flail chest).
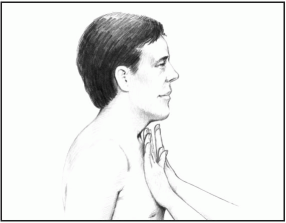
Palpating for tactile fremitus
Because sound travels more easily through solid structures than through air, assessing for tactile fremitus—which involves palpating for voice vibrations—provides valuable information about the contents of the lungs. Follow this procedure:
♦ Place your open palm flat against the patient’s chest without touching the chest with your fingers.
|
♦ Ask the patient to repeat a resonant phrase, such as “ninety-nine” or “blue moon,” as you systematically move your hands over his chest from the central airways to the lung periphery and back. Always proceed systematically from the top of the suprascapular area to the interscapular, infrascapular, and hypochondriac areas (found at the levels of the fifth and tenth intercostal spaces to the right and left of the midline).
♦ Repeat this procedure on the posterior thorax. You should feel vibrations of equal intensity on either side of the chest. Fremitus normally occurs in the upper chest, close to the bronchi, and feels strongest at the second intercostal space on either side of the sternum. Little or no fremitus should occur in the lower chest. The intensity of the vibrations varies according to the thickness and structure of the patient’s chest wall as well as the intensity and pitch of his voice.
Percussing the thorax
Percussion of the thorax helps to determine the boundaries of the lungs and
the amount of gas, liquid, or solid in the lungs. Percussion can effectively assess structures as deep as 1¾″ to 3″ (4.5 to 7.5 cm).
the amount of gas, liquid, or solid in the lungs. Percussion can effectively assess structures as deep as 1¾″ to 3″ (4.5 to 7.5 cm).
To percuss a patient’s thorax, always use indirect percussion, which involves striking one finger with another. Proceed systematically, percussing the anterior, lateral, and posterior chest over the intercostal spaces.
Avoid percussing over bones, such as the manubrium, sternum, xiphoid, clavicles, ribs, vertebrae, or scapulae. Because of their denseness, bones produce a dull sound on percussion and, therefore, yield no useful information.
Always follow the same sequence when performing percussion, comparing variations in sound from one side to the other. This helps to ensure consistency and prevents you from overlooking important findings.
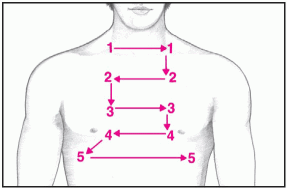
Anterior thorax
Place your hands over the lung apices in the supraclavicular area. Then proceed downward, moving from side to side at intervals of 1½″ to 2″ (4 to 5 cm), as shown below. Anterior chest percussion should produce resonance from below the clavicle to the fifth intercostal space on the right (where dullness occurs close to the liver) and to the third intercostal space on the left (where dullness occurs near the heart).
|
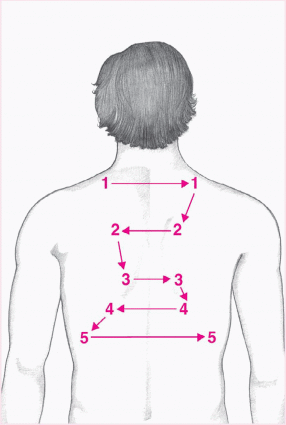
Posterior thorax
Progress in a zigzag fashion from the suprascapular to the interscapular to the infrascapular areas, avoiding the vertebral column and the scapulae, as shown below. Posterior percussion should sound resonant to the level of T10.
|
Auscultating breath sounds
Auscultating breath sounds is an important step in physical assessment. It helps you to detect abnormal accumulation of fluid or mucus and obstructed air passages.
To detect breath sounds, auscultate the anterior, lateral, and posterior thorax, following the same sequence that you used for percussion of the thorax. Begin at the upper lobes, and move from side to side and down, comparing findings.
 If the patient is a child, begin just below the right clavicle, moving to the midsternum, left clavicle, left nipple, and right nipple. Assess one full breath (inspiration and expiration) at each point.
Auscultate the lungs to detect normal, abnormal, and absent breath sounds. Classify breath sounds by their location, intensity, pitch, and duration during the inspiratory and expiratory phases.
Assessing the neurologic system
Initial questions
♦ Ask the patient to state his full name and the date, time, and place where he is now.
♦ Investigate the character of any headaches (frequency, intensity, location, and duration).
♦ Determine whether your patient has vertigo or syncope.
♦ Ask if he has a history of seizures or use of anticonvulsants.
♦ Explore cognitive disturbances, including recent or remote memory loss, hallucinations, disorientation, speech and language dysfunction, or inability to concentrate.
♦ Ask if the patient has a history of sensory disturbances, including tingling, numbness, and sensory loss.
♦ Explore motor problems, including problems with gait, balance, coordination, tremor, spasm, or paralysis.
♦ Ask him if cognitive, sensory, or motor symptoms have interfered with his activities of daily living.
Assessing neurologic vital signs
A supplement to routine measurement of temperature, pulse, and respirations, neurologic vital signs are used to evaluate the patient’s LOC, pupillary activity, and level of orientation to time, place, and person.
LOC reflects brain stem function and usually provides the first sign of central nervous system deterioration. Changes in pupillary activity may signal increased intracranial pressure (ICP). Level of orientation evaluates higher cerebral functions. Evaluating muscle strength and tone, reflexes, and posture may also help to identify nervous system damage. Finally, evaluating the respiratory rate and pattern can help to locate brain lesions and determine their size.
Equipment
Penlight ♦ thermometer ♦ stethoscope ♦ sphygmomanometer ♦ pupil size chart
Implementation
♦ Explain the procedure to the patient, even if he’s unresponsive.
♦ Assess the patient’s LOC.
♦ Ask the patient to state his full name. If he responds appropriately, assess his orientation to time, place, and person. Assess the quality of his replies.
♦ Assess the patient’s ability to understand and follow one-step commands that require a motor response. For example, ask him to open and close his eyes. Note whether he can maintain his LOC.
♦ If the patient doesn’t respond to commands, squeeze the nail beds on his fingers and toes with moderate pressure and note his response. Alternately, rub the upper portion of his sternum between the second and third intercostal spaces with your knuckles. Check the motor responses bilaterally to rule out monoplegia and hemiplegia.
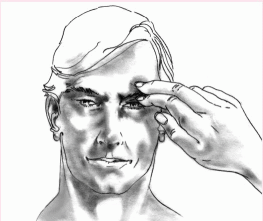
Examine pupils and eye movement
♦ Ask the patient to open his eyes. If he’s unresponsive, lift his upper eyelids. Inspect the pupils for size and shape, and compare them for equality. To evaluate them more precisely, use a chart showing the various pupil sizes.
♦ Test the patient’s direct light response. First, darken the room. Hold each eyelid open in turn, keeping the other eye covered. Swing the penlight from the patient’s ear toward the midline of the face. Shine the light directly into the eye. Normally, the pupil constricts immediately when exposed to light and then dilates immediately when the light is removed. Wait 20 seconds before testing the other pupil to allow it to recover from reflex stimulation.
♦ Test consensual light response. Hold both eyelids open, but shine the light into one eye only. Watch for constriction in the other pupil, which indicates proper nerve function.
♦ Brighten the room, and ask the conscious patient to open his eyes. Observe the eyelids for ptosis or drooping. Then check the extraocular movements. Hold up one finger and ask the patient to follow it with his eyes as you move your finger up, down, laterally, and obliquely. See if the patient’s eyes track together to follow your finger (conjugate gaze). Watch for involuntary jerking or oscillating movements (nystagmus).
♦ Check accommodation. Hold up one finger midline to the patient’s face and several feet away. Ask the patient to focus on your finger as you move it toward his nose. His eyes should converge, and his pupils should constrict equally.
♦ Test the corneal reflex with a wisp of cotton. Have the patient look straight ahead. Bring the cotton wisp in from the side to lightly touch the cornea. Observe the patient for bilateral blinking. Tearing will occur in the eye that’s touched.
♦ If the patient is unconscious, test the oculocephalic (doll’s eye) reflex. Hold the patient’s eyelids open. Quickly but gently turn the patient’s head to one side and then to the other. If the patient’s eyes move in the opposite direction from the side to which you turn the head, the reflex is intact.
Stay updated, free articles. Join our Telegram channel

Full access? Get Clinical Tree


Get Clinical Tree app for offline access
