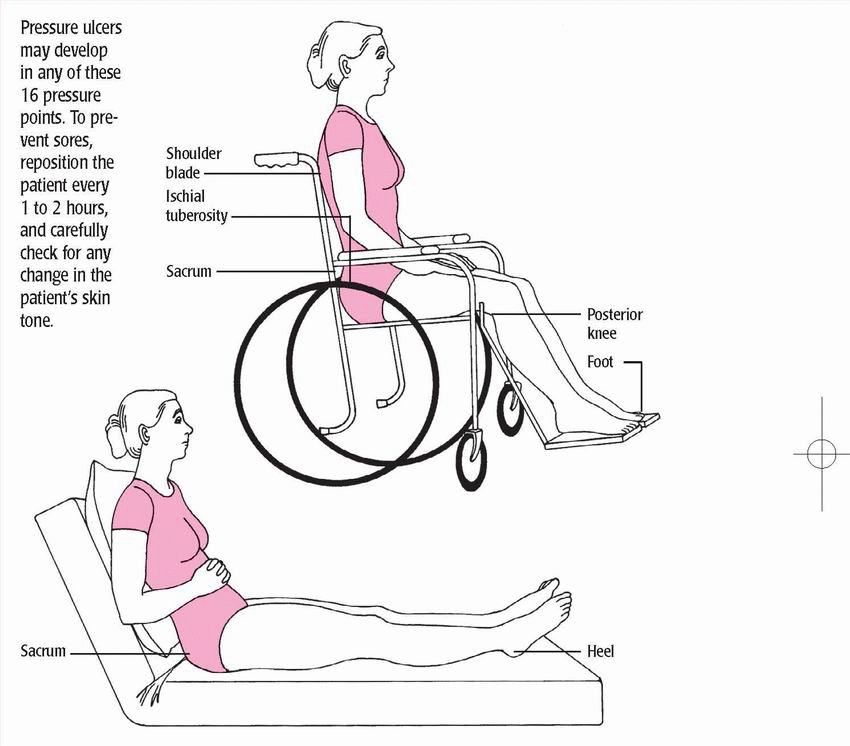
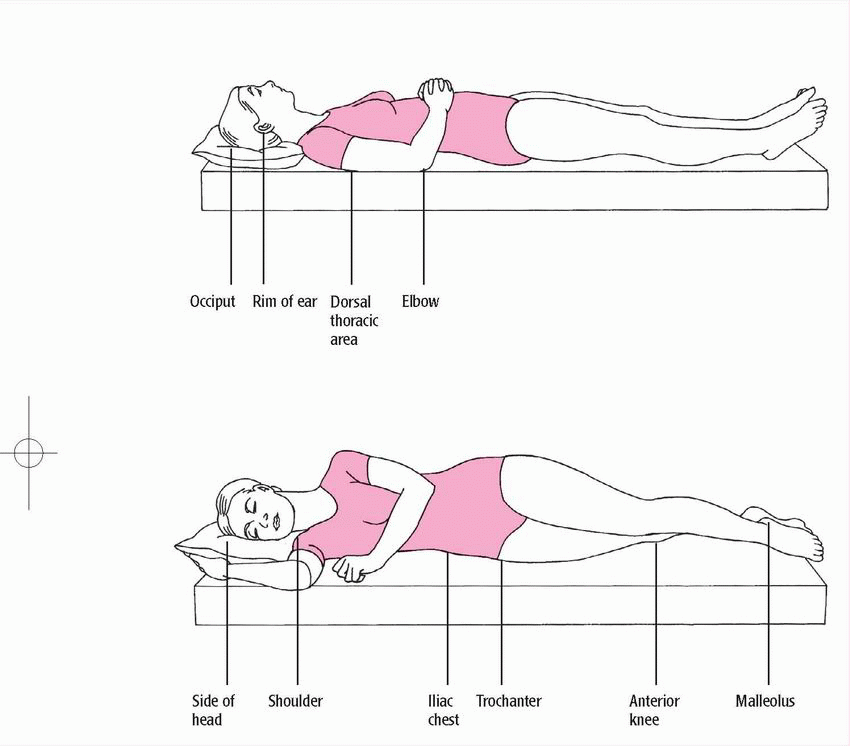
Care of pressure ulcers and traumatic wounds
Care of pressure ulcers
♦ A pressure ulcer is a skin or tissue injury that results when pressure, or pressure combined with shear and/or friction, against the tissues impairs circulation and delivery of oxygen and other life-sustaining nutrients.
♦ The pressure may be applied with great force for a short period or with less force over a longer period.
♦ Most pressure ulcers develop over bony prominences. Common sites include the sacrum, coccyx, ischial tuberosities, and greater trochanters. (See Pressure points: Common sites of pressure ulcers, pages 356 and 357.)
♦ Particularly in bedridden and relatively immobile patients, other common sites include the skin over the vertebrae, scapulae, ears, elbows, knees, and heels.
♦ Successful treatment involves relieving pressure, restoring circulation and, if possible, resolving or managing related disorders.
♦ Typically, the duration and effectiveness of treatment depend on the characteristics of the pressure ulcer. (See Pressure ulcer staging, pages 358 and 359.)
♦ Ideally, prevention is the key to avoiding extensive therapy.
♦ Preventive measures include:
– ensuring adequate nourishment
– maintaining mobility to relieve pressure and promote circulation.
♦ When a pressure ulcer develops despite preventive efforts, treatment includes:
– frequent repositioning to relieve pressure
– pressure-redistribution devices, such as beds, mattresses, mattress overlays, and chair cushions. (See Pressureredistribution devices, page 360.)
♦ Treatment also includes:
– topical drugs
– medicated dressings
– wound cleaning
– debridement
– moist dressings to support wound healing.
♦ The nurse performs or coordinates treatments according to facility policy. The procedures described here address cleaning and dressing pressure ulcers. Always follow standard precautions.
Equipment
Hypoallergenic tape or elastic netting ♦ piston-type irrigating system ♦ two pairs of gloves ♦ normal saline solution, as ordered ♦ sterile 4″ × 4″ gauze pads ♦ selected topical dressing (moist saline gauze, hydrocolloid, transparent, alginate, foam, or hydrogel) ♦ linensaver pads ♦ impervious plastic trash bag ♦ disposable wound-measuring device ♦ sterile cotton swabs ♦ optional: 21G needle and syringe, spray or wipe skin sealant, pressure-redistribution device, turning sheet
Implementation
♦ Assemble the equipment at the patient’s bedside.
♦ Cut the tape into strips for securing dressings.
♦ Loosen the lids on cleaning solutions, drugs, or medicated dressings for easy removal.
♦ Make sure that the impervious plastic trash bag is within reach.
♦ Before performing any dressing change, wash your hands and implement standard precautions.
Cleaning the pressure ulcer
♦ Provide privacy and explain the procedure to the patient to reduce fear and promote cooperation.
♦ Position the patient in a way that maximizes his comfort while giving easy access to the pressure ulcer.
♦ Cover the bed linens with a linensaver pad to prevent soiling.
♦ Open the normal saline solution container and the piston syringe.
♦ Carefully pour normal saline solution into an irrigation container to avoid splashing. (The container may be clean or sterile, depending on facility policy.)
♦ Insert the piston syringe into the opening in the irrigation container.
♦ Open the packages of supplies.
♦ Put on gloves and remove the old dressing from the pressure ulcer.
♦ Discard the soiled dressing in the impervious plastic trash bag to avoid contaminating the sterile or clean field and spreading infection.
♦ Inspect the wound. Note the color, amount, and odor of drainage and necrotic debris. (See Tailoring wound care to wound color, page 361.)
♦ Measure the perimeter of the wound with the disposable woundmeasuring device (a square, transparent card with concentric circles arranged in a bull’s-eye fashion and bordered with a straightedge ruler).
Pressure ulcer staging
The National Pressure Ulcer Advisory Panel has updated the staging of pressure ulcers to include the original four stages but also has added two other stages called suspected deep tissue injury and unstageable.
Suspected deep tissue injury
Suspected deep tissue injury involves maroon or purple intact skin or a blood-filled blister due to damage from shearing or pressure on the underlying soft tissue. Before the discoloration occurs, the area may be painful, mushy or firm or boggy, warmer or cooler as compared to other tissue.
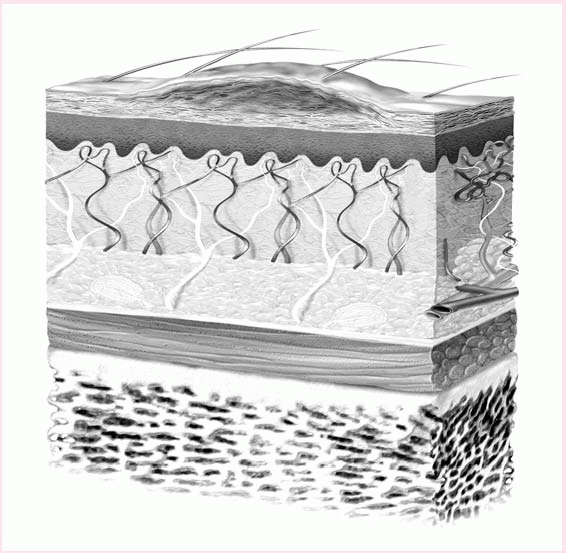
Stage I
A stage I pressure ulcer is an area of intact skin that does not blanch and is usually over a bony prominence. Skin that is darkly pigmented may not show blanching but its color may differ from surrounding area. The area may be painful, firm or soft, or warmer or cooler when compared to the surrounding tissue.
 |
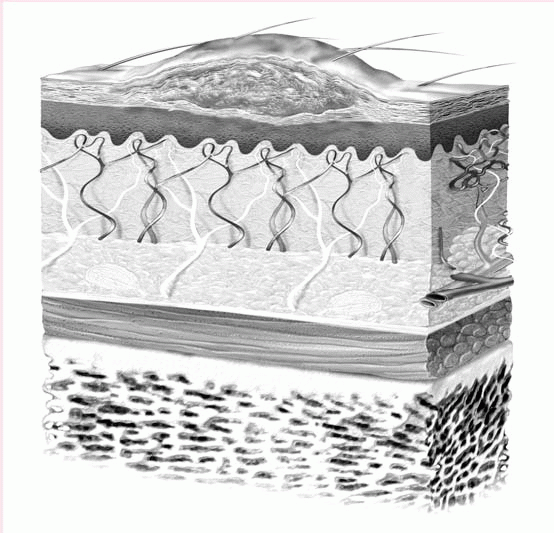
Stage II
A stage II pressure ulcer is a superficial partial-thickness wound that presents clinically a shallow and open ulcer without slough and with a red and pink wound bed. This term shouldn’t be used to describe perineal dermatitis, maceration, tape burns, skin tears or excoriation, only an abrasion, a blister, or a shallow crater that involves the epidermis and dermis.
 |
Stage III
A stage III pressure ulcer is a full-thickness wound with tissue loss. The subcutaneous tissue may be visible but muscle, tendon, or bone is not exposed. Slough may be present but it does not hide the depth of the tissue loss. Undermining and tunneling may be present.
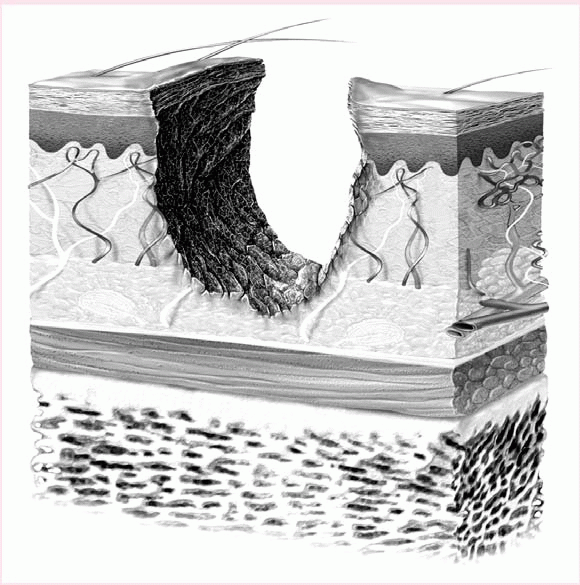 |
Stage IV
A stage IV pressure ulcer involves fullthickness skin loss with exposed muscle, bone, and tendon. Eschar and sloughing may be present as well as undermining and tunneling.
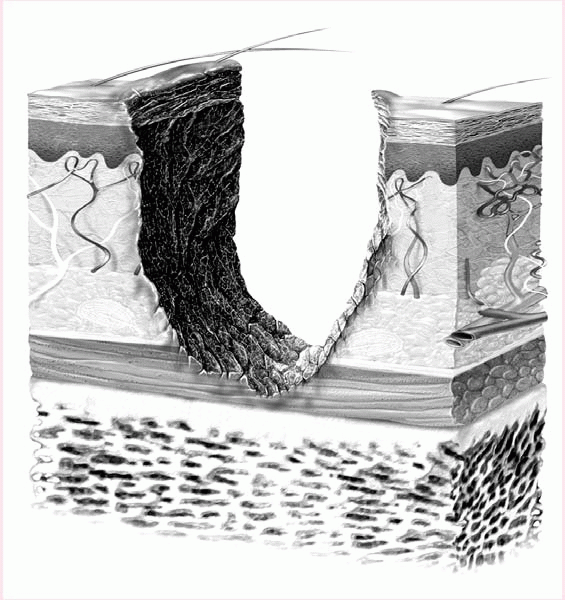 |
Unstageable
An unstageable pressure ulcer involves full-thickness tissue loss. The base of the ulcer is covered by yellow, tan, gray, green, or brown slough or tan, brown or black eschar. Some may have both slough and eschar. The pressure cannot be staged until enough eschar or slough is removed to expose the base of the wound.
♦ Using the piston syringe, apply full force to irrigate the pressure ulcer to remove necrotic debris and help to decrease bacteria in the wound.
♦ Remove and discard the soiled gloves and put on another pair.
♦ Insert a sterile cotton swab into the wound to gauge the depth of wound tunneling or undermining. Tunneling usually signals extension of the wound along fascial planes.
♦ Look at the condition of the skin and the ulcer. Note the character of the clean wound bed and the surrounding skin.
 If you observe adherent necrotic material, notify a wound care specialist or a physician to ensure that appropriate debridement is performed.
♦ Prepare to apply the selected topical dressing. Directions for application of topical moist saline gauze, hydrocolloid, transparent, alginate, foam, and hydrogel dressings follow. For other
dressings or topical agents, follow facility protocol or manufacturer instructions. (See Wound care dressings, page 362.)
dressings or topical agents, follow facility protocol or manufacturer instructions. (See Wound care dressings, page 362.)
Pressure-redistribution devices
Stay updated, free articles. Join our Telegram channel

Full access? Get Clinical Tree


Get Clinical Tree app for offline access


