Examination Routines
‘Work out the best method for examination and practise it until it is second nature to you.’*
These books exist as they are because of many previous candidates who, over the years, have completed our surveys and given us invaluable insight into the candidate experience. Please give something back by doing the same for the candidates of the future. For all of your sittings, whether it be a triumphant pass or a disastrous fail …
Remember to fill in the survey at www.ryder-mrcp.org.uk
THANK YOU
In this chapter routines are suggested for the clinical assessment of various subsystems. These are readily adaptable to your individual methods. The subsystems are arranged according to the examiners’ standard instructions (e.g. examine the heart, abdomen, hands, etc.). We have retained the original choice of subsystems, which was governed by our first edition surveys, except for the addition of ‘Examine this patient’s knee’ and ‘Examine this patient’s hip’, when PACES was first introduced. Examples of variations of the instruction are given both from our original survey and from our original PACES survey. Even though Station 5 is now covered in Volume 3, we have kept all the examination routines together in this volume as we believe they represent ‘a whole’. They have, in more or less unchanged form, prepared the candidates for MRCP for over a quarter of a century and, on the grounds that ‘if it ain’t broke, don’t fix it’*, we have left them relatively undisturbed. It is accepted that with the new Station 5, Spot Diagnosis routines (e.g. ‘What is the diagnosis’) are likely to be overtly called upon less often. Nevertheless, the conditions lending themselves to spot diagnosis will undoubtedly continue to appear and although the instruction from the examiner may be different, you will still be expected to ‘spot’ the diagnostic clues in your visual survey. The routines as a whole prepare you for the challenge of being able to examine anything wherever that challenge comes in PACES. Under each subsystem a list of the possible short cases is presented in order of their occurrence based on our surveys that led up to the third edition. We have not felt any merit in making any changes for the fourth edition. The percentages given represent our estimate of your chances of each diagnosis being present when you hear the particular instruction.† These lists of diagnoses have guided our suggested routines. The latter are broken down into numbered constituents to aid memory and checklists are given in Appendix 1 which match up to the numbered points in the examination routine. The checklists are to help your practice with each subsystem.
The idea is to develop a controlled, spontaneous and flawless technique of examination for each subsystem, so that you do not have to keep pausing and thinking what to do next and so that you do not miss out important steps (see Vol. 2, Section F, Experience 144). Often you will not need the complete sequence in the examination (for example, with regard to the ‘Examine this patient’s chest’ routine, often the examiner will ask you to only examine ‘the back of this patient’s chest’) but it will certainly increase your confidence if you enter the examination armed with the complete routines so that you can adapt them as necessary. The examination methods are supplemented with appropriate hints to avoid common pitfalls and to simplify the diagnostic maze.
The routines are presented in a single section without necessarily being associated with a particular station because our PACES survey has confirmed that many of the routines may be called upon in more than one station. For example, assessment of visual fields may be required in Station 3 for a patient with a hemiplegia who might have homonymous hemianopia, or Station 5 for a patient with acromegaly who might have a bitemporal hemianopia. It is essential that you bear in mind the station you are in when you are given the particular instruction and adapt it accordingly, but you also need to be wary of jumping to conclusions. For example, we are aware of the anecdote from a PACES pilot, hosted by Dr Ryder at City Hospital for the Royal Colleges, of a patient with acromegaly who had had a cerebrovascular accident secondary to acromegalic hypertension; her visual fields were required to be examined in Station 5 and showed homonymous hemianopia! Similarly, the only radial nerve palsy patient to occur in any of our surveys since the 1980s turned up in Station 5, Locomotor, of a PACES sitting. In Vol. 2, Section F, Experience 27 and Anecdote 88, accounts are given of patients with Marfan’s syndrome appearing in Station 1, Respiratory, so it is important to remain open to many possibilities whilst taking into account the station you are in.
Before dealing with the individual subsystems, we would make some general points. You should avoid repeating the instruction or echoing the last part of it. Refrain from asking questions like: ‘Would you like me to give you a running commentary or give the findings at the end?’. Such a response wastes invaluable seconds which could be used running through the checklist and completing your visual survey. It is like a batsman asking a bowler in a cricket match whether he would like his ball hit for a six or played defensively! You must do what you are best at and hope that the examiner does not ask you to do otherwise. As suggested below, a well-rehearsed procedure suited to each subsystem should make it possible for you to start purposefully without delay.
Your approach to the patient is of great importance. You should introduce yourself to him and ask his permission to examine him.* Permission should also be sought for various manoeuvres, such as adjusting the backrest when examining the heart or before removing any clothing. These polite exchanges will not only please most examiners and patients, but will also provide you with an opportunity to calm your nerves, collect your thoughts and recall the appropriate checklist.
Although we have continually emphasized the value of looking for signs peripheral to the examiner’s instruction (e.g. examine this patient’s heart, abdomen, chest), we would also like to emphasize that dithering may be counterproductive. In the visual survey, you should be scanning the patient rapidly and purposefully with a trained eye, not gazing helplessly at him for a long period while you try to decide what to do next. While you are feeling the pulse (heart) or settling the patient lying flat (abdomen), a quick look at the hands should establish whether there are any abnormalities or not. Pondering over normal hands from all angles at great length looks as unprofessional as, indeed, it is. It is of paramount importance to be gentle with the patient. Rough handling (e.g. roughly and abruptly digging deep into the patient’s abdomen so that he winces with pain) has always been a behaviour to bring you instantly to the pass/fail borderline or below it (see Vol. 2, Section F, Experience 192). The new PACES marking system is now formally seeking to confirm that all the candidates who pass achieve near perfection under the heading ‘Managing Patient Welfare’. At the time of writing, the marking system requires a score of at least 90% under this heading to ensure a pass. Make sure that you cover the patient up when you have finished examining him, and thank him.
1 | ‘Examine this Patient’s Pulse’
Variations of Instruction from our Original Survey
Feel this pulse.
Examine this patient’s pulse – look for the cause.
Examine this patient’s pulses.
Diagnoses from Our Original Survey in Order of Frequency
1 Irregular pulse 44%
2 Slow pulse 12%
3 Graves’ disease (Vol. 3, Station 5, Endocrine, Case 3) 12%
4 Aortic stenosis 9%
5 Complete heart block 9%
6 Brachial artery aneurysm 9%
7 Impalpable radial pulses due to low output cardiac failure 9%
8 Tachycardia 6%
9 Takayasu’s disease (Vol. 3, Station 5, Other, Case 3) 3%
10 Hypothyroidism (Vol. 3, Station 5, Endocrine, Case 5) 3%
11 Fallot’s tetralogy with a Blalock shunt 3%
Examination Routine
As you approach the patient from the right and ask for his permission to examine him you should:
1 look at his face for a malar flush (mitral stenosis, myxoedema) or for any signs of hyper- or hypothyroidism. As you take the arm to examine the right radial pulse, continue the survey of the patient by looking at
2 the neck (Corrigan’s pulse, raised JVP, thyroidectomy scar, goitre) and then the chest (thoracotomy scar). Quickly run your eyes down the body to complete the survey (ascites, clubbing, pretibial myxoedema, ankle oedema, etc.) and then concentrate on
3 the pulse and note
4 its rate (count for at least 15 sec), volume and
5 its rhythm. A common diagnostic problem is presented by slow atrial fibrillation which may be mistaken for a regular pulse. To avoid this, concentrate on the length of the pause from one beat to another and see if each pause is equal to the succeeding one (see also Station 3, Cardiovascular, Case 8). This method will reveal that the pauses are variable from beat to beat in controlled slow atrial fibrillation.
6 Assess whether the character (waveform) of the pulse (information to be gained from radial, brachial and carotid) is normal, collapsing, slow rising or jerky. To determine whether there is a collapsing quality, put the palmar aspect of the four fingers of your left hand on the patient’s wrist just below where you can easily feel the radial pulse. Press gently with your palm, lift the patient’s hand above his head and then place your right palm over the patient’s axillary artery. If the pulse has a water-hammer character you will experience a flick (a sharp and tall upstroke and an abrupt downstroke) which will run across all four fingers and at the same time you may also feel a flick of the axillary artery against your right palm. The pulse does not merely become palpable when the hand is lifted but its character changes and it imparts a sharp knock. This is classic of the pulse that is present in haemodynamically significant aortic incompetence and in patent ductus arteriosus. If the pulse has a collapsing character but is not of a frank water-hammer type then the flick runs across only two or three fingers (moderate degree of aortic incompetence or patent ductus arteriosus, thyrotoxicosis, fever, pregnancy, moderately severe mitral incompetence, anaemia, atherosclerosis). A slow rising pulse can best be assessed by palpating the brachial pulse with your left thumb and, as you press gently, you may feel the anacrotic notch (you will need practice to appreciate this) on the upstroke against the pulp of your thumb. In mixed aortic valve disease, the combination of plateau and collapsing effects can produce a bisferiens pulse. Whilst feeling the brachial pulse, look for any catheterization scars (indicating valvular or ischaemic heart disease).
7 Proceed to feel the carotid where either a slow rising or a collapsing pulse can be confirmed.
8 Feel the opposite radial pulse and determine if both radials are the same (e.g. Fallot’s with a Blalock shunt; see Station 3, Cardiovascular, Case 23), and then feel
9 the right femoral pulse checking for any radiofemoral delay (coarctation of the aorta). If you are asked to examine the pulses (as opposed to the pulse), you should continue to examine
10 all the other peripheral pulses. It is unlikely that the examiner will allow you to continue beyond what he thinks is a reasonable time to spot the diagnosis that he has in mind. However, should he not interrupt, continue to look for
11 additional diagnostic clues. Thus, in a patient with atrial fibrillation and features suggestive of thyrotoxicosis, you should examine the thyroid and/or eyes. In a patient with atrial fibrillation and hemiplegia or atrial fibrillation and a mitral valvotomy scar, proceed to examine the heart.
See Appendix 1, Checklist 1, Pulse.
2 | ‘Examine this Patient’s Heart’
Variations of Instruction in Initial PACES Survey (Resultant Diagnoses in Brackets)
Examine this patient’s heart (mitral stenosis)
Examine this patient’s cardiovascular system (mitral valve disease and aortic regurgitation; mitral valve disease; mixed aortic valve disease; prosthetic valves; aortic stenosis; atrial fibrillation and prosthetic mitral valve; corrected Fallot’s tetralogy)
Examine this gentleman’s heart. He has been complaining of palpitations (atrial fibrillation and mitral stenosis)
The GP has referred this 72-year-old lady with a murmur. Please examine her (mitral regurgitation)
This patient has been having palpitations – can you find a cause? (atrial fibrillation and mitral stenosis)
This patient is short of breath. Please examine the heart (mixed aortic valve disease)
You are seeing this elderly lady in the cardiology clinic which she has been attending for some time (prosthetic valve)
This young lady presented with increasing shortness of breath on exertion. Examine the cardiovascular system (aortic incompetence)
This lady has a heart murmur. Please examine her cardiovascular system (mitral stenosis and cerebrovascular accident)
This patient had a myocardial infarct 1 year ago. Please examine the cardiovascular system (aortic stenosis)
This man has been complaining of chest pain and palpitations. Please examine the cardiovascular system (aortic stenosis)
This patient has had an acute episode of breathlessness. Please examine the cardiovascular system (aortic stenosis)
This patient presented with shortness of breath. Please examine the cardiovascular system (mixed mitral valve disease and atrial fibrillation; aortic incompetence)
This gentleman came in on the take 2 days ago and he was breathless. Examine his cardiovascular system (atrial fibrillation and mitral regurgitation)
This man has just returned from the ITU. Please examine his cardiovascular system (prosthetic valves)
This woman, who is about 60 years of age, is becoming increasingly breathless. Can you examine her cardiovascular system and see if you can find a reason? (atrial fibrillation and mitral stenosis)
Look at this patient and describe what you see. Then listen to the heart (Marfan’s syndrome and prosthetic aortic valve)
The GP has noted a murmur – can you tell me what you think?(mixed aortic valve disease)
This man has a heart murmur. Please examine him (mitral regurgitation)
Examine the cardiovascular system (hypertrophic cardiomyopathy)
Diagnoses from Survey in Order of Frequency
1 Prosthetic valves 17%
2 Mitral incompetence (lone) 13%
3 Mixed aortic valve disease 9%
4 Mixed mitral valve disease 9%
5 Other combinations of mitral and aortic valve disease 8%
6 Mitral stenosis (lone) 7%
7 Aortic stenosis (lone) 7%
8 Aortic incompetence (lone) 5%
9 Ventricular septal defect 3%
10 Irregular pulse 2%
11 HOCM 2%
12 Marfan’s syndrome (Vol. 3, Station 5, Locomotor, Case 9) 2%
13 Eisenmenger’s syndrome 2%
14 Mitral valve prolapse 2%
15 Patent ductus arteriosus 2%
16 Tricuspid incompetence 2%
17 Fallot’s tetralogy/Blalock shunt 0.9%
18 Raised jugular venous pressure 0.9%
19 Coarctation of the aorta 0.9%
20 Slow pulse 0.9%
21 Dextrocardia 0.5%
22 Pulmonary stenosis 0.5%
23 Cannon waves 0.5%
24 Subclavian-steal syndrome 0.3%
25 Pulmonary incompetence 0.3%
26 Infective endocarditis 0.3%
27 Atrial septal defect 0.1%
Other diagnoses were: chronic liver disease due to tricuspid incompetence (<1%), pulmonary stenosis (<1%), cor pulmonale (<1%), complete heart block (<1%), transposition of the great vessels (<1%), repaired thoracic aortic aneurysm (<1%) and left ventricular aneurysm (<1%).
Examination Routine
When asked to ‘examine this patient’s heart’, candidates are often uncertain as to whether they should start with the pulse or go straight to look at the heart. On the one hand, it would be absurd to feel all the pulses in the body and leave the object of the examiner’s interest to the last minute, whilst on the other hand it would be impetuous to palpate the praecordium straight away. Repeating the examiner’s question in the hope that he might clarify it, or asking for a clarification, does nothing but communicate your dilemma to the examiner. You should not waste any time. Bear in mind that our survey has confirmed that the diagnosis is usually mitral and/or aortic valve disease. Approach the right-hand side of the patient and adjust the backrest so that he reclines at 45° to the mattress. If the patient is wearing a shirt, you should ask him to remove it so that the chest and neck are exposed. Meanwhile, you should complete a quick:
1 visual survey. Observe whether the patient is
(a) breathless,
(b) cyanosed,
(c) pale, or
(d) whether he has a
malar flush (mitral stenosis).
Look briefly at the earlobes for creases
* and then at the
neck for
pulsations:
(e) forceful carotid pulsations (Corrigan’s sign in aortic incompetence; vigorous pulsation in coarctation of the aorta), or
(f) tall, sinuous venous pulsations (congestive cardiac failure, tricuspid incompetence, pulmonary hypertension, etc.).
Run your eyes down onto the chest looking for:
(g) a
left thoracotomy scar (mitral stenosis
†) or a
midline sternal scar (valve replacement
‡), and then down to the feet looking for:
(h) ankle oedema. As you take the arm to feel the pulse, complete your visual survey by looking at the hands (a quick look; don’t be ponderous) for
(i) clubbing of the fingers (cyanotic congenital heart disease, subacute bacterial endocarditis) and splinter haemorrhages (infective endocarditis).
If the examiner does not want you to feel the pulse he may intervene at this stage – otherwise you should proceed to
2 note the rate and rhythm of the pulse.
3 Quickly ascertain whether the pulse is collapsing (particularly if it is a large-volume pulse) or not (make sure you are seen lifting the arm up; see Vol. 2, Section F, Experience 144).
Next may be an opportune time to look for
4 radiofemoral delay (coarctation of the aorta), though this can be left until after auscultation if you prefer and if you are sure you will not forget it (see Vol. 2, Section F, Experience 108).
5 Feel the brachial pulse followed by the carotid pulses to see if the pulse is a slow rising one, especially if the volume (the upstroke) is small.
If the pulsations in the neck present any interesting features you may have already noted these during your initial visual survey. You should now proceed to confirm some of these impressions. The Corrigan’s sign in the neck (forceful rise and quick fall of the carotid pulsation) may already have been reinforced by the discovery of a collapsing radial pulse. The individual waves of a large venous pulse can now be timed by palpating the opposite carotid. A large v wave, which sometimes oscillates the earlobe, suggests tricuspid incompetence and you should later on demonstrate peripheral oedema and the pulsatile liver using the bimanual technique. If the venous wave comes before the carotid pulsation, it is an a wave suggestive of pulmonary hypertension (mitral valve disease, cor pulmonale) or pulmonary stenosis (rare). After
6 assessing the height of the
venous pressure in centimetres vertically above the sternal angle, you should move to the praecordium
* and
7 localize the apex beat with respect to the mid-clavicular line and ribspaces, firstly by inspection for visible pulsation and secondly by palpation. If the apex beat is vigorous you should stand the index finger on it, to localize the point of maximum impulse, and assess the extent of its thrust. The impulse can be graded as just palpable, lifting (diastolic overload, i.e. mitral or aortic incompetence), thrusting (stronger than lifting) or heaving (outflow obstruction).
8 Palpation with your hand placed from the lower left sternal edge to the apex will detect a tapping impulse (left atrial ‘knock’ in mitral stenosis) or thrills over the mitral area (mitral valve disease), if present.
9 Continue palpation by feeling the right ventricular lift (left parasternal heave). To do this, place the flat of your right palm parasternally over the right ventricular area and apply sustained and gentle pressure. If right ventricular hypertrophy is present, you will feel the heel of your hand lifted by its force (pulmonary hypertension).
10 Next, you should
palpate the pulmonary area for a
palpable second sound (pulmonary hypertension), and the aortic area for a palpable
thrill (aortic stenosis).
† If you feel a strong right ventricular lift, quickly recall, and sometimes recheck, whether there is a giant
a wave (pulmonary hypertension, pulmonary stenosis) or
v wave (tricuspid incompetence, congestive cardiac failure) in the neck. A palpable thrill over the mitral area (mitral valve disease) or palpable pulmonary second sound over the pulmonary area (pulmonary hypertension) should make you think of, and check for, the other complementary signs. You should by now have a fair idea of what you will hear on auscultation of the heart but you should keep an open mind for any unexpected discovery.
11 The next step will be
auscultation and you should only stray away from the heart (examiner’s command) if you have a strong expectation of being able to demonstrate an interesting and relevant sign (such as a pulsatile liver to underpin the diagnosis of tricuspid incompetence).
Time the first heart sound with either the apex beat, if this is palpable, or by feeling the carotid pulse (see Vol. 2, Section F, Experience 188). It is important to listen to the expected murmurs in the most favourable positions. For example, mitral diastolic murmurs are best heard by turning the patient
onto the left side, and the early diastolic murmur of aortic incompetence is made more prominent by asking the patient to
lean forwards with his breath held after expiration.
* For low-pitched sounds (mid-diastolic murmur of mitral stenosis, heart sounds), use the bell of your chest-piece but do not press hard or else you will be listening through a diaphragm formed by the stretched skin! The high-pitched early diastolic murmur of aortic incompetence is very easily missed (see Vol. 2, Section F, Anecdote 276). Make sure you specifically listen for it.
If the venous pressure is raised you should check for
12 sacral oedema and, if covered, expose the feet to demonstrate any ankle oedema.
Auscultation over
13 the lung bases for inspiratory crepitations (left ventricular failure), though an essential part of the routine assessment of the cardiovascular system, is seldom required in the examination. You may make a special effort to do this in certain relevant situations such as a breathless patient, aortic stenosis with a displaced point of maximum impulse or if there are any signs of left heart failure (orthopnoea, pulsus alternans, gallop rhythm, etc.). Similarly, after examination of the heart itself it may (on rare occasions only) be necessary to
14 palpate the
liver, especially if you have seen a large
v wave and heard a pansystolic murmur over the tricuspid area. In such cases you may be able to demonstrate a
pulsatile liver by placing your left palm posteriorly and the right palm anteriorly over the enlarged liver.
† Finally, you should offer to
15 measure the blood pressure. This is particularly relevant in patients with aortic stenosis (low systolic and narrow pulse pressure), and aortic incompetence (wide pulse pressure).
See Appendix 1, Checklist 2, Heart.
3 | ‘Examine this Patient’s Chest’
Variations of Instruction in Initial PACES Survey (Resultant Diagnoses in Brackets)
Examine this patient’s chest (bronchiectasis; pleural effusion with chest drain; pleural effusion; bilateral lower lobectomy and fibrosis)
This gentleman is breathless on climbing stairs. Examine his respiratory system (chronic obstructive pulmonary disease)
Examine this patient’s respiratory system (lung transplant and bronchiolitis obliterans; lung cancer)
This gentleman presented with a cough and shortness of breath. Please examine his respiratory system (pleural effusion)
This is a 56-year-old lady who has been dyspnoeic for a long time. Examine her respiratory system (Marfan’s syndrome and pulmonary fibrosis)
This patient is complaining of shortness of breath. Please examine the chest (pleural effusion)
Examine this man’s chest from the back (reduced expansion with reduced breath sounds and increased vocal resonance)
This patient presented with worsening shortness of breath. Please examine his chest (pulmonary fibrosis)
This lady is short of breath, please examine her respiratory system (pulmonary fibrosis)
This man has a long history of breathlessness. Please examine his respiratory system (pulmonary fibrosis)
Examine this lady’s respiratory system from the front. About half a minute later I was asked to examine her chest from the back (carcinoma of the lung)
This gentleman has been getting more breathless in recent months. Please examine his chest (thoracotomy)
This lady is breathless. Please examine her chest (emphysema)
This man has noisy breathing. Please examine his chest to find out why (upper airways obstruction)
This man has developed a productive cough. Please examine his chest and suggest a cause (aspergillosis and old tuberculosis)
Examine this patient’s respiratory system and comment on positive findings as you go (pulmonary fibrosis)
This young man is breathless. Please examine his chest (chronic obstructive pulmonary disease and α1-antitrypsin deficiency)
This man has a cough. Please examine his chest (bronchiectasis)
This man has been becoming increasingly breathless over the past 2 years. He is a non-smoker. Please examine his respiratory system to determine a cause (no diagnosis reached)
This man complains of shortness of breath. Examine him and find out why (no diagnosis reached)
Diagnoses from Survey in Order of Frequency
1 Interstitial lung disease (fibrosing alveolitis) 21%
2 Pneumonectomy/lobectomy 16%
3 Bronchiectasis 12%
4 Dullness at the lung bases 10%
5 Chronic bronchitis and emphysema 8%
6 Rheumatoid lung 8%
7 Old tuberculosis 6%
8 Stridor 4%
9 Superior vena cava obstruction 3%
10 Kartagener’s syndrome 2%
11 Marfan’s syndrome (Vol. 3, Station 5, Locomotor, Case 9) 2%
12 Lung transplant 2%
13 Cor pulmonale 2%
14 Chest infection/consolidation/pneumonia 1%
15 Obesity/Pickwickian syndrome 1%
16 Tuberculosis/apical consolidation 1%
17 Carcinoma of the bronchus <1%
18 Pneumothorax <1%
19 Cystic fibrosis <1%
Examination Routine
While approaching the patient, asking for his permission to examine him and settling him reclining at 45° to the bed with his chest bare, you should observe from the end of the bed
1 his general appearance. Note any evidence of weight loss. The features of conditions such as superior vena cava obstruction (see Station 1, Respiratory, Case 22), systemic sclerosis (see Vol. 3, Station 5, Locomotor, Case 3) and lupus pernio (see Vol. 3, Station 5, Skin, Case 9) may be readily apparent as should be severe kyphoscoliosis. However, ankylosing spondylitis is easily missed with the patient lying down (see Vol. 2, Section F, Experiences 110 and 139). Observe specifically whether the patient
2 is breathless at rest or from the effort of removing his clothes,
3 purses his lips (chronic small airways obstruction), or
4 has central
cyanosis * (cor pulmonale, fibrosing alveolitis, bronchiectasis). Central cyanosis may be difficult to recognize; it is always preferable to look at the oral mucous membranes (see below). Observe
5 if the accessory muscles are being used during breathing (chronic small airways obstruction, pleural effusion, pneumothorax, etc.),
6 if there is generalized indrawing of the intercostal muscles or supraclavicular fossae (hyperinflation) or if there is indrawing of the lower ribs on inspiration (due to low, flat diaphragms in emphysema). Localized indrawing of the intercostal muscles suggests bronchial obstruction.
Listen to the breathing with unaided ears whilst you observe the chest wall and hands (but do not dither). This will allow a dual input whereby a combination of what you hear and what you see may help you form a diagnostic impression. You should listen to whether expiration is more prolonged than inspiration (normally the reverse), and difficult (chronic airways obstruction), whether it is noisy (breathlessness) and if there are any additional noises such as wheezes or clicks. Difficult and noisy inspiration is usually caused by obstruction in the major bronchi (mediastinal masses, retrosternal thyroid, bronchial carcinoma, etc.) while the more prolonged, noisy and often wheezy expiration is caused by chronic small airways obstruction (asthma, chronic bronchitis). Note the character of any cough, whether it is productive (?bronchiectasis) or dry. While you are listening, observe
7 the movement of the chest wall. It may be mainly upwards (emphysema) or asymmetrical (fibrosis, collapse, pneumonectomy, pleural effusion, pneumothorax). In the context of the examination, it is particularly important to look for localized apical flattening suggestive of underlying fibrosis due to old tuberculosis (see Station 1, Respiratory, Case 7) or pneumonectomy (see Station 1, Respiratory, Case 2). You may also note a thoracotomy or thoracoplasty scar (see Station 1, Respiratory, Cases 2 and 7) or the presence of radiotherapy field markings (Indian ink marks) or radiation burns on the chest (intrathoracic malignancy; see Vol. 3, Station 5, Skin, Case 31).
Before touching the patient, ensure that you have looked for any peripheral clues, such as sputum pots for haemoptysis or purulent sputum, nebulizer therapy, inhaler therapy, oxygen (what rate per minute?), temperature chart, peak flow chart or transplant pagers.
Check the hands for
8 clubbing (see Vol. 3, Station 5, Skin, Case 17), tobacco staining, coal dust tattoos or other conditions which affect the hands and may be associated with lung disease such as rheumatoid arthritis (nodules; see Vol. 3, Station 5, Locomotor, Case 1) or systemic sclerosis (see Vol. 3, Station 5, Locomotor, Case 3).
9 Feel the pulse and if it is bounding, or if the patient is cyanosed, check for a flapping tremor of the hands (CO2 retention) or a fine tremor due to β-agonist therapy (salbutamol or terbutaline). If there is doubt about the presence of cyanosis, you could at this point check the tongue and the buccal mucous membranes over the premolar teeth before moving to the neck to look for
10 raised venous pressure (cor pulmonale) or fixed distension of the neck veins (superior vena cava obstruction). Next examine
11 the
trachea. Place the index and ring fingers on the manubrium sternae over the prominent points on either side. Use the middle finger as the exploring finger to gently feel the tracheal rings to detect either
deviation or a
tracheal tug (i.e. the middle finger being pushed upwards against the trachea by the upward movement of the chest wall). Check the
notch–cricoid distance.
*
12 Feel for lymphadenopathy (carcinoma, tuberculosis, lymphoma, sarcoidosis) in the cervical region and axillae. As the right hand returns from the left axilla, look for
13 the apex beat (difficult to localize if the chest is hyperinflated) which in conjunction with tracheal deviation may give you evidence of mediastinal displacement (collapse, fibrosis, pneumonectomy, effusion, scoliosis).
14 To look for asymmetry, rest one hand lightly on either side of the front of the chest to see if there is any diminution of movement (effusion, fibrosis, pneumonectomy, collapse, pneumothorax). Next grip the chest symmetrically with the fingertips in the ribspaces on either side and approximate the thumbs to meet in the middle in a straight horizontal line in order to
15 assess expansion first in the inframammary and then in the supramammary regions. Note the distance between each thumb and the midline (may give further information about asymmetry of movement) and between both thumbs and try to express the expansion in centimetres (it is better to produce a tape measure for a more accurate assessment of the expansion in centimetres). Comparing both sides at each level,
16 percuss the chest from above downwards starting with the supraclavicular fossae and over the clavicles
* and do not forget to percuss over the axillae. Few clinicians now regularly map out the area of cardiac dullness. In healthy people there is dullness behind the lower left quarter of the sternum which is lost together with normal liver dullness in hyperinflation. Complete palpation by checking for
17 tactile vocal fremitus with the ulnar aspect of the hand applied to the chest.
18 Auscultation of the
breath sounds should start
high at the apices and you should remember to listen in the
axillae. You are advised to cover both lung fields first with the bell
† before using the diaphragm (if for no other reason than that this allows you a chance to check the findings without appearing to backtrack!). In the nervousness of the examination, harsh breathing heard with the diaphragm near a major bronchus (over the second intercostal space anteriorly or below the scapula near the mid-line posteriorly) may give an impression of bronchial breathing, particularly in thin people. Compare corresponding points on opposite sides of the chest. Ensure that the patient breathes with the mouth open, regularly and deeply, but not noisily (see Vol. 2, Section F, Experience 162). Auscultation is completed by checking
19 vocal resonance ‡ in all areas;
if you have found an area of bronchial breathing (the sounds may resound close to your ears – aegophony), check also for whispering pectoriloquy. The classic timings of crackles/crepitations of various origins are:
(a) early inspiratory: chronic bronchitis, asthma,
(b) early and mid-inspiratory and recurring in expiration: bronchiectasis (altered by coughing),
(c) mid/late inspiratory: restrictive lung disease (e.g. fibrosing alveolitis
§) and pulmonary oedema.
20 To examine the back of the chest, sit the patient forward (it may help to cross the arms in front of the patient to pull the scapulae further apart) and repeat steps 14–19. You may wish to start the examination of the back by palpating for cervical nodes from behind (particularly the scalene nodes between the two heads of the sternomastoid).
Though with sufficient practice this whole procedure can be performed rapidly without loss of efficiency, often in the examination you will only be asked to perform some of it – usually ‘examine the back of the chest’. As always when forced to perform only part of the complete routine, be sure that the partial examination is no less thorough and professional. Be prepared to put on your ‘wide-angled lenses’ so as not to miss other related signs (see Vol. 2, Section F, Experience 108 and Anecdotes 254 and 255).
Though by now you will usually have sufficient information to present your findings, occasionally you will wish to check other features on the basis of the findings so far. Commonly, you will wish to inspect the ankles for oedema and, if relevant and available, the peak flow chart and temperature chart. Further purposeful examination gives an impression of confidence but it should not be overdone. For example, looking for evidence of Horner’s syndrome or wasting of the muscles of one hand* in a patient with apical dullness and a deviated trachea will suggest professional keenness whereas routinely looking at the eyes and hands after completion of the examination may only suggest to the examiner that you do not have the diagnosis and are hoping for inspiration! If you suspect airways obstruction, the examiner may be impressed if you perform a bedside respiratory function test – the forced expiratory time (FET).†
See Appendix 1, Checklist 3, Chest.
4 | ‘Examine this Patient’s Abdomen’
Variations of Instruction in Initial PACES Survey (Resultant Diagnoses in Brackets)
Examine this patient’s abdomen (transplanted kidney; hepatomegaly and lymph nodes; ascites and chronic liver disease; ascites and hepatosplenomegaly)
This gentleman was found collapsed. Examine his abdomen and give a differential as to the cause of his collapse (alcoholic liver disease)
This gentleman has lost weight and is experiencing fullness in his abdomen. Please examine the abdomen (hepatosplenomegaly and axillary lymph nodes)
This lady has thrombocytopenia. Examine her abdomen and come up with a likely diagnosis (splenomegaly)
This patient is complaining of tiredness, examine his abdomen (hepatosplenomegaly and rheumatoid hands)
Examine this gentleman’s abdomen (alcoholic liver disease, tender hepatomegaly and encephalopathy)
This man has pain on walking. Please examine his abdomen (hepatosplenomegaly and polycythaemia rubra vera)
This patient’s abdomen has shown intermittent swelling – what could one cause be? (alcoholic liver disease)
Examine this abdomen (jaundice, parotid swelling and palpable liver; hepatosplenomegaly and ascites; hepatosplenomegaly and Dupuytren’s contracture)
This patient has been referred from the cardiology clinic with sweats and a mass in the abdomen. Please examine (infective endocarditis)
Please examine this gentleman’s abdominal system and comment on the findings (alcoholic liver disease)
I was given some haematology results which were suggestive that the patient might have a spleen palpable. Examine the abdomen (splenomegaly)
This patient attends the renal clinic with hypertension. Please examine his abdominal system (transplanted kidney)
This 62-year-old man has a lymphocytosis. Please examine his abdomen (splenomegaly)
This lady has been having abdominal pain. Please examine and suggest a cause (polycystic kidneys and polycystic liver)
Examine this man’s abdomen, commenting on what you are doing (hepatosplenomegaly)
Please examine the abdomen of this man who is complaining of pruritus (polycystic kidneys)
This man has high blood pressure. Please examine his abdomen (heart transplant and dialysis fistula)
This 43-year-old man failed a routine medical examination for insurance purposes. Please examine the abdomen and suggest if you can find a reason why (hepatomegaly)
Examine this man’s abdomen and tell me what you find (chronic liver disease)
Diagnoses from Survey in Order of Frequency
1 Chronic liver disease 21%
2 Hepatosplenomegaly 17%
3 Polycystic kidneys 14%
4 Splenomegaly (without hepatomegaly) 13%
5 Transplanted kidney 9%
6 Hepatomegaly (no splenomegaly) 5%
7 Ascites 4%
8 Polycythaemia rubra vera 4%
9 Abdominal mass 2%
10 Carcinoid 2%
11 Crohn’s disease 1%
12 Idiopathic haemochromatosis 1%
13 Nephrotic syndrome <1%
14 Hereditary spherocytosis <1%
15 Felty’s syndrome <1%
16 Generalized lymphadenopathy <1%
17 Single palpable kidney <1%
18 Primary biliary cirrhosis <1%
Other diagnoses were: aortic aneurysm (1%), haemochromatosis (<1%), polycystic kidneys and a transplanted kidney (<1%), splenomegaly and generalized lymphadenopathy (<1%), abdominal lymphadenopathy (<1%), postsplenectomy (<1%) and normal abdomen (<1%).
Examination Routine
Analysis of the above list reveals that in over 80% of cases, the findings in the abdomen relate to a palpable spleen, liver or kidneys. Bearing this in mind, you should approach the right-hand side of the patient and position him so that he is lying supine on one pillow (if comfortable), with the whole abdomen and chest in full view. Ideally, the genitalia should also be exposed but to avoid embarrassment to patients, who are volunteers and whose genitals are usually normal, we suggest that you ask the patient to lower his garments and ensure that these are pulled down to a level about halfway between the iliac crest and the symphysis pubis. While these preparations are being made you should be performing
1 a visual survey of the patient. Amongst the many relevant physical signs that you may observe in these few seconds are pallor, pigmentation, jaundice, spider naevi, xanthelasma, parotid swelling, gynaecomastia, scratch marks, tattoos, abdominal distension, distended abdominal veins, an abdominal swelling, herniae and decreased body hair. If you use the following routine most of these will also be noted during your subsequent examination but at this stage you should particularly note any
2 pigmentation. As the patient is being correctly positioned,
3 quickly examine the hands * for:
(a) Dupuytren’s contracture,
(b) clubbing,
(c) leuconychia,
(d) palmar erythema, and
(e) a flapping tremor (if relevant).
After asking you to examine the abdomen, many examiners would like, and expect, you to concentrate on the abdomen itself without delay, and yet they will not forgive you for missing an abnormal physical sign elsewhere. This emphasizes the importance of a good visual survey; a trained eye will miss nothing important on the face or in the hands while the patient is being properly positioned with the hands by his side. Thus, steps 1–3 need not occupy you for more than a few seconds; you may wish to omit steps 5 and 6 if there is no visible abnormality, and steps 7–11 can be completed as part of the visual survey.
4 Pull down the lower eyelid to look for anaemia. At the same time check the sclerae for icterus and look for xanthelasma. The guttering between the eyeball and the lower lid is the best place to look for pallor or for any discoloration (e.g. cyanosis, jaundice, etc.).
5 Look at the lips for cyanosis (cirrhosis of the liver) and shine your pen torch into the mouth
* looking for swollen lips (Crohn’s), telangiectasis (Osler–Weber–Rendu), patches of pigmentation (Peutz–Jeghers) and mouth ulcers (Crohn’s).
6 Palpate the neck and supraclavicular fossae for
cervical lymph nodes.
† If you do find lymph nodes you should then proceed to examine the axillae and groins for evidence of generalized lymphadenopathy (lymphoma, chronic lymphatic leukaemia). As you move from the neck to the chest, check for
7 gynaecomastia (palpate for glandular breast tissue in obese subjects),
8 spider naevi (may have been noted already on hands, arms and face and may also be present on the back), and
9 scratch marks (may have been noted on the arms, and may also be found on the back and elsewhere). Next,
10 look at the chest (in the male) and in the axillae for paucity of hair (if diminished, note facial hair in the male; pubic hair, if not visible, may be noted later).
11 Observe the abdomen in three segments (epigastric, umbilical and suprapubic) for any visible signs such as
pulsations, generalized
distension (ascites) or a
swelling in one particular area. Note any scars or fistulae (previous surgery; Crohn’s). Look for distended
abdominal veins (the flow is away from the umbilicus in portal hypertension but upwards from the groin in inferior vena cava obstruction).
With practice, the examination to this point can be completed very rapidly and will provide valuable information which may be overlooked if proceeding carelessly straight to palpation of the abdomen (see Vol. 2, Section F, Experience 109). If the examiner insists that you start with abdominal palpation
‡ it suggests that there is little to be found elsewhere, but you should nevertheless be prepared to use your ‘wide-angled lenses’ in order not to miss any of the above features.
12 Palpation of the abdomen should be performed in an orthodox manner; any temptation to go straight for a visible swelling should be resisted. Put your palm gently over the abdomen and ask the patient if he has any tenderness and to let you know if you hurt him. First systematically examine the whole of the abdomen with
light palpation. Palpation should be done with the
pulps of the fingers rather than the tips, the best movement being a gentle flexion at the metacarpophalangeal joints with the hand flat on the abdominal wall. Next, examine specifically for the
internal organs. For both liver and spleen, start in the right iliac fossa (you cannot be frowned upon for following this orthodox procedure
*), working upwards to the right hypochondrium in the case of the
liver and diagonally across the abdomen to the left hypochondrium in the case of the
spleen. The organs are felt against the radial border of the index finger and the pulps of the index and middle fingers as they descend on inspiration, at which time you can gently press and move your hand upwards to meet them. The
kidneys are then sought by bimanual palpation of each lateral region. The lower pole of the normal right kidney can sometimes be felt, especially in thin women. Palpation of the internal organs may be difficult if there is ascites. In this case, the technique is to press quickly, flexing at the wrist joint, to displace the fluid and palpate the enlarged organ (‘dipping’ or ‘ballotting’). In a patient well chosen for the examination, a mass in the left hypochondrium may present a problem of identification (see Vol. 2, Section F, Experiences 131 and 245, and Anecdotes 268 and 270); the examiner (testing your confidence) may ask you if you are sure that it is a spleen and not a kidney or vice versa. Do not forget to establish whether you can
get above the mass and
separate it from the costal edge, whether you can
bimanually palpate it and whether the percussion note over it is
resonant (all features of an enlarged kidney; see also Station 1, Abdominal, Case 6 for the features of a spleen). Palpate
deeply with the pulps to look for the
ascending and
descending colons in the flanks, and use
gentle palpation to feel for an
aortic aneurysm in the mid-line. Complete palpation by feeling for
inguinal lymph nodes, noting obvious herniae and, at the same time, adding information about the distribution and thickness of pubic hair to that already gained about the rest of the body hair.
13 Percussion must be used from the nipple downwards on both sides to locate the upper edge of the liver on the right and the spleen on the left (NB: the left lower lateral chest wall may become dull to percussion before an enlarged spleen is palpable). The lower palpable edges of the spleen and liver should be defined by percussion in an orthodox manner, proceeding from the resonant to dull areas. If you suspect free fluid in the peritoneum, you must establish its presence by demonstrating
14 shifting dullness. Initially check for stony dullness in the flanks. There is no need to continue with the procedure of demonstrating shifting dullness if this is not present. By asking the patient with ascites to turn on his side, you can shift the dullness from the upper to the lower flank.
Before you conclude the palpation and percussion of the abdomen, ask yourself whether you have found anything abnormal. If there are no abnormal physical signs, make sure that you have not missed a polycystic kidney or a palpable splenic edge (or occasionally a mass in the epigastrium or iliac fossae). During your auscultation listen carefully for a bruit over the aorta and renal vessels. Generally speaking,
15 auscultation has very little to contribute in the examination setting, but as part of the full routine you should listen to the bowel sounds, check for renal artery bruits and for any other sounds such as a rub over the spleen or kidney or a venous hum (both excessively rare).
Examination of the
16 external genitalia is not usually required in the examination for the reasons given above, and we have never heard of a case where
17 a rectal examination was required. You should, however, comment that you would like to complete your examination of the abdomen by examining the external genitalia (especially in the male with chronic liver disease – small testes; or cervical lymphadenopathy – drainage of testes to paraaortic and cervical lymph nodes) and rectum. You may of course never get this far since the examiner may interrupt you at an appropriate stage to ask for your findings. If you are allowed to conclude the examination and you have found nothing abnormal despite your careful search, on rare occasions the diagnosis of a normal abdomen will be accepted (see Station 1, Abdominal, Case 11).
See Appendix 1, Checklist 4, Abdomen.
5 | ‘Examine this Patient’s Visual Fields’
Variations of Instruction from our Original Survey
Examine this patient’s visual fields and fundi*
Diagnoses from our Original Survey in Order of Frequency
1 Homonymous hemianopia 25%
2 Optic atrophy (Vol. 3, Station 5, Eyes, Case 3) 21%
3 Bitemporal hemianopia 21%
4 Unilateral hemianopia 7%
5 Partial field defect in one eye due to retinal artery branch occlusion (Vol. 3, Station 5, Eyes, Case 16) 7%
6 Bilateral homonymous quadrantic field defect 4%
7 Acromegaly (Vol. 3, Station 5, Endocrine, Case 2) 4%
Examination Routine
Ask the patient to sit upright on the side of the bed while you position yourself in visual confrontation about a metre away. This apposition will help you to test the visual fields of his left and right eyes against those of your right and left respectively. As he is doing this, perform
1 a visual survey (acromegaly, hemiparesis, cerebellar signs in multiple sclerosis) of the patient. Test both temporal fields together so that you do not miss any visual inattention. Ask the patient to look at your eyes while you place your index fingers just inside the outer limits of your temporal fields. Then move your fingers in turn and then both at the same time, and ask him: ‘Point to the finger which moves’. If there is visual inattention, the patient will only point to one finger when you move both at the same time. Next test each eye individually and ask him to cover his right eye with his right hand, and close your left eye: ‘Keep looking at my eye’.
2 Examine his
peripheral visual fields. Test his left temporal vision against your right temporal by moving your wagging finger from the periphery towards the centre: ‘Tell me when you see my finger move’.
* The temporal field should be tested in the horizontal plane and by moving your finger through the upper and lower temporal quadrants. Change hands and repeat on the nasal side. By comparing his visual field with your own, any areas of field defect are thus mapped out. The visual fields of his right eye are similarly tested.
3 A central scotoma is tested for with a red-headed hat pin. If you have already found a field defect which does not require further examination, or if the examiner does not wish you to continue, he will soon stop you. Otherwise, comparing your right eye with the patient’s left, as before, move the red-headed pin from the temporal periphery through the central field to the nasal periphery, asking the patient: ‘Can you see the head of the pin? What colour is it? Tell me if it disappears or changes colour’.
Patients with optic neuropathy may report altered colour vision even if there is no absolute central loss of vision. If there is no scotoma, find his blind spot and compare it with your own. The blind spot may be enlarged in chronic papilloedema or consecutive optic atrophy.
Having found the field defect, look for
4 additional features (e.g. acromegaly, hemiparesis, nystagmus and cerebellar signs) if appropriate. Recall the possible causes for each type of field defect as this question, at the end of the case, is inevitable (see Station 3, CNS, Case 13).
See Appendix 1, Checklist 5, Visual fields.
6 | ‘Examine this Patient’s Cranial Nerves’
Variations of Instruction in Initial PACES Survey (Resultant Diagnoses in Brackets)
Examine this patient’s cranial nerves (right homonymous hemianopia)
Examine this patient’s cranial nerves and check the reflexes in the lower limbs as this patient has had a noticeable weakness of both legs (multiple sclerosis)
Diagnoses from Our MRCP Surveys
1 Right homonymous hemianopia with macula sparing
2 Bulbar palsy
3 Internuclear ophthalmoplegia – multiple sclerosis
4 Cerebellopontine angle syndrome
5 Myasthenia gravis
6 Ocular palsy and dysarthria
7 Unilateral VIth, VIIth nerve palsies and nystagmus and possibly a XIIth nerve palsy
*
8 Unilateral IXth, Xth, XIth and XIIth nerve lesions (suggesting jugular foramen syndrome
†)
Examination Routine
Perhaps surprisingly, this instruction was comparatively rare in our surveys before PACES, but seems to have experienced a slight increase in popularity in the PACES era, appearing in 4% of the PACES survey reports we have received (see Vol. 2, Section F, Experiences 26 and 30). It is one of the most feared instructions but at the same time it can provide an opportunity to score highly. More than in any other system, the well-rehearsed candidate can appear competent and professional compared with the unrehearsed. Detailed examination of the individual nerves is not usually required but rather a quick and efficient screen like that used by neurologists at the bedside or in outpatients (it is well worth attending neurology outpatients to watch quick and efficient examination techniques, if for nothing else). Not only can you look good but also the abnormalities are usually easy to detect. Although it is to be hoped that your practised routine will not miss out any nerves, it is preferable to perform a smooth, professional examination, which accidentally misses out a nerve, than to test your examiner’s patience through a hesitant and meditative examination which takes a long time to start and may never finish! Since the examination is most easily carried out face to face with the patient, it is best, if possible, to get him to sit on the edge of the bed facing you. First
1 take a good general and quick look at the patient, in particular his face, for any obvious abnormality. Next ask him about
2 his sense of smell and taste: ‘Do you have any difficulty with your sense of smell?’ (I). Although you should have the ability to examine taste (VII, IX) and smell formally if equipment is provided, usually questioning (or possibly the judicious use of a bedside orange) is all that is required. All the examination referable to the eyes is best performed next. Unless there is a Snellen chart available, ask the patient to look at the clock on the wall or some newspaper print to give you a good idea of his
3 visual acuity:
‘Do you have any difficulty with your vision?’
‘Can you see the clock on the wall?’ (if he has glasses for long sight he should put them on)
‘Can you tell me what time it says?’ (II).
A portable Snellen chart will enable you to perform a more formal test.
Now test the
4 visual fields (see Section B, Examination Routine 5 above), including for central scotoma, with a red-headed hat pin. Follow this by examining
5 eye movements (move your finger in the shape of a cross, from side to side then up and down): ‘Look at my finger; follow it with your eyes’ (III, IV, VI), asking the patient at the extremes of gaze whether he sees one or two fingers. If he has diplopia, establish the extent and ask him to describe the ‘false’ image. As you test eye movements, note at the same time any
6 nystagmus (VIII, cerebellum or cerebellar connections; see Fig. C3.21, Station 3, CNS, Case 32, or
7 ptosis (III, sympathetic).
Remember that either extreme abduction of the eyes or gazing at a finger that is too near can cause nystagmus in normal eyes (optokinetic). Now examine
8 the
pupils for the direct and consensual
light reflex (II → optic tract → lateral geniculate ganglion → Edinger–Westphal nucleus of III → fibres to ciliary muscle) and for the
accommodation–convergence reflex (cortex → III) with your finger just in front of his nose:
‘Look into the distance’
‘Now look at my finger’ (see also Footnote, Section B, Examination Routine 13).
Finally examine the optic discs (II) by
9 fundoscopy (this can be left until last if you prefer). Having finished examining the eyes, examine
10 facial movements:

11 then
palatal movement:
‘Keep your mouth open; say aah’ (IX, X)
12 and
gag reflex * – touch the back of the pharynx on both sides with an orange stick (IX, X). Look at
13 the
tongue as it lies in the floor of the mouth for
wasting or
fasciculation (XII):
‘Open your mouth again’
then get the patient to:
‘Put your tongue out’ – note any deviation
† – ‘waggle it from side to side’ (XII).
14 Test the
accessory nerve:
‡
‘Shrug your shoulders; keep them shrugged’ – push down on the shoulders (XI).
‘Turn your head to the left side, now to the right’ – feel for the sternomastoid muscle on the side opposite to the turned head (XI).
Finally test
15 hearing:
‘Any problem with the hearing in either ear?’
‘Can you hear that?’ – rub finger and thumb together in front of each ear in turn (VIII – proceed to the Rinné and Weber tests
* if there is any abnormality, and look in the ear if you suspect disease of the external ear, perforated drum, wax, etc.), and
16 test
facial sensation including
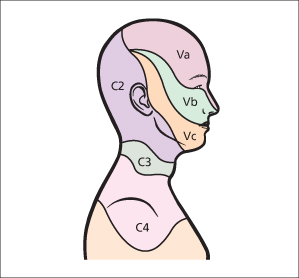
corneal reflex (sensory V; see
Fig. B.1).
See Appendix 1, Checklist 6, Cranial nerves.
7 | ‘Examine this Patient’s Arms’
Variations of Instruction in Initial PACES Survey (Resultant Diagnoses in Brackets)