Assisting in the Analysis of Urine
Learning Objectives
1. Define, spell, and pronounce the terms listed in the vocabulary.
2. Apply critical thinking skills in performing the patient assessment and patient care.
3. Understand the purpose of routine urinalysis.
4. Describe the physiology of urine formation.
5. Display sensitivity to patient rights and feelings when collecting specimens.
6. Explain the various means and methods used to collect urine specimens.
7. Instruct a patient in the collection of a 24-hour urine specimen.
8. Instruct a patient in the collection of a clean-catch midstream urine specimen.
9. Describe the components of the physical and chemical examination of urine.
10. Measure the urine specific gravity.
11. Perform a complete urinalysis using a chemical reagent strip.
13. Prepare a urine specimen for microscopic examination.
14. Perform quality control measures to determine the reliability of chemical reagent strips.
15. Conduct glucose testing using the Clinitest method.
16. Explain the principle of lateral flow technology in pregnancy testing.
19. Explain the principle of lateral flow technology in drug testing on urine.
20. Demonstrate a method of drug testing on a urine specimen.
21. List the means by which urine could be adulterated before drug testing.
22. Demonstrate a method of detecting adulterating substances in a urine sample for drug testing.
23. Describe patient education factors that are pertinent to urine sample collection.
Vocabulary
amorphous (a-mohr′-fuhs) Lacking a defined shape.
bilirubinuria (bi-li-roo′-bin-yuhr-e-uh) The presence of bilirubin in the urine.
colony-forming units (CFUs) A term used when reporting bacteriuria; one CFU represents one bacterium present in the urine sample.
crenate Forming notches or leaflike, scalloped edges on an object.
culture and sensitivity (C&S) A procedure performed in the microbiology laboratory in which a specimen is cultured on artificial media to detect bacterial or fungal growth, followed by appropriate screening for antibiotic sensitivity.
cystoscopy Visual examination of the urinary bladder using a fiberoptic instrument.
enzymatic reaction A chemical reaction controlled by an enzyme.
filtrate The fluid that remains after a liquid is passed through a membranous filter.
gold standard The paragon of excellence; the diagnostic test against which all others are compared.
metabolite The product of the metabolism of a substance, such as a drug.
mononuclear white blood cells Leukocytes with an unsegmented nucleus; monocytes and lymphocytes in particular.
myoglobinuria The abnormal presence of a hemoglobinlike chemical of muscle tissue in the urine; it is the result of muscle deterioration.
phenylalanine (fe-nehl-ah′-luh-nen) An essential amino acid found in milk, eggs, and other foods.
polymorphonuclear white blood cells Leukocytes with a segmented nucleus; also known as polymorphonuclear neutrophils (PMNs) or segmented neutrophils.
refractile (re-frak′-tuhl) Causing light to refract or bend, thus creating a sharp boundary or image.
renal thresholds Levels above which substances cannot be reabsorbed by the renal tubules and therefore are excreted in the urine.
sediment Insoluble material that settles to the bottom of a urine specimen.
Scenario
As part of her duties as a CMA (AAMA), Rosa Gonzales performs tests on patients’ urine ordered by her employer, Dr. Ronald Hill. Rosa knows that urinalysis is a very important part of patient care, and a number of urinary tests are performed in the laboratory in Dr. Hill’s busy practice. Dr. Hill most commonly orders routine urinalysis testing, but Rosa also performs some specialized tests. Today, Dr. Hill has ordered a urinalysis (UA) on a specimen from Mr. Parks, a UA and pregnancy test on a specimen from Mrs. Carpenter, and a UA and culture and sensitivity (C&S) on a specimen from Ms. Hillman.
While studying this chapter, think about the following questions:
• What is involved in a routine urinalysis?
• What quality assurance measures will Rosa take when performing laboratory tests on urine?
• How are pregnancy and drug tests performed on urine?
A routine urinalysis (UA) is one of the more common laboratory examinations used in the diagnosis and treatment of disease. It is easily and quickly performed, and invasive techniques generally are not needed to collect the specimen. The results of a routine UA can reveal diseases of the bladder or kidneys; systemic metabolic or endocrine disorders, such as diabetes; and diseases of the liver, such as hepatitis or cirrhosis, or obstruction of the bile ducts. UA is routinely performed on all patients undergoing physical examination and on those entering the hospital for treatment.
Physiology of Urine Formation
For centuries abnormalities in the urine have been recognized as possible indicators of a disruption of homeostasis. One of the earliest known tests of urine involved pouring it on the ground to see whether it attracted insects. Such attraction indicated “honey urine,” which was known to be excreted by people with skin eruptions. Today, urine is still checked for glucose as a means of detecting diabetes.
Historically, examination of the urine became a game for quacks and charlatans. Paintings from the Middle Ages show physicians peering into round-bottomed flasks of urine, claiming not only to be able to diagnose disease, but also to see into the future by simply looking at the fluid. These charlatans became known as “pisse prophets.” During the twentieth century, UA became a practical laboratory procedure, and today urine is the most commonly analyzed body fluid in the clinical laboratory.
Urine is analyzed for several reasons—first to detect extrinsic conditions, in which the kidneys are functioning normally but abnormal end products of metabolism are excreted as a result of an imbalance in homeostasis. For example, individuals with diabetes mellitus may excrete glucose in the urine when they are experiencing hyperglycemia. The second reason is to detect intrinsic pathologic conditions that involve the kidneys or the urinary tract, such as the presence of kidney stones or of a urinary tract infection. In addition, because chemicals are excreted through the kidneys, urinalysis can be used to determine the effectiveness of medications and/or the possibility of urinary system side effects from prescribed drugs.
Anatomy of the Urinary Tract
Medical assistants must have a basic knowledge of kidney structure and urine formation to understand the results of a UA. The urinary tract consists of two kidneys, two ureters, one bladder, and one urethra. The functional unit of the kidney is the nephron. Each kidney has more than 1 million nephrons, and each nephron is composed of five distinct areas, each playing a role in urine formation (Figure 52-1). Each nephron consists of a glomerulus, which acts in filtering, and a tubule, through which the filtrate passes. As the filtrate passes through, various changes occur. Certain solutes are reabsorbed, and others are secreted into the kidney for eventual excretion. Nearly all of the water that passes through the glomeruli is reabsorbed.
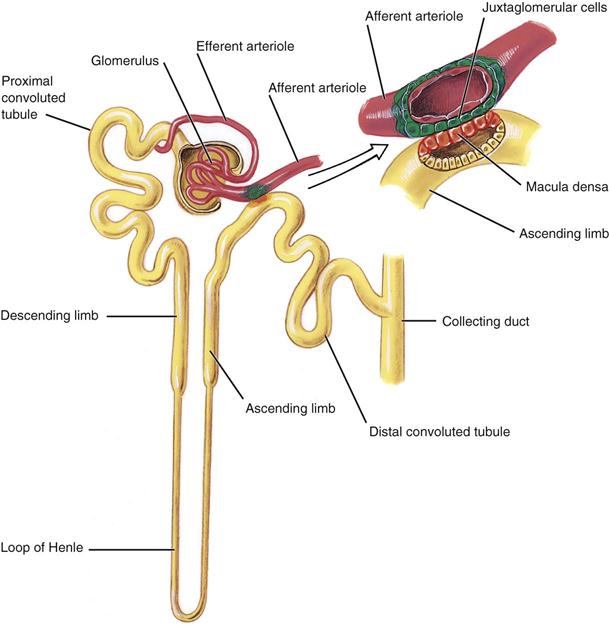
The glomerulus is composed of a network of capillaries surrounded by a membrane called Bowman’s capsule. The afferent arteriole carries blood from the renal artery into the glomerulus, where it then divides to form a capillary network. Where they reunite, the capillaries form the efferent arteriole, through which blood exits the glomerulus.
The tubular portion of the nephron is composed of the proximal convoluted tubule, the thin-walled segment, and the distal convoluted tubule. The thin-walled descending portion forms a loop known as the loop of Henle. Filtrate from several nephrons drains into a collecting tubule, several of which join to form a collecting duct. The collecting ducts join to form the papillary ducts, which empty at the tips of the papillae into the calyces. The filtrate then drains into the renal pelvis and is now called urine. Urine passes from the pelvis of the kidney down the ureter and into the bladder, where it remains until it is voided through the urethra.
Formation of Urine
The kidney selectively excretes or retains substances according to the body’s needs and renal thresholds. Approximately 1,200 mL of blood flows through the kidneys each minute. The blood enters the glomerulus through the afferent arteriole. The capillary walls of the glomerulus are highly permeable to water and to the low-molecular-weight solutes of the plasma, and they filter through into Bowman’s space and then into the tubules. Many components of the filtrate, including glucose, water, and amino acids, are partially or completely reabsorbed by the capillaries surrounding the proximal tubules. More water is absorbed, and hydrogen and potassium ions are secreted in the distal tubules. Urine is concentrated in the system of collecting tubules and the loop of Henle. The kidneys convert nearly 180,000 mL of filtered plasma per day into a final urine volume of 750 to 2000 mL—approximately 1% of the filtered plasma volume. The largest component of urine is water; the solutes consist mostly of urea, chloride, sodium, potassium, phosphate, sulfate, creatinine, and uric acid.
Collecting a Urine Specimen
Patient Sensitivity
The request for a urine specimen may create an embarrassing moment for the patient. The request should be made in private, such as after the patient is seated in the examination room, and the individual should be given explicit instructions so that he or she understands what is expected. The medical assistant should use therapeutic communication to explain the details of the procedure to the patient and should be observant for indications of confusion. If a language barrier exists, be creative but respectful of the patient’s need to follow through correctly on the instructions for collection of the specimen.
Containers
The most important requirement for a collection container is scrupulous cleanliness. The physician’s office laboratory should provide a container; patients should not use jars from home. Disposable, nonsterile, plastic, or coated paper containers are the most common and are available in many sizes with tight-fitting lids. If the sample is being sent to the laboratory for a culture, the specimen must be collected in a sterile container, and the patient must understand how to collect the specimen and how to handle the sterile specimen cup. Special pliable polyethylene bags with adhesive (see Chapter 42) are used to collect urine from infants and children who are not toilet trained. For specimens that must be collected over a specified period, large, wide-mouth plastic containers with screw-cap tops are used. Most routine UA testing, pregnancy testing, and tests for abnormal analytes are performed on urine collected in nonsterile containers.
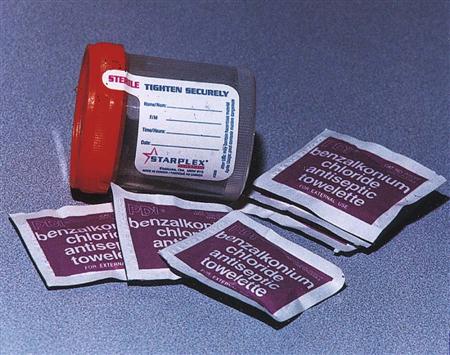
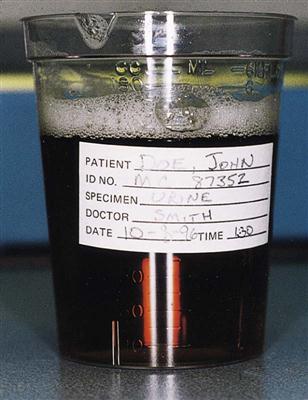
As mentioned, when a urine culture is ordered, the specimen must be collected in a sterile container. Such containers are packaged with an intact paper seal over the cap and/or in sterile envelopes (Figure 52-2). The label on all specimens must include the patient’s name, the date and time of collection, and the type of specimen. Always put on gloves before handling filled specimen containers.

Methods of Specimen Collection
Most analyses are performed on freshly voided urine collected in clean containers; this is called a random specimen. If the specimen is ordered to be collected when the patient arises in the morning, it is called a first morning specimen. These specimens are most concentrated and are best for nitrite and protein determination, bacterial culture, pregnancy testing, and microscopic examination. Two-hour postprandial urine specimens, collected 2 hours after a meal, are used in diabetes screening and for home diabetes testing programs. The 24-hour urine specimen is collected over 24 hours to provide a quantitative chemical analysis, such as hormone levels and creatinine clearance rates (a procedure for evaluating the glomerular filtration rate of the kidneys) (Procedure 52-1).
Procedure 52-1
Explain the Rationale for Performing a Procedure
Instruct a Patient in the Collection of a 24-Hour Urine Specimen
GOAL: To collect a 24-hour urine sample for creatinine clearance.
EQUIPMENT and SUPPLIES
Procedural Steps
1. Greet the patient by name.
PURPOSE: To make sure you have the right patient.
2. Label the container with the patient’s name and the current date, identify the specimen as a 24-hour urine specimen, and include your initials.
PURPOSE: Labeling the container prevents a possible mix-up of specimens.
3. Explain the following instructions to adult patients or to the guardians of pediatric patients.
Patient Instructions for Obtaining a 24-Hour Urine Specimen
2. For the next 24 hours, each time you empty your bladder, the urine should be voided directly into the large specimen container (Figure 1).
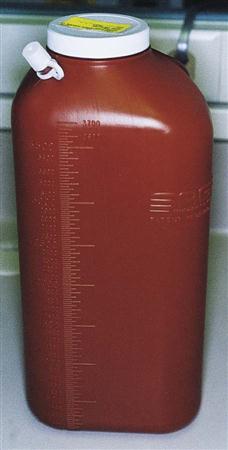
3. Put the lid back on the container after each urination and store the container in the refrigerator or in an ice chest throughout the 24 hours of the study.
PURPOSE: To inhibit microbial growth in the specimen.
4. If at any time you forget to empty your bladder into the specimen container, or if some urine is accidentally spilled, the test must be started all over again with an empty container and a newly recorded start time.
PURPOSE: The test will be inaccurate if the patient fails to collect all urine produced during the designated 24-hour period.
7. Give the patient the specimen container with written instructions to confirm understanding.
8. Document the details of the patient education intervention in the patient’s record.
Processing a 24-Hour Urine Specimen
1. Ask the patient whether he or she collected all voided urine throughout the 24-hour period or whether any problems occurred during the collection process.
PURPOSE: To confirm the accuracy of the specimen.
2. Complete the laboratory request form and prepare the specimen for transport.
3. Store the specimen in the refrigerator until it is picked up by the laboratory.
A second-voided specimen usually is collected to determine glucose levels; the first void of the morning is discarded, and the second void of the day is collected. For a catheterized specimen, the physician, the physician’s assistant, or the nurse must insert a sterile catheter into the bladder to collect the specimen. A suprapubic specimen is collected with a needle inserted directly into the bladder.
The minimum volume for a routine UA usually is 12 mL, but 50 mL is preferred. For any type of collection, it is imperative that the patient receive adequate verbal and/or written instructions. The easiest directions for the patient are to ask the person to fill the container halfway.
A clean-catch midstream specimen (CCMS) is ordered when the physician suspects a urinary tract infection and therefore orders a urine culture for examination of microorganisms. The clean-catch technique is used to remove microorganisms from the urinary meatus by thoroughly cleansing the area around the meatus and to flush out the distal portion of the urethra. Because the specimen is collected in the medical office by the patient, the medical assistant needs to give complete, understandable instructions to the patient on the method of collection (Procedure 52-2). Failure to do so may mean that the patient will have to return to the office to provide another specimen. For a urine culture, the urine is collected either by catheterization or by the clean-catch method in a sterile container.
Procedure 52-2
Instruct Patients According to Their Needs
Instruct a Patient in the Collection of a Clean-Catch Midstream Urine Specimen
GOAL: To collect a contaminant-free urine sample for culture or analysis using the clean-catch midstream specimen (CCMS) technique.
EQUIPMENT and SUPPLIES
Procedural Steps
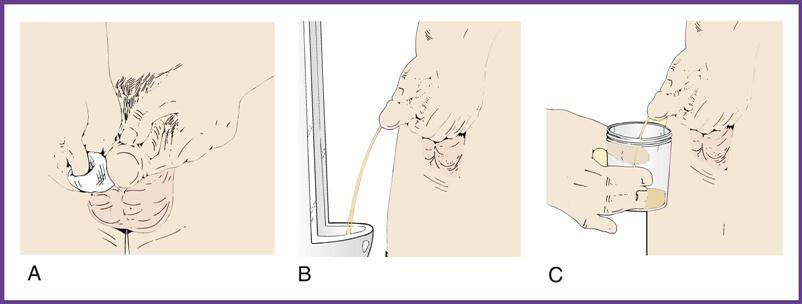
1. Label the container and give the patient the supplies (Figure 1).
PURPOSE: Labeling the container prevents a possible mix-up of specimens.
Obtaining a Clean-Catch Midstream Specimen (Female Patient)
1. Wash your hands and open the towelette packages for easy access.
2. Remove the lid from the specimen container, being careful not to touch the inside of the lid or the inside of the container. Place the lid, facing up, on a paper towel.
PURPOSE: The lid and the container must be handled carefully to maintain the sterility of the container and prevent contamination of the urine sample.
3. Remove your underclothing and sit on the toilet.
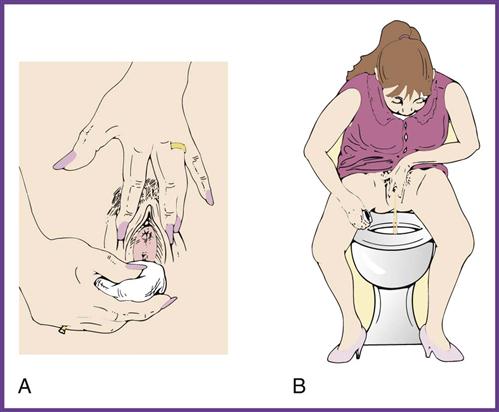
4. Expose the urinary meatus by spreading apart the labia with one hand (Figure 2, A).
5. Cleanse each side of the urinary meatus with a front-to-back motion, from the pubis to the anus. Use a separate antiseptic wipe to cleanse each side of the meatus.
PURPOSE: Cleansing the area around the urinary meatus prevents contamination of the urine sample. Wiping in one stroke from front to back prevents the passage of microorganisms from the anal region to the area around the urinary meatus.
6. Cleanse directly across the meatus, front-to-back, using a third antiseptic wipe (see Figure 2, A).
7. Hold the labia apart throughout this procedure.
8. Void a small amount of urine into the toilet (Figure 2, B).
PURPOSE: Allowing the initial flow of urine to pass into the toilet flushes the opening of the urethra.
Obtaining a Clean-Catch Midstream Specimen (Male Patients)
1. Wash your hands and expose the penis.
2. Retract the foreskin of the penis (if not circumcised).
3. Cleanse the area around the glans penis (meatus) and the urethral opening by washing each side of the glans with a separate antiseptic wipe (Figure 3, A).
4. Cleanse directly across the urethral opening using a third antiseptic wipe.
5. Void a small amount of urine into the toilet or urinal (Figure 3, B).
6. Collect the next portion of the urine in the sterile container, filling the container halfway without touching the inside of the container with the hands or the penis (Figure 3, C).
7. Void the last amount of urine into the toilet or urinal.
9. Return the specimen to the designated area.
PURPOSE: Instructions must be understood if they are to be followed correctly. By talking to the patient, you can determine whether the patient understands or has any questions.
Processing a Clean-Catch Urine Specimen
1. Document the date, time, and collection type.
2. Process the specimen according to the physician’s orders. Perform urinalysis in the office or prepare the specimen for transport to the laboratory. If it is to be sent to an outside laboratory, complete the following steps:
• Make sure the label is properly completed with patient information, date, time, and test ordered.
• Place the specimen in a biohazard specimen bag.
• Complete a laboratory requisition and place it in the outside pocket of the specimen bag.
• Keep the specimen refrigerated until pickup.
Handling and Transportation of a Specimen
Proper handling of specimens is essential. The chemical and cellular components of urine change if the urine is allowed to stand at room temperature (Table 52-1). Urine specimens should be kept refrigerated and should be processed within 1 hour of collection. If the specimen must be transported to a referral laboratory, evacuated transport tubes are available; these contain preservatives and look much like blood collection tubes (Figure 52-3). The vacuum in the tube allows for the delivery of 7 to 8 mL of urine, using a transfer straw or a urine collection cup with an integrated sampling device. Alternatively, the urine can be poured into the tube after the stopper is removed. The preservatives in the BD Vacutainer cherry red/yellow-stoppered tube—chlorhexidine, ethylparaben, and sodium propionate—prevent the overgrowth of bacteria and inhibit changes in the urine that can affect test results. Chemical reagent strip testing can be performed on preserved specimens; however, it should be performed within 72 hours. Tubes may be held at room temperature during this time.
TABLE 52-1
Changes in Urine at Room Temperature
| CONSTITUENT | CHANGE |
| Clarity | Becomes cloudy as crystals precipitate and bacteria multiply |
| Color | May change if pH becomes alkaline |
| pH | Becomes alkaline as bacteria form ammonia from urea |
| Glucose | Decreases as it is metabolized by bacteria |
| Ketones | Decrease because of evaporation |
| Bilirubin and urobilinogen | Undergo degradation in light |
| Blood | May hemolyze; false-positive results are possible because of bacterial peroxidase |
| Nitrite | May become positive as bacteria multiply and reduce nitrate |
| Casts | Lyse or dissolve in alkaline urine |
| Cells | Lyse or dissolve in alkaline urine |
| Bacteria | Multiply twofold approximately every 20 minutes |
| Yeasts | Multiply |
| Crystals | Precipitate as urine cools; may dissolve if pH changes |

A different preservative must be used for urine specimens slated for culture. The BD Vacutainer urine collection kit contains the preservatives sodium formate and boric acid to help preserve the level of bacteria present at the time of collection. This transport system should be used only for urine specimens that will be cultured. Results on the chemical reagent strip may be altered by these preservatives. Culture and sensitivity (C&S) testing should be performed within 72 hours. Tubes may be held at room temperature.
A laboratory request form must be completed for all specimens that will be transported to another site for analysis. Typical forms include the patient’s name and the date, the type of urinalysis ordered, the name of the physician requesting the examination, the appropriate International Classification of Diseases, Ninth Revision, Clinical Modification (ICD-9-CM) code for the diagnosis that warranted the test, and a line for the physician to sign after he or she has reviewed the results. Specimens are sent to the laboratory in a plastic biohazard bag that zips closed and has an outside pocket, where the laboratory request is placed.
Routine Urinalysis
Physical Examination of the Urine
The first part of a complete UA is assessment of the physical properties of the urine and measurement of selected chemical constituents that are diagnostically important (Table 52-2 and Procedure 52-3).
TABLE 52-2
Components of Macroscopic Urinalysis
| PHYSICAL PROPERTIES | CHEMICAL PROPERTIES |
| Color | Protein |
| Clarity | Glucose |
| Specific gravity | Ketones |
| Volume* | Bilirubin |
| Odor* | Blood |
| Foam* | Nitrite |
| pH | |
| Urobilinogen | |
| Leukocyte esterase |
Procedure 52-3
Perform a Urinalysis and Patient Screening Using Established Protocols
Assess the Urine for Color and Turbidity—the Physical Test
GOAL: To assess and record the color and clarity of a urine specimen.
EQUIPMENT and SUPPLIES
Procedural Steps
1. Sanitize your hands and put on gloves.
2. Mix the urine by swirling.
PURPOSE: Suspended substances settle when urine stands. If urine is not mixed before assessment of appearance, the finding will be incorrect.
3. Label a centrifuge tube if a complete urinalysis is being done.
PURPOSE: If a complete urinalysis is to be done, a portion of the specimen will be centrifuged for microscopic examination. The centrifuged specimen must be labeled to prevent specimen confusion.
4. Pour the specimen into a standard-sized centrifuge tube.
PURPOSE: Standard-sized containers are better for assessing color and clarity results.
5. Assess and record the color (Figure 1):
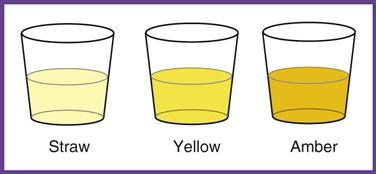
• Yellow
• Amber
• Slightly turbid—can see light print through tube
• Moderately turbid—can see only dark print through tube
• Very turbid—cannot see through tube
7. Clean the work area, remove your gloves, dispose of the gloves and procedure supplies in a biohazard waste container, and sanitize your hands.
PURPOSE: To ensure infection control.
8. Record the results in the patient’s record.
PURPOSE: A procedure is considered not done until it is recorded.
Appearance
Color.
Normal urine is a shade of yellow, ranging from pale straw to yellow to amber. The color depends on the concentration of the pigment urochrome and the amount of water in the specimen. A dilute specimen should be pale, and a more concentrated specimen should be a darker yellow. Variations in color may be caused by diet, medication, and disease. Abnormal colors may be related to pathologic or nonpathologic factors (Table 52-3).
TABLE 52-3
| COLOR | PATHOLOGIC CAUSE | NONPATHOLOGIC CAUSE |
| Straw | Diabetes | Diuretics; high fluid intake (coffee, beer) |
| Amber | Dehydration | Excessive sweating; low fluid intake |
| Bright yellow | Carotene, vitamins | |
| Red | Blood, porphyrins | Menstruation, beets, drugs, dyes |
| Orange-yellow | Bile, hepatitis | Pyridium (phenazopyridine hydrochloride), dyes, drugs |
| Greenish yellow | Bile, hepatitis | Senna, cascara, rhubarb |
| Reddish brown | Old blood, methemoglobin | |
| Brownish black | Methemoglobin, melanin | Levodopa |
| Salmon pink | Amorphous urates | |
| White (milky) | Fats, pus | Amorphous phosphates |
| Blue-green | Biliverdin, infection with Pseudomonas organisms | Vitamin B, drugs, dyes |
Turbidity.
Both normal and abnormal urine specimens may range in appearance from clear to very cloudy. Cloudiness may be caused by cells, bacteria, yeast, vaginal contaminants, or crystals. Often a urine specimen that was clear when voided becomes cloudy as it cools, as crystals form and precipitate.
Volume
The amount of urine is rarely measured in a random specimen. With a timed specimen, volume is measured by pouring the entire collection into a large, graduated cylinder. Generally, it is not accurate enough to use the markings on the side of the collection container. Once the volume has been measured and recorded, a portion of well-mixed specimen, called an aliquot, is removed for testing. The remainder is discarded or stored, depending on the preference of the laboratory.
The normal volume of urine produced every 24 hours varies according to the age of the individual. Infants and children produce smaller volumes than adults. The normal adult volume is 750 to 2,000 mL in 24 hours; the average amount is about 1,500 mL. Excessive production of urine is called polyuria. This is common in diabetes and in certain kidney disorders. Oliguria is insufficient production of urine, which can be caused by dehydration, decreased fluid intake, shock, or renal disease. The absence of urine production, anuria, occurs in renal obstruction and renal failure.
Foam
Normally the presence of foam is not recorded, but careful observation of this property can be a significant clue to an abnormality. Foam is seen as small bubbles that persist for a long time after the specimen has been shaken; they must not be confused with any bubbles that rapidly disperse. White foam can indicate the presence of increased protein (Figure 52-4). Greenish yellow foam can mean bilirubinuria. Care should be taken in handling such urines, because the color of the foam may indicate that the patient has viral hepatitis.
Odor
As with foam, odor is not normally recorded but can be an important clue to metabolic disorders. Normal urine is said to be aromatic. Changes in the odor of urine may be caused by disease, the presence of bacteria, or diet. The odor of the urine of a patient with uncontrolled diabetes is described as fruity because of the presence of ketones, which are the products of fat metabolism. An ammonia or putrid smell in the urine can be caused by an infection or may be noted in urine that has been allowed to stand before it is tested. The bacteria break down the urea in the urine to form ammonia. Foods such as asparagus and garlic also can produce an abnormal odor in the urine. Urine from a child with phenylketonuria (PKU) is said to smell “mousy.” PKU is a rare hereditary condition in which the amino acid phenylalanine is not properly metabolized, which can lead to severe mental retardation. Accumulation of phenylalanine in the blood and urine gives body fluids an odor like wet fur. (Blood sampling for PKU is discussed in Chapter 54.)
Specific Gravity
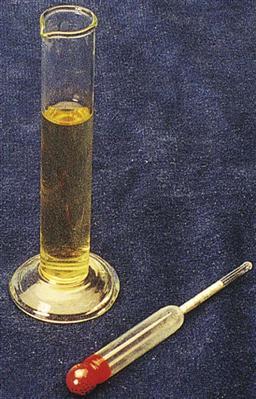
Specific gravity is the weight of a substance compared with the weight of an equal volume of distilled water. In UA, it is the rough measurement of the concentration, or amount, of substances dissolved in urine. The specific gravity of distilled water is 1.000. The normal specific gravity of urine ranges from 1.005 to 1.030, depending on the patient’s fluid intake. Most samples fall between 1.010 and 1.025. The urine specific gravity indicates whether the kidneys are able to concentrate the urine and is one of the first indications of kidney disease. The presence of glucose, protein, or an x-ray contrast medium used in diagnostic studies also may increase the specific gravity of urine. To measure the specific gravity of urine, laboratories may use a urinometer, a refractometer, or a chemical reagent strip.
A urinometer is a sealed glass float with a calibrated paper scale in its stem (Figure 52-5). According to guidelines established by the Occupational Safety and Health Administration (OSHA), urinometers containing mercury must be replaced, because mercury is a hazardous waste. With a slight spinning motion, the urinometer is placed in a cylinder containing a urine sample, and the value is read at the meniscus of the urine. Enough urine must be used to suspend the float freely—usually about 20 to 25 mL. If the sample is insufficient to float the urinometer, a refractometer can be used, or “QNS” (quantity not sufficient) can be recorded.
A urinometer is fragile, and jarring can cause the paper scale in the stem to shift, resulting in erroneous readings. Because a damaged urinometer occasionally loses its calibration, the calibration should be checked daily with distilled water. The specific gravity of the distilled water should calibrate at 1.000 at 20° C (68° F; room temperature). For example, if the urinometer reads 1.002 in distilled water, 0.002 must be subtracted from the urine readings. However, it is better to replace the instrument. For each 3° C (37.4° F) the water temperature measures above 20° C (68° F), 0.001 must be added to the reading. For each 3° C (37.4° F) the water temperature measures below 20° C (68° F), 0.001 must be subtracted from the reading. Use a laboratory thermometer to determine the water temperature. The urinometer method, although considered the gold standard of specific gravity testing, uses a large volume of urine and results in contamination of several pieces of glassware. For these reasons, it is rarely used in modern laboratories.
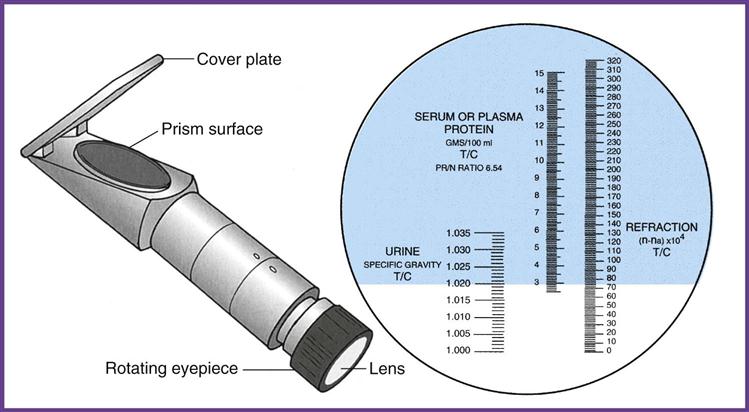
A refractometer measures the refraction of light through solids in a liquid. The result is called the refractive index, which for our purposes is the same as specific gravity (Figure 52-6). The refractometer is both faster and easier to use than the urinometer and requires only a drop of urine. One drop of well-mixed urine is placed under the hinged cover of the instrument, and the value is read directly from a scale viewed through an ocular. The refractometer must be calibrated daily with distilled water, which should read 1.000 (Procedure 52-4). Note that the measurement of specific gravity carries no unit of measure after the number.
Procedure 52-4
Perform Quality Control Measures
Measure the Urine Specific Gravity with a Refractometer
GOAL: To calibrate a refractometer and measure the refractive index of urine. A refractometer is also known as a total solids (TS) meter.
EQUIPMENT and SUPPLIES
Procedural Steps
1. Sanitize your hands and assemble the equipment while the urine specimen reaches room temperature.
PURPOSE: Measuring the specific gravity of cold or warm urine may alter the results.
2. Put on gloves and mix the urine specimen in the collection container.
PURPOSE: Mixing the urine resuspends solids that have settled during storage.
3. Using a disposable pipet, apply a drop of water to the prism of the refractometer (see Figure 52-6) by lifting the plastic cover. Close the cover and point the device toward a light source, such as a window or a lamp. Look into the refractometer and rotate the eyepiece so that the scale can be clearly read. The scale reads from 1.000 to 1.035 in increments of 0.001.
4. Calibrate the refractometer by inserting the small screwdriver provided by the manufacturer into the screw on the underside of the instrument. Turn the screw so that the line is positioned over 1.000 (Figure 1).
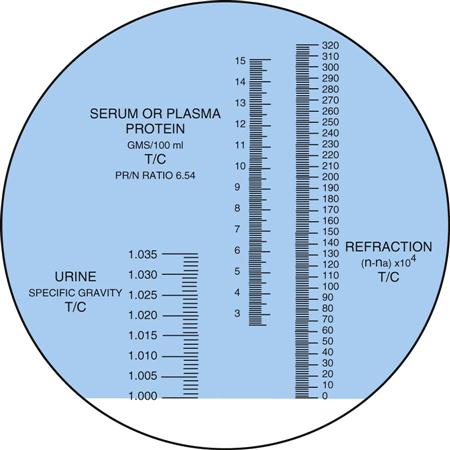
5. Wipe the prism with a soft, lint-free tissue and apply a drop of mixed urine. Close the cover, point the device at a light source, and read the specific gravity on the scale. Discard the pipet in a biohazard waste container. The value for the specific gravity shown in Figure 52-7 is 1.020. Note that specific gravity has no units after the value.
PURPOSE: A soft cloth should be used to prevent scratching of the glass prism.
6. Wipe the urine from the prism with a disposable, soft, lint-free tissue between samples. When finished, clean with tissue moistened with alcohol or with a disposable alcohol wipe. Discard these tissues in a biohazard waste container.
PURPOSE: Urine, a biohazardous material, must be removed from the prism. The prism must be decontaminated after use.
8. Document the results in the patient’s record.
PURPOSE: A procedure is not considered finished until it is recorded.
10/1/XX 9:28 AM SG: 1.010 Rosa Gonzales, CMA (AAMA) _____________________________________________
The reagent strip (dipstick) test is the method most commonly used in the physician’s office laboratory (POL), and it is considered a Clinical Laboratory Improvement Amendments (CLIA)-waived test. The pad on the strip contains a chemical that is sensitive to positively charged ions, such as sodium (Na+) and potassium (K+). The strip detects specific gravity in the range of 1.005 to 1.030.


Chemical Examination of Urine
Tests can be performed on urine to detect the presence of certain chemicals, which can provide valuable information to the physician. In certain situations, these chemical test results can be critical to the diagnosis.
Reagent strip testing is the most widely used technique for detecting chemicals in the urine (Procedure 52-5); these strips are available in a variety of types (Figure 52-7). Generally, they are plastic strips to which one or more pads containing chemicals are attached. Tests are available for pH, specific gravity, vitamin C, leukocyte esterase, protein, ketones, glucose, blood, bilirubin, nitrite, urobilinogen, phenylketones, and other chemicals. The presence or absence of these chemicals in the urine provides information on the status of carbohydrate metabolism, liver and kidney function, and the patient’s acid-base balance.
Procedure 52-5
Perform a Urinalysis and Patient Screening Using Established Protocols
Test Urine with Chemical Reagent Strips—the Chemical Urinalysis
GOAL: To perform chemical testing on a urine sample.
EQUIPMENT and SUPPLIES
• Urine specimen
• Reagent strips
• Timer
• Biohazard waste container
• Eye protection
• Disposable gloves
• Patient’s record
Stay updated, free articles. Join our Telegram channel

Full access? Get Clinical Tree


