Wilson & Hockenberry: Wong’s Clinical Manual of Pediatric Nursing, 8th Edition: Patient Teaching Guide


Wilson & Hockenberry: Wong’s Clinical Manual of Pediatric Nursing, 8th Edition


Patient Teaching Guide


This section may be photocopied and distributed to families.


Source: Wilson D, Hockenberry MJ: Evolve resources for Wong’s clinical manual of pediatric nursing, ed 8. Copyright © 2012, Mosby, St Louis.


Caring for a Central Venous Catheter


A catheter (tube) was placed in your child so that an intravenous (IV) line will be available for long-term treatment. This tube can be used to give medications, fluids, and nutrients and possibly to obtain blood specimens. Several different types of catheters can be used, such as the Broviac or the Groshong. Both types of catheters are inserted under the skin and into a major blood vessel near the heart (Figure 1).


A peripherally inserted central catheter (PICC) may also be used to give medications over a long period. This catheter is placed in a vein in an extremity such as the arm; the catheter will be advanced through the vein to a large vein in the chest. Because the PICC line is not tunneled under the skin like a Broviac or Groshong catheter is, there is greater chance for it to become dislodged, pulled out, or kinked. The PICC line insertion site is covered by a dressing, which is usually changed by the nurse. Unless special teaching is provided by your health practitioner, it is recommended that the home health nurse or practitioner be called for problems with the PICC line. The PICC line is flushed in the same manner as an intermittent infusion device. Follow the practitioner’s guidelines for the number of times the PICC line must be flushed and the type of solution to be used for flushing.


Special Considerations


A young child, either the child with the tube or a playmate, may want to handle the tube and as a result may accidentally pull it out. To prevent the child from playing with the tube, keep a T-shirt on the child, use one-piece outfits such as overalls, or select outfits that open in the back. Never leave the child alone when she is undressed. Keep all sharp objects, especially scissors, out of the reach of young children in the home.


When the child is bathed, keep the skin dry where the tube enters the body. Plastic wrap can be taped over a gauze dressing, or a transparent dressing can be used to protect the site.


All people who care for the child should be taught about the catheter. At school, tell both the child’s teacher and the school nurse so that an adult can help the child if needed.


Your health professional should be notified if the tube becomes damaged. The tube should be repaired as soon as possible because of the risk of infection. If the child has a Broviac catheter, clamp the tube at once. The Groshong catheter does not need to be clamped.


Flushing the Tube


The care of each catheter is slightly different. These written instructions will help you to care for the tube at home. Catheter care should always be done in a quiet place where you will not be disturbed. If the child is active, you will need a helper. The helper can keep the child still while you do the catheter care.


The inside of the Broviac must be flushed (rinsed) with a heparin solution (heparin is a special drug called an anticoagulant). This will help prevent any blood clots from forming. If blood clots form, the tube may become plugged. The small amount of heparin that you are using will rinse the entire length of the tube. If the child has a Groshong catheter, no heparin flushes are needed, only weekly saline (special sterile salt water) rinses. The Broviac must be flushed time(s) each day, and both types of tubes are rinsed (flushed) after giving any drug or fluid through the tube.


These instructions describe the use of needleless devices on the syringe and medicine bottle (also called a vial).


The type of needleless device you use may differ from the type described here, but the same basic methods are used for all of them. Be sure to ask your health professional to show you how your device works. Information for using a needle on the syringe is also given, but be very careful to avoid sticking yourself or someone else with the needle.


Instructions


1. Gather equipment that you will need, and place on a clean, dry surface.


2. Wash your hands with soap and water. Count to 10 while washing, then rinse with clear water and dry with a clean paper or cloth towel.


3. Open the package of antiseptic swabs.


4. With one of the swabs, scrub the top of the solution bottle for about 10 seconds. Let the bottle top dry. Do not touch the bottle top after you have cleaned it.


5. Open the package of the bottle adapter, and push the pointed end straight into the rubber top of the bottle. It may take some force to do this, but do not try to twist the adapter into the bottle top.


6. Open the package containing a new syringe, and remove the cap from the tip of the syringe. Do not touch the exposed part.


7. Open the package of the needle cannula by pulling apart the wrapping at the top of the package. Connect the tip of the syringe to the opening of the cannula by twisting the two pieces together.


8. Remove the cover of the cannula. Do not touch any part of it. If you do touch it, use a new one.


9. If you are using a syringe with a needle, you do not need the bottle adapter. Just follow steps 6 through 8, substituting the needle for the cannula. Sometimes the syringe and needle are already attached.


10. Pull back the plunger, and fill the syringe with the same amount of air as needed (Figure 2).


Stay updated, free articles. Join our Telegram channel

Jan 16, 2017 | Posted by in NURSING | Comments Off on Wilson & Hockenberry: Wong’s Clinical Manual of Pediatric Nursing, 8th Edition: Patient Teaching Guide

Full access? Get Clinical Tree

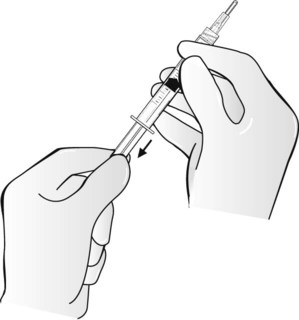
Get Clinical Tree app for offline access