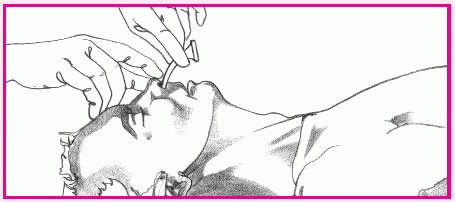
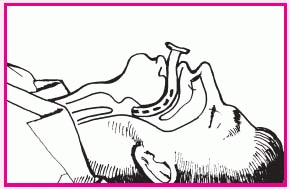
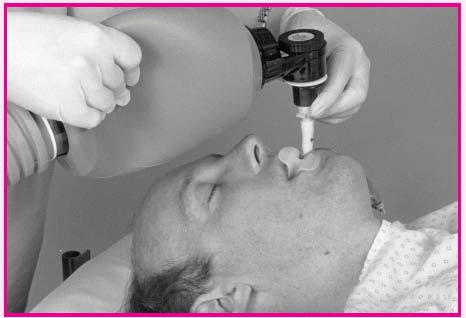
Inserting a nasopharyngeal airway
First, hold the airway beside the patient’s face to make sure it’s the proper size (as shown below left). It should be slightly smaller than the patient’s nostril diameter and slightly longer than the distance from the tip of his nose to his earlobe.
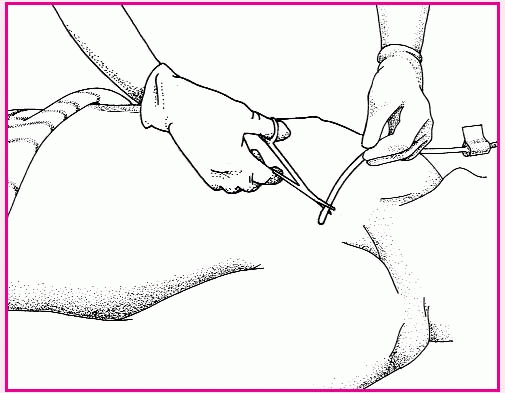
To insert the airway, hyperextend the patient’s neck (unless contraindicated). Lubricate the airway with water-soluble gel. Then push up the tip of his nose and pass the airway into his nostril (as shown below right). Avoid pushing against any resistance to prevent tissue trauma and airway kinking. Be sure to have the bevel facing the nasal septum when inserting.
To check for correct airway placement, first close the patient’s mouth. Then place your finger over the tube’s opening to detect air exchange. Also, depress the patient’s tongue with a tongue blade and look for the airway tip behind the uvula.
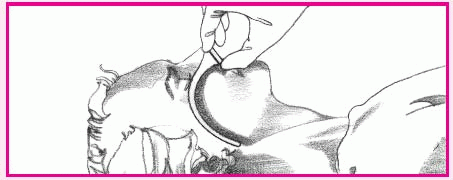
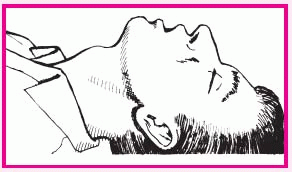
Inserting an oral airway (used only in unconscious patients)
Unless this position is contraindicated, hyperextend the patient’s head (as shown top right) before using either the cross-finger or tongue blade insertion method.
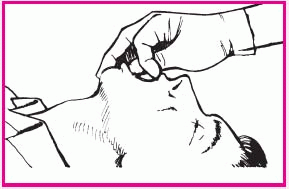
To insert an oral airway using the cross-finger method, place your thumb on the patient’s lower teeth and your index finger on his upper teeth. Gently open his mouth by pushing his teeth apart (as shown middle right).
Insert the airway upside down to avoid pushing the tongue toward the pharynx, and slide it over the tongue toward the back of the mouth. Rotate the airway as it approaches the posterior wall of the pharynx so that it points downward (as shown below right).
To use the tongue blade technique, open the patient’s mouth and depress his tongue with the blade. Guide the airway over the back of the tongue as you did for the cross-finger
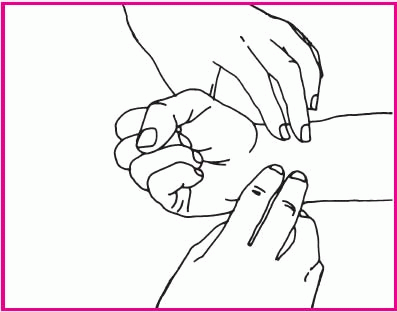
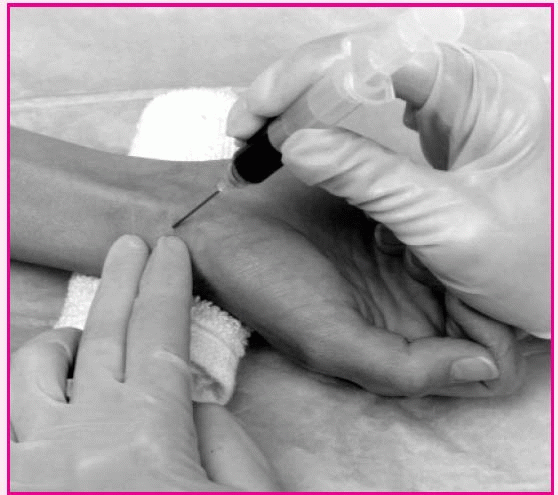
Performing Allen’s test
Perform an Allen’s test before puncturing a radial artery to ascertain adequate perfusion to the hand.
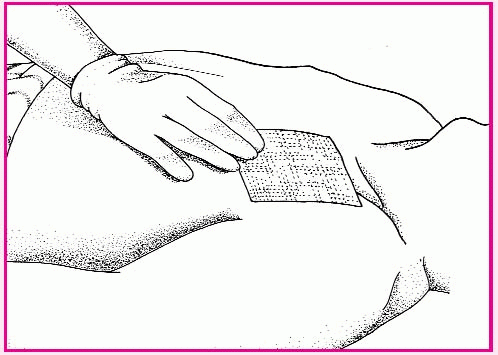
Rest the patient’s arm on the mattress or bedside stand, and support his wrist with a rolled towel. Have him clench his fist. Then, using your index and middle fingers, press on the radial and ulnar arteries. Hold this position for a few seconds.
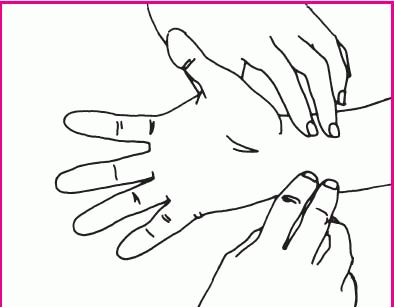
Without removing your fingers from the patient’s arteries, ask him to unclench his fist and hold his hand in a relaxed position. The palm will be blanched because pressure from your fingers has impaired the normal blood flow.
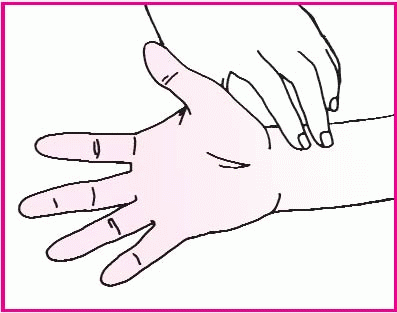
Release pressure on the patient’s ulnar artery. If the hand becomes flushed, which indicates blood filling the vessels, you can safely proceed with the radial artery puncture. If the hand doesn’t flush, perform the test on the other arm.
Recognizing an abnormal arterial waveform
Understanding a normal arterial waveform is relatively straightforward; however, an abnormal waveform is more difficult to decipher. Abnormal patterns and markings may provide important diagnostic clues to the patient’s cardiovascular status, or they may simply signal trouble in the monitor. Use this table to help you recognize and resolve waveform abnormalities.
Abnormality |
Possible causes |
Nursing interventions |
|---|
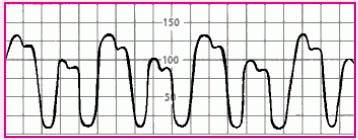
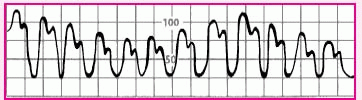
Alternating high and low waves in a regular pattern |
|
• Ventricular bigeminy |
• Check the patient’s electrocardiogram to confirm ventricular bigeminy. The tracing should reflect premature ventricular contractions every second beat. |
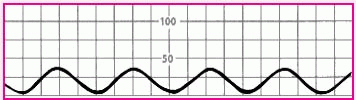
Flattened waveform |
|
• Overdampened waveform or hypotensive patient |
• Check the patient’s blood pressure with a sphygmomanometer. If you obtain a reading, suspect overdampening. Correct the problem by trying to aspirate the arterial line. If you succeed, flush the line. If the reading is very low or absent, suspect hypotension. |
Slightly rounded waveform with consistent variations in systolic height |
|
• Patient on ventilator with positive end-expiratory pressure |
• Check the patient’s systolic blood pressure regularly. The difference between the highest and lowest systolic pressure reading should be less than 10 mm Hg. If the difference exceeds that amount, suspect pulsus paradoxus, possibly from cardiac tamponade. |
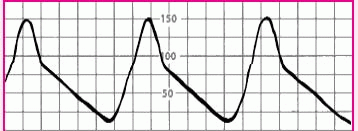
Slow upstroke |
|
• Aortic stenosis |
• Check the patient’s heart sounds for signs of aortic stenosis. Also, notify the practitioner, who will document suspected aortic stenosis in his notes. |
Diminished amplitude on inspiration |

|
• Pulsus paradoxus, possibly from cardiac tamponade, constrictive pericarditis, or lung disease |
• Note systolic pressure during inspiration and expiration. If inspiration pressure is at least 10 mm Hg less than expiratory pressure, call the practitioner.
• If you’re also monitoring pulmonary artery pressure, observe for a diastolic plateau. This occurs when the mean central venous pressure (right arterial pressure), mean pulmonary artery pressure, and mean pulmonary artery wedge pressure are within 5 mm Hg of one another. |
Arterial puncture technique
The angle of needle penetration in arterial blood gas sampling depends on which artery will be sampled. For the radial artery, which is used most commonly, the needle should enter bevel up at a 30- to 45-degree angle over the radial artery. After collecting the sample, apply pressure to the site for at least 5 minutes.
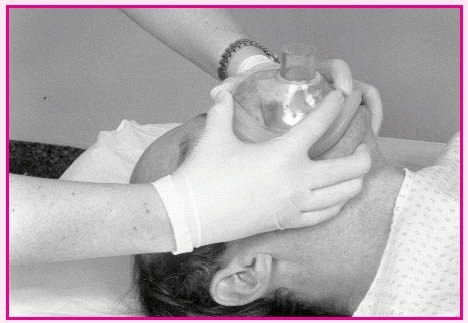
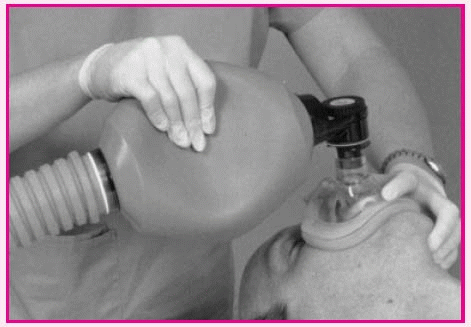
Using a bag-valve-mask device
Place the mask over the patient’s face so that the apex of the triangle covers the bridge of the nose and the base lies between the lower lip and chin.
Make sure that the patient’s mouth remains open underneath the mask. Attach the bag to the mask and to the tubing leading to the oxygen source.
Or, if the patient has a tracheostomy or endotracheal tube in place, remove the mask from the bag and attach the device directly to the tube.
Transfusing blood
The most common cause of a severe transfusion reaction is receiving the wrong blood. You can protect your patients against this possibility by taking the following steps before administering blood or blood products:
Check
Check the practitioner’s order for transfusion. Then check to make sure an informed consent form was signed. Then double-check the patient’s name, medical record number, ABO blood group, Rh status (and other compatibility factors), and blood bank identification number against the label on the blood bag. Also check the expiration date on the bag. Then check and record the patient’s vital signs.
Verify
Ask another nurse to verify all information, according to your facility’s policy. (Most facilities require double identification.) Make sure that you and the nurse who checked the blood or blood product sign the blood confirmation slip. If even one discrepancy exists, don’t administer the blood or blood product. Instead, immediately notify the blood bank.
Inspect
Inspect the blood or blood product to detect abnormalities.
Then confirm the patient’s identity by checking the name and medical record number on his wristband.
Transfusion don’ts
A blood transfusion requires extreme care. Here are some tips on what not to do when administering a transfusion:
• Don’t add medications to the blood bag.
• Don’t give blood products without checking the order against the blood bag label—the only way to tell whether the request form has been stamped with the wrong name. Most life-threatening reactions occur when this step is omitted.
• Don’t transfuse the blood product if you discover a discrepancy in the blood number, blood slip type, or patient identification number.
• Don’t piggyback blood into the port of an existing infusion set. Most solutions, including dextrose in water, are incompatible with blood. Administer blood only with normal saline solution.
• Don’t hesitate to stop the transfusion if your patient shows changes in vital signs, is dyspneic or restless, or develops chills, hematuria, or pain in the flank, chest, or back. Your patient could go into shock, so don’t remove the I.V. device that’s in place. Keep it open with a slow infusion of normal saline solution; call the practitioner and the laboratory.
• Don’t transfuse blood that has been out of the refrigerator for more than 4 hours. Once started, a transfusion must be infused within 4 hours.
Monitoring a blood transfusion
To help avoid transfusion reactions and safeguard your patient, follow these guidelines:
• Record vital signs before the transfusion, 15 minutes after the start of the transfusion, just after the transfusion is complete, and more frequently if warranted by the patient’s condition, transfusion history, or your facility’s policy. Most acute hemolytic reactions occur during the first 30 minutes of the transfusion, so monitor your patient carefully during that time.
• Always have sterile normal saline solution—an isotonic solution—set up as a primary line along with the transfusion.
• Act promptly if your patient develops wheezing and bronchospasm. These signs may indicate an allergic reaction or anaphylaxis. If the patient becomes dyspneic and shows generalized flushing and chest pain (with or without vomiting and diarrhea), he could be having an anaphylactic reaction. Stop the blood transfusion immediately, start the normal saline solution, check and document vital signs, call the practitioner, and follow your facility’s policy for a transfusion reaction. Provide supportive care as indicated.
• If the patient develops a transfusion reaction, return the remaining blood together with a posttransfusion blood sample and any other required specimens to the blood bank.
Transfusing blood products: Plasma or plasma fractions
• Obtain baseline vital signs.
• Flush the patient’s venous access device with normal saline solution.
• Attach the plasma, fresh frozen plasma, albumin, factor VIII concentrate, prothrombin complex, platelets, or cryoprecipitate to the patient’s venous access device, after proper verification of patient and product, per your facility’s policy.
• Begin the transfusion, and adjust the flow rate as ordered.
• Take the patient’s vital signs, and assess him frequently for signs or symptoms of a transfusion reaction, such as fever, chills, or nausea.
• After the infusion, flush the line with 20 to 30 ml of normal saline solution. Then disconnect the I.V. line. If therapy is to continue, resume the prescribed infusate and adjust the flow rate as ordered.
• Record the type and amount of plasma or plasma fraction administered, duration of the transfusion, baseline and posttransfusion vital signs, and any adverse reactions.
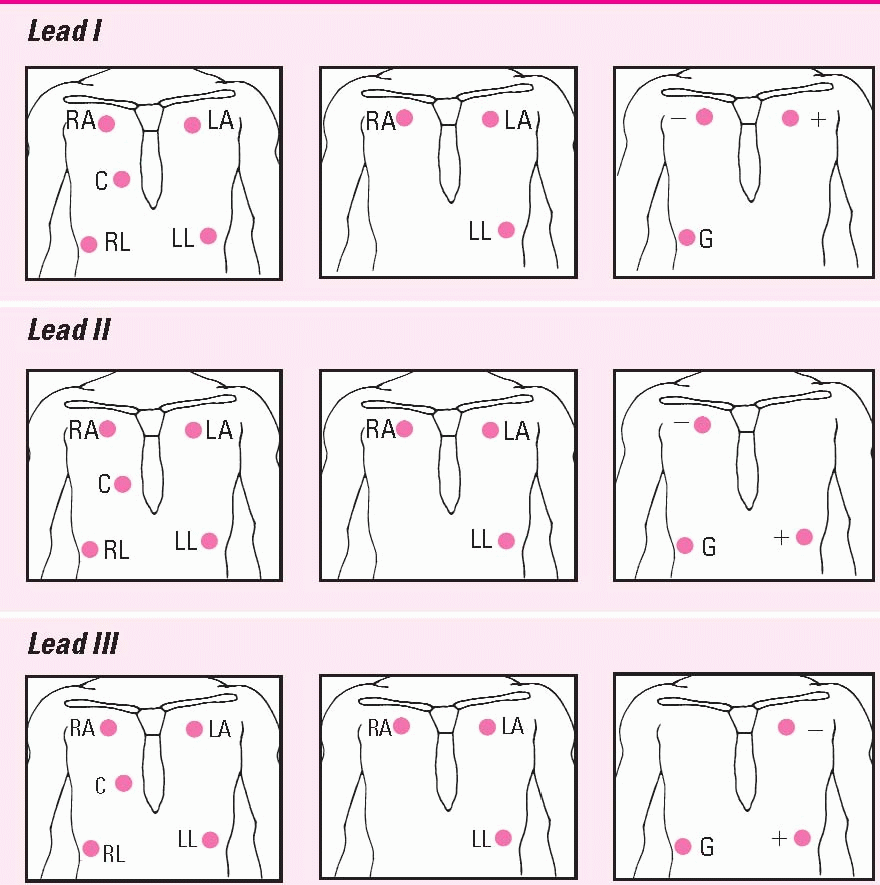
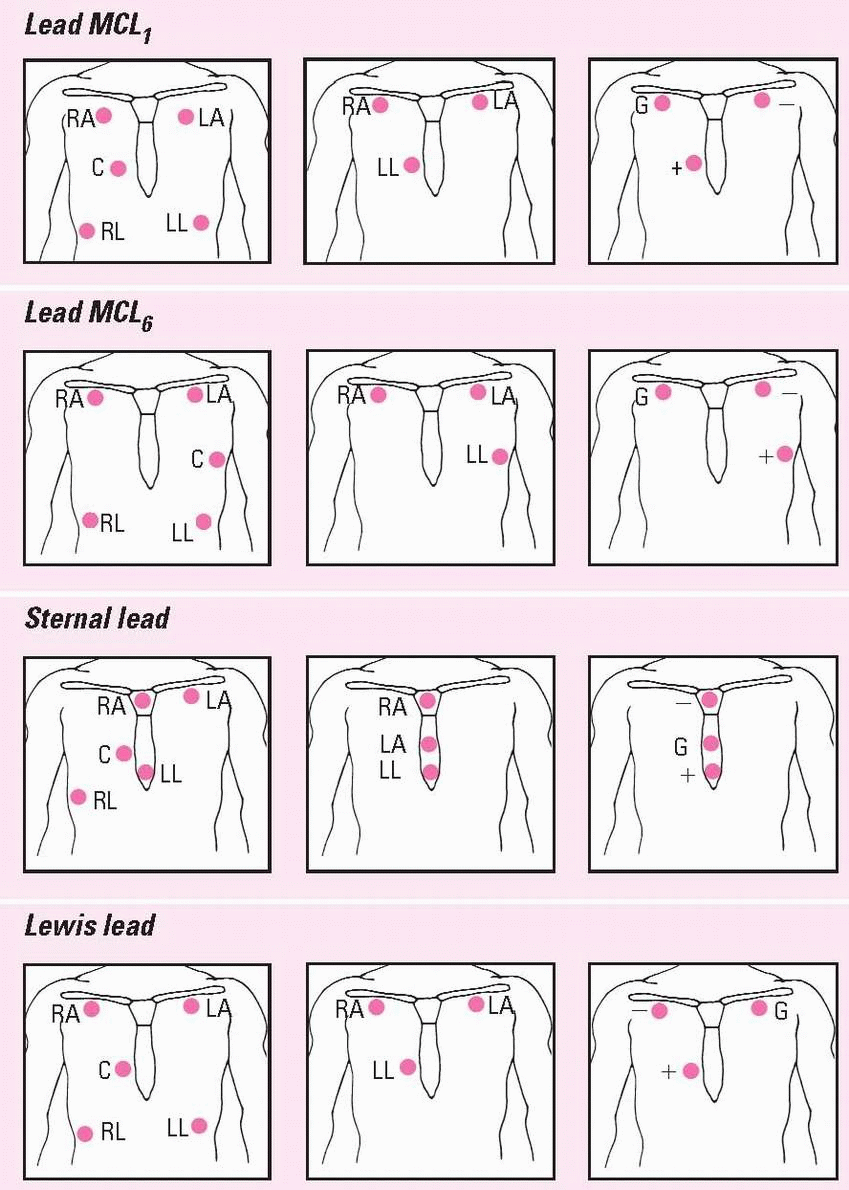
Positioning cardiac monitoring leads
This chart shows the correct electrode positions for some of the monitoring leads you’ll use most often. For each lead, you’ll see electrode placement for two hardwire systems (the five-and the threeleadwire systems) and a telemetry system.
In the two hardwire systems, the electrode positions for one lead may be identical to the electrode positions for another lead. In this case, you simply change the lead selector switch to the setting that corresponds to the lead you want. In some cases, you’ll need to reposition the electrodes.
In the telemetry system, you can create the same lead with two electrodes that you do with three by eliminating the ground electrode.
The illustrations below use these abbreviations: RA, right arm; LA, left arm; RL, right leg; LL, left leg; C, chest; and G, ground.
Identifying cardiac monitor problems
Problem |
Possible causes |
Nursing interventions |
|---|
False-high-rate alarm |
• Monitor interpreting large T waves as QRS complexes, which doubles the rate
• Skeletal muscle activity |
• Reposition electrodes to lead where QRS complexes are taller than T waves.
• Place electrodes away from major muscle masses. |
False-low-rate alarm |
• Shift in electrical axis from patient movement, making QRS complexes too small to register
• Low amplitude of QRS
• Poor contact between electrode and skin |
• Reapply electrodes. Set gain so height of complex is greater than 1 mV.
• Increase gain.
• Reapply electrodes. |
Low amplitude |
• Gain dial set too low
• Poor contact between skin and electrodes; dried gel; broken or loose leadwires; poor connection between patient and monitor; malfunctioning monitor; physiologic loss of QRS amplitude |
• Increase gain.
• Check connections on all leadwires and monitoring cable. Replace electrodes as necessary. Reapply electrodes, if required. |
Wandering baseline |
• Poor position or contact between electrodes and skin
• Thoracic movement with respirations |
• Reposition or replace electrodes.
• Reposition electrodes. |
Artifact (waveform interference) |
• Patient having seizures, chills, or anxiety
• Patient movement
• Electrodes applied improperly
• Static electricity
• Electrical short circuit in leadwires or cable
• Interference from decreased room humidity |
• Notify practitioner and treat patient as ordered. Keep patient warm and reassure him.
• Help patient relax.
• Check electrodes and reapply, if necessary.
• Make sure cables don’t have exposed connectors. Change patient’s static-causing gown or pajamas.
• Replace broken equipment. Use stress loops when applying leadwires.
• Regulate humidity to 40%. |
Broken leadwires or cable |
• Stress loops not used on leadwires
• Cables and leadwires cleaned with alcohol or acetone, causing brittleness |
• Replace leadwires and retape them, using stress loops.
• Clean cable and leadwires with soapy water. Don’t allow cable ends to become wet. Replace cable as necessary. |
60-cycle interference (fuzzy baseline) |
• Electrical interference from other equipment in room
• Patient’s bed improperly grounded |
• Attach all electrical equipment to common ground. Check plugs to make sure prongs aren’t loose.
• Attach bed ground to the room’s common ground. |
Skin excoriation under electrode |
• Patient allergic to electrode adhesive
• Electrode on skin too long |
• Remove electrodes and apply nonallergenic electrodes and nonallergenic tape.
• Remove electrode, clean site, and reapply |
Measuring cardiac output
• Verify the presence of a pulmonary artery (PA) waveform on the cardiac monitor.
• Unclamp the I.V. tubing and withdraw exactly 10 ml of solution.
• Reclamp the tubing.
• Turn the stopcock at the catheter injectant hub to open a fluid path between the injectant lumen of the PA catheter and the syringe.
• Press the START button on the cardiac output computer or wait for the “Inject” message to flash.
• Inject solution smoothly within 4 seconds, making sure it doesn’t leak at the connectors.
• If available, analyze the contour of the thermodilution washout curve on a strip chart recorder for a rapid upstroke and a gradual, smooth return to baseline.
• Repeat steps until three values are within 10% to 15% of the median value.
• Compute the average of three values, and record the patient’s cardiac output.
• Return the stopcock to the original position, and make sure the injectant delivery system tubing is clamped.
• Verify the presence of a PA waveform on the cardiac monitor.
• Discontinue cardiac output measurements when the patient is hemodynamically stable and weaned from vasoactive and inotropic drugs, as ordered.
Performing synchronized cardioversion
• Confirm the patient’s identity using two patient identifiers according to your facility’s policy.
• Explain the procedure to the patient, and make sure he has signed a consent form.
• Check his recent serum potassium and magnesium levels and arterial blood gas results.
• Check recent digoxin levels.
• Digitalized patients may undergo cardioversion, but tend to require lower energy levels to convert.
• Withhold food and fluids for 6 to 12 hours before the procedure.
• Obtain a 12-lead electrocardiogram (ECG) to serve as a baseline.
• Check to see if the practitoner has ordered cardiac drugs before the procedure.
• Verify that the patient has a patent I.V. site in case drugs become necessary.
• Connect the patient to a pulse oximeter and automatic blood pressure cuff, if available.
• Consider giving oxygen for 5 to 10 minutes before cardioversion to promote myocardial oxygenation.
• If the patient wears dentures, evaluate whether they support his airway or may cause airway obstruction. If they may cause an obstruction, remove them.
• Place the patient in the supine position, and assess vital signs, level of consciousness (LOC), cardiac rhythm, and peripheral pulses.
• Remove the oxygen delivery device before cardioversion to prevent combustion.
• Have epinephrine (Adrenalin), lidocaine (Xylocaine), and atropine at the patient’s bedside.
• Make sure the resuscitation bag is at the bedside.
• Give a sedative, as ordered. The sedation is considered moderate to deep with reflexes intact and with the patient still able to breathe adequately.
• Carefully monitor blood pressure and respiratory rate until he recovers.
• Press the POWER button to turn on the defibrillator.
• Push the SYNC button to synchronize the machine with the patient’s QRS complexes.
• Make sure the SYNC button flashes with each of the patient’s QRS complexes.
• You should see a bright green flag flash on the monitor.
• Turn the ENERGY SELECT dial to the ordered amount of energy.
• Remove the paddles from the machine, and prepare them as if you were defibrillating the patient.
• Place conductive gel pads or paddles in the same positions you would to defibrillate.
• Make sure everyone stands away from the bed; push the discharge buttons.
• Hold the paddles in place and wait for energy to be discharged—the machine has to synchronize the discharge with the QRS complex.
• Check the waveform on the monitor.
• If the arrhythmia fails to convert, repeat the procedure two or three more times at 3-minute intervals.
• Gradually increase the energy level with each additional countershock.
• After cardioversion, frequently assess the patient’s LOC and respiratory status, including airway patency, respiratory rate and depth, and need for supplemental oxygen.
• Record a postcardioversion 12-lead ECG, and monitor the patient’s ECG rhythm for 2 hours or per your facility’s sedation protocol.
• Check for electrical burns and treat as needed.
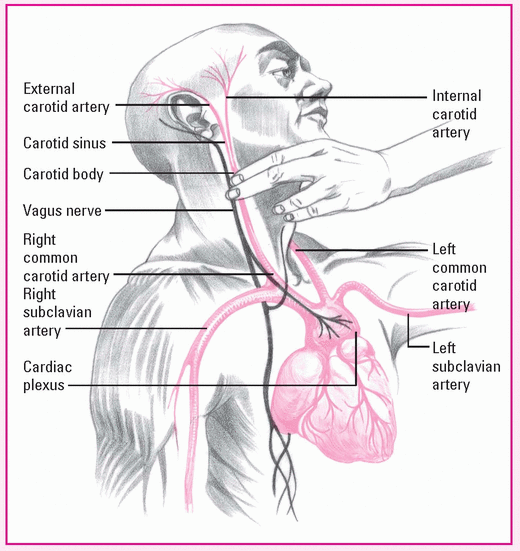
Performing carotid sinus massage
Before applying manual pressure to the patient’s right carotid sinus, locate the bifurcation of the carotid artery on the right side of the neck. Turn his head slightly to the left and hyperextend the neck, bringing the carotid artery closer to the skin and moving the sternocleidomastoid muscle away from the carotid artery.
Using a circular motion, massage the right carotid sinus between your fingers and the transverse processes of the spine for 3 to 5 seconds. Don’t massage for more than 5 seconds to avoid risking life-threatening complications.
Inserting an arterial catheter
• The practitioner prepares and anesthetizes the insertion site and covers the surrounding area with sterile drapes.
• The practitioner inserts the catheter into the artery and attaches it to the fluid-filled pressure tubing.
• While the practitioner holds the catheter in place, activate the fast-flush release (flushing 1 to 3 seconds) to flush blood from the catheter.
• After each fast flush, observe the drip chamber to verify a correct continuous flush rate.
• Observe the bedside monitor for a waveform.
• The practitioner may suture the catheter in place or secure it with hypoallergenic tape.
• Cover the insertion site with a sterile dressing.
• With a radial or brachial site, immobilize the insertion site according to your facility’s policy.
• With a femoral site, assess the need for immobilization of the leg and maintain the patient on bed rest, with the head of the bed raised no more than 30 degrees, to prevent the catheter from kinking.
• Level the zeroing stopcock of the transducer with the phlebostatic axis, and then zero the transducer system to atmospheric pressure.
• Activate monitor alarms, as appropriate.
Removing an arterial catheter
• Determine if you’re permitted to perform this procedure, according to your facility’s policy.
• If you’re permitted, record the patient’s systolic, diastolic, and mean blood pressures.
• Obtain a manual blood pressure reading to establish a new baseline.
• Turn off the monitor alarms and the flow clamp to the flush solution.
• Carefully remove the dressing over the insertion site.
• Remove sutures using the suture removal kit.
• Withdraw the catheter using a gentle, steady motion, keeping the catheter parallel to the artery during withdrawal.
• Immediately apply pressure to the site with a sterile 4″ × 4″ gauze pad for at least 10 minutes (longer if bleeding or oozing persists) until hemostasis is obtained.
• If the patient has coagulopathy or is receiving anticoagulants, apply additional pressure to a femoral site.
• Cover the site with an appropriate dressing; secure the dressing with tape.
• Make a pressure dressing for a femoral site by folding four sterile 4″ × 4″ gauze pads in half. Place the dressing over the femoral site and cover with a tight adhesive bandage. Cover the bandage with a sandbag.
• Maintain the patient on bed rest for 6 hours with the sandbag in place.
• Observe the site for bleeding.
• Assess the extremity distal to the site by evaluating color, pulses, and sensation every 15 minutes for the first 4 hours, every 30 minutes for the next 2 hours, and hourly for the next 6 hours.
Catheter-tip culture
• If infection is suspected, obtain a culture of the catheter by cutting the tip so it falls into a sterile container. Label the specimen and send it to the laboratory.
Removing a central venous catheter
• Place the patient in a supine position to prevent an air embolism.
• Wash your hands, and put on clean gloves and a mask.
• Turn off all infusions.
• Remove and discard the old dressing, and change to sterile gloves.
• Inspect the site for signs of drainage and inflammation.
• Clip the sutures and, using forceps, remove the catheter in a slow and even motion. Have the patient perform Valsalva’s maneuver as the catheter is withdrawn to prevent an air embolism.
• Apply pressure to the site until bleeding stops.
• Apply povidone-iodine ointment to the insertion site to seal it. Cover the site with a gauze pad, and apply a transparent semipermeable dressing over the gauze. Label the dressing with the date and time of the removal and your initials.
• Discard the catheter, soiled dressing, and gloves in the appropriate receptacle.
Using a nasal balloon catheter
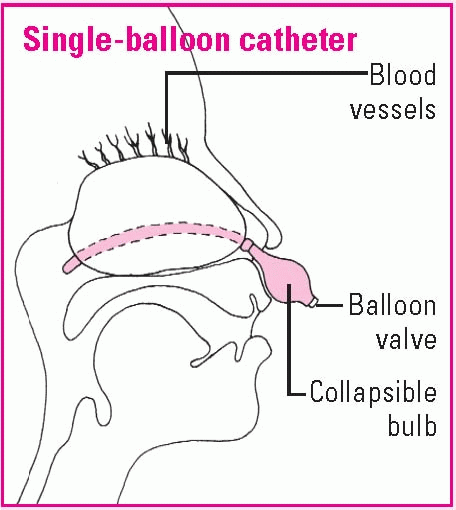
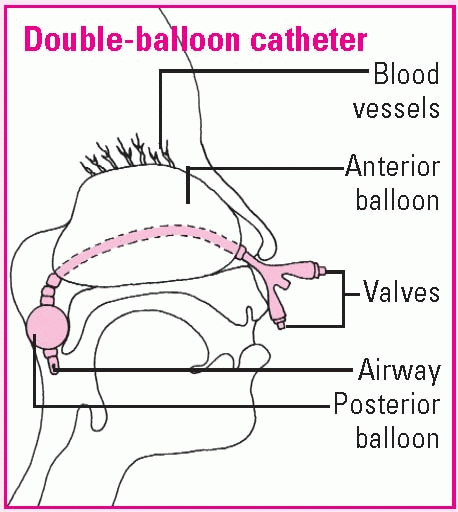
To control epistaxis, a balloon catheter may be inserted instead of nasal packing. Self-retaining and disposable, the catheter may have a single or double balloon to apply pressure to bleeding nasal tissues. If bleeding is still uncontrolled, arterial ligation, cryotherapy, or arterial embolization may be performed.
Assisting with insertion
To assist with inserting a single-or double-balloon catheter, prepare the patient as you would for nasal packing. Be sure to discuss the procedure thoroughly to alleviate the patient’s anxiety and promote his cooperation.
Explain that the catheter tip will be lubricated with an antibiotic or a water-soluble lubricant to ease passage and prevent infection.
Answer all questions.
Providing routine care
The tip of the single-balloon catheter will be inserted in the nostrils until it reaches the posterior pharynx. Then the balloon will be inflated with normal saline solution, pulled gently into the posterior nasopharynx, and secured at the nostrils with the collapsible bulb. With a double-balloon catheter, the posterior balloon is inflated with normal saline solution; then the anterior balloon is inflated.
To check catheter placement, mark the catheter at the nasal vestibule; then inspect for that mark and observe the oropharynx for the posteriorly placed balloon. Assess the nostrils for irritation or erosion. Remove secretions by gently suctioning the airway of a double-balloon catheter or by dabbing away crusted external secretions if the patient has a catheter with no airway.
To prevent damage to nasal tissue, the balloon may be deflated for 10 minutes every 24 hours. If bleeding recurs or remains uncontrolled, packing may be added.
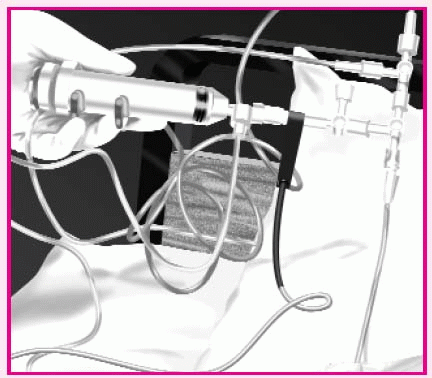
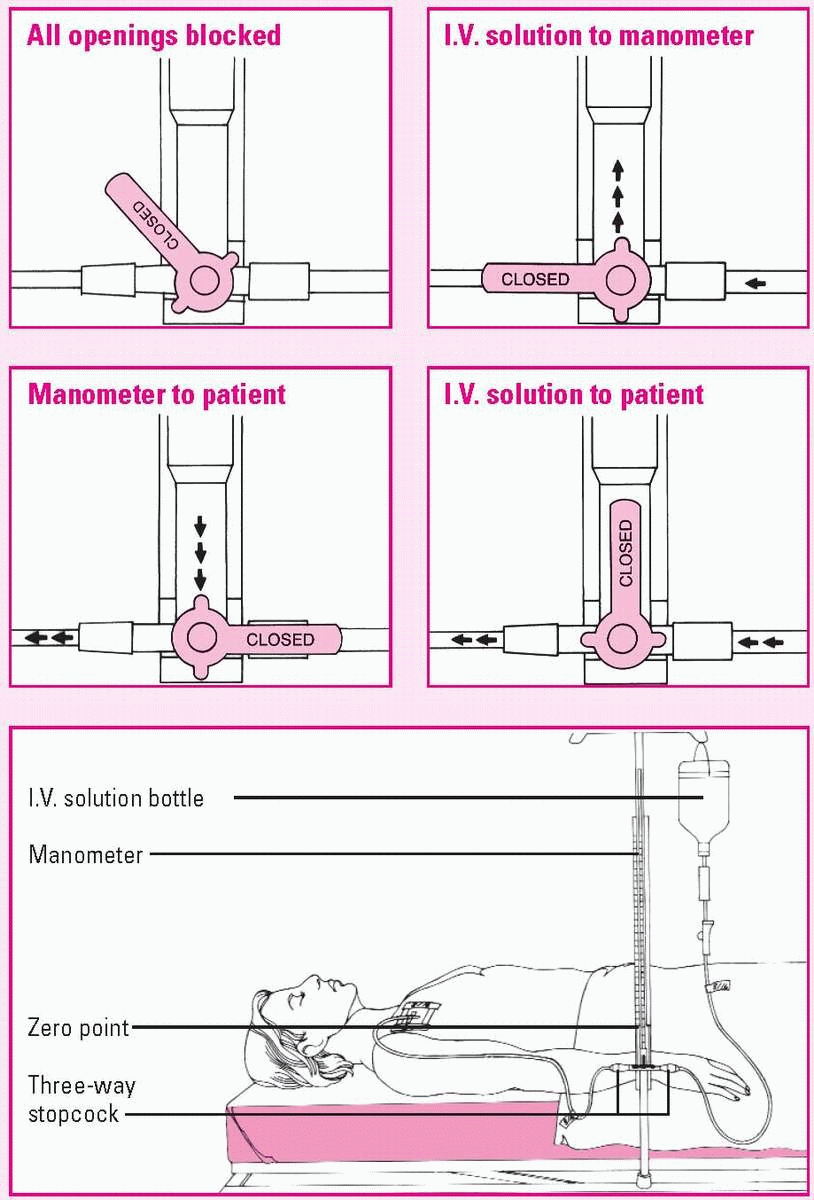
Measuring CVP with a manometer
To ensure accurate central venous pressure (CVP) readings, make sure the manometer base is aligned with the patient’s right atrium (the zero reference point). The manometer set usually contains a leveling rod to allow you to determine this quickly.
After adjusting the manometer’s position, examine the typical three-way stopcock. By turning it to any position shown here, you can control the direction of fluid flow. Four-way stopcocks also are available.
Using a cerebrospinal fluid drainage system
Cerebrospinal fluid (CSF) drainage aims to control intracranial pressure (ICP) during treatment for traumatic injury or other conditions that cause a rise in ICP. CSF can be withdrawn from the lateral ventricle (ventriculostomy) or lumbar subarachnoid space, depending on indication and desired outcome. Ventricular drainage is used to reduce increased ICP, whereas lumbar drainage is used to aid healing of the dura mater.
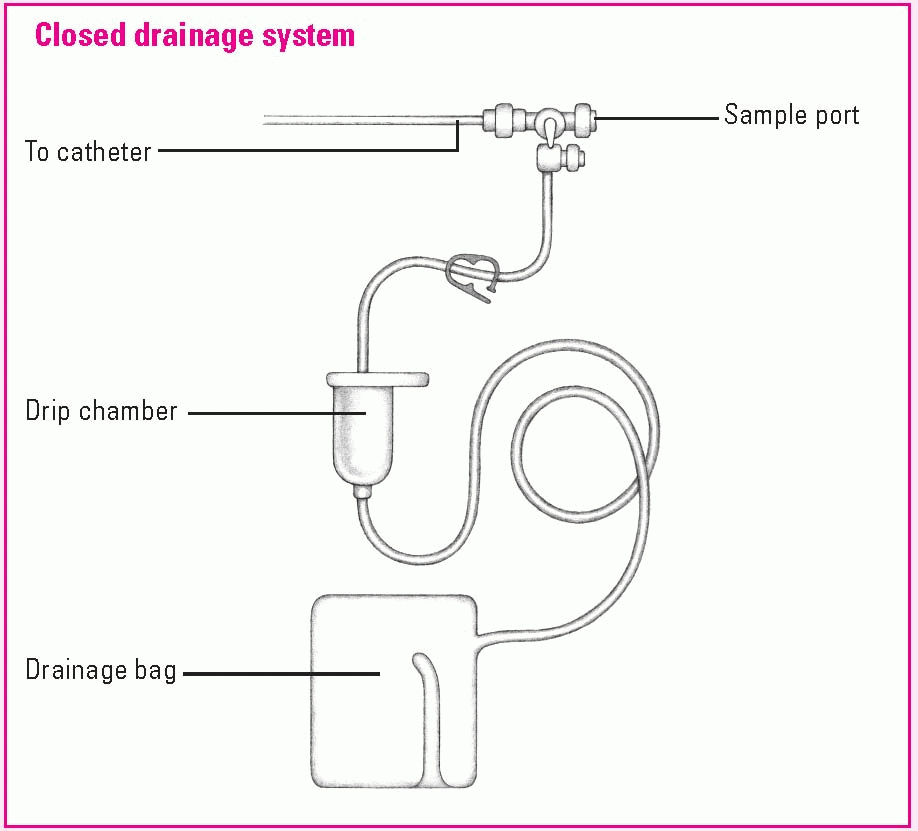
Drainage system setup
For a ventricular drain, the neurosurgeon makes a burr hole in the patient’s skull and inserts the catheter into the ventricle. For a lumbar drain, the catheter is inserted into the lumbar subarachnoid space. The distal end of the catheter is connected to a closed drainage system, as shown below.
Monitoring CSF drainage
• Maintain a continuous hourly output of CSF by raising or lowering the drainage system drip chamber.
• To maintain CSF outflow, the drip chamber should be slightly lower than or at the level of the lumbar drain insertion site.
• You may need to carefully raise or lower the drip chamber to increase or decrease CSF flow.
• For a ventricular drain, ensure that the flow chamber of the ICP monitoring setup remains positioned as ordered.
• Correlate changes in ICP readings to the drainage.
• To drain CSF as ordered, put on gloves, and turn the main stopcock on to drainage to allow CSF to collect in the graduated flow chamber.
• Document the time and the amount of CSF obtained, and turn the stopcock off to drainage.
• To drain the CSF from this chamber into the drainage bag, release the clamp below the flow chamber.
• Check the dressing frequently for drainage, which could indicate CSF leakage.
• Check the tubing for patency by watching the CSF drops in the drip chamber.
• Observe CSF for color, clarity, amount, blood, and sediment.
• Obtain any CSF specimens for laboratory analysis from the collection port attached to the tubing, not from the collection bag.
• Change the collection bag when it’s full or every 24 hours, according to your facility’s policy.