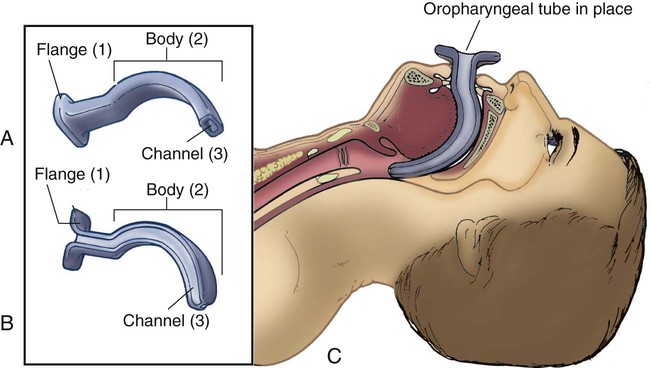
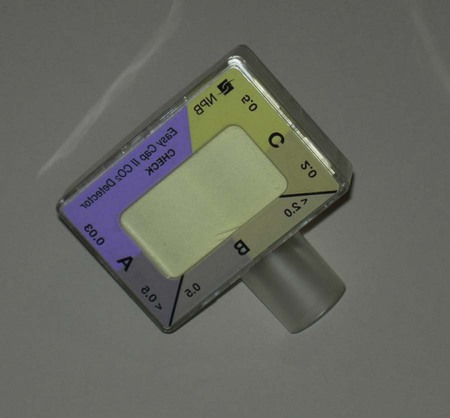
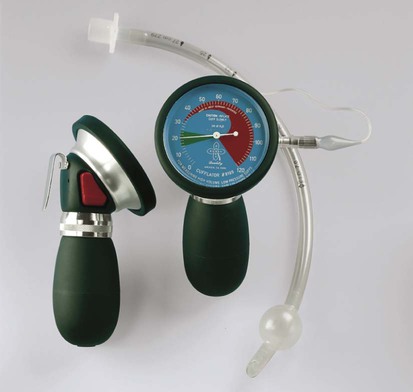
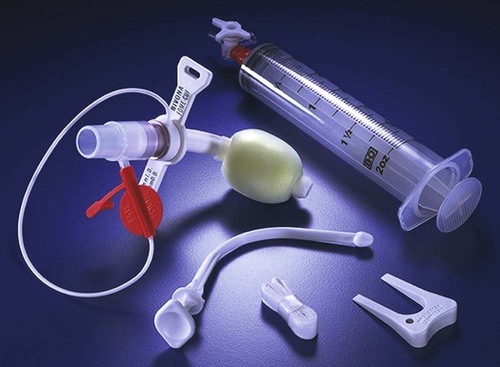
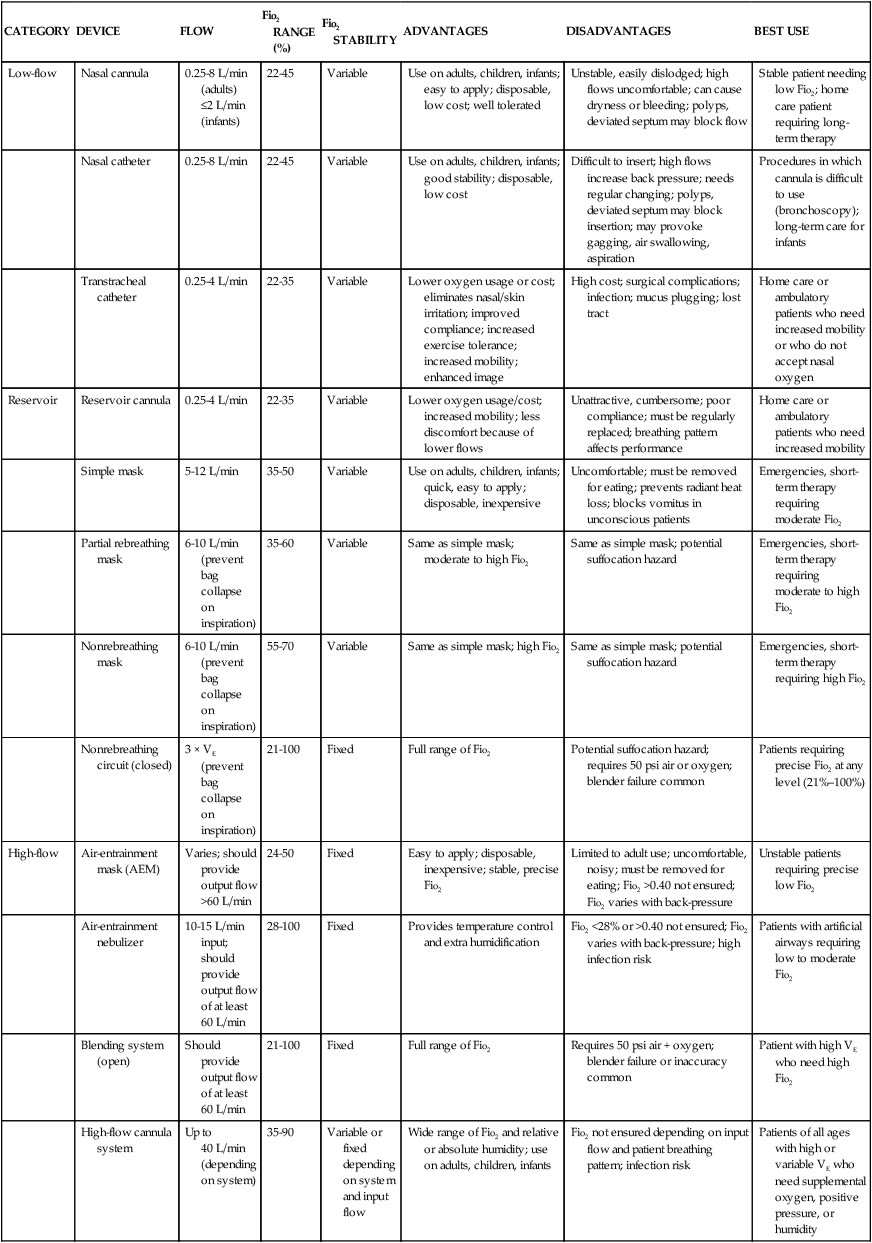
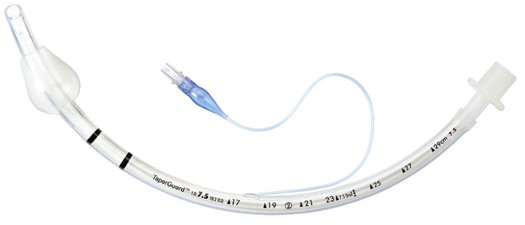
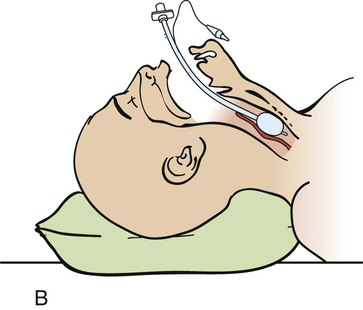
Chapter 21 Normal cellular function depends on the delivery of an adequate supply of oxygen to the cells to meet their metabolic needs. The goal of oxygen therapy is to provide a sufficient concentration of inspired oxygen to permit full use of the oxygen-carrying capacity of the arterial blood; this ensures adequate cellular oxygenation, provided the cardiac output and hemoglobin concentration are adequate.1,2 Oxygen is an atmospheric gas that must also be considered a medication because—like most other medications—it has detrimental as well as beneficial effects. Oxygen is one of the most commonly used and misused medications. As a medication, it must be administered for good reason and in a proper, safe manner. Oxygen is usually ordered in liters per minute (L/min), as a concentration of oxygen expressed as a percentage (e.g., 40%), or as a fraction of inspired oxygen (Fio2) such as 0.4. The primary indication for oxygen therapy is hypoxemia.3 The amount of oxygen administered depends on the pathophysiologic mechanisms affecting the patient’s oxygenation status. In most cases, the amount required should provide an arterial partial pressure of oxygen (Pao2) of greater than 60 mm Hg or an arterial hemoglobin saturation (Sao2) of greater than 90% during rest and exercise.2 The concentration of oxygen given to an individual patient is a clinical judgment based on the many factors that influence oxygen transport such as hemoglobin concentration, cardiac output, and arterial oxygen tension.1,2 After oxygen therapy has begun, the patient is continuously assessed for level of oxygenation and the factors affecting it. The patient’s oxygenation status is evaluated several times daily until the desired oxygen level has been reached and has stabilized. If the desired response to the amount of oxygen delivered is not achieved, the oxygen supplementation is adjusted, and the patient’s condition is re-evaluated. It is important to use this dose-response method so that the lowest possible level of oxygen is administered that will still achieve a satisfactory Pao2 or Sao2.2,3 Oxygen therapy can be delivered by many different devices (Table 21-1). Common problems with these devices include system leaks and obstructions, device displacement, and skin irritation. These devices are classified as low-flow, reservoir, or high-flow systems.3 TABLE 21-1 FiO2, Fraction of inspired oxygen; VE, minute volume. Modified from Heuer AJ. Medical gas therapy. In: Wilkins RL, et al, eds. Egan’s Fundamentals of Respiratory Care. 10th ed. St. Louis: Mosby; 2013. A low-flow oxygen delivery system provides supplemental oxygen directly into the patient’s airway at a flow of 8 L/min or less. Because this flow is insufficient to meet the patient’s inspiratory volume requirements, it results in a variable Fio2 as the supplemental oxygen is mixed with room air. The patient’s ventilatory pattern affects the Fio2 of a low-flow system: as this pattern changes, differing amounts of room air gas are mixed with the constant flow of oxygen. A nasal cannula is an example of a low-flow device.3 A reservoir system incorporates some type of device to collect and store oxygen between breaths. When the patient’s inspiratory flow exceeds the oxygen flow of the oxygen delivery system, the patient is able to draw from the reservoir of oxygen to meet his or her inspiratory volume needs. Less mixing of the inspired oxygen occurs with room air than in a low-flow system. A reservoir oxygen delivery system can deliver a higher Fio2 than a low-flow system. Examples of reservoir systems are simple face masks, partial rebreathing masks, and nonrebreathing masks.3 With a high-flow system, the oxygen flows out of the device and into the patient’s airways in an amount sufficient to meet all inspiratory volume requirements. This type of system is not affected by the patient’s ventilatory pattern. A high-flow system uses either an air-entrainment system or blending system to mix air and oxygen to achieve the desired Fio2. An air-entrainment mask is an example of a high-flow system that delivers precisely controlled oxygen at the lower Fio2 range.3 One of the newest high-flow systems is the high-flow nasal cannula. With this system, warmed and humidified oxygen is delivered to the patient via a nasal cannula using a blending system. This system has been shown to improve oxygenation and ventilation and decrease the work of breathing in the patient with acute lung failure. It also is more comfortable and better tolerated than similar therapies.4 Oxygen, like most medications, has adverse effects and complications resulting from its use. The adage, “If a little is good, a lot is better,” does not apply to oxygen. The lung is designed to handle a concentration of 21% oxygen, with some adaptability to higher concentrations, but adverse effects and oxygen toxicity can result if a high concentration is administered for too long.5 The most detrimental effect of breathing a high concentration of oxygen is the development of oxygen toxicity. It can occur in any patient who breathes oxygen concentrations of greater than 50% for longer than 24 hours. Patients most likely to develop oxygen toxicity are those who require intubation, mechanical ventilation, and high oxygen concentrations for extended periods.3 Hyperoxia, or the administration of higher-than-normal oxygen concentrations, produces an overabundance of oxygen free radicals. These radicals are responsible for the initial damage to the alveolar–capillary membrane. Oxygen free radicals are toxic metabolites of oxygen metabolism. Normally, enzymes neutralize the radicals, preventing any damage from occurring. During the administration of high levels of oxygen, the large number of oxygen free radicals produced exhausts the supply of neutralizing enzymes. Damage to the lung parenchyma and vasculature occurs, resulting in the initiation of acute respiratory distress syndrome (ARDS).2,5 A number of clinical manifestations are associated with oxygen toxicity. The first symptom is substernal chest pain that is exacerbated by deep breathing. A dry cough and tracheal irritation follow. Eventually, definite pleuritic pain occurs on inhalation, followed by dyspnea. Upper airway changes may include a sensation of nasal stuffiness, sore throat, and eye and ear discomforts. Chest radiographs and pulmonary function tests show no abnormalities until symptoms are severe. Complete, rapid reversal of these symptoms occurs as soon as normal oxygen concentrations are restored.5 In patients with severe chronic obstructive pulmonary disease (COPD), carbon dioxide (CO2) retention may occur as a result of administration of oxygen in high concentrations. A number of theories have been proposed for this phenomenon. One states that the normal stimulus to breathe (i.e., increasing CO2 levels) is muted in patients with COPD and that decreasing oxygen levels become the stimulus to breathe. If hypoxemia is corrected by the administration of oxygen, the stimulus to breathe is abolished; hypoventilation develops, resulting in a further increase in the arterial partial pressure of carbon dioxide (Paco2).2,3 Another theory is that the administration of oxygen abolishes the compensatory response of hypoxic pulmonary vasoconstriction. This results in an increase in perfusion of underventilated alveoli and the development of dead space, producing ventilation–perfusion mismatch. As alveolar dead space increases, so does the retention of CO2.2,3 One further theory states that the rise in CO2 is related to the ratio of deoxygenated to oxygenated hemoglobin (Haldane effect). Deoxygenated hemoglobin carries more CO2 compared with oxygenated hemoglobin. Administration of oxygen increases the proportion of oxygenated hemoglobin, which causes increased release of CO2 at the lung level.5 Because of the risk of CO2 accumulation, all patients who are chronically hypercapnic require careful low-flow oxygen administration.3 Another adverse effect of high concentrations of oxygen is absorption atelectasis. Breathing high concentrations of oxygen washes out the nitrogen that normally fills the alveoli and helps hold them open (residual volume). As oxygen replaces the nitrogen in the alveoli, the alveoli start to shrink and collapse. This occurs because oxygen is absorbed into the bloodstream faster than it can be replaced in the alveoli, particularly in areas of the lungs that are minimally ventilated.2,3 Nursing management of the patient receiving oxygen is outlined in Box 21-1. Key nursing interventions include ensuring the oxygen is being administered as ordered and observing for complications of the therapy. Confirming that the oxygen therapy device is properly positioned and replacing it after removal is important. During meals, an oxygen mask should be changed to a nasal cannula if the patient can tolerate one. The patient receiving oxygen therapy should also be transported with the oxygen. In addition, oxygen saturation should be periodically monitored using a pulse oximeter. NIC Oxygen Therapy • Clear oral, nasal, and tracheal secretions, as appropriate. • Set up oxygen equipment and administer through a heated, humidified system. • Administer supplemental oxygen, as ordered. • Monitor the oxygen liter flow. • Monitor position of oxygen delivery device. • Instruct patient about importance of leaving oxygen delivery device on. • Periodically check oxygen delivery device to ensure that the prescribed concentration is being delivered. • Monitor the effectiveness of oxygen therapy (e.g., pulse oximetry, arterial blood gases) as appropriate. • Assure replacement of oxygen mask or cannula whenever the device is removed. • Monitor patient’s ability to tolerate removal of oxygen while eating. • Change oxygen delivery device from mask to nasal prongs during meals, as tolerated. • Observe for signs of oxygen-induced hypoventilation. • Monitor for signs of oxygen toxicity and absorption atelectasis. • Monitor oxygen equipment to ensure that it is not interfering with the patient’s attempts to breathe. • Monitor patient’s anxiety related to need for oxygen therapy. • Monitor for skin breakdown from friction of oxygen device. • Provide for oxygen when patient is transported. • Instruct patient to obtain a supplementary oxygen prescription before air travel or trips to high altitude, as appropriate. • Consult with other health care personnel about use of supplemental oxygen during activity, sleep, or both. • Instruct patient and family about use of oxygen at home. • Arrange for use of oxygen devices that facilitate mobility and teach patient accordingly. • Convert to alternate oxygen delivery device to promote comfort, as appropriate. From Bulechek GM, et al. Nursing Interventions Classification (NIC). 6th ed. St. Louis: Mosby; 2013. Pharyngeal airways are used to maintain airway patency by keeping the tongue from obstructing the upper airway. The two types of pharyngeal airways are oropharyngeal and nasopharyngeal airways. Complications of these airways include trauma to the oral or nasal cavity, obstruction of the airway, laryngospasm, gagging, and vomiting.6,7 An oropharyngeal airway is made of plastic and is available in various sizes. The proper size is selected by holding the airway against the side of the patient’s face and ensuring that it extends from the corner of the mouth to the angle of the jaw. If the airway is improperly sized, it will occlude the airway.6,7 An oral airway is placed by inserting a tongue depressor into the patient’s mouth to displace the tongue downward and then passing the airway into the patient’s mouth, slipping it over the patient’s tongue (Fig. 21-1).7 When properly placed, the tip of the airway lies above the epiglottis at the base of the tongue. It should be used only in an unconscious patient who has an absent or diminished gag reflex.6,7 A nasopharyngeal airway is usually made of plastic or rubber and is available in various sizes. The proper size is selected by holding the airway against the side of the patient’s face and ensuring that it extends from the tip of the nose to the ear lobe.6,7 A nasal airway is placed by lubricating the tube and inserting it midline along the floor of the naris into the posterior pharynx.7 When properly placed, the tip of the airway lies above the epiglottis at the base of the tongue.6,7 An endotracheal tube (ETT) is the most commonly used artificial airway for providing short-term airway management. Indications for endotracheal intubation include maintenance of airway patency, protection of the airway from aspiration, application of positive-pressure ventilation, facilitation of pulmonary toilet, and use of high oxygen concentrations.8 An ETT may be placed through the orotracheal or the nasotracheal route.9,10 In most situations involving emergency placement, the orotracheal route is used because it is simpler and allows the use of a larger-diameter ETT.10,11 Nasotracheal intubation provides greater patient comfort over time and is preferred in patients with a jaw fracture.9,11,12 The advantages of orotracheal and nasotracheal intubation are presented in Table 21-2. TABLE 21-2 ADVANTAGES OF OROTRACHEAL, NASOTRACHEAL, AND TRACHEOSTOMY TUBES ETTs are available in various sizes, which are based on the inner diameters of the tubes, and have a radiopaque marker that runs the length of the tube. On one end of the tube is a cuff that is inflated with the use of the pilot balloon. Because of the high incidence of cuff-related problems, low-pressure, high-volume cuffs are preferred. On the other end of the tube is a 15-mm adaptor that facilitates connection of the tube to a manual resuscitation bag (MRB), T-tube, or ventilator (Fig. 21-2).13 Rapid sequence intubation (RSI) is a seven-step process that is often used to intubate the critically ill patient. It is considered safer for the patient as it decreases the risk of aspiration.14 Before intubation, the necessary equipment is gathered and organized to facilitate the procedure. Readily available equipment should include a suction system with catheters and tonsil suction, an MRB with a mask connected to 100% oxygen, a laryngoscope handle with assorted blades, a variety of sizes of ETTs, and a stylet. Before the procedure is initiated, all equipment is inspected to ensure that it is in working order. The patient should be prepared for the procedure, if possible, with an intravenous catheter in place and should be monitored with a pulse oximeter.14 Once everything is ready, the patient is preoxygenated with 100% oxygen for 3 to 5 minutes via a tight-fitting face mask. If the patient is unable to maintain adequate spontaneous ventilations, then assisted ventilations are initiated with an MRB. The goal is to avoid positive pressure ventilation, if possible, as this intervention increases the chances of gastric distention and the risk of aspiration. If an MRB is used, cricoid pressure should be initiated.14 While the patient is being preoxygenated, the patient is pretreated with adjunct medications to decrease the physiologic response to intubation. These medications include lidocaine, fentanyl, and atropine. A very low dose of a paralytic agent may be administered to prevent fasciculations. The use of these medications is dependent on the patient’s underlying condition. If possible, pretreatment should occur 3 minutes prior to the next step.14 Next, a sedative agent and a paralytic agent are administered in “rapid sequence” to achieve induction and paralysis. A variety of sedative agents, including etomidate, midazolam, ketamine, and propofol, are used to facilitate rapid loss of consciousness. Induction dosages for these medications are usually slightly higher than the typical dosages used for sedation. The two most administered neuromuscular blocking agents used to facilitate skeletal muscle relaxation are succinylcholine and rocuronium.14 The procedure is initiated by positioning the patient with the neck flexed and head slightly extended in the “sniff” position. The oral cavity and pharynx are suctioned, and any dental devices are removed. Next cricoid pressure is applied to protect the airway by preventing vomiting and subsequent aspiration of gastric contents.14 Next, the ETT is inserted into the trachea (Fig. 21-3), and placement is confirmed.14 Each intubation attempt is limited to 30 seconds to prevent hypoxemia. After the ETT is inserted, the patient is assessed for bilateral breath sounds and chest movement. Absence of breath sounds is indicative of an esophageal intubation, whereas breath sounds heard over only one side is indicative of a main stem intubation. A disposable end-tidal CO2 detector (Fig. 21-4) is used to initially verify correct airway placement, after which the cuff of the tube is inflated and the tube is secured. Finally, a chest radiograph is obtained to confirm placement.9–11 The tip of the ETT should be approximately 3 to 4 cm above the carina when the patient’s head is in the neutral position.10 After final adjustment of the position is complete, the level of insertion (marked in centimeters on the side of the tube) at the teeth is noted. The ETT is then secured to patient’s face using tape or a commercial tube holder (Fig. 21-5). Securing the tube stabilizes it to prevent movement and potential dislodgement. 9,10,15 A number of complications can occur during the intubation procedure, including nasal and oral trauma, pharyngeal and hypopharyngeal trauma, vomiting with aspiration, and cardiac arrest.15 Tracheal rupture is a rare and often fatal complication that is associated with emergent intubation.16 Hypoxemia and hypercapnia can also occur, resulting in bradycardia, tachycardia, dysrhythmias, hypertension, and hypotension.8,12,15 Several complications can occur while the ETT is in place, including nasal and oral inflammation and ulceration, sinusitis and otitis, laryngeal and tracheal injuries, and tube obstruction and displacement. Other complications can occur days to weeks after the ETT is removed, including laryngeal and tracheal stenosis and a cricoid abscess (Table 21-3). Delayed complications usually require some form of surgical intervention.17,18 TABLE 21-3 COMPLICATIONS OF ENDOTRACHEAL TUBES A tracheostomy tube is the preferred method of airway maintenance in the patient who requires long-term intubation. Although no ideal time to perform the procedure has been identified, it is commonly accepted that if a patient has been intubated or is anticipated to be intubated for longer than 7 to 10 days, a tracheostomy should be performed.19 A tracheostomy is also indicated in several other situations such as the presence of an upper airway obstruction due to trauma, tumors, or swelling and the need to facilitate airway clearance due to spinal cord injury, neuromuscular disease, or severe debilitation.20,21 A tracheostomy tube provides the best route for long-term airway maintenance because it avoids the oral, nasal, pharyngeal, and laryngeal complications associated with an ETT. The tube is shorter, of wider diameter, and less curved than an ETT; the resistance to air flow is less, and breathing is easier. Additional advantages of a tracheostomy tube include easier secretion removal, increased patient acceptance and comfort, capability of the patient to eat and talk if possible, and easier ventilator weaning.11,20 See Table 21-2 for a list of the advantages of a tracheostomy tube. Tracheostomy tubes are made of plastic or metal and may have one or two lumens. Single-lumen tubes consist of the tube; a built-in cuff, which is connected to a pilot balloon for inflation purposes; and an obturator, which is used during tube insertion. The double-lumen tubes consist of the tube with the attached cuff, the obturator, and an inner cannula that can be removed for cleaning and then reinserted or, if disposable, replaced by a new sterile inner cannula. The inner cannula can quickly be removed if it becomes obstructed, making the system safer for patients with significant secretion problems. Single-lumen tubes provide a larger internal diameter for airflow, so airflow resistance is reduced, and the patient can ventilate through the tube with greater ease. Plastic tracheostomy tubes also have a 15-mm adaptor on the end (Fig. 21-6).20,21 A number of complications can occur during the tracheostomy procedure, including misplacement of the tracheal tube, hemorrhage, laryngeal nerve injury, pneumothorax, pneumomediastinum, and cardiac arrest.17,21,22 Several complications can occur while the tracheostomy tube is in place, including stomal infection, hemorrhage, tracheomalacia, tracheoesophageal fistula, tracheoinnominate artery fistula, and tube obstruction and displacement.21,22 A number of complications can occur days to weeks after the tracheostomy tube is removed, including tracheal stenosis and tracheocutaneous fistula (Table 21-4). Delayed complications usually require some form of surgical intervention.21 TABLE 21-4 COMPLICATIONS OF TRACHEOSTOMY TUBES Nursing management of the patient with an endotracheal or tracheostomy tube requires some additional measures to address the effects associated with tube placement on the respiratory and other body systems (Box 21-2). Nursing interventions for the patient with an artificial airway include providing humidification, managing the cuff, suctioning, establishing a method of communication, and providing oral hygiene. Because the tube bypasses the upper airway system, warming and humidifying of air must be performed by external means. Because the cuff of the tube can cause damage to the walls of the trachea, proper cuff inflation and management are imperative. In addition, the normal defense mechanisms are impaired and secretions may accumulate; thus, suctioning may be needed to promote secretion clearance. Because the tube does not allow air flow over the vocal cords, developing a method of communication is also very important. Last, observing the patient to ensure proper placement of the tube and patency of the airway is essential. NIC Artificial Airway Management • Use personal protective equipment (gloves, goggles, and mask), as appropriate. • Provide an oropharyngeal airway or bite block to prevent biting on the endotracheal tube, as appropriate. • Provide 100% humidification of inspired air, oxygen, or gas. • Provide adequate systemic hydration via oral or intravenous fluid administration. • Inflate endotracheal or tracheostoma cuff using minimal occlusive volume (MOV) technique or minimal leak technique (MLT). • Maintain inflation of the endotracheal or tracheostoma cuff at 15 to 25 mm Hg during mechanical ventilation and during and after feeding. • Monitor cuff pressures every 4 to 8 hours during expiration using a three-way stopcock, calibrated syringe, and manometer. • Check cuff pressure immediately after delivery of any general anesthesia or manipulation of endotracheal tube. • Institute endotracheal suctioning, as appropriate. • Suction the oropharnyx and secretions from the top of the tube cuff before deflating cuff. • Change endotracheal tapes or ties every 24 hours, inspect the skin and oral mucosa, and reposition ET to the other side of the mouth. • Loosen commercial endotracheal tube holders at least once a day, and provide skin care. • Auscultate for presence of lung sounds bilaterally after insertion and after changing endotracheal or tracheostomy ties. • Note the centimeter reference marking on endotracheal tube to monitor for possible displacement. • Assist with chest radiographic examination, as needed, to monitor position of tube. • Minimize leverage and traction on the artificial airway by suspending ventilator tubing from overhead supports, using flexible catheter mounts and swivels, and supporting tubes during turning, suctioning, and ventilator disconnection and reconnection. • Monitor for presence of crackles and rhonchi over large airways. • Monitor secretions: color, amount, and consistency. • Perform oral care (i.e., use toothbrush, swabs, mouth and lip moisturizer), as needed. • Monitor for decrease in exhale volume and increase in inspiratory pressure in patients receiving mechanical ventilation. • Institute measures to prevent spontaneous decannulation (i.e., secure artificial airway with tape or ties, administer sedation and muscle paralyzing agent, use arm restraints), as appropriate. • Provide additional intubation equipment and Ambu bag in a readily available location. • Provide trachea care every 4 to 8 hours, as appropriate: clean the inner cannula, clean and dry the area around the stoma, and change tracheostomy ties. • Inspect skin around tracheal stoma for drainage, redness, irritation and bleeding. • Inspect and palpate for air under skin every 8 hours. • Monitor for presence of pain. • Maintain sterile technique when suctioning and providing tracheostomy care. • Shield the tracheostomy from water. • Tape the tracheostomy obturator to head of bed. • Tape a second tracheostomy (same type and size) and forceps to head of bed. • Institute chest physiotherapy, as appropriate. • Ensure that endotracheal or tracheostomy cuff is inflated during feedings, as appropriate. • Elevate head of the bed 30 degrees or more, or assist patient to a sitting position in a chair during feedings, as appropriate. From Bulechek GM, et al. Nursing Interventions Classification (NIC), 6th ed. St. Louis: Mosby; 2013. One recent study examined patients’ perception of endotracheal tube–related discomforts. Forty-six percent of the patients reported remembering having the endotracheal tube while in the critical care unit. The majority of these patients found the discomfort associated with the ETT and the inability to speak very stressful. In addition, some of the patient’s continued to have problems with hoarseness, sore throat, and voice changes days to months later.24 Humidification of air normally is performed by the mucosal layer of the upper respiratory tract. When this area is bypassed, as occurs with ETT and tracheostomy tubes or when supplemental oxygen is used, humidification by external means is necessary. Various humidification devices add water to inhaled gas to prevent drying and irritation of the respiratory tract, to prevent undue loss of body water, and to facilitate secretion removal.25,26 The humidification device should provide inspired gas conditioned (heated) to body temperature and saturated with water vapor.27 Because the cuff of the ETT or tracheostomy tube is a major source of the complications associated with artificial airways, proper cuff management is essential. To prevent the complications associated with cuff design, only low-pressure, high-volume cuffed tubes are used in clinical practice.13,28 Even with these tubes, cuff pressures can be generated that are high enough to lead to tracheal ischemia and injury. Proper cuff inflation techniques and cuff pressure monitoring are critical components of the care of the patient with an artificial airway.10,28 Figure 21-7 is an example of a one device used to measure cuff pressures. Two cuff inflation techniques are used: 1) the minimal leak (ML) technique and 2) the minimal occlusion volume (MOV) technique. The ML technique consists of injecting air into the cuff until no leak is heard and then withdrawing the air until a small leak is heard on inspiration. Problems with this technique include difficulty maintaining positive end-expiratory pressure (PEEP) and aspiration around the cuff. The MOV technique consists of injecting air into the cuff until no leak is heard at peak inspiration. This technique generates higher cuff pressures than does the ML technique. The selection of one technique over the other is determined by individual patient needs. If the patient needs a seal to provide adequate ventilation or is at high risk for aspiration, the MOV technique is used. If these are not concerns, usually the ML technique is used.10,11,28 Cuff pressures are monitored at least every shift with a cuff pressure manometer. Cuff pressures should be maintained at 20 to 25 mm Hg (24 to 30 cm H2O) because greater pressures decrease blood flow to the capillaries in the tracheal wall and lesser pressures increase the risk of aspiration. Pressures in excess of 25 mm Hg (30 cm H2O) should be reported to the physician. Cuffs are not routinely deflated because this increases the risk of aspiration.10,28 One tracheostomy tube on the market has a cuff made of foam that is self-inflating (Fig. 21-8). It is deflated during insertion, after which the pilot port is opened to atmospheric pressure (room air), and the cuff self-inflates. After inflation, the foam cuff conforms to the size and shape of the patient’s trachea, thereby reducing the pressure against the tracheal wall. The pilot port can be left open to atmospheric pressure or attached to the mechanical ventilator tubing, allowing the cuff to inflate and deflate with the cycling of the ventilator. Routine maintenance of a foam cuff tracheostomy tube includes aspirating the pilot port every 8 hours to measure cuff volume, to remove any condensation from the cuff area, and to assess the integrity of the cuff. Removal is accomplished by deflating the cuff; this can be complicated if the plastic sheath covering the foam is perforated. If perforation occurs, the foam may not be deflatable because the air cannot be totally aspirated.21 The cuff has also been implicated in the development of ventilator-associated pneumonia. Fluids can leak around the cuff into the airway, resulting in microaspiration. Bacteria-laden oral secretions trickle down the larynx and pool above the cuff of the artificial airway. These secretions are referred to as subglottic secretions. Subglottic secretions can then leak into the lower airways around the cuff via the longitudinal folds in that form in the cuff as it accommodates for the shape of the airway, an underinflated cuff that fails to form a proper seal in the airway, or inadvertent movement of the endotracheal tube within airway. Thus, the use of established cuff inflation techniques, monitoring of cuff pressures, using an appropriate method of tube stabilization, and oral hygiene are important interventions for preventing this problem.29 Deep oropharyngeal suctioning to remove subglottic secretions should be performed at least every 12 hours and prior to deflating the cuff or moving the tube.30 Specialized tubes are available to allow for the continuous removal of subglottic secretions. These tubes have an additional lumen, with an opening above the cuff, which is connected to continuous (–20 to –30 cm H2O) suction (Fig. 21-9).11 These tubes are recommended for patients who are expected to be intubated for longer than 72 hours.31 One issue with these tubes is that the aspiration lumen can become clogged and, thus, requires a small amount of air to be injected into the aspiration port every 4 hours. Suctioning is often required to maintain a patent airway in the patient with an ETT or tracheostomy tube. Suctioning is a sterile procedure that is performed only when the patient needs it and not on a routine schedule.10,32,33 Indications for suctioning include coughing, secretions in the airway, respiratory distress, presence of rhonchi on auscultation, increased peak airway pressures on the ventilator, and decreasing oxygenation saturation.11 Complications associated with suctioning include hypoxemia, atelectasis, bronchospasms, dysrhythmias, increased intracranial pressure, and airway trauma.11,32 Hypoxemia can result because the oxygen source is disconnected from the patient or the oxygen is removed from the patient’s airways when the suction is applied. Atelectasis is thought to occur when the suction catheter is larger than one half of the diameter of the ETT. Excessive negative pressure occurs when suction is applied, promoting collapse of the distal airways. Bronchospasms are the result of stimulation of the airways with the suction catheter. Cardiac dysrhythmias, particularly bradycardias, are attributed to vagal stimulation. Airway trauma occurs with impaction of the catheter in the airways and excessive negative pressure applied to the catheter.10,11,32 A number of protocols regarding suctioning have been developed. Several practices have been found helpful in limiting the complications of suctioning. Hypoxemia can be minimized by giving the patient three hyperoxygenation breaths (breaths at 100% Fio2) with the ventilator before the procedure begins and again after each pass of the suction catheter.10,33,34 If the patient exhibits signs of desaturation, hyperinflation (breaths at 150% tidal volume) should be added to the procedure.10 Atelectasis can be avoided by using a suction catheter with an external diameter of less than one half of the internal diameter of the ETT.32,33 Using no greater than 120 mm Hg of suction decreases the chances of hypoxemia, atelectasis, and airway trauma.10,33 Limiting the duration of each suction pass to 10 to 15 seconds;10,32,33 and the number of passes to a maximum of three also helps minimize hypoxemia, airway trauma, and cardiac dysrhythmias.35 The process of applying intermittent (instead of continuous) suction has been shown to be of no benefit.33,36 The instillation of normal saline to help remove secretions has not proved to be of any benefit;32,33,37 and it may actually contribute to the development of hypoxemia, as well as lower airway colonization, resulting in ventilator-associated pneumonia (VAP).10,38,39 One device to facilitate the suctioning of a patient on a ventilator is the closed tracheal suction system (CTSS) (Fig. 21-10). This device consists of a suction catheter in a plastic sleeve that attaches directly to the ventilator tubing. It allows the patient to be suctioned while remaining on the ventilator. Advantages of the CTSS include maintenance of oxygenation and PEEP during suctioning, reduction of hypoxemia-related complications, and protection of staff members from the patient’s secretions. The CTSS is convenient to use, requiring only one person to perform the procedure.11 Concerns related to the CTSS include autocontamination, inadequate removal of secretions, and increased risk of unintentional extubation resulting from the extra weight of the system on the ventilator tubing. Autocontamination has been shown not to be an issue if the catheter is cleaned properly after every use. Inadequate removal of secretions may or may not be a problem, and further investigation is required to settle this issue.11 Although recommendations for changing the catheter vary, one study indicated that the catheter could be changed on an as-needed basis without increasing the incidence of VAP.40 Once recent study found that suctioning with the CTSS caused massive aspiration of fluid around the tracheal tube cuff as a result of a significant drop in airway pressure.41 One of the major stressors for the patient with an artificial airway is impaired communication. This is related to the inability to speak, insufficient explanations from staff members, inadequate understanding, fear of being unable to communicate, and difficulty with communication methods.42 A number of interventions can facilitate communication in the patient with an ETT or tracheostomy tube. These include establishing an environment that fosters communication, performing a complete assessment of the patient’s ability to communicate, anticipating the patient’s needs, teaching the patient and family how to communicate, using a variety of methods to communicate, and facilitating the patient’s ability to communicate by providing the patient with his or her eyeglasses or hearing aid.43 Methods to facilitate communication in this patient population include the use of verbal and nonverbal language and a variety of devices to assist the patient on short-term and long-term ventilator assistance. Nonverbal communication may include the use of sign language, gestures, lip reading, pointing, facial expressions, or eye blinking. Simple devices available include pencil and paper; Magic Slates; magnetic boards with plastic letters; picture, alphabet, or symbol boards; and flash cards. More sophisticated devices include typewriters, computers, talking ETT and tracheostomy tubes, and external handheld vibrators. Regardless of the method selected, the patient must be taught how to use the device.10,43 One device used to assist the mechanically ventilated patient with a tracheostomy to speak is the Passy-Muir valve. This one-way valve opens on inhalation, allowing air to enter the lungs through the tracheostomy tube, and closes on exhalation, forcing air over the vocal cords and out the mouth, permitting the patient to speak (Fig. 21-11). Before the valve can be placed on a tracheostomy tube, the cuff must be deflated to allow air to pass around the tube, and the tidal volume of the ventilator must be increased to compensate for the air leak. In addition to aiding communication, the Passy-Muir valve can assist the ventilator-dependent patient with relearning normal breathing patterns. The valve is contraindicated in patients with laryngeal or pharyngeal dysfunction, excessive secretions, or poor lung compliance.43
Pulmonary Therapeutic Management
Oxygen Therapy
Principles of Therapy
Methods of Delivery
CATEGORY
DEVICE
FLOW
Fio2 RANGE (%)
Fio2 STABILITY
ADVANTAGES
DISADVANTAGES
BEST USE
Low-flow
Nasal cannula
0.25-8 L/min (adults)
≤2 L/min (infants)
22-45
Variable
Use on adults, children, infants; easy to apply; disposable, low cost; well tolerated
Unstable, easily dislodged; high flows uncomfortable; can cause dryness or bleeding; polyps, deviated septum may block flow
Stable patient needing low Fio2; home care patient requiring long-term therapy
Nasal catheter
0.25-8 L/min
22-45
Variable
Use on adults, children, infants; good stability; disposable, low cost
Difficult to insert; high flows increase back pressure; needs regular changing; polyps, deviated septum may block insertion; may provoke gagging, air swallowing, aspiration
Procedures in which cannula is difficult to use (bronchoscopy); long-term care for infants
Transtracheal catheter
0.25-4 L/min
22-35
Variable
Lower oxygen usage or cost; eliminates nasal/skin irritation; improved compliance; increased exercise tolerance; increased mobility; enhanced image
High cost; surgical complications; infection; mucus plugging; lost tract
Home care or ambulatory patients who need increased mobility or who do not accept nasal oxygen
Reservoir
Reservoir cannula
0.25-4 L/min
22-35
Variable
Lower oxygen usage/cost; increased mobility; less discomfort because of lower flows
Unattractive, cumbersome; poor compliance; must be regularly replaced; breathing pattern affects performance
Home care or ambulatory patients who need increased mobility
Simple mask
5-12 L/min
35-50
Variable
Use on adults, children, infants; quick, easy to apply; disposable, inexpensive
Uncomfortable; must be removed for eating; prevents radiant heat loss; blocks vomitus in unconscious patients
Emergencies, short-term therapy requiring moderate Fio2
Partial rebreathing mask
6-10 L/min (prevent bag collapse on inspiration)
35-60
Variable
Same as simple mask; moderate to high Fio2
Same as simple mask; potential suffocation hazard
Emergencies, short-term therapy requiring moderate to high Fio2
Nonrebreathing mask
6-10 L/min (prevent bag collapse on inspiration)
55-70
Variable
Same as simple mask; high Fio2
Same as simple mask; potential suffocation hazard
Emergencies, short-term therapy requiring high Fio2
Nonrebreathing circuit (closed)
3 × VE (prevent bag collapse on inspiration)
21-100
Fixed
Full range of Fio2
Potential suffocation hazard; requires 50 psi air or oxygen; blender failure common
Patients requiring precise Fio2 at any level (21%–100%)
High-flow
Air-entrainment mask (AEM)
Varies; should provide output flow >60 L/min
24-50
Fixed
Easy to apply; disposable, inexpensive; stable, precise Fio2
Limited to adult use; uncomfortable, noisy; must be removed for eating; Fio2 >0.40 not ensured; Fio2 varies with back-pressure
Unstable patients requiring precise low Fio2
Air-entrainment nebulizer
10-15 L/min input; should provide output flow of at least 60 L/min
28-100
Fixed
Provides temperature control and extra humidification
Fio2 <28% or >0.40 not ensured; Fio2 varies with back-pressure; high infection risk
Patients with artificial airways requiring low to moderate Fio2
Blending system (open)
Should provide output flow of at least 60 L/min
21-100
Fixed
Full range of Fio2
Requires 50 psi air + oxygen; blender failure or inaccuracy common
Patient with high VE who need high Fio2
High-flow cannula system
Up to 40 L/min (depending on system)
35-90
Variable or fixed depending on system and input flow
Wide range of Fio2 and relative or absolute humidity; use on adults, children, infants
Fio2 not ensured depending on input flow and patient breathing pattern; infection risk
Patients of all ages with high or variable VE who need supplemental oxygen, positive pressure, or humidity
Low-Flow Systems
Reservoir Systems
High-Flow Systems
Complications of Oxygen Therapy
Oxygen Toxicity
Carbon Dioxide Retention
Absorption Atelectasis
Nursing Management
 Box 21-1
Artificial Airways
Pharyngeal Airways
Oropharyngeal Airway
Nasopharyngeal Airway
Endotracheal Tubes
OROTRACHEAL TUBES
NASOTRACHEAL TUBES
TRACHEOSTOMY TUBES
Easier access
Easily secured and stabilized
Easily secured and stabilized
Avoids nasal and sinus complications
Reduces risk of unintentional extubation
Reduces risk of unintentional decannulation
Allows for larger-diameter tube, which facilitates:
• Work of breathing
Well tolerated by patient
Enables swallowing and oral hygiene
Well tolerated by patient
Enables swallowing, speech, and oral hygiene
• Suctioning
Facilitates communication
Avoids upper airway complications
• Fiberoptic bronchoscopy
Avoids need for bite block
Allows for larger-diameter tube, which facilitates:
• Work of breathing
• Suctioning
• Fiberoptic bronchoscopy
Rapid Sequence Intubation
Step 1—Preparation.
Step 2—Preoxygenation.
Step 3—Pretreatment.
Step 4—Paralysis with Induction.
Step 5—Protection and Positioning.
Step 6—Placement of the Endotracheal Tube.
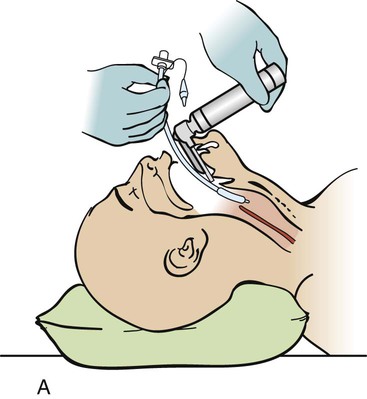
A, Insert the tube with the tip initially against the right buccal mucosa so that a clear view of the vocal cords can be maintained at all times. As it advances, watch the tube pass through the cord. B, The tube is correctly placed when the tip is 2 to 3 cm beyond the vocal cords. (From Savage S. Tracheal intubation. In: Pfenninger JL, Fowler GC, eds. Pfenninger and Fowler’s Procedures for Primary Care. 3rd ed. Philadelphia: Elsevier; 2011.)
Step 7—Post Intubation Management.
Complications
COMPLICATIONS
CAUSES
PREVENTION AND TREATMENT
Tube obstruction
Patient biting tube
Prevention:
Tube kinking during repositioning
Place bite block.
Cuff herniation
Sedate patient PRN.
Dried secretions, blood, or lubricant
Suction PRN.
Tissue from tumor
Humidify inspired gases.
Trauma
Treatment:
Foreign body
Replace tube.
Tube displacement
Movement of patient’s head
Prevention:
Movement of tube by patient’s tongue
Traction on tube from ventilator tubing
Secure tube to upper lip.
Restrain patient’s hands as needed.
Sedate patient PRN.
Self-extubation
Ensure that only 2 inches of tube extend beyond lip.
Support ventilator tubing.
Treatment:
Replace tube.
Sinusitis and nasal injury
Obstruction of the paranasal sinus drainage
Prevention:
Avoid nasal intubations.
Pressure necrosis of nares
Cushion nares from tube and tape or ties.
Treatment:
Remove all tubes from nasal passages.
Administer antibiotics.
Tracheoesophageal fistula
Pressure necrosis of posterior tracheal wall, resulting from overinflated cuff and rigid nasogastric tube
Prevention:
Inflate cuff with minimal amount of air necessary.
Monitor cuff pressures every 8 hours.
Treatment:
Position cuff of tube distal to fistula.
Place gastrostomy tube for enteral feedings.
Place esophageal tube for secretion clearance proximal to fistula.
Mucosal lesions
Pressure at tube and mucosal interface
Prevention:
Inflate cuff with minimal amount of air necessary.
Monitor cuff pressures every 8 hours.
Use appropriate size tube.
Treatment:
May resolve spontaneously.
Perform surgical intervention.
Laryngeal or tracheal stenosis
Injury to area from end of tube or cuff, resulting in scar tissue formation and narrowing of airway
Prevention:
Inflate cuff with minimal amount of air necessary.
Monitor cuff pressures every 8 hours.
Suction area above cuff frequently.
Treatment:
Perform tracheostomy.
Place laryngeal stent.
Perform surgical repair.
Cricoid abscess
Mucosal injury with bacterial invasion
Prevention:
Inflate cuff with minimal amount of air necessary.
Monitor cuff pressures every 8 hours.
Suction area above cuff frequently.
Treatment:
Perform incision and drainage of area.
Administer antibiotics.
Tracheostomy Tubes

A, Dual-lumen cuffed tracheostomy tube with disposable inner cannula. B, Dual-lumen cuffed fenestrated tracheostomy tube. C, Single-lumen cannula cuffed tracheostomy tube. (From Rees HC. Care of patients requiring oxygen therapy or tracheostomy. In: Ignatavicius DD, Workman ML, eds. Medical-Surgical Nursing. 7th ed. St. Louis: Elsevier; 2013.)
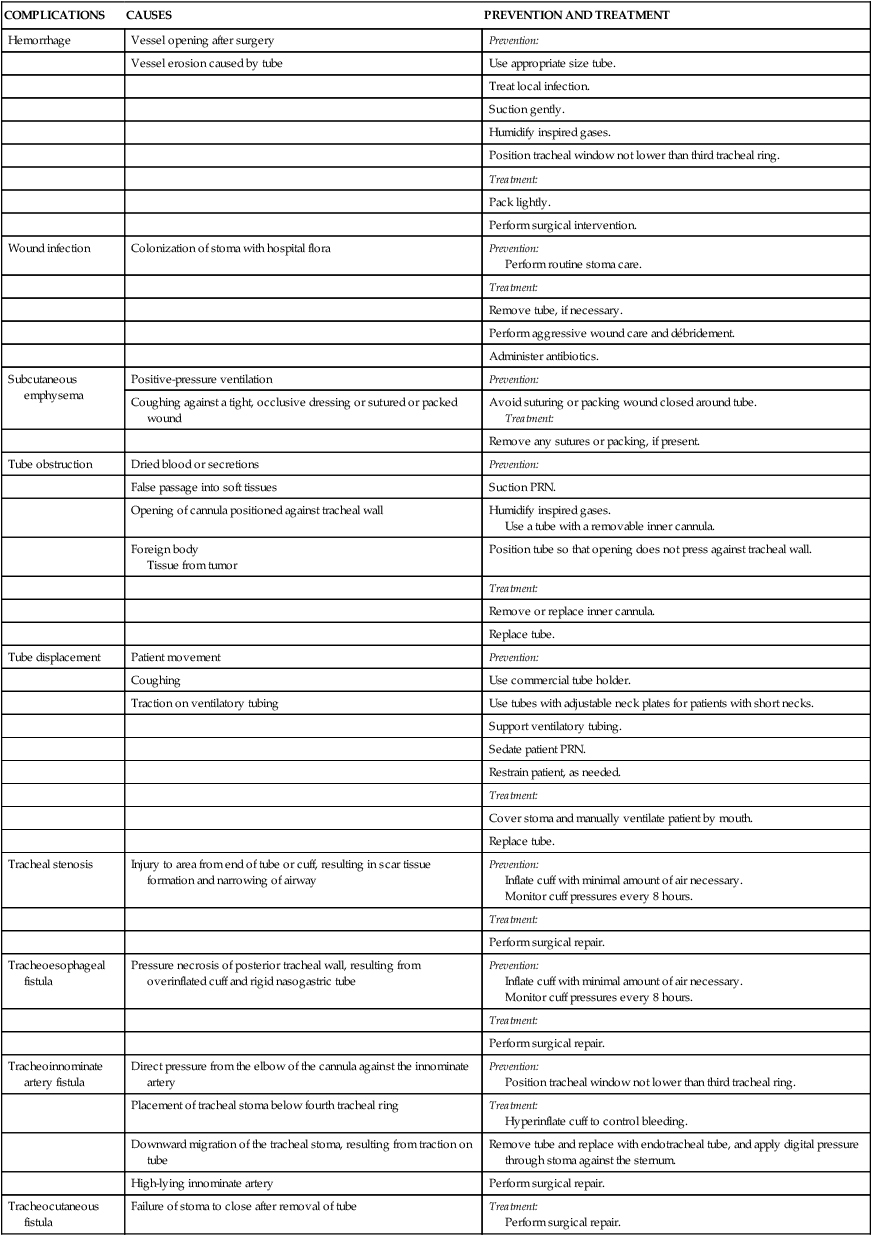
Complications
COMPLICATIONS
CAUSES
PREVENTION AND TREATMENT
Hemorrhage
Vessel opening after surgery
Prevention:
Vessel erosion caused by tube
Use appropriate size tube.
Treat local infection.
Suction gently.
Humidify inspired gases.
Position tracheal window not lower than third tracheal ring.
Treatment:
Pack lightly.
Perform surgical intervention.
Wound infection
Colonization of stoma with hospital flora
Prevention:
Perform routine stoma care.
Treatment:
Remove tube, if necessary.
Perform aggressive wound care and débridement.
Administer antibiotics.
Subcutaneous emphysema
Positive-pressure ventilation
Prevention:
Coughing against a tight, occlusive dressing or sutured or packed wound
Avoid suturing or packing wound closed around tube.
Treatment:
Remove any sutures or packing, if present.
Tube obstruction
Dried blood or secretions
Prevention:
False passage into soft tissues
Suction PRN.
Opening of cannula positioned against tracheal wall
Humidify inspired gases.
Use a tube with a removable inner cannula.
Foreign body
Tissue from tumor
Position tube so that opening does not press against tracheal wall.
Treatment:
Remove or replace inner cannula.
Replace tube.
Tube displacement
Patient movement
Prevention:
Coughing
Use commercial tube holder.
Traction on ventilatory tubing
Use tubes with adjustable neck plates for patients with short necks.
Support ventilatory tubing.
Sedate patient PRN.
Restrain patient, as needed.
Treatment:
Cover stoma and manually ventilate patient by mouth.
Replace tube.
Tracheal stenosis
Injury to area from end of tube or cuff, resulting in scar tissue formation and narrowing of airway
Prevention:
Inflate cuff with minimal amount of air necessary.
Monitor cuff pressures every 8 hours.
Treatment:
Perform surgical repair.
Tracheoesophageal fistula
Pressure necrosis of posterior tracheal wall, resulting from overinflated cuff and rigid nasogastric tube
Prevention:
Inflate cuff with minimal amount of air necessary.
Monitor cuff pressures every 8 hours.
Treatment:
Perform surgical repair.
Tracheoinnominate artery fistula
Direct pressure from the elbow of the cannula against the innominate artery
Prevention:
Position tracheal window not lower than third tracheal ring.
Placement of tracheal stoma below fourth tracheal ring
Treatment:
Hyperinflate cuff to control bleeding.
Downward migration of the tracheal stoma, resulting from traction on tube
Remove tube and replace with endotracheal tube, and apply digital pressure through stoma against the sternum.
High-lying innominate artery
Perform surgical repair.
Tracheocutaneous fistula
Failure of stoma to close after removal of tube
Treatment:
Perform surgical repair.
Nursing Management
 Box 21-2
Humidification
Cuff Management
Cuff Inflation Techniques.
Cuff Pressure Monitoring.
Foam Cuff Tracheostomy Tubes.
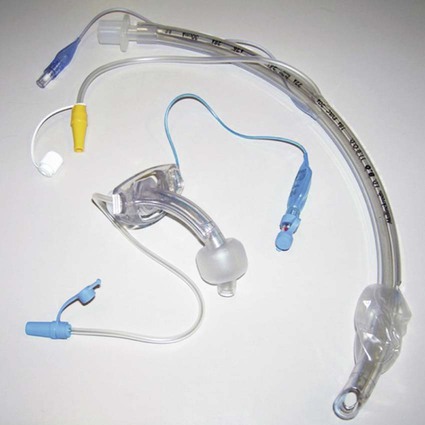
Subglottic Secretion Removal.
Suctioning
Complications.
Suctioning Protocol.
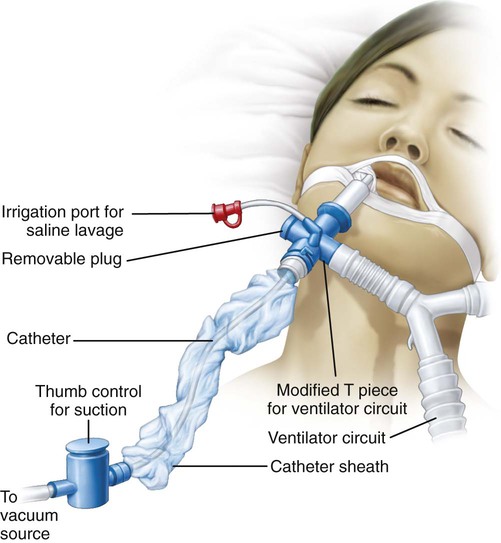
Closed Tracheal Suction System.
Communication
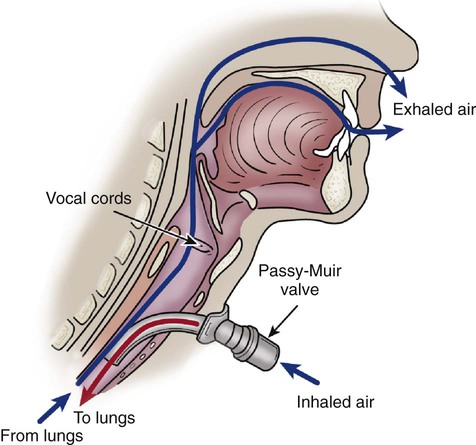
Passy-Muir Valve.
![]()
Stay updated, free articles. Join our Telegram channel

Full access? Get Clinical Tree