1. Principles of abdominal examination
during pregnancy and labour
CHAPTER CONTENTS
Abdominal examination: principles 2
Visual appearance of the abdomen 2
Assessing the uterine fundus 3
Measuring the symphysis fundal height 3
Presentation of the fetus 4
Position of the fetus 4
Abdominal examination in labour 6
Documentation 6
PROCEDURE: abdominal examination 6
Auscultation of the fetal heart 9
PROCEDURE: using a Pinard stethoscope 11
Use of the sonicaid 11
PROCEDURE: using a fetal Doppler 11
Cardiotocography 11
Palpation of uterine contractions 15
PROCEDURE: assessing uterine contractions 16
Role and responsibilities of the midwife 16
Summary 16
Self-assessment exercises 17
References 170
LEARNING OUTCOMES
Having read this chapter the reader should be able to:
• discuss the indications for abdominal examination in pregnancy and labour
• discuss the different components of an abdominal examination, indicating the nature of the information sought and the rationale for it
• describe the ways in which the fetal heart can be auscultated
• explain the indications for using a CTG, how it is applied and how to interpret the tracing
• describe how uterine contractions are palpated in labour, why this is undertaken and the significance of the findings
• explain the midwife’s role and responsibilities in relation to each of these aspects of care.
Maternity care is changing. According to the National Institute for Health and Clinical Excellence (NICE 2008), the emphasis is moving from the woman having ‘lots done to her’ to a much more holistic approach in which psychological and social issues are prioritized with physical care. This means that skills such as palpating the abdomen in the antenatal period are perhaps undertaken less often, but that they nevertheless remain skills that midwives need to maintain. This chapter considers the skill of abdominal examination, what is learned from it and how it is undertaken both antenatally and during labour.
Routine antenatal auscultation of the fetal heart is no longer recommended, but it is a much needed skill when caring for a labouring woman and it is needed for aspects of non-routine antenatal care. This chapter discusses the use of a Pinard stethoscope, fetal Doppler and cardiotocograph (CTG). Some of what is described overlaps with labour care and so should be read in conjunction with Chapters 30, 31 and the glossary. The final part of the chapter considers the other aspect of abdominal examination in labour, that of palpating uterine activity.
Antenatal abdominal examination
Undertaking an abdominal examination antenatally has historically sought to:
• assess fetal growth, size, wellbeing, position and presentation
• detect deviations from the norm.
However, in the climate of evidence-based best practice, NICE (2008) considers some of these aims to be questionable. Fetal wellbeing is more likely to be assessed by discussions about the fetal movements than it is by listening to the fetal heart for 1 minute. Equally, the position and presentation of the fetus have little bearing on care until the end of pregnancy, when labour is approaching. Consequently, the recommended components (NICE 2008) for abdominal examination are:
• the measuring and recording of symphysis fundal height on each occasion from 24 weeks gestation
• assessment for fetal presentation at and after 36 weeks.
It is likely that multiparous women in particular, having had prior experience, will expect to have a thorough abdominal examination at much earlier gestations than 36 weeks. Women are often reassured to hear the fetal heart and to know which way the ‘baby’ (fetus) is lying. The skill of abdominal palpation increases with both knowledge and experience and, whereas the current requirements in pregnancy are limited, the authors recognise the need to maintain the skill (for the times when it is much needed) or lose it! As with all guidelines, the midwife will exercise her clinical judgement and might, at times, need to deviate from them.
Indications
• At antenatal assessments after 24 weeks of pregnancy, adapted according to gestation.
• Prior to auscultation of the fetal heart and use of CTG equipment.
• Before a vaginal examination.
• Throughout labour.
Contraindications
As the uterus can be stimulated when this examination is performed, it should be undertaken cautiously when there is:
• placental abruption
• preterm labour.
Abdominal examination: principles
The assessment begins by appreciating the woman – how she is looking, feeling, coping and what she reveals in conversation. A woman who describes lots of indigestion, some breathlessness and ‘the baby right under her ribs’ might cause the midwife to begin wondering whether the fetus is a breech presentation, for example.
Informed consent should be obtained for palpation. Olsen (1999) discovered that women didn’t like palpation and thereafter made efforts to explain the procedure, to seek permission before doing anything and to ensure greater comfort. Explanations should be given during and after the examination, there should be full discussion of the findings, contemporaneous documentation and explanations as to what has been written. These are some of the ways in which women can experience greater empowerment.
Although the midwife should have clean hands, other standard precautions are unlikely to be necessary as contact with body fluids does not occur. Care should be taken to ensure that aortocaval occlusion is avoided and the woman should be encouraged to empty her bladder. She should be comfortable, in a private location and her dignity should be maintained throughout. A woman might choose to have others present or absent and she needs to know that she has the option to cease the examination if she so desires.
Visual appearance of the abdomen
The visual appearance of the abdomen can influence the midwife’s findings and add to the holistic care offered:
• Shape: may give an indication of the fetal position or presentation, e.g. a dip at the umbilicus can be indicative of an occipitoposterior position.
• Skin changes: linea nigra, striae gravidarum, signs of previous abdominal surgery, presence of rash or itching.
• Fetal movements may be seen.
• Signs of potential domestic violence may be observed.
Assessing the uterine fundus
Using the hands on the abdomen, the uterine fundus can be located. Using the hand nearest to the woman, the pads of the fingers are placed on the abdomen below the xiphisternum and moved gently downwards until the firmness of the fundus is felt. As the fetus grows, so does the uterus, making the fundal height a possible indicator as to fetal growth. The presence of a fetal pole in the fundus (e.g. buttocks) is confirmatory of what is suspected as the presenting part.
The height of the fundus can be affected by several maternal factors, including size, parity and a full bladder. Fundal height can be assessed in two ways, although neither is considered to have absolute reliability (Rosser 2000):
1. using a traditional set of indicators that consider landmarks on the abdomen (Fig. 1.1)
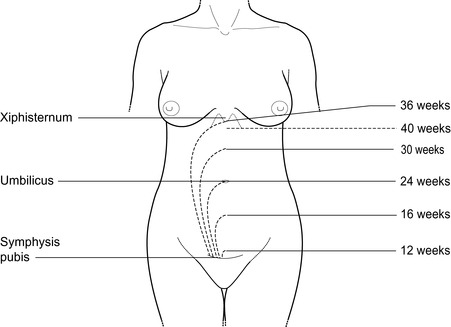 |
| Figure 1.1 • Fundal height at different stages of pregnancy |
2. measuring with a tape measure.
Neilson (1998) undertook a Cochrane review of the value of measuring the symphysis fundal height. He concluded that there was not enough evidence to evaluate its use. Other studies consider that when plotted on customized growth charts it has some (but still limited) predictive value (Gardosi and Francis, 1999 and Wright et al., 2006). NICE (2008) recommends that each woman has the fundal height measurement recorded and plotted at each consultation from 24 weeks gestation.
Measuring the symphysis fundal height
A disposable tape measure is used to measure in centimetres (cm): 0 cm is placed scale down on the upper border of the symphysis pubis, the tape measure is placed smoothly straight along the midline of the abdomen, to the top of the fundus. Once the top of the fundus is confirmed the tape measure is held securely, turned over and the number of centimetres read. The fundal height in centimetres generally equates with the weeks of gestation; a margin of error of ± 2 cm is generally permitted, but this will depend on local protocols. A fundal height inconsistent with gestation may indicate:
• unreliable landmarks, e.g. long abdomen
• inaccurate dates
• that the fetus is larger or smaller than expected
• that the amount of amniotic fluid might be greater or lesser than expected
• multiple pregnancy
• abnormal lie, e.g. transverse
• uterine mass, e.g. fibroid, cyst or tumour
• poor technique
• intrauterine death.
NICE (2008) recommends that, until 36 weeks gestation, it is not necessary to offer routine abdominal palpation, considering that it is only from this gestation that the information is of clinical value.
Presentation of the fetus
Assessing the presentation
The fundus is located as described above. The palmar surfaces of both hands are used to palpate and identify the fetal pole (Fig. 1.2):
• buttocks: feel softer, less ballotable, bulkier, less clearly defined
• head: feels firmer, more rounded and ballotable, i.e. can be moved gently from side to side.
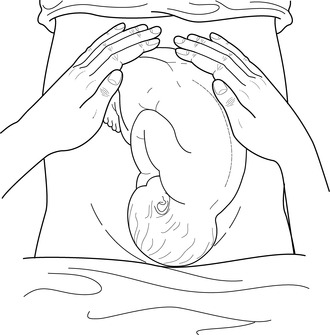 |
| Figure 1.2 • Fundal palpation |
If a pole is not located in the fundus, the lie is not longitudinal (see Fig. 1.3); the lateral palpation (below) will then identify the position.
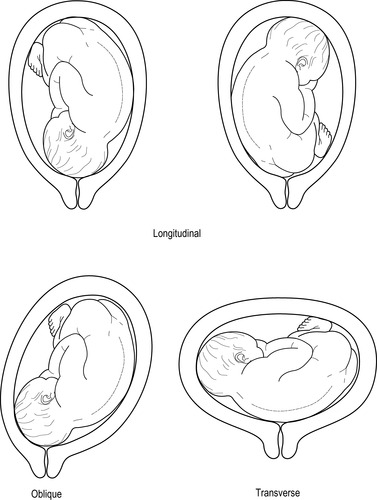 |
| Figure 1.3 • The lie of the fetus |
Pelvic palpation (Fig. 1.4) assesses the presentation, i.e. the part of the fetus lying in the lower segment of the uterus or at the pelvic brim, and then determines:
• if the fetus is flexed
• if any of the presenting part has engaged in the pelvis
• how ‘mobile’, or moveable, the presenting part is if it has not engaged.
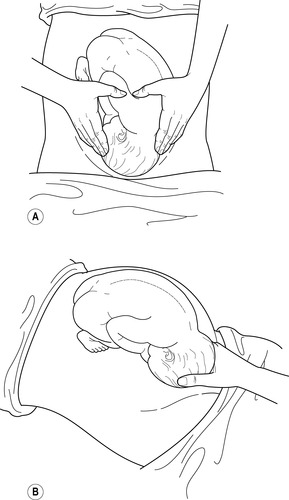 |
| Figure 1.4 • A Pelvic palpation: the fingers are directed inwards and downwards. B Pawlik’s manoeuvre |
There are five main presentations (Fig. 1.5) and two methods of undertaking pelvic palpation:
1. Using both hands, one either side of the presentation (fingers facing towards the woman’s feet), press in gently. The presentation can be felt beneath the hands, as described for fundal palpation and identified according to its features (Fig. 1.4A). It is helpful if the woman can take a deep breath and hold it for a moment while the hands are able to feel deeply around the presentation.
2. Pawlik’s manoeuvre can be considered. Using one hand with fingers facing the woman’s head, the presenting pole is held between the fingers and thumb (Fig. 1.4B). This should be done very gently, as it is uncomfortable for the woman. Ideally it is avoided.
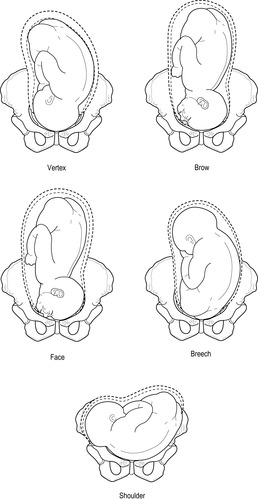 |
| Figure 1.5 • Five presentations of the fetus |
Engagement into the pelvis is assessed according to the passage of the widest transverse diameter through the pelvic brim. In a cephalic presentation this is the biparietal diameter (9.5 cm). Engagement is generally measured in fifths; for example, a cephalic presentation that is 3/5 palpable has 3/5 of the head palpable out of the pelvis, indicating that 2/5 of the head has passed through the pelvic brim into the pelvis; 1/5 palpable would mean 4/5 has engaged, and so on. When 3/5 of the head has passed through the pelvic brim the presentation is ‘engaged’. A non-engaged presentation may be referred to as ‘free’ or ‘at the brim’ and may necessitate referral at term, particularly for the primigravid woman.
Position of the fetus
An abdominal examination is often undertaken as one seamless procedure for which the midwife may alter the ‘order’ accordingly. Many midwives will begin at the fundus, undertake the lateral palpation and end with the pelvic palpation.
Lateral palpation assesses the main body of the uterus to identify the fetal position. It combines with the fundal and pelvic palpations to confirm the lie. It also gives information about the fetal size, volume of amniotic fluid, uterine tone and fetal movements.
Stay updated, free articles. Join our Telegram channel

Full access? Get Clinical Tree


Get Clinical Tree app for offline access
