National Association for Orthopaedic Nurses. 2012. Core Curriculum for Orthopaedic Nursing. Across the Lifespan (3rd ed.). Chicago: Author.
McRae, R. (2010). Clinical orthopaedic examination (6th ed.). New York: Elsevier.
Subjective Data
Much can be learned about musculoskeletal disorders from subjective data. History of injury, description of symptoms, and associated personal health and family history can give clues to the underlying problem and appropriate care for that problem.
Common Manifestations of Musculoskeletal Problems
Pain
Where is the pain located?
Joints, as in osteoarthritis (OA).
Muscles or soft tissue, as in contusions, sprains, or strains.
Bone, as in fractures or tumors.
Is it sharp, as in a fracture or sprain, or dull, as in a bone tumor?
Does the pain radiate?
To buttocks or legs, as in lower back pain.
To thigh or knee, as in hip fracture.
What makes the pain increase? What makes it better?
When was the onset of pain?
Limited Range of Motion
Is stiffness present? How long does it last?
Present in morning for less than 30 minutes or after sitting for long period when due to OA.
May persist and is associated with acute pain when due to spasm of lower back strain.
Is swelling present and limiting mobility?
May be due to fracture.
May be soft-tissue injury, such as sprain, strain, or contusion.
How does limited mobility affect activities of daily living (ADLs)?
Associated Symptoms
Any sensory or motor deficits, such as numbness, paresthesias, or weakness, indicating neurovascular compromise?
Any weight loss, fever, or malaise, as in bone tumors?
Any bony nodules or deformity, as in rheumatoid arthritis?
History
Mechanism of Injury
How did the injury occur? Essential for all trauma, including fractures, contusions, sprains, and strains, to help identify the extent of injury.
What was the progression of symptoms?
If not an acute injury, was there any repetitive movement or strain that may have contributed to problem, as in tendinitis?
Medical History
What medications are you taking (include name, dosage schedule, and last time taken—include prescription medications, vitamins, over-the-counter (OTC) medications, and herbals)?
Any history of corticosteroid use that predisposes to osteoporosis?
Is the woman postmenopausal? On estrogen replacement? If estrogen deficient, may predispose to osteoporosis.
Any history of prostate, breast, or lung cancer, which may metastasize to the bone?
What are other chronic conditions that may affect immobility imposed by casting, traction, or surgery?
Social History
What is the patient’s occupation, which may contribute to lower back strain or OA?
Does the patient exercise? What type of exercise is performed, how frequently, and what is the duration of exercise? When was the last time this was performed?
What activities or sports does the patient participate in, such as running or tennis, which may cause tendinitis?
Are there risk factors for osteoporosis, such as smoking, inactivity, low calcium intake, or lack of exposure to the sun?
Is there a family history of osteoporosis or arthritis?
What cultural issues/religious beliefs contribute to this history?
Does the patient drink alcohol? If yes, what is the daily alcohol consumption?
Objective Data
Data on current system condition and functional abilities are secured through inspection, palpation, and measurement. Always compare with contralateral side (one side of the body to the other).
Musculoskeletal System
Skeletal Component
Note deviation from normal structure—bony deformities, length discrepancies, alignment, symmetry, amputations.
Identify abnormal motion and crepitus (grating sensation), as found with fractures.
Joint Component
Identify swelling that may be due to inflammation or effusion.
Note deformity associated with contractures or dislocations.
Evaluate stability, which may be altered.
Estimate active and passive range of motion (ROM).
Muscle Component
Inspect for size and contour of muscles.
Assess coordination of movement.
Palpate for muscle tone.
Estimate strength through cursory evaluation (ie, handshake) or scaled criteria (ie, 0 = no palpable contraction; 5 = normal ROM against gravity with full resistance).
Measure girth to note increases due to swelling or bleeding into muscle or decreases due to atrophy (difference of more than 1 cm is significant).
Identify abnormal clonus (rhythmic contraction and relaxation) or fasciculation (contraction of isolated muscle fibers).
Additional Assessment
Neurovascular Component
Assess circulatory status of involved extremities by noting skin color and temperature, peripheral pulses, capillary refill response, pain, and edema.
Assess neurologic status of involved extremities by the patient’s ability to move distal muscles and description of sensation (eg, paresthesia).
The subjective and objective data will help to differentiate acute from chronic processes. Signs and symptoms of infection, neurovascular compromise, and fracture require immediate diagnostic testing.
Radiologic and Imaging Studies
Many radiologic and imaging studies are helpful in evaluating musculoskeletal problems to rule out fracture or skeletal changes and to differentiate soft tissue injury.
DRUG ALERT
Many radiologic studies include injection or oral contrast. Check the patient’s allergies and make sure a recent creatinine level has been obtained. Report elevated creatinine as soon as possible. Ensure that nephrotoxic drugs and metformin should be held at least 24 hours before the procedure and for 48 hours following. The patient should be well hydrated before and after the procedure.
X-rays
Of bone—to determine bone density, texture, integrity, erosion, changes in bone relationships.
Of cortex—to detect any widening, narrowing, irregularity.
Of medullary cavity—to detect any alteration in density.
Of involved joint—to show fluid, irregularity, spur formation, narrowing, changes in joint contour.
Tomogram—special x-ray technique for detailed view of special plane of bone.
Nursing and Patient Care Considerations
Tell patient that proper positioning is important to obtain a good x-ray, so cooperation is essential.
Advise patient to remove all jewelry, clothing with zippers or snaps, change from pockets, or other items that may interfere with x-ray.
Medicate for pain prior to x-ray, as needed.
Bone Scan
A bone scan consists of parenteral injection of bone-seeking radiopharmaceutical (such as gallium); concentration of isotope uptake revealed in primary skeletal disease (osteosarcoma), metastatic bone disease, inflammatory skeletal disease (osteomyelitis); fracture.
Nursing and Patient Care Considerations
There is usually no special preparation prior to the scan.
Injectable radionuclide is given several hours before the scan.
Reassure patient that the procedure will not cause pain and that scan will take 1 to 2 hours.
Analgesics or sedatives may be ordered for patients for whom lying immobile for any length of time is difficult.
Breastfeeding should be discontinued for at least 4 weeks after test to prevent radionuclide exposure to infant.
Inform patient that the exposure to radioactive substances is small (dose of radiation is less than a chest x-ray) and substances are excreted quickly by the body.
Bone Densitometry
Bone densitometry is a noninvasive study that yields an actual measurement of bone density and is diagnostic for osteoporosis (see page 184). It is most often performed on the lower spine and hips; however, simple portable screening tests that analyze the wrist or heel are also available.
Nursing and Patient Care Considerations
Calcium supplements should be avoided 24 hours prior to exam.
DXA scan should be avoided for 10 to 14 days if patient recently had a barium examination or has been injected with a contrast material for a computed tomography (CT) scan or radioisotope scan.
Have patient remove clothing and all jewelry or other metal objects.
Advise patient to lie still with hips flexed for about 20 minutes during test; technician will remain in the room.
Reassure patient that radiation exposure is minimal.
Magnetic Resonance Imaging
Magnetic resonance imaging (MRI) uses magnetic fields to demonstrate differences in hydrogen density of various tissues. Demonstrates tumors and soft tissue (muscle, ligament, tendon) abnormalities. Although it is more costly than CT scans, the cost is typically validated through the diagnostic accuracy. MRI not only clearly defines internal organs, but also is able to detect nerve damage and changes, such as edema or bruises, of bone. Bone bruises (osseous contusions) with traumatic injuries have some predictive value for future development of posttraumatic arthritis.
Nursing and Patient Care Considerations
Prepare patient for need to lie still for about 1 hour; repetitive clanging noise of machine will be heard; patients may feel closed in.
Practice relaxation techniques, such as relaxation breathing and imagery, ahead of time.
Some patients may need sedation; claustrophobic patients may be unable to undergo procedure or may need open MRI.
May be contraindicated for patients with some types of metal implants and devices. Notify the technologist or radiologist of any surgical implants, medical devices, or hardware for evaluation prior to MRI.
In general, metal objects used in orthopedic surgery pose no risk during MRI. However, a recently placed artificial joint may require the use of another imaging procedure. If there is any question of their presence, an x-ray may be taken to detect the presence of and identify any metal objects.
Patients who might have metal objects in certain parts of their bodies may also require an x-ray prior to an MRI. Notify the technologist or radiologist of any shrapnel, bullets, or other pieces of metal that may be present due to accidents.
Dyes used in tattoos may contain iron and could heat up during MRI, but this is rarely a problem.
Tooth fillings and braces usually are not affected by the magnetic field but they may distort images of the facial area or brain, so the radiologist should be aware of them.
Parents who accompany children into the scanning room also need to remove metal objects and notify the technologist of any medical or electronic devices they may have.
NURSING ALERT
In most cases, an MRI exam is safe for patients with metal implants, except for a few types. People with the following implants cannot be scanned and should not enter the MRI scanning area unless cleared by a radiologist:
Internal (implanted) defibrillator or pacemaker
Cochlear (ear) implant
Some types of clips used on brain aneurysms
Some types of metal coils placed within blood vessels
Other Tests
CT scan—narrow beam of x-ray that scans area in successive layers to evaluate disease, bone structure, joint abnormalities, and trauma (fractures).
Arthrogram—injection of radiopaque substance or air into joint cavity to outline soft tissue structures (eg, meniscus) and contour of joint.
Myelogram—injection of contrast medium into subarachnoid space at lumbar spine to determine level of disk herniation or site of tumor.
Diskogram—injection of small amount of contrast medium into lumbar disk abnormalities.
Arthrocentesis—insertion of needle into joint and aspiration of synovial fluid for purposes of examination or injection of therapeutic medications.
Arthroscopy—endoscopic procedure that allows direct visualization of joint structures (synovium, articular surfaces, menisci, ligaments) through a small needle incision. May be combined with arthrography.
Electromyography (EMG)—measures electrical potential generated by the muscle during relaxation and contraction.
Nerve conduction velocities—measure the rate of potential generation along specific nerves (speed of impulse conduction).
GENERAL PROCEDURES AND TREATMENT MODALITIES
Evidence Base
Bowden, G., McNally, M., Thomas, S., et al. (Eds.). (2011). Oxford handbook of orthopaedics and trauma nursing. Oxford, UK: Oxford University Press.
Crutch Walking
Crutches are artificial supports that assist patients who need aid in walking because of disease, injury, or a birth defect.
Preparation for Crutch Walking
The goals are to develop power in the shoulder girdle and upper extremities that bear the patient’s weight in crutch walking and strengthen and condition the patient.
Strengthening the Muscles Needed for Ambulation
Instruct the patient as follows:
For quadriceps setting:
Contract the quadriceps muscle while attempting to push the popliteal area against the mattress and raise the heel.
Maintain the muscle contraction for a count of 5.
Relax for the count of 5.
Repeat this exercise 10 to 15 times hourly.
For gluteal setting:
Contract or pinch the buttocks together for a count of 5.
Relax for the count of 5.
Repeat 10 to 15 times hourly.
Strengthening the Muscles of the Upper Extremities and Shoulder Girdle
Instruct the patient as follows:
Flex and extend arms slowly while holding traction weights; gradually increase poundage of weight and number of repetitions to increase strength and endurance.
Do push-ups while lying in a prone position.
Squeeze rubber ball—increases grasping strength.
Raise head and shoulders from bed; stretch hands forward as far as possible.
Sit up on bed or chair.
Raise body from chair by pushing hands against chair seat (or mattress).
Raise body out of seat. Hold. Relax.
Measuring for Crutches
When the patient is lying down (an approximate measurement):
Measure from the anterior fold of the axilla to the sole. Then add 2 inches (5 cm).
Alternatively, subtract 16 inches (40 cm) from the patient’s height.
When the patient is standing erect:
Stand the patient against the wall with feet slightly apart and away from the wall.
The crutches should be fitted with large rubber suction tips.
The elbow is flexed 30 degrees with the hand resting on the grip.
There should be a two-finger-width insertion between the axillary fold and the underarm piece grip. A foam-rubber pad on the underarm piece will relieve pressure on the upper arm and thoracic cage.
The tip of the crutch is placed 6 to 8 inches (15 to 20 cm) lateral to the forefoot.
Teaching the Crutch Stance
Have the patient wear well-fitting shoes with firm soles.
Before using the crutches, have the patient stand by a chair on the unaffected leg to achieve balance.
Position the patient against a wall with head in a neutral position.
Tripod position—basic crutch stance for balance and support.
Crutches rest approximately 8 to 10 inches (20 to 25 cm) in front of and to the side of the patient’s toes (see Figure 32-1).
Taller patient requires a wider base, whereas shorter patient needs a narrower base.
Teach the patient to support weight on hands; weight borne on the axillae can damage the brachial plexus nerves and produce “crutch paralysis.”
Figure 32-1. The tripod position is the basic crutch stance for balance and support.
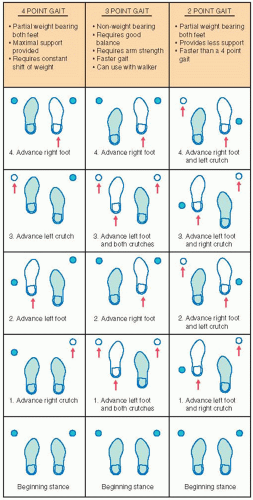
Teaching the Crutch Gait
Crutch walking requires balance, coordination, and a high expenditure of energy; these can be acquired with diligent and regular practice.
Practice balancing with crutches while leaning against the wall.
Practice shifting body weight in different positions while standing with crutches.
The selection of the crutch gait depends on the type and severity of the disability, weight-bearing status, and the patient’s physical condition, arm and trunk strength, and body balance.
Teach the patient at least two gaits—a faster gait to be used for swiftness and a slower one to be used in crowded places.
Instruct the patient to change from one gait to another—relieves fatigue because a different combination of muscles is used.
A walker provides more support than crutches or a cane for the patient who has poor balance and cannot use crutches.
Technique for Using a Walker
Be aware that a walker gives stability but does not permit a natural reciprocal walking pattern.
Rolling walkers may assist the patient who has painful joints in the lower extremities, decreased balance, or decreased cardiopulmonary function.
Teach the following sequence for a patient using a stationary (nonrolling) walker:
Lift the walker, placing it in front of you while leaning your body slightly forward.
Take a step or two into the walker.
Lift the walker and place it in front of you again.
Teach the following sequence for a patient using a rolling walker:
Roll the walker and move it forward about 12 inches.
If the patient has an injured leg, a new joint, or a weaker side, step forward with that foot first. Instruct the patient to use the walker to help keep his or her balance as they take the step.
Bring the other foot forward to the center of the walker.
Repeat the sequence.
PATIENT EDUCATION GUIDELINES 32-1
Crutch-Maneuvering Techniques
STANDING UP
Move forward to the edge of the chair with the strong leg slightly under the seat.
Place both crutches in the hand on the side of the affected extremity.
Push down on the hand pieces while raising the body to a standing position.
SITTING IN A CHAIR
Grasp the crutches at the hand pieces for control and bend forward slightly while assuming a sitting position.
GOING UP STAIRS
Advance the stronger leg first up to the next step.
Advance the crutches and the weaker extremity.
GOING DOWN STAIRS
Place feet forward as far as possible on the step.
Advance crutches to the lower step. The weaker leg is advanced first and then the stronger one—the stronger extremity shares the work of raising and lowering the body weight with the patient’s arms.
Note: Strong leg goes up stairs first and down stairs last.
Ambulation with a Cane
A cane is used for balance and support. Canes come in a variety of shapes, but the majority have a curved handle and a rubber tip. Quad canes may offer greater support.
Purposes
To assist the patient to walk with greater balance and support and less fatigue.
To compensate for deficiencies of function normally performed by the neuromuscular skeletal system.
To relieve pressure on weight-bearing joints.
To provide forces to push or pull the body forward or to restrain the forward motion of the patient while walking.
Principles of Cane Use
An adjustable aluminum cane fitted with a 1½-inch (3.8-cm) rubber suction tip to provide traction while walking gives optimal stability to the patient.
With bilateral disease, using two canes gives better balance and weight relief.
To fit for a cane:
Have patient flex elbow at a 30-degree angle and hold the cane 6 inches (15 cm) lateral to the base of fifth toe.
Adjust the cane so the handle is approximately level with the greater trochanter.
Alternatively, while the patient is standing with arms at side, the handle of the cane should line up with the crease in wrist.
Technique for Walking with a Cane
Hold the cane in the hand opposite to the affected extremity (ie, the cane should be used on the good side)—allows partial weight-bearing relief because the cane is in contact with the floor at the same time as the affected extremity.
Advance the cane at the same time the affected leg is moved forward.
Keep the cane fairly close to the body to prevent leaning.
If the patient cannot use the cane in the opposite hand, the cane may be carried on the same side and advanced when the affected leg is advanced.
To go up and down stairs:
Step up on unaffected extremity.
Then place cane and affected extremity on the step.
Reverse this procedure for the descending steps.
The strong leg goes up first and comes down last.
When using a quad cane, ensure that all four tips are touching the ground.
Casts
Evidence Base
Bulstrode, C., Wilson-MacDonald, J., Fairbank, J., et al. (2011). Oxford textbook of trauma and orthopaedics (2nd ed.). Oxford, UK: Oxford University Press.
A cast is an immobilizing device made up of layers of plaster or fiberglass (water-activated polyurethane resin) bandages molded to the body part that it encases. See Procedure Guidelines 32-1. See also Procedure Guidelines 32-2, pages 1109 to 1110, for application and removal of a cast.
PROCEDURE GUIDELINES 32-1
Application of a Cast
EQUIPMENT
Plaster or synthetic bandages in desired widths
Stockinette (tubular knitted material)*
Cast padding (roll padding)*
Splints (for reinforcement)
Cotton, polyester, or polyurethane foam padding for bony prominences*
Cast knives, scissors
Polyethylene sheeting or newspaper—to protect floor
Disposable gloves—to protect hands of operator
Large, plastic-lined pail of water at room temperature—70°-75° F (21°-24° C)—or as recommended by cast material manufacturer
Cast finishing hand cream for synthetic cast, as needed
CONSIDERATIONS
The application of a cast requires two to three persons: one to apply the plaster (operator), one to dip and hand the plaster bandages to the operator, and a third person to hold the extremity in correct position. (Body spicas may require additional personnel.)
The time required for the cast to become rigid varies with the material used—generally 2-6 minutes.
There should be no movement of the extremity while the cast is being applied and set.
In general, the joints above and below the involved bone are immobilized.
PROCEDURE
Nursing Action
Rationale
Preparatory phase
1. Spread polyethylene sheeting or newspaper on floor.
1. Contains mess.
2. Explain to the patient that there will be a feeling of warmth as the plaster is applied.
2. Heat is produced by an endothermic reaction causing crystallization as plaster sets. The reaction of water with plaster of Paris liberates heat.
3. Apply stockinette and roll cast padding on the extremity or part to be immobilized.
a. Apply roll padding as smoothly and snugly as possible so each turn overlaps the preceding turn by one-half the width of the roll.
b. Extra pieces of padding may be placed over bony prominences: olecranon process, malleoli, patella, or ulnar protuberance.
3. Padding is used to pad the sharp cast margins for patient comfort and to prevent pressure areas, minimize circulatory problems, and facilitate cast removal. It is applied from the distal to the proximal end of the extremity. When too much padding is used, it may shift and produce pressure areas under the cast.
4. While keeping the thumb under the forward edge of the bandage, submerge the plaster bandage vertically in water (room temperature) for a minute or so, or until bubbles cease to rise.
4. Water that is too warm will accelerate setting time, may cause a burn, and may result in excessive plaster loss by loosening the adhesive agents that bond the plaster to the fabric.
5. Expel excess water by squeezing (not wringing) toward the center of the bandage; hand bandage to operator with free end hanging loose.
5. Cast will dry more quickly (thus will acquire maximum strength sooner) if a well-squeezed plaster bandage is used. Maximum strength is achieved by synthetic casts through chemical reaction in about 30 minutes.
Performance phase (by operator)
1. Starting at the distal end, roll the bandage gently and evenly on the extremity overlapping the preceding turn by one-half the width of the roll.
1. Roll inward toward the patient’s body for ease of control.
2. Keep bandage moving and in constant contact with surface of extremity. Smooth and rub down successive layers or turns of each bandage into layers below with the thumbs and thenar eminences (mound on the palm) in circumferential and longitudinal directions.
2. Keeps the cast uniformly thick. Rubbing the plaster as it is applied will form a smooth, solid, and well-fused cast. Avoid indenting the cast with the fingertips because this may produce pressure sores on underlying skin. Handle fresh casts with palms.
3. Make tucks in the lower border of the bandage by lifting the bandage off the surface (without tension) and overlapping it in a V-shaped fashion.
3. Tucking the bandage helps to contour the cast to the changing circumference of the extremity. Do not twist or reverse the bandage to change its direction because this produces sharp cutting edges.
4. Trim the cast to size with a sharp knife. Fold stockinette over edges of cast and anchor with cast material.
4. Stockinette produces smooth, comfortable edges on cast. Do not pull too vigorously on the stockinette because this may cause pressure on bony prominences.
5. Finish synthetic cast with cast hand cream, as indicated.
5. Smoothes rough exterior surface.
6. Ask the patient if there is any discomfort or pain.
6. If a patient complains of pain, it may be due to manipulation of fracture during setting; pain should subside rapidly. If it persists, the cast and encircling dressings are split to avoid constriction, circulatory problems, and pressure sores.
Follow-up phase
1. Support the cast with the palm of the hand while moving the patient. Avoid indentations from tips of fingers.
1. Finger indentation on a fresh cast can produce pressure sores.
2. Expose the cast to warm, circulating, dry air or blow air over cast with a circulating fan to increase the evaporation of water.
2. Avoid covering the cast when it is drying because this delays drying time. Usually the plaster cast will reach its maximum temperature 5-15 minutes after it is applied and will then cool rapidly. The ultimate plaster cast strength is obtained after the cast is dry (up to 48 hours, depending on outside temperature and humidity).
The synthetic cast strength is maximum within 30 minutes of application and not dependent on being dry.
3. Clean equipment and store ready for use.
Evidence Base National Association for Orthopaedic Nursing. (2012). Orthopedic nursing core competencies across the lifespan, (3rd ed.). Chicago: Author.
*Material needs to be nonabsorbent if nonplaster cast is used.
PROCEDURE GUIDELINES 32-2
Removal of a Cast
EQUIPMENT
Cast cutter—an electric saw with circular blade that oscillates and is connected to a vacuum collector
Cast spreader
Plaster knife
Scissors
Felt-tip pen
PROCEDURE
Nursing Action
Rationale
Preparatory phase
1. Describe to the patient how and where the cast cutter will be used and the expected sensations.
1. Reassures the patient that the cutter produces vibrations but not pain.
2. Determine whether the cast is padded.
2. An electric plaster cast cutter should not be used on unpadded casts.
3. Determine where the cut will be made. Mark the area to be cut with a felt pen.
3. The line should be in front of the lateral malleolus and behind the medial malleolus on a lower-extremity cast. An upper-extremity cast is usually split along the ulnar or flexor surface.
Performance phase
1. Inform the patient to shield eyes.
1. Plaster dust may be irritating to the eyes.
2. Grasp the electric cutter as illustrated.
2. Correct grasp is essential for stabilizing the electric cutter.
3. Rest the thumb on the cast.
3. The thumb serves as a depth gauge and acts as a guard in front of the blade.
4. Turn on the electric cutter. Push the blade firmly and gently through the cast while holding the thumb against the cast to steady the blade while cutting through the cast.
5. As the blade cuts through the plaster, a sudden lack of resistance is felt; plaster will “give” (or “dip”) when the cut is completed.
6. Lift the cutting blade up a degree (but not out of the cutting groove) and advance the blade at a slightly higher or lower level. The cast is cut by a series of alternating pressure and linear movements along the line of the cut (see accompanying figure).
7. Avoid drawing the cutting blade along the extremity in a single motion.
7. This will cut the skin. If saw blade is in contact with padding too long, the patient will feel burning sensation on skin from rapidly oscillating blade.
8. Cut the cast on both sides. Then rock the anterior portion of the cast over the posterior portion.
8. Allows the operator to determine if the cast is completely cut.
9. Insert the blades of the cast spreader in the cut trough. Separate the two halves with the spreader at several sites along the cast split. Separate the cast with the hands.
10. Cut through the padding and stockinette with scissors, keeping the scissor blade that is closest to the skin parallel to the skin.
10. Use bandage scissors; place the flat blade closest to the skin.
11. Lift the extremity carefully out of the posterior portion of the cast. Support the extremity so it is maintained in the same position as when in the cast.
11. When the support of the cast has been removed, stresses and strain are placed on parts that have been at rest.
After removal of cast
1. Clean the skin gently with mild soap and water. Blot dry. Apply a skin cream.
1. Explain to the patient that the skin will be scaly and the extremity will appear “thin” from disuse. Reassure him or her that it will take a few weeks to regain normal appearance and function.
2. Emphasize the importance of continuing the prescribed exercises, reporting for physical therapy, and so forth.
2. Exercises are necessary to redevelop and increase strength and function. Pain and stiffness may be expected after cast removal.
Evidence Base National Association for Orthopaedic Nursing. (2012). Orthopedic nursing core competencies across the lifespan, (3rd ed.). Chicago: Author.
Purposes
To immobilize and hold bone fragments in reduction.
To apply uniform compression of soft tissues.
To permit early mobilization.
To correct and prevent deformities.
To support and stabilize weak joints.
Types of Casts
Short-arm cast—extends from below the elbow to the proximal palmar crease.
Gauntlet cast—extends from below the elbow to the proximal palmar crease, including the thumb (thumb spica).
Long-arm cast—extends from upper level of axillary fold to proximal palmar crease; elbow usually immobilized at right angle.
Short-leg cast—extends from below knee to base of toes.
Long-leg cast—extends from upper thigh to the base of toes; foot is at right angle in a neutral position.
Body cast—encircles the trunk stabilizing the spine.
Spica cast—incorporates the trunk and extremity.
Shoulder spica cast—a body jacket that encloses trunk, shoulder, and elbow.
Hip-spica cast—encloses trunk and a lower extremity.
Single hip-spica—extends from nipple line to include pelvis and extends to include pelvis and one thigh.
Double hip-spica—extends from nipple line or upper abdomen to include pelvis and extends to include both thighs and lower legs.
One-and-a-half hip-spica—extends from upper abdomen, includes one entire leg and extends to the knee of the other.
Cast-brace—external support about a fracture that is constructed with hinges to permit early motion of joints, early mobilization, and independence.
Cast bracing is based on the concept that some weight-bearing is physiologic and will promote the formation of bone and contain fluid within a tight compartment that compresses soft tissues, providing a distribution of forces across the fracture site.
Cast-brace is applied after initial edema and pain have subsided and there is evidence of fracture stability.
Cylinder cast—Can be used for upper or lower extremity. Used for fracture or dislocation of knee (lower extremity) or elbow dislocation (upper extremity).
Complications Associated with Casts
Pressure of cast on neurovascular and bony structures causes necrosis, pressure sores, and nerve palsies.
Compartment syndrome is a condition resulting from increased progressive pressure within a confined space, thus compromising the circulation and the function of tissues within that space. This is a medical emergency and can be limb-threatening. A tight cast, trauma, fracture, prolonged compression of an extremity, bleeding, and edema put patients at risk for compartment syndrome.
Immobility and confinement in a cast, particularly a body cast, can result in multisystem problems.
Nausea, vomiting, and abdominal distention associated with cast syndrome (superior mesenteric artery syndrome, resulting in diminished blood flow to the bowel), adynamic ileus, and possible intestinal obstruction.
Acute anxiety reaction symptoms (ie, behavioral changes and autonomic responses—increased respiratory and heart rate, elevated blood pressure [BP], diaphoresis) associated with confinement in a space.
Thrombophlebitis and possible pulmonary emboli associated with immobility and ineffective circulation (eg, venous stasis).
Respiratory atelectasis and pneumonia associated with ineffective respiratory effort.
Urinary tract infection—renal and bladder calculi associated with urinary stasis, low fluid intake, and calcium excretion associated with immobility.
Anorexia and constipation associated with decreased activity.
Psychological reaction (eg, depression) associated with immobility, dependence, and loss of control.
Nursing Assessment
Assess neurovascular status of the extremity with a cast for signs of compromise.
Pain (pain out of proportion to injury is an indication for compartment syndrome).
Swelling.
Discoloration—pale or blue.
Cool skin distal to injury.
Tingling or numbness (paresthesia).
Pain on passive extension (muscle stretch).
Slow capillary refill; diminished or absent pulse.
Paralysis.
Assess skin integrity of casted extremity. Be alert for:
Severe initial pain over bony prominences; this is a warning symptom of an impending pressure ulcer. Pain increases when ulceration occurs.
Odor.
Drainage on cast.
Carefully assess for positioning and potential pressure sites of the casted extremity (see Figure 32-3).
Lower extremity—heel, malleoli, dorsum of foot, head of fibula, anterior surface of patella.
Upper extremity—medial epicondyle of humerus, ulnar styloid.
Plaster jackets or body spica casts—sacrum, anterior and superior iliac spines, vertebral borders of scapulae.
Assess cardiovascular, respiratory, and GI systems for possible complications of immobility.
Assess psychological reaction to illness, cast, and immobility.
NURSING ALERT
Signs and symptoms of compartment syndrome include pain, paresthesia, pal lor, pulselessness, poikilothermia, and paralysis. Pain is the first sign and is usually described as deep, constant, poorly localized, and out of proportion to the injury. The pain is not relieved by analgesia and worsens with stretching of the muscle group. The other signs occur late in the course of compartment syndrome. Unrelenting pain and other signs of compartment syndrome should be reported immediately. The cast may have to be split and removed.
Figure 32-3. Pressure areas in different types of casts.
Nursing Diagnoses
Risk for neurovascular injury related to swelling and constrictive bandage or cast.
Impaired Physical Mobility related to condition and casting.
Risk for impaired gastrointestinal motility related to cast syndrome.
Nursing Interventions
Maintaining Adequate Tissue Perfusion
Elevate the extremity on cloth-covered pillow above the level of the heart. Keep the heel off the mattress.
Avoid resting cast on hard surfaces or sharp edges that can cause denting or flattening of the cast and consequent pressure sores.
Handle moist cast with palms of hands.
Turn patient every 2 hours while cast dries.
Instruct patient not to place objects into cast. Advise patient of alternative methods of managing itching such as blowing cool air under the cast.
Assess neurovascular status hourly during the first 24 hours, then less frequently as condition warrants and swelling resolves.
If symptoms of neurovascular compromise occur:
Notify health care provider immediately.
Bivalve the cast—split cast on each side over its full length into two halves.
Cut the underlying padding—blood-soaked padding may shrink and cause constriction of circulation.
Spread cast sufficiently to relieve constriction.
If symptoms of pressure area occur, cast may be “windowed” (hole cut in it) so the skin at the pain point can be examined and treated. The window must be replaced so the tissue does not swell and cause additional pressure problems at window edge.
Minimizing the Effects of Immobility
Encourage the patient to move about as normally as possible.
Encourage compliance with prescribed exercises to avoid muscle atrophy and loss of strength.
Active ROM for every joint that is not immobilized at regular and frequent intervals.
Isometric exercises for the muscles of the casted extremity. Instruct patient to alternately contract and relax muscles without moving affected part.
Reposition and turn patient frequently.
Avoid pressure behind knees, which reduces venous return and predisposes to thromboembolism.
Use anti-embolism stockings and sequential compression devices (SCDs), as indicated.
Administer prophylactic anticoagulants, as prescribed.
Encourage deep-breathing exercises and coughing at regular intervals to prevent atelectasis and pneumonia.
Encourage patient to drink liberal quantities of fluid to avoid urinary infection and calculi secondary to immobility.
Facilitate patient participation in care planning and activities. Encourage verbalization of feelings and concerns regarding restriction of activities.
Provide and encourage diversional activities.
Pay special attention to positioning and turning for patients in spica or body cast (see Box 32-1).
NURSING ALERT
People at high risk for pulmonary emboli include older adults and persons with previous thromboembolism, obesity, heart failure, or multiple trauma. These patients require prophylaxis against thromboembolism.
Preventing Gastrointestinal Impairment
Encourage balanced nutritional intake.
Assess the patient’s food preferences. Serve small meals.
Provide natural bowel stimulants (eg, fiber) and good fluid intake.
Monitor bowel movements, bowel sounds, and use a bowel program, if necessary.
Observe for symptoms of cast syndrome—nausea, vomiting, abdominal distention, abdominal pain, and decreased bowel sounds.
If symptoms of cast syndrome develop, report immediately to the health care provider.
Place patient in a prone position, if tolerated, to relieve pressure symptoms.
Use nasogastric suction as prescribed.
Maintain electrolyte balance by intravenous (IV) replacement of fluids, as prescribed.
Prepare the patient for removal of the cast or surgical relief of duodenal obstruction, if necessary.
NURSING ALERT
Cast syndrome (superior mesen teric artery syndrome) is a rare sequela of body cast application, yet it is a potentially fatal complication. It is important to teach patients about this syndrome because this can develop as late as several weeks after cast application.
Patient Education and Health Maintenance
Neurovascular Status
Instruct patient to check neurovascular status and to control swelling.
Watch for signs and symptoms of circulatory disturbance, including blueness or paleness of fingernails or toenails accompanied by pain and tightness, numbness, cold or tingling sensation.
Elevate affected extremity and wiggle fingers or toes.
Apply ice bags, as prescribed (one third to one half full), to each side of the cast, making sure they do not make indentations in plaster.
Call health care provider promptly if excessive swelling, paresthesia, persistent pain, pain on passive stretch, or paralysis occurs.
Instruct patient to alternate ambulation with periods of elevation to the cast when seated. Encourage the patient to lie down several times daily with cast elevated.
Skin Irritation
Advise patient to prevent skin irritation at cast edge by padding edges of cast with moleskin or “petaling” cast edges with strips of adhesive tape.
BOX 32-1 Specific Care for Patient in Spica or Body Cast
POSITIONING
Place a bed board under the mattress for uniform support of the body.
Support the curves of the cast with cloth-covered flexible pillows—prevents cracking and flat spots while cast is drying.
Place three pillows crosswise on bed for body cast.
Place one pillow crosswise at the waist and two pillows lengthwise for affected leg for spica cast. If both legs are involved, use two additional pillows.
Encourage the patient to maintain physiologic position by:
Using the overhead trapeze.
Placing good foot flat on bed and pushing down while lifting him-or herself up on the trapeze.
Avoiding twisting motions.
Avoiding positions that produce pressure on groin, back, chest, and abdomen.
TURNING
Move the patient to the side of the bed using a steady, even pulling motion.
Place pillows along the other side of the bed—one for the chest and two (lengthwise) for the legs.
Instruct the patient to place arms at side or above head.
Turn the patient as a unit. Avoid twisting the patient in the cast.
Turn the patient toward the leg not encased in plaster or toward the unoperated side if both legs are in plaster.
One nurse stands at other side of bed to receive the patient’s shoulders.
Second nurse supports leg in plaster while the third nurse supports the patient’s back as he or she is turned.
Turn the patient in body cast to a prone position twice daily—provides postural drainage of bronchial tree; relieves pressure on back.
Keep the cast level by elevating the lumbar sacral area with a small pillow when the head of the bed is elevated.
NURSING ALERT
Do not grasp cross bar of spica cast to move the patient. The purpose of the bar is to maintain the integrity of the cast.
OTHER CARE
Protect cast from soiling.
Cover perineum with a towel and apply spray (lacquertype) to perineal area of cast. Tuck 4-inch (10-cm) strips of thin polyethylene sheeting under perineal area of cast and tape to cast exterior. Replace when soiling occurs.
Clean outside of soiled cast with a mild powdered cleanser and a slightly dampened or dry, clean cloth and pat dry completely, only when necessary.
Roll the patient onto fracture bedpan; use small pillow in lumbosacral area for support.
Inspect skin for signs of irritation around cast edge, under cast using a flashlight for illumination.
Reach up under cast and massage accessible skin.
Protect the toes from the pressure of the bedding.
Exercise
Instruct patient to actively exercise every joint that is not immobilized and to perform isometric exercises (contract muscles without moving joint) of those immobilized to maintain muscle strength and to prevent atrophy.
Tell patient to perform hourly when awake:
Leg cast—push down on the popliteal space, hold it, relax, repeat. Move toes back and forth; bend toes down, then pull them back.
Arm cast—make a fist, hold it, relax, repeat. Move shoulders.
Encourage ambulation with weight-bearing restrictions.
Cast Care
Advise to avoid getting cast wet, especially padding under cast—causes skin breakdown as plaster cast becomes soft.
Warn against covering a leg cast with plastic or rubber boots because this causes condensation and wetting of the cast.
Instruct to avoid weight-bearing or stress on plaster cast for 24 hours.
Instruct to report to health care provider if the cast cracks or breaks; instruct the patient not to try to fix it.
Teach how to clean the cast:
Remove surface soil with slightly damp cloth.
Rub soiled areas with household scouring powder.
Wipe off residual moisture.
Teaching Safety Measures
To prevent falls, avoid walking on wet floors or sidewalks. To prevent pressure and injury to the skin, do not place objects inside the cast.
After Cast Removal
Instruct to clean skin with mild soap and water, blot dry, and apply emollient lotion to dry skin.
Warn against scratching the skin.
Advise to continue prescribed exercises. Gradually resume activities and elevate extremity to control swelling.
Evaluation: Expected Outcomes
No pain, discoloration, or sensory or motor impairment of affected extremity; warm, with good capillary refill.
Ambulates with assistance; performing active ROM and isometric exercises every 1 to 2 hours.
No signs of cast syndrome.
Traction
Traction is force applied in a specific direction. To apply the force needed to overcome the natural force or pull of muscle groups, a system of ropes, pulleys, and weights is used. See Procedure Guidelines 32-3, page 1114.
PROCEDURE GUIDELINES 32-3
Application of Buck’s Extension Traction
PURPOSE
Buck’s extension skin traction is used as a temporary measure to provide immobility, support, and comfort until definitive treatment is accomplished.
EQUIPMENT
Foam Buck’s traction boot or traction tape and 4-inch elastic bandage
Spreader block or metal spreader
Pulley, nylon rope, and weights (5-7 lb [2.5-3 kg] is usual [amount of weight is prescribed, generally not more than 10 lb (4.5 kg)])
Sheepskin pad
Shock blocks or adjustable bed for Trendelenburg’s position
PROCEDURE
Nursing Action
Rationale
Preparatory phase
1. Bed position is flat or in Trendelenburg’s position. This depends on the size of the patient and the weight applied.
1. Elevating the foot of the bed (countertraction) helps prevent the patient from sliding down toward the foot of the bed.
2. Question the patient to determine previous skin conditions (contact dermatitis). Inspect skin for evidences of atrophy, abrasions, and circulatory disturbances.
2. The skin must be in healthy condition to tolerate skin traction.
3. Make sure the skin of the extremity is clean and dry.
3. Clean, dry skin helps traction tape adherence.
4. Document the neurovascular status of the extremity, any evidence of skin problems or varicosities.
4. As baseline for future reference.
Performance phase
1. Position the patient in center of bed in good alignment.
1. For effective line of pull.
If traction tape is used:
2. Apply continuous traction tape to medial and lateral aspects of lower leg (below knee and loosely around foot to allow for attachment of spreader).
2. Avoid pressure over malleoli and head of fibula. Pressure sores develop rapidly over bony prominences. Pressure over the region of the fibular head and common peroneal nerve may produce peroneal palsy and footdrop.
3. Have a second person elevate and support the extremity under the ankle and knee while the elastic bandage is applied. Beginning at the ankle, wrap the elastic bandage snugly over the tape up to the tibial tubercle.
3. The elastic bandage holds tape to the skin and helps prevent slipping.
4. Attach a spreader block (or metal spreader) to the distal end of the tape. Attach a rope to the spreader block and pass it over a pulley fastened to the end of the bed and gently apply weights.
4. The spreader block prevents pressure along the side of the foot. The spreader should not be too narrow (causes pressure sores on ankle) or too wide (pulls traction tape away from the heel).
5. Place a sheepskin pad under the leg (or use a commercial heel protector).
5. Sheepskin is used to reduce friction of the heel against the bed.
If foam boot is used:
1. Apply anti-embolism stockings, if prescribed.
1. Prophylactic measure in high-risk population.
2. Place leg in foam boot, adjusting it so the heel is in the heel of the boot.
2. Preventing sore heels is a primary concern.
3. Secure Velcro bootstraps, avoiding excessive pressure on malleoli and fibular head.
3. Pressure over bony prominences causes skin breakdown and pressure on peroneal nerve may result in footdrop.
4. Attach rope to built-in spreader plate, pass it over pulley, and apply weights gently.
4. The rope should move unobstructed and the weights should hang free of the bed and not touch the floor.
Evidence Base National Association for Orthopaedic Nursing. (2012). Orthopedic nursing core competencies across the lifespan, (3rd ed.). Chicago: Author.
Purposes of Traction
To reduce and immobilize fracture.
To regain normal length and alignment of an injured extremity.
To lessen or eliminate muscle spasm.
To prevent deformity.
To give the patient freedom for “in-bed” activities.
To reduce pain.
Types of Traction
Running Traction
A form of traction in which the pull is exerted in one plane.
May use either skin or skeletal traction.
Buck’s extension traction (see Figure 32-4) is an example of running skin traction.
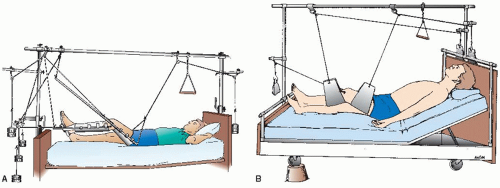
Balanced Suspension Traction
Uses additional weights to counterbalance the traction force and floats the extremity in the traction apparatus.
The line of pull on the extremity remains fairly constant despite changes in the patient’s position.
Application of Traction
Traction may be applied to the skin or to the skeletal system.
Skin Traction
Accomplished by applying a light force that pulls on tape, sponge rubber, or special device (boot, cervical halter, pelvic belt) that is in contact with the skin.
The pulling force is transmitted to the musculoskeletal structures.
Skin traction is used as a temporary measure in adults to control muscle spasm and pain.
It is used before surgery in the treatment of hip fracture (Buck’s extension) and femoral shaft fractures (Russell’s traction).
It may be used definitively to treat fractures in children.
Figure 32-4. Buck’s extension traction. (A) Skin traction is accomplished through a boot device in contact with the skin. (B) Weight is applied to exert running traction in one plane, while the body acts as a counterweight. (Courtesy DM Systems Inc., www.dmsystems.com.)
Traction applied by the orthopedic surgeon under aseptic conditions using wires, pins, or tongs placed through bones and provides a strong, steady, continuous pull.
Skeletal traction is used most frequently in treating fractures of the femur, humerus (supracondylar fractures), tibia, and cervical spine.
Complications
Infection of pin tracts in skeletal traction.
Skin breakdown and dermatitis under skin traction.
Neurovascular compromise resulting in increased pain, muscle spasms, numbness, tingling, and loss of sensation.
Inadequate fracture alignment resulting in posttreatment arthritis.
Complications of immobility include:
Stasis pneumonia.
Thrombophlebitis.
Pressure ulcers.
Urinary infection and calculi.
Constipation.
Nursing Assessment
Assess for pain, deformity, swelling, motor and sensory function, and circulatory status of the affected extremity.
Assess skin condition of the affected extremity, under skin traction and around skeletal traction, as well as over bony prominences throughout the body.
Assess for alignment of affected body part.
Assess for signs and symptoms of complications.
Assess traction equipment for safety and effectiveness.
The patient is placed on a firm mattress.
The ropes and the pulleys should be in alignment.
The pull should be in line with the long axis of the bone.
Any factor that might reduce the pull or alter its direction must be eliminated.
Weights should hang freely.
Ropes should be unobstructed and not in contact with the bed or equipment.
Patient’s bed should have an overhead trapeze set up to assist the patient to pull self up in bed at frequent intervals.
The amount of weight applied in skin traction must not exceed the tolerance of the skin. The condition of the skin must be inspected frequently.
Cover exposed sharp ends of skeletal pins with cork or other pin covering to protect patient and caregivers from injury.
Assess emotional reaction to condition and traction.
Assess understanding of the treatment plan.
Figure 32-5. Balanced skeletal traction using (A) Thomas leg splint and Pearson attachment and (B) slings for support and suspension.
NURSING ALERT
Traction is not accomplished if the knot in the rope or the footplate is touching the pulley or the foot of the bed or if the weights are resting on the floor. Never remove the weights when repositioning the patient who is in skeletal traction because this will interrupt the line of pull and cause the patient considerable pain.
Nursing Diagnoses
Impaired Physical Mobility related to traction therapy and underlying pathology.
Risk for Impaired Skin Integrity related to pressure on soft tissues.
Risk for Infection related to bacterial invasion at skeletal traction site.
Risk for Peripheral Neurovascular Dysfunction related to injury or traction therapy.
Nursing Interventions
Minimizing the Effects of Immobility
Encourage active exercise of uninvolved muscles and joints to maintain strength and function. Dorsiflex feet hourly to avoid development of footdrop and aid in venous return.
Encourage deep breathing hourly to facilitate expansion of lungs and movement of respiratory secretions.
Auscultate lung fields at least twice per day.
Encourage fluid intake of 2,000 to 2,500 mL daily.
Provide balanced high-fiber diet rich in protein; avoid excessive calcium intake.
Establish bowel routine through use of diet and stool softeners, laxatives, and enemas, as prescribed.
Prevent pressure on the calf and evaluate twice daily for the development of thrombophlebitis.
Check traction apparatus at repeated intervals—the traction must be continuous to be effective, unless prescribed as intermittent, as with pelvic traction.
With running traction, the patient may not be turned without disrupting the line of pull.
With balanced suspension traction, the patient may be elevated, turned slightly, and moved as desired.
Use SCDs and compression stockings, as indicated.
Administer prophylactic anticoagulants, as prescribed.
NURSING ALERT
Every complaint of the patient in traction should be investigated immediately to prevent injury.
Maintaining Skin Integrity
Examine bony prominences frequently for evidence of pressure or friction irritation.
Observe for skin irritation around the traction bandage.
Observe for pressure at traction-skin contact points.
Report complaint of burning sensation under traction.
Relieve pressure without disrupting traction effectiveness.
Make sure that linens and clothing are wrinkle-free.
Use lambs’ wool pads, heel and elbow protectors, and special mattresses, as needed.
Special care must be given to the back every 2 hours because the patient maintains a supine position.
Have patient use trapeze to pull self up and relieve back pressure.
Provide backrubs.
Avoiding Infection at Pin Site
Monitor vital signs for fever or tachycardia.
Watch for signs of infection, especially around the pin tract.
The pin should be immobile in the bone and the skin surrounding the wound should be dry. Small amount of serous oozing from pin site may occur.
If infection is suspected, percuss gently over the tibia; this may elicit pain if infection is developing.
Assess for other signs of infection: heat, redness, fever.
If directed, clean the pin tract with sterile applicators and prescribed solution or ointment (ie, normal saline, sterile water, chlorhexidine)—to clear drainage at the entrance of tract and around the pin because plugging at this site can predispose to bacterial invasion of the tract and bone.
Preventing Neurovascular Injury
Assess motor and sensory function of specific nerves that might be compromised.
Peroneal nerve—have patient point great toe toward nose; check sensation on dorsum of foot; presence of footdrop.
Radial nerve—have patient extend thumb; check sensation in web between thumb and index finger.
Median nerve—thumb-middle finger apposition; check sensation of index finger.
Determine adequacy of circulation (eg, color, temperature, motion, capillary refill of peripheral fingers or toes).
With Buck’s traction, inspect the foot for circulatory difficulties within a few minutes and then periodically after the elastic bandage has been applied.
Report promptly if change in neurovascular status is identified.
Patient Education and Health Maintenance
Teach the patient the purpose of traction therapy.
Delineate limitations of activity necessary to maintain effective traction.
Teach use of patient aids (eg, trapeze).
Instruct the patient not to adjust or modify traction apparatus.
Instruct the patient in activities designed to minimize effects of immobility on body systems.
Teach the patient necessity for reporting changes in sensations, pain, movement.
Evaluation: Expected Outcomes
Exercises as instructed; deep breaths hourly; fluid intake 2,000 to 2,500 mL/24 hours.
No signs of skin breakdown under traction bandage or over bony prominences.
No drainage, redness, or odor at pin site.
No motor or sensory impairment; good capillary refill, color, and warmth of extremity.
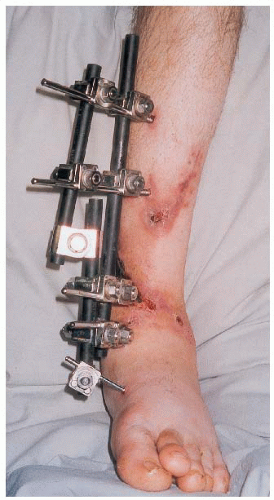
External Fixation
External fixation is a technique of fracture immobilization in which a series of transfixing pins is inserted through bone and attached to a rigid external metal frame (see Figure 32-6). The method is used mainly in the management of open fractures with severe soft-tissue damage.
Advantages
Permits rigid support of severely comminuted open fractures, infected nonunions, and infected unstable joints.
Facilitates wound care (frequent debridements, irrigations, dressing changes) and soft tissue reconstruction (delayed wound closure, muscle flaps, skin grafts).
Allows early function of muscles and joints.
Allows early patient comfort.
Circular Fixators
Purpose
May be used for limb lengthening, correction of angulation and rotation defects, and in treatment of nonunion.
Figure 32-6. External fixation device used for reduction and immobilization of open fracture, allowing treatment of soft tissue wounds.
Components
This fixator apparatus consists of through-the-bone tension wires placed above and below the treatment site.
The wires are attached to fixator rings surrounding the limb.
The rings are connected to one another by telescoping rods.
Management
Adjustments are made daily at about 1 mm/day, stimulating callus and bone formation.
Patient compliance is essential.
Weight-bearing is encouraged.
When the desired length or correction is achieved, the fixator is left in place without further adjustment until bone healing occurs.
Application of External Fixator
Only gold members can continue reading. Log In or Register to continue
 Evidence Base
 NURSING ALERT
 DRUG ALERT
 NURSING ALERT
 Evidence Base
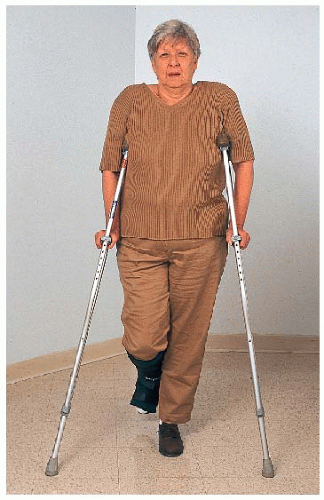
 Evidence Base
 Evidence Base National Association for Orthopaedic Nursing. (2012). Orthopedic nursing core competencies across the lifespan, (3rd ed.). Chicago: Author.
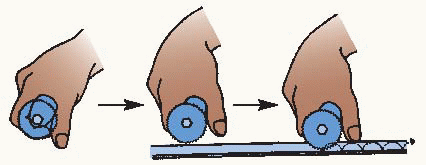
 Evidence Base National Association for Orthopaedic Nursing. (2012). Orthopedic nursing core competencies across the lifespan, (3rd ed.). Chicago: Author.
 NURSING ALERT
 NURSING ALERT
 NURSING ALERT
 NURSING ALERT
 Evidence Base National Association for Orthopaedic Nursing. (2012). Orthopedic nursing core competencies across the lifespan, (3rd ed.). Chicago: Author.
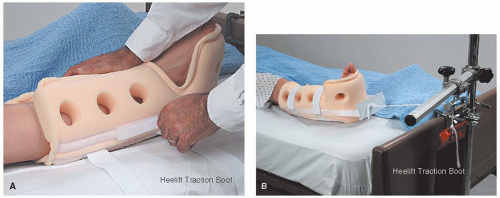
 NURSING ALERT
 NURSING ALERT