Colostomy and Ileostomy Care
A patient with an ascending, transverse, or descending colostomy or an ileostomy must wear an external pouch to collect emerging fecal matter, which may be watery, pasty, or formed, depending on location of the stoma. Besides collecting waste matter, the pouch helps to control odor and protect the stoma and peristomal skin. Most disposable pouching systems can be used for
3 to 7 days; however, single-use, closed-end pouches should be changed more frequently.
3 to 7 days; however, single-use, closed-end pouches should be changed more frequently.
All pouching systems need to be changed immediately if a leak develops, and every pouch needs emptying when it’s one-third to one-half full. The patient with an ileostomy may need to empty his pouch four or five times daily.
The best time to change the pouching system is when the bowel is least active, usually in the morning before breakfast. After a few months, most patients can predict the best changing time.
The selection of a pouching system should take into consideration which system provides the best adhesive seal and skin protection for the individual patient. The type of pouch selected also depends on the stoma’s location and structure, availability of supplies, wear time, consistency of effluent, personal preference, and finances.
Equipment
For Appliance Care
Pouching system ▪ scissors ▪ stoma measuring guide ▪ stoma paste or moldable barrier ring (if drainage is watery to pasty or if stoma secretes excess mucus) ▪ plastic bag ▪ water ▪ washcloth and towel ▪ closure clamp, if needed ▪ water or pouch cleaning solution ▪ gloves ▪ Optional: paper tape, clippers, liquid skin sealant, pouch deodorant.
Pouching systems may be drainable or closed-ended, disposable or reusable, adhesive-backed, and one-piece or two-piece. (See Comparing ostomy pouching systems, page 190.)
For Pouch Emptying
Bedpan, toilet, or measuring device ▪ gloves ▪ tissue ▪ Optional: pouch deodorant.
Implementation
Gather the appropriate equipment.
Confirm the patient’s identity using at least two patient identifiers according to your facility’s policy.1
Explain the procedure to the patient and answer any questions to decrease anxiety and ensure cooperation. As you perform each step, explain what you are doing and why because the patient will eventually perform the procedure himself.
Provide privacy and emotional support.
Fitting the Skin Barrier and Pouch
For a pouch with an attached skin barrier, measure the stoma with the measuring guide. Select the opening size that matches the stoma.
For an adhesive-backed pouch with a separate skin barrier, measure the stoma with the measuring guide and select the opening that matches the stoma. Trace the selected size opening onto the paper back of the skin barrier’s adhesive side. Cut out the opening. (If the pouch has precut openings, which can be handy for a round stoma, select an opening that’s 1/8″ larger than the stoma. If the pouch comes without an opening, cut the hole 1/8″ wider than the measured tracing.) The cut-to-fit system works best for an irregularly shaped stoma. (See Applying a skin barrier and pouch, page 191.)
Applying or Changing the Pouch
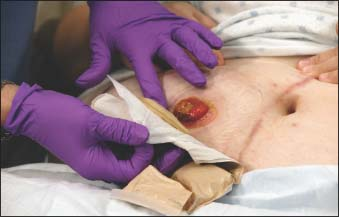
Empty, remove, and discard the old pouch, if applicable (as shown below).

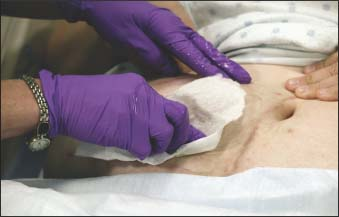
Wipe the stoma and peristomal skin gently with a soft cloth or gauze (as shown below).

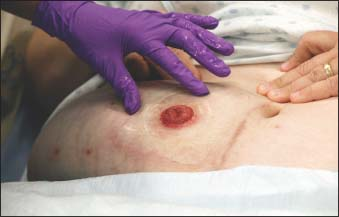
Carefully wash with water and dry the peristomal skin by patting gently. Allow the skin to dry thoroughly. Inspect the peristomal skin and stoma (as shown below). If necessary, clip surrounding hair (in a direction away from the stoma) to promote a better seal and avoid skin irritation from hair pulling against the adhesive.

You may want to apply a ring of stoma paste or a molded barrier ring around the opening on the back of the skin barrier (depending on the product) to provide extra skin protection.
Stay updated, free articles. Join our Telegram channel

Full access? Get Clinical Tree


Get Clinical Tree app for offline access
