Arterial Puncture for Blood Gas Analysis
Obtaining an arterial blood sample requires percutaneous puncture of the brachial, radial, or femoral artery or withdrawal of a sample from an arterial line. Once collected, the sample can be analyzed to determine arterial blood gas (ABG) values.
ABG analysis evaluates ventilation by measuring blood pH and the partial pressures of arterial oxygen (PaO2) and carbon dioxide (PaCO2). Blood pH measurement reveals the blood’s acid-base balance, PaO2 indicates the amount of oxygen that the lungs deliver to the blood, and PaCO2 indicates the lungs’ capacity to eliminate carbon dioxide. ABG samples can also be analyzed for oxygen content and saturation and for bicarbonate values.1
Typically, ABG analysis is ordered for patients who have chronic obstructive pulmonary disease, pulmonary edema, acute respiratory distress syndrome, myocardial infarction, or pneumonia. It’s also performed during episodes of shock and after coronary artery bypass surgery, resuscitation from cardiac arrest, changes in respiratory therapy or status, and prolonged anesthesia.
Most ABG samples can be drawn by a respiratory technician or specially trained nurse. Collection from the femoral artery, however, is usually performed by a doctor. Before attempting a radial puncture, you should perform Allen’s test. (See Performing Allen’s test, page 36.)
Equipment
Preheparinized ABG plastic luer-lock syringe specially made for drawing blood for ABG analysis ▪ 1-mL ampule of aqueous heparin (1:1,000), if a preheparinized syringe isn’t available ▪ 0G to 25G 1″ to 1½″ needle ▪ 22G 1″ needle ▪ gloves ▪ goggles ▪ chlorhexidine solution ▪ two 2″ × 2″ gauze pads ▪ rubber cap for syringe hub ▪ ice-filled plastic bag ▪ label ▪ laboratory request form ▪ small
towel ▪ adhesive bandage ▪ Optional: 1% lidocaine solution without epinephrine or lidocaine and prilocaine cream, 1-mL syringe with 25G needle.
towel ▪ adhesive bandage ▪ Optional: 1% lidocaine solution without epinephrine or lidocaine and prilocaine cream, 1-mL syringe with 25G needle.
Performing Allen’s Test
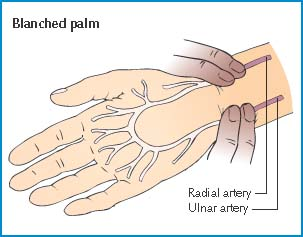
To perform Allen’s test, rest the patient’s arm on the mattress or bedside stand and support his wrist with a rolled towel. Then tell him to clench his fist. Using your index and middle fingers, press on the radial and ulnar arteries. Hold this position for a few seconds.
Without removing your fingers from the patient’s arteries, ask him to unclench his fist and hold his hand in a relaxed position. The palm will be blanched because pressure from your fingers has impaired the normal blood flow.
 |
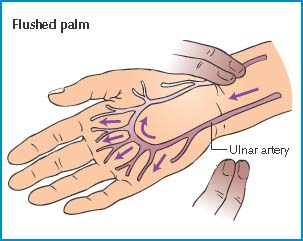
Release pressure on the patient’s ulnar artery. If the hand becomes flushed, which indicates blood filling the vessels, you can safely proceed with the radial artery puncture. If the hand doesn’t flush, select another site for the puncture.1
 |
Many health care facilities use a commercial ABG kit that contains most of the equipment listed above.
Preparation of Equipment
Verify the doctor’s order and then prepare the collection equipment before entering the patient’s room. Perform hand hygiene.2,3,4 Open the ABG kit and remove the sample label and the plastic bag. Record on the label the patient’s name and room number, the date and collection time, and the doctor’s name. Fill the plastic bag with ice and set it aside. Label the syringe in the presence of the patient.5
If the syringe isn’t heparinized, you will have to do so. To heparinize the syringe, first attach the 22G needle to the syringe. Then open the ampule of heparin. Draw all the heparin into the syringe to prevent the sample from clotting. Hold the syringe upright, and pull the plunger back slowly to about the 7-mL mark. Rotate the barrel while pulling the plunger back to allow the heparin to coat the inside surface of the syringe. Then slowly force the heparin toward the hub of the syringe, and expel all of the heparin.
Stay updated, free articles. Join our Telegram channel

Full access? Get Clinical Tree


