Chapter 22 ADDITIONAL CLINICAL MEASUREMENTS
URINALYSIS
ELIMINATION OF URINE
COLLECTION OF A URINE SAMPLE
Timed urine collection
Some tests require urine to be collected over 2–72 hours. The 24-hour timed collection is the most common. All urine excreted during the timed period is collected and sent for laboratory analysis to measure the quantity of various substances present, such as specific hormones. The required equipment consists of: a large-volume, screw-topped labelled container and a jug to transfer urine into the container. A suggested method of collecting a timed urine specimen is outlined in Table 22.1.
TABLE 22.1 GUIDELINES FOR TIMED URINE COLLECTION
| Action | Rationale |
|---|---|
| Review and carry out the standard steps in Appendix 1 | |
| The bladder is emptied completely and the urine discarded. Note the time of collection | Collection begins with the bladder empty. Only urine secreted during the time allocated is collected |
| From the starting time of collection onwards, each specimen of urine voided in the time requested is added to the container | All urine voided in that period is collected to ensure an accurate test result |
| The container of urine is refrigerated until the collection is complete | Keeping the urine cold helps prevent decomposition |
| At the end of 24 hours the bladder is emptied and the urine added to the container | The last voiding empties the bladder and completes the 24-hour collection |
| Encourage client to drink two glasses of water an hour before timed urine collection ends. Ensure that the client is not on restricted fluids | Facilitates client’s ability to void at the end of the period |
| Ensure that the label on the container has all the relevant information. Despatch specimen to the laboratory as soon as possible with the request form, or store specimen in refrigerator | Accurate documentation is necessary to avoid errors |
| If any of the urine is inadvertently discarded, the collection may need to be abandoned and the procedure restarted | Inaccurate results will be obtained if all urine excreted over the 24-hour period is not acquired |
Mid-stream urine specimen
A suggested method of collection is outlined in Table 22.2.
TABLE 22.2 GUIDELINES FOR MID-STREAM URINE COLLECTION
| Action | Rationale |
|---|---|
| Review and carry out the standard steps in Appendix 1 | |
| Explain to client and/or family member reason specimen is needed, how client can assist (when applicable), and how to obtain a specimen that is free of tissue and stool | Promotes cooperation and client participation. In some cases client can collect clean-voided specimen independently |
| Give client or family member towel, wash-cloth and soap to cleanse perineum, or assist client (after application of clean gloves) with cleansing perineum | Clients usually prefer to wash their own perineal area when possible. Prevents external microorganisms from contaminating the specimen |
| Using surgical asepsis, open outer package of commercial specimen kit | Maintains sterility of specimen container |
| Apply sterile gloves | Prevents introduction of microorganisms into urine specimen from nurse’s hands |
| Client voids 30–60 mL of urine into the toilet or toilet utensil | Flushes any residual microorganisms out of the urethra |
| Collect the next 20–30 mL of urine in a sterile container, e.g. sterile kidney dish | This is the middle stream of urine and is the portion sent for analysis |
| The person completes voiding into the toilet or toilet utensil | The remainder of the urine is not required for collection |
| Pour collected urine specimen into labelled sterile specimen container and remove gloves | Prevents cross-infection |
| Despatch specimen to the laboratory as soon as possible with the request form, or store specimen in refrigerator | Decomposition and cell growth occur if urine is left standing, and may provide a false result |
| The procedure should be documented | Appropriate care can be planned and implemented |
| Special note: Indicate on laboratory slip if client is menstruating | |
(deWit 2005; Elkin et al 2008)
Using a collection bag
A urine collection bag may be used to obtain a specimen from a client who is unable to control the flow of urine, for example, a person who is incontinent, unconscious or confused. It is not possible to obtain mid-stream urine collection from a child who is not toilet trained; in this case, urine for culture should be obtained by using a sterile plastic urine-collecting bag that adheres to the perineum. The required equipment consists of:
A suggested method of collecting a sample of urine using a collection bag is outlined in Table 22.3.
TABLE 22.3 GUIDELINES FOR BAG COLLECTION OF URINE
| Action | Rationale |
|---|---|
| Review and carry out the standard steps in Appendix 1 | |
| Place the person in a supine position if possible | Facilitates application of the bag |
| Cleanse the perineal area, swabbing towards the anus. Ensure that the urethral meatus is clean and dry | Prevents contamination of the urine by microorganisms from the surrounding skin |
| Remove the covering from the bag’s adhesive surfaces and apply the bag. The bag should enclose the urethral meatus, but not the anus | The bag must be correctly positioned and firmly secured to avoid leakage |
| Press the adhesive surfaces onto the skin (if necessary, the surrounding skin is shaved before applying the bag) | Promotes adherence of the bag to the skin |
| Check frequently and gently remove the bag when sufficient urine has been collected | Avoids damage to the skin |
| Transfer the urine into the specimen container | Prepares specimen for testing or despatch to the laboratory |
| Reposition the client and adjust the bedclothes to meet needs | Promotes comfort |
| Despatch specimen to the laboratory as soon as possible with the request form, or store specimen in refrigerator | Decomposition and cell growth occur if urine is left standing |
| Wash and dry hands | Prevents cross-infection |
Collecting a sterile urine specimen from a client with an indwelling urinary catheter
A catheter specimen of urine is obtained from a client who has an indwelling catheter (Figure 22.1). The insertion of a catheter for the sole purpose of obtaining a urine specimen is generally avoided because of the risk of introducing microorganisms into the urinary tract. To reduce this risk when obtaining a specimen of urine from an indwelling catheter, it is important to maintain a closed urinary drainage system. For this reason, collecting a specimen from the end of the catheter connected to the drainage tubing should be avoided. Instead, the urine should be aspirated through the sampling port using a sterile syringe and needle. A urine specimen for culture tests should not be collected from a urinary drainage bag unless it is the first urine to drain into a new sterile bag. Bacteria can ascend up into the drainage bag from surfaces it makes contact with, and grow rapidly. This can give a false measurement of bacteria in the urine.
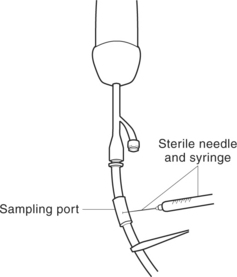
The equipment necessary consists of a sterile syringe and needle, alcohol swabs or disinfectant swabs, sterile labelled specimen container, completed laboratory request form, clean disposable gloves and a clamp. The recommended method for obtaining a urine specimen from a catheter is outlined in Table 22.4.
TABLE 22.4 COLLECTING URINE FROM AN INDWELLING URINARY CATHETER
| Action | Rationale |
|---|---|
| Review and carry out the standard steps in Appendix 1 | |
| Explain procedure to client | Minimises anxiety when nurse manipulates catheter and aspirates urine with needle and syringe |
| Clamp the catheter about 30 minutes before the specimen is to be collected | Allows urine to accumulate in the bladder so that a specimen can be obtained |
| Wash and dry hands and put on disposable gloves and goggles | Prevents risk of transferring microorganisms |
| Position client so catheter port is easily accessible. Wipe the sampling port with an alcohol swab | Prevents entry of microorganisms into catheter |
| Attach the needle to the syringe and insert the needle at 45 degree angle just above where catheter is attached to drainage tube at built-in sampling port in silastic, silicone or plastic catheter into the port. Aspirate the specimen of urine into the syringe and transfer it into the specimen container | The needle should not be inserted into the shaft of the catheter, as this may result in subsequent leakage of urine |
| Wipe the puncture area on the catheter with an alcohol swab | Prevents entry of microorganisms into catheter |
| Unclamp the catheter | Allows urine to flow again |
| Dispose of the used swabs, gloves, syringe and needle safely | Prevents risk of transferring microorganisms and injury |
| Wash and dry hands | Prevents cross-infection |
| Despatch specimen to the laboratory as soon as possible with the request form, or store specimen in refrigerator | Prevents decomposition of urine or cell growth |
(deWit 2005; Elkin et al 2008)
Stay updated, free articles. Join our Telegram channel

Full access? Get Clinical Tree


