Section Nine Circulation Procedures
PROCEDURE 48 Positioning the Hypotensive Patient
PROCEDURE 49 Doppler Ultrasound for Assessment of Blood Pressure and Peripheral Pulses
PROCEDURE 50 Measuring Postural Vital Signs
PROCEDURE 51 Pneumatic Antishock Garment
PROCEDURE 52 Therapeutic Phlebotomy
PROCEDURE 53 Pericardiocentesis
PROCEDURE 54 Emergency Thoracotomy and Internal Defibrillation
PROCEDURE 55 Electrocardiographic Monitoring
PROCEDURE 56 12-, 15-, and 18-Lead Electrocardiograms
PROCEDURE 57 Continuous ST-Segment Monitoring
PROCEDURE 58 Phlebotomy for Laboratory Specimens
PROCEDURE 48 Positioning the Hypotensive Patient
Also known as modified Trendelenburg position.
CONTRAINDICATIONS AND CAUTIONS
1. Ensure the adequacy of airway, breathing, and circulation before initiating treatment.
2. Because of the many potential adverse consequences of the traditional Trendelenburg position (i.e., head lower than body), it is no longer recommended for treatment of hypotension.
3. In the obese patient, supine positioning can cause ventilatory impairment, with compression on the aorta and inferior vena cava (Babatunde & Whitten, 2006).
4. Patients who are in cardiogenic or anaphylactic shock may not be able to tolerate a supine or modified Trendelenburg position.
PROCEDURAL STEPS
1. Place the patient in a supine position.
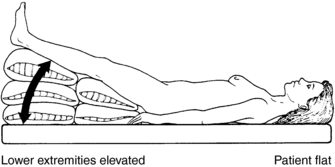
2. Raise the lower extremities to a maximum elevation of 45 degrees. This is known as the modified Trendelenburg position (Figure 48-1).
3. Do not lower the patient’s head below the level of the body, because this places pressure on the diaphragm that may result in respiratory distress. See the Contraindications and Cautions for the traditional Trendelenburg position listed earlier.
Babatunde O., Whitten C. Anesthesia and obesity. In: Barash P.G., Cullen B.F., Stoelting R.K. Clinical anesthesia. 5th ed. Philadelphia: Lippincott Williams & Wilkins; 2006:1040–1051.
Bridges N., Jarquin-Valdiviva A. Use of the Trendelenburg position as the resuscitation position: To T or not to T? American Journal of Critical Care. 2005;14:364–368.
Faust R.J. Patient positioning. In: Miller R.D., ed. Miller’s anesthesia. 6th ed. Philadelphia: Churchill Livingstone; 2004:1151–1167.
Warner M. Patient positioning. In: Barash P.G., Cullen B.F., Stoelting R.K. Clinical anesthesia. 5th. Philadelphia: Lippincott Williams & Wilkins; 2006:643–667.
PROCEDURE 49 Doppler Ultrasound for Assessment of Blood Pressure and Peripheral Pulses
INDICATIONS
1. To measure the blood pressure, pulse, or both, when auscultation by stethoscope is unsuccessful (i.e., in the presence of hypotension, hypothermia, or shock; when the pulse is faint or weak; extremity edema; faint Korotkoff sounds; or in a noisy environment). Fetal heart tones can also be assessed by Doppler; see Procedure 108.
2. To assess peripheral blood flow when circulatory impairment or vascular trauma is suspected.
CONTRAINDICATIONS AND CAUTIONS
1. Use of an ultrasonic transmission gel recommended by the vendor assists in optimal sound transmission and protects the crystals, which are found in the probe. The crystals transmit and receive ultrasonic waves. In emergency situations, any surgical jelly or lubricant may be substituted for a conductive gel but ECG paste or cream should never be used as it may damage the probe (Parks Medical Electronics, 2005).
2. The probe should be checked regularly for damage to the electrode and integrity of the crystals.
3. Improper probe placement may lead to erroneous interpretations. Care should be taken to verify that the signal is coming from the intended vessel and not from a collateral vessel. This can be determined by assessing the quality of the sound, as described in the Complications section of this procedure.
4. Excess pressure on the probe may compress the artery and abolish the signal.
5. Verify sensitivity when signals are absent from a position where they would normally be expected. Sensitivity may be verified by checking one’s own pulses with the Doppler device.
6. The presence of a signal does not always indicate that circulation and perfusion are adequate to maintain viable tissue, just as absence of a signal does not always indicate that there is no blood flow through the vessel.
7. Tissue penetration varies, depending on which Doppler probe is used. A high-frequency (8 to 10 Hz) probe is usually used on the surface vessel sites; this probe is typically long and narrow. A low-frequency probe is usually used for deeper tissue sites, such as fetal heart tones; this probe is typically short and wide.
8. Falsely elevated pressures may be observed in patients with diabetes, obesity, or calcified vessels (Gorgas, 2004).
EQUIPMENT
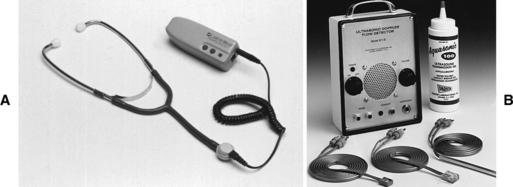
Doppler probe with a frequency of 5 to 10 MHz (for limb arteries and veins) and an amplifier (Figure 49-1)
PROCEDURAL STEPS
Blood Pressure Measurement
1. Place the blood pressure cuff on the upper arm, the thigh, or the ankle and apply a transmission gel to the skin over the brachial-popliteal artery or the posterior-tibial artery. Be sure the cuff is high enough on the limb that the Doppler probe can access the area with the strongest pulse.
2. Turn on the Doppler instrument and turn down the volume. Insert the stethoscope earpieces, if applicable.
3. Adjust the volume control as necessary.
4. Identify the brachial-popliteal pulse or the posterior-tibial pulse with the Doppler instrument.
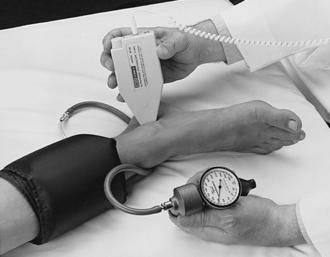
5. Position the probe over the artery and tilt it so that it is at a 45-degree angle along the length of the vessel to optimize frequency shifts and signal amplitude (Figure 49-2).
6. Inflate the blood pressure cuff until the arterial sounds are no longer audible.
7. Deflate the cuff slowly, listening for the first sound, which reflects the systolic pressure. Diastolic pressure is recorded at the point at which there is a decrease in arterial wall motion (Pickering, 2002).
8. Clean the gel from the patient’s skin with a wet towel or tissue.
9. Clean the face of the Doppler probe with a soft tissue. Do not use alcohol or other organic solvents to clean the probe. If the gel has dried on the probe, clean the probe with warm (not hot) running tap water but do not immerse the probe. The probe may be gas (ethylene oxide) sterilized at the lowest temperature consistent with good sterilization not to exceed 60° C [140° F]). A sterile water wash after sterilization is recommended (Parks Medical Electronics, 2005).
Assessment of Peripheral Blood Flow
1. Apply a transmission gel to the skin over the vessel.
2. Turn on the Doppler instrument and turn down the volume. Insert the stethoscope earpieces, if applicable.
3. Place the probe over the vessel to be assessed and tilt the probe so that it is at a 45-degree angle to the vessel. Standard arterial locations include the brachial, radial, femoral, popliteal, dorsalis pedis, and posterior tibial pulses.
4. Adjust the volume control as necessary.
5. Mark the pulse location with a waterproof marker. Compare the blood flow bilaterally. Begin assessment of the extremity at its most distal aspect. If you do not find a pulse with the Doppler instrument, move to a more proximal site. Continue to move more proximally until you are able to identify the blood flow. The findings may then be recorded by describing the pulses at each location as absent, present, or diminished.
AGE-SPECIFIC CONSIDERATION
In infants, auscultation or Korotkoff sound techniques may underestimate true systolic pressure, and ultrasonic flow detectors are recommended (Pickering, 2002).
COMPLICATIONS
1. Absence of a Doppler signal may be due to any of the following:
2. The signal may be misinterpreted. Arterial sounds are loud, pulsatile, pumping sounds that are repeated with each cardiac cycle. Venous sounds are normally cyclic. They occur with respirations, and on expiration, they produce a high-pitched sound that resembles a rushing wind.
3. Static may occur. Possible causes are hair movement on the body, air bubbles in the gel popping, and radio interference.
4. The output of ultrasonic signals from diagnostic Doppler applications is very low; nevertheless, prolonged, unnecessary exposure to ultrasonic signals should be avoided to prevent tissue damage.
Gorgas D.L. Vital sign measurement. In: Roberts J.R., Hedges J.R. Clinical procedures in emergency medicine. 4th ed. Philadelphia: Saunders; 2004:3–28.
Parks Medical Electronics, Inc. Parks Flo-Lab operating manual. Aloha, OR: Author, 2005.
Pickering T.G. Principles and techniques of blood pressure measurement. Cardiology Clinics. 2002;20(2):207–223.
PROCEDURE 50 Measuring Postural Vital Signs
Postural vital signs are also known as orthostatic vital signs and tilt test.
INDICATIONS
1. To noninvasively evaluate a patient’s symptoms of cerebral hypoperfusion or disease associated with orthostatic hypotension (hemorrhage or profound volume loss) (Bradley & Davis, 2003).
2. To assess response to a change in position in the elderly or ill.
3. To evaluate a patient with a history of known or suspected fluid loss secondary to vomiting, diarrhea, diaphoresis, bleeding, blunt abdominal or chest trauma, abdominal pain, unexplained syncope, weakness or dizziness, or autonomic dysfunction.
CONTRAINDICATIONS AND CAUTIONS
1. The value of orthostatic vital signs is disputed as there is no universal definition of how to perform them or what blood pressure and heart rate changes constitute “positive orthostatics.” Euvolemic patients may have orthostatic changes, whereas hypovolemic patients may not. Therefore, the vital signs should be interpreted in the context of the patient’s other signs and symptoms such as dizziness and visual dimming.
2. An assistant may be necessary because a patient with orthostatic hypotension may experience dizziness, lightheadedness, or syncope when moving from a lying to a standing position for postural vital sign measurement. Do not leave the patient alone during this procedure.
3. Orthostatic vital signs are contraindicated in patients with supine hypotension, shock, or a severe alteration in mental status, as well as in those who may have spinal, pelvic, or lower-extremity injuries (Gorgas, 2004).
4. Certain medications, such as sympatholytic drugs, diuretics, nitrates, narcotics, antihistamines, psychotropic agents, barbiturates, antihypertensives, and anticholergenics, can predispose a patient to orthostatic hypotension in the absence of hypovolemia. Studies have demonstrated a significant incidence of orthostatic hypotension, even in euvolemic patients (Irvin & White, 2004).
5. Paradoxical bradycardia may be observed in hypovolemic patients who have rapid and massive bleeding; this may be interpreted as orthostasis (Gorgas, 2004).
6. Prevent unreliable results by avoiding invasive or painful procedures during the measurement of postural vital signs.
PATIENT PREPARATION
Have the patient lie in a supine position for 2 to 3 minutes before taking the initial measurements.
PROCEDURAL STEPS
1. Measure the blood pressure and heart rate measurements after the patient has been in supine position for 2 to 3 minutes. Taking two sets of measurements and using the second set as baseline helps prevent false-positive results that are based on patient’s sympathetic response (Bradley & Davis, 2003).
2. Have the patient move from the supine to the sitting position (if three measurements are taken) or from supine to standing. If the patient is unable to stand for blood pressure measurement, try the high Fowler’s position, although the results may be less credible. A supine-to-standing measurement is more accurate than a supine-to-sitting measurement (Gorgas, 2004).
3. Question the patient about weakness, dizziness, or visual dimming associated with a change of position. Note any pallor or diaphoresis. These symptoms are as important as the measurement of vital signs. If the patient becomes extremely dizzy and needs to lie down or becomes syncopal, the measurement should be terminated.
4. Take the standing or sitting blood pressure (in the same arm as the initial readings) and the heart rate measurement within 1 minute. Support the patient’s forearm at heart level when taking the blood pressure to prevent an inaccurate measurement.
5. If an intermediate sitting measurement was taken, have the patient move into the standing position and repeat steps 3 and 4.
6. Return patient to supine or sitting position.
7. Note all measurements on the patient record, including the position in which they were taken (i.e., with the patient lying, sitting, or standing). Positive findings in adults are usually considered to be a heart rate increase of 30 beats/min, a decrease in systolic blood pressure of 20 mm Hg, a diastolic blood pressure decrease of 10 mm Hg, or symptoms of cerebral hypofusion, such as dizziness and syncope (Bradley & Davis, 2003). Other authors state that changes in blood pressure are too variable to be considered a reliable indicator of blood loss (Gorgas, 2004). The results of one study indicate that the two most valuable predictors for hypovolemia are a pulse increase of 30 beats/min or severe dizziness on standing (McGee, Abernethy, & Simel, 1999).
AGE-SPECIFIC CONSIDERATIONS
1. The usefulness of orthostatic vital signs in children is not clear. Postural near-syncope or an increase in heart rate of 25 beats/min or more may be a predictor of dehydration in children (Gorgas, 2004). Assessment of dehydration in children should be based on preillness and postillness weight, capillary refill, and clinical assessment (Gorelick, Shaw, & Murphy, 1997).
2. Patients with nondemand pacemakers or those taking beta-blocking medications may not have significant changes in heart rate.
Bradley J.G., Davis K.A. Orthostatic hypotension. American Family Physician. 2003;68:2393–2398.
Gorelick M.H, Shaw K.N., Murphy K.O. Validity and reliability of clinical signs in the diagnosis of dehydration in children. Pediatrics. 1997;99:6–18.
Gorgas D.L. Vital-sign measurement procedures. In: Roberts J.R., Hedges J.R. Clinical procedures in emergency medicine. 4th ed. Philadelphia: Saunders; 2004:3–28.
Irvin D.J., White M. The importance of accurately assessing orthostatic hypotension. Geriatric Nursing. 2004;25:100–101.
McGee S., Abernethy W.B., Simel D.L. Is this patient hypovolemic? Journal of the American Medical Association. 1999;281:1022–1029.
PROCEDURE 51 Pneumatic Antishock Garment
CONTRAINDICATIONS AND CAUTIONS
1. Absolute contraindications to the application of a PASG include the following:
2. Relative contraindications to the use of a PASG include the following:
3. The application of PASG for isolated lower-extremity fractures is not recommended because of the risk of the development of compartment syndrome (McSwain, Frame, & Salomone, 2003). A traction splint provides a better method of stabilizing femur fractures.
4. In conditions that require long inflation times (20 to 40 minutes or greater), significant alterations in fluid and electrolyte balance may occur and may complicate management and recovery. The patient is also at greater risk of developing pressure sores as well as compartment syndrome the longer the pants remain inflated.
5. PASG application should always be used in combination with oxygen administration and intravenous (IV) fluid resuscitation.
6. If the patient is transported to a higher altitude (air transport or over mountain passes), the air in the PASG expands and the pressure inside the garment increases. Monitor the PASG pressures carefully in these situations.
EQUIPMENT
Pneumatic antishock garment (Figure 51-1)
Long spine board or scoop stretcher
Foot pump or inflation device that comes with the pants
PATIENT PREPARATION
1. If the mechanism of injury warrants immobilization, place the patient on a long spine board or a scoop stretcher (see Procedure 111). Position the garment on the board or the scoop stretcher before the patient. The patient may be log rolled onto the garment and the garment slid up under the patient (technique A), or, alternatively, the garment may be placed on the patient like trousers (technique B).
2. Remove all clothing and anything else below the waist to prevent compression injuries from objects such as belts when the pants are inflated.
PROCEDURAL STEPS
Inflation
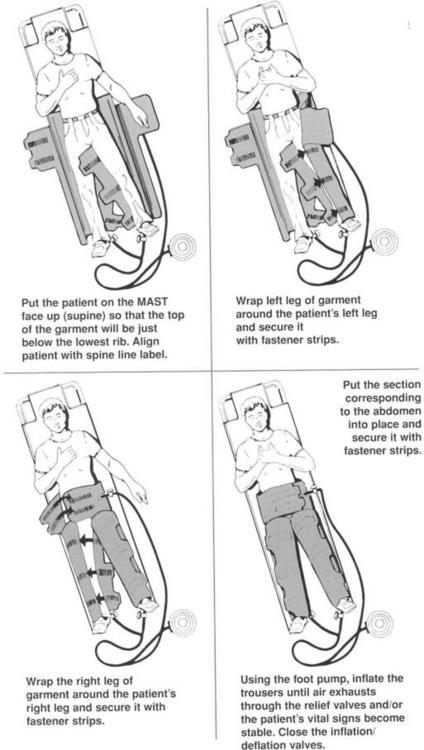
Technique A (see Figure 51-1)
a. Release the leg and abdominal Velcro closures. Lay the garment out flat. Maintain in-line spinal immobilization if indicated.
b. One or more persons may then slide the garment underneath the patient. Raise the feet and slide the PASG under the buttocks. Elevate the buttocks slightly to place the pants properly.
c. Match the Velcro straps on the leg compartments and secure them (some models color code the Velcro closures). Fasten the Velcro straps on the abdominal compartment.
Technique B
(This method is contraindicated in persons with suspected or confirmed spinal fractures.)
2. The abdominal compartment should be placed just below the rib cage so as not to reduce vital capacity and impair respiration.
3. Close the stopcock to the abdominal compartment and open the stopcocks to the leg compartments.
4. Attach the tubing from the foot pump to the three compartments. Some models have color-coded tubing for the different compartments.
5. Inflate the leg compartments with the pump until the pressure gauge (if present) indicates the appropriate amount of pressure. Some pants have a pop-off valve that limits the inflation pressure to 104 mm Hg. Crackling of the Velcro closures also indicates sufficient inflation. The goal is to achieve a systolic pressure of 100 mm Hg while using the lowest inflation pressure possible (less than 40 mm Hg). Patients in extremis may need rapid, simultaneous inflation of all three compartments to 100 mm Hg immediately on application of the garment. If the foot pump is not available, sufficient pressures may be obtained by manually inflating the compartments.
6. Recheck the patient’s vital signs. Inflation should be stopped when the systolic pressure reaches 100 mm Hg.
7. If the systolic pressure has not increased to more than 100 mm Hg, inflate the abdominal compartment. (Note: Pregnancy is a relative contraindication for inflation of the abdominal compartment.)
8. Assess vital signs and respiratory effort frequently.
9. Secure the patient to the long board or scoop stretcher as necessary.
Monitoring Chamber Pressure
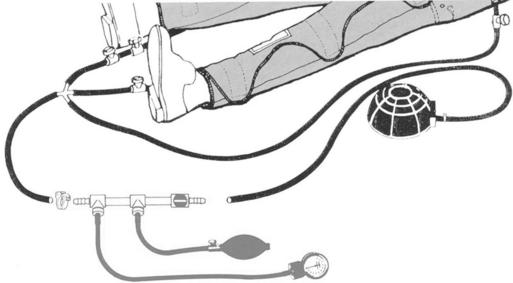
1. The pressure monitoring assembly consists of interconnecting tubing, pressure gauge, hand bulb, air flow control valve, and inflation/deflation valve (Figure 51-2).
2. Connect the monitor between the foot pump and the PASG as shown in Figure 51-2.
3. Increase or decrease the pressure in the leg or abdominal chambers based on the patient’s response to resuscitation and comfort.
Deflation
1. Any patient who has had the PASG applied and inflated must be stabilized before the garment is deflated. Stabilization may be accomplished via intravenous fluids, hemorrhagic control, vasopressors, or surgical intervention. Deflation of the garment must be done slowly. Remind all providers that this device should never be cut off!
2. Assess vital signs while the garment is inflated.
3. Gradually release air from the abdominal compartment and recheck the vital signs. If the blood pressure has dropped more than 5 mm Hg, deflation should be stopped and more fluids administered (if necessary) to restore pressure. In addition to the drop in pressure, some protocols suggest stopping deflation if the heart rate increases by 10 beats/min after deflation. If pressure is not restored, reinflate the abdominal compartment.
4. Continue to release air from the abdomen, assessing the patient’s vital signs each time. Some protocols suggest waiting 5 minutes between each step of deflation, although this has not been fully researched or documented.
5. Release air from one leg of the PASG at a time, following the same procedure as above. If one leg is injured, release the pressure from the uninjured leg first.
6. Reassess the patient’s condition frequently after deflation.
7. Do not remove the deflated garment from the patient, in the event that rapid reapplication is necessary.
COMPLICATIONS
1. Sudden and severe hypotension may ensue after sudden removal of the garment.
2. Metabolic acidosis may develop after prolonged use of the garment as a result of a release of lactic acid from peripheral tissues.
3. Respiratory compromise may occur as a result of decreased vital capacity or pulmonary congestion (see Contraindications and Cautions).
4. Decreases in renal blood flow may result in a decline in renal perfusion, glomerular filtration rate, and urine output.
5. Inflation of the abdominal compartment may aggravate lumbar instability because of the circumferential compartment expansion.
6. Bleeding from extremity wounds may increase with increased blood pressure.
7. Skin breakdown and decubitus ulcer formation may occur.
8. Compartmental syndrome may develop in the lower extremities.
American College of Surgeons (ACS), Committee on Trauma. Advanced trauma life support manual, 7th ed. Chicago: Author, 2004.
Eichelberger M.R., Partsch G.S., Ball J.W., Clark J.R., et al. Pediatric emergencies: A manual for prehospital care providers, 2nd ed. Upper Saddle River, NJ: Brady Communications, Prentice-Hall, 1998.
McSwain N., Frame S., Salomone J. Basic and advanced prehospital trauma life support. St. Louis: Mosby, 2003.
National Highway Transportation and Safety Administration (NHTSA). Emergency medical technician: National standard curriculum. Washington, DC: Author, 1998.
Salomone J.P., Ustin J.S., McSwain N.E., Feliciano D.V. Opinions of trauma practitioners regarding prehospital interventions for critically injured patients. Journal of Trauma. 2005;58:509–515.
PROCEDURE 52 Therapeutic Phlebotomy
Therapeutic phlebotomy is also known as blood letting.
INDICATIONS
1. To decrease iron stores in iron overload syndromes, such as hemochromatosis, porphyria cutanea tarda, and African dietary iron overload (previously known as African siderosis). For every 500 ml of blood withdrawn, 200 to 250 mg of iron is removed (Heaney & Andrews, 2004). Iron is then mobilized from tissue stores by the bone marrow as it replaces the lost hemoglobin.
2. To decrease red blood cell mass in the presence of high blood viscosity (e.g., polycythemia vera). In patients with severe polycythemia (hematocrit greater than 55%), phlebotomy provides a means to reduce mean pulmonary artery pressure and pulmonary vascular resistance and enhance exercise performance (Wiedemann, 2004).
3. Rarely, therapeutic phlebotomy is advised in the patient with acute decompensation of cor pulmonale with marked polycythemia or for the rare patient who continues to have significant polycythemia despite appropriate long-term oxygen therapy (Wiedemann, 2004).
CONTRAINDICATIONS AND CAUTIONS
1. A physician from transfusion medicine should be involved in the decision to perform therapeutic phlebotomy (AABB, 2006).
2. Monitor patients who have bleeding disorders and those who are taking anticoagulant medications closely.
3. Generally, less than 500 ml of blood is removed slowly; the volume can be replaced with normal saline (Hamilton & Janz, 2006).
4. For patients with known cardiovascular disease, take care to prevent a large reduction in blood volume at one time (Means, 2004).
5. Prompt initiation of phlebotomy is critical following the diagnosis of iron overload because accumulation of iron can lead to cardiac arrhythmias, cardiomyopathy, and sudden death (Tavill, 2001).
EQUIPMENT
PROCEDURAL STEPS
1. Obtain an order including the diagnosis, most recent hemoglobin or hematocrit value, and the amount of blood to be removed.
2. Apply the tourniquet or blood pressure cuff and locate the most suitable antecubital vein. Remove the tourniquet or deflate the blood pressure cuff.
3. Cleanse the site with antiseptic solution.
4. Clamp the tubing with the hemostat at the patient’s end and insert the other end into the vacuum bottle. If using the Saf-T donor set, clamp the tubing to maintain the vacuum in the bottle and connect the 15-G stopper-piercing needle to the bottle.
5. Reapply the tourniquet or inflate the blood pressure cuff to a pressure between the patient’s systolic and diastolic readings.
6. Inject 1 to 2 ml of local anesthetic intradermally at the venipuncture site (optional).
7. Perform the venipuncture with the needle on the proximal end of the tubing.
8. Tape the needle in place and cover the site with an occlusive dressing.
9. Unclamp the hemostat and collect the desired amount of blood, usually 250 to 500 ml, in the collection bottle or bag.
10. Reclamp the tubing with the hemostat.
11. Release the tourniquet or deflate the cuff.
12. Withdraw the needle and apply pressure with a gauze dressing until the bleeding stops.
AGE-SPECIFIC CONSIDERATION
Removal of smaller volumes of blood during therapeutic phlebotomy is recommended in the elderly.
PATIENT TEACHING
1. Rest for 15 minutes before moving to a sitting or standing position.
2. Eat and drink before the procedure, and drink after the procedure if not contraindicated.
3. Avoid vigorous exercise within 24 hours of therapeutic phlebotomy.
4. Do not take iron supplements if you have iron overload problems. Vitamin C supplements, which increase the absorption of iron, should also be avoided.
5. Avoid alcohol if you have iron overload problems; alcohol is toxic to the liver.
6. Patients with porphyria can contact the American Porphyria Foundation (http://www.porphyriafoundation.com/) for additional information. For patients with hemochromatosis, information on treatment with therapeutic phlebotomy is available at:http://www.cdc.gov/ncbddd/hemochromatosis/training/pdf/phlebotomy_info.pdf
American Association of Blood Banks (AABB). Standards for blood banks and transfusion services: Technical manual, 24th ed. Bethesda, MD: Author, 2006.
Hamilton G.G., Janz T.G. Anemia, polycythemia and white blood cell disorders. In: Marx J.A., Hockberger R.S., Walls R.M., et al. Rosen’s emergency medicine: Concepts and clinical practice. 6th ed. St. Louis: Mosby; 2006:1867–1884.
Heaney M.M., Andrews N.C. Iron homeostasis and inherited iron overload disorders: An overview. Hematology Oncology Clinics of North America. 2004;18:1379–1403.
Means R. Polycythemia vera. In: Greer J.P., Foerster J., Lukens J.N., Rodgers G.M., Paraskevas F., Glader B. Wintrobe’s clinical hematology. 11th ed. Philadelphia: Lippincott Williams & Williams; 2004:2259–2272.
Tavill A.S. American Association for the Study of Liver Diseases guidelines: Diagnosis and management of hemochromatosis. Hepatology. 2001;33:1321–1328.
Wiedemann H.L. Cor pulmonale. UpToDate, version 14.3, 2004. Uptodate.com.
PROCEDURE 53 Pericardiocentesis
Pericardiocentesis is also known as pericardial tap.
INDICATIONS
1. To assist in the diagnosis of pericardial tamponade in patients with decreased cardiac output, elevated central venous pressure with jugular vein distention, muffled heart tones, and hypotension (also known as Beck’s triad) who have sustained blunt or penetrating trauma to the chest. Ultrasound is the preferred diagnostic technique as it is noninvasive and easily performed at the bedside.
2. To relieve pericardial tamponade secondary to infection, tumor, bleeding diathesis, or recent intracardiac instrumentation, such as pacemaker insertion.
3. To assist in the diagnosis and treatment of patients in pulseless electrical activity.
4. Placement of an indwelling “pigtail catheter” may be considered for serial drainage if effusion is likely to recur.
CONTRAINDICATIONS AND CAUTIONS
1. Ideally, pericardiocentesis is performed in the cardiac catheterization laboratory using fluoroscopic or echocardiac guidance. In the emergency department, ultrasound or echocardiography may be useful adjunctive techniques for this procedure (Ciccone, 2004; Tang, 2005; Tibbles & Porcaro, 2004). The electrocardiogram (ECG)-assisted “blind” technique for pericardiocentesis is associated with significant morbidity, and therefore, it is only recommended when there may be a considerable delay in obtaining an ultrasound or a fluoroscope (Harper, 2004). If the patient is stable and ultrasound is not available, a computed tomography (CT) scan can provide definitive diagnosis of pericardial effusion (Harper, 2004).
2. Extreme caution is necessary when performing pericardiocentesis on patients who are taking anticoagulant medication.
3. All equipment must be secured and properly grounded to prevent small current leaks, which may result in arrhythmias.
4. Pericardiocentesis may be inadequate for traumatic pericardial tamponade; a pericardial window or other operative intervention may be necessary to remove clots in the pericardium.
Stay updated, free articles. Join our Telegram channel

Full access? Get Clinical Tree


