Section Eight Pleural Decompression
PROCEDURE 38 Emergency Needle Thoracentesis
PROCEDURE 39 Chest Tube Insertion
PROCEDURE 40 Management of Chest-DrainageSystems
PROCEDURE 42 Chest-Drainage Bottles
PROCEDURE 43 Chest-Drainage Devices: Emerson
PROCEDURE 44 Chest-Drainage Devices: Pleur-Evac
PROCEDURE 45 Chest-Drainage Devices: Argyle
PROCEDURE 46 Chest-Drainage Devices: Atrium
PROCEDURE 38 Emergency Needle Thoracentesis
Emergency needle thoracentesis is also known as needling a chest.
INDICATIONS
CONTRAINDICATIONS AND CAUTIONS
1. If this procedure is used in the absence of a tension pneumothorax, there is a risk of producing a pneumothorax, causing damage to the lung or blood vessels (ACS, 2004).
2. Needle thoracentesis is performed as an interim procedure until tube thoracostomy (chest tube placement) can be carried out. Anticipate thoracostomy as a follow-up procedure.
3. Initial presentation of a traumatic ruptured diaphragm with herniation of abdominal contents into a hemithorax can mimic a tension pneumothorax. Placement of a needle in this instance can result in bacterial contamination of the pleural cavity. Suspect a ruptured diaphragm in a patient with a history of sudden, compressive force to the abdomen.
4. Owing to the urgent nature of a tension pneumothorax, consideration should be given to training nursing and ancillary personnel in this procedure in areas that have no immediate access to a physician. The patient may suffer cardiac arrest without immediate intervention.
5. Research demonstrates that in some adults, the standard 3-cm, over-the-needle catheter may not reach the pleural cavity at the second intercostal space. Insufficient cannula length may contribute to the failure of the procedure. A minimum length of 4.5 cm (1.77 inches) is recommended (Britten, Palmer, & Snow, 1996).
6. Reinforced cannulae such as used for needle cricothyrotomy may be more resistant to kinking than intravenous cannulas.
PATIENT PREPARATION
1. Chest radiography may be deferred initially, depending on the patient’s presentation. If a ruptured diaphragm is suspected, consider obtaining films before performing needle thoracentesis.
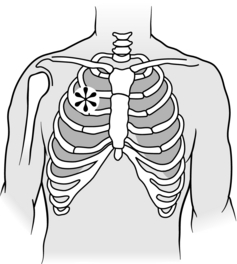
2. If time allows, cleanse the chest with an antiseptic solution on the side of the tension pneumothorax. The usual site for needle insertion is the second intercostal space at the midclavicular line (Figure 38-1).
3. If cervical spine pathology is ruled out and the patient’s condition permits, place the patient in an upright position.
PROCEDURAL STEPS
1. * If the patient is conscious and the patient’s condition permits, infiltrate the area with local anesthetic.
2. *Insert the needle with a catheter through the skin at the second intercostal space, just superior to the third rib at the midclavicular line, 1 to 2 cm from the sternal edge, and direct it toward the top of the second rib. Hold the needle perpendicular to the chest wall when inserting over the top of the rib (intercostal nerves and arteries run inferior to the rib) and into the pleural space.
3. *Egress of air confirms the diagnosis of tension pneumothorax. If no air is released or if signs and symptoms do not improve, consider the presence of pericardial tamponade, myocardial contusion, or air embolism.
4. *Remove the needle and leave the catheter in place. The catheter may now be secured with tape and left open to the air. A simple pneumothorax now exists.
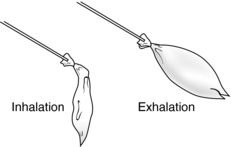
5. Assemble the equipment and prepare for subsequent chest tube placement (see Procedure 39). If there is a delay in chest tube placement (e.g., during transport), a flutter valve can be placed over the hub of the catheter. A simple form of flutter valve could be a 2-inch sterile rubber drain or a finger of a sterile glove with the tip removed. The flutter valve can then be secured to the hub of the catheter with tape or a suture (Figure 38-2). Alternately, intravenous extension tubing can be attached to the catheter with the distal end of the tubing submerged a few centimeters into sterile fluid to create a water seal.
6. Intubated patients receiving positive-pressure ventilation do not necessarily require a flutter valve or water seal to the needle as this is a short-term intervention and the positive pressure of ventilation will force out any air that does enter the chest cavity.
7. After chest tube placement is carried out, remove the catheter. Apply antibiotic ointment and a sterile dressing over the puncture site.
COMPLICATIONS
1. Creation of a pneumothorax if a tension pneumothorax did not exist before procedure was performed.
2. Hematoma at insertion site, lung laceration (ACS, 2004).
3. Perforation of abdominal viscera if ruptured diaphragm or herniation of abdominal contents is present.
4. Placement of the needle close to the sternum may result in a laceration of the internal mammary artery with significant blood loss and resultant hemothorax.
5. Failure to decompress a tension pneumothorax with resulting patient deterioration.
6. Infection of puncture site (late).
PROCEDURE 39 Chest Tube Insertion
Chest tube insertion is also known as tube thoracostomy.
INDICATIONS
1. To remove air, blood, or both from the pleural cavity in the presence of a pneumothorax (free air in the pleural space), hemothorax (free blood in the pleural space), or hemopneumothorax (combination of air and blood).
2. To remove fluid from the pleural cavity in the presence of a large pleural effusion, empyema, or chylothorax. Iatrogenic pleural collections are most commonly seen after central venous access procedures.
3. To provide prophylactic chest drainage in patients with severe blunt chest trauma (flail chest or pulmonary contusions) who will require positive-pressure ventilatory support. Prophylactic chest tubes may also be inserted in patients with penetrating thoracic injuries, even in the absence of evidence of pneumothorax.
CONTRAINDICATIONS AND CAUTIONS
1. A patient’s hemodynamic status may deteriorate rapidly after the evacuation of a massive hemothorax (larger than 1000 to 2000 ml). Initiate fluid resuscitation before performing chest decompression and anticipate the need for high-volume resuscitation. Autotransfusion may be indicated if available. A large left hemothorax may signal an aortic or great vessel injury.
2. The use of trocar chest tubes is controversial and is not recommended by most authors because trocar use has been associated with damage to the thoracic and abdominal structures. If a trocar is used, it should be used only to guide the tube through an opening already created by blunt dissection, rather than to enter the chest forcibly (Kirsch & Mulligan, 2004).
3. A patient with a previous thoracostomy may have scar tissue and adhesions, making chest tube placement difficult.
4. Consideration should be given to decompression of a pneumothoraces before attempting air transport, because the size of the pneumothorax may increase with altitude.
5. Chest tube insertion is not indicated if an emergency thoracotomy is imminent.
EQUIPMENT
Syringes and needles for local anesthesia
36 Fr to 40 Fr for blood or viscous fluid
Large silk suture (0-0 to 2-0)
Occlusive dressing (gauze impregnated with petroleum jelly) (optional)
Gauze dressings (4 × 4, split drain sponges)
Autotransfusion equipment if indicated or available
(Most institutions have preassembled trays containing most of this equipment.)
PATIENT PREPARATION
1. Provide supplemental oxygen.
2. Obtain a chest radiograph unless the patient’s condition mandates immediate chest tube placement.
3. In nonemergent circumstances, establish intravenous access, electrocardiographic monitoring, and pulse oximetry.
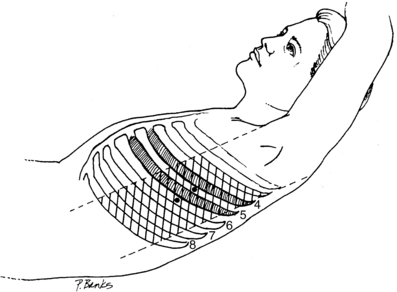
4. If time allows, cleanse the insertion site with antiseptic solution. The usual site for chest tube placement is the fourth or fifth intercostal space in the anterior or midaxillary line (Figure 39-1). Alternatively, the level of the nipple line can be used as a marker, especially in the unstable patient who requires immediate tube placement. In women with pendulous breasts, the lateral crease of tche breast is a more stable landmark. Insertion through a lower site risks subdiaphragmatic placement, possibly into the liver or spleen.
5. Place the patient in a supine position with the arm over the head on the involved side. If the patient’s injuries permit, elevate the trunk to a 30- to 60-degree angle.
6. Administer antibiotics as prescribed to prevent empyema and pneumonia (Maxwell et al., 2004).
7. Administer sedation and analgesia as prescribed. This is an extremely uncomfortable and painful procedure.
8. Prepare the chest-drainage device (see Procedures 40 to 46).
9. Prepare autotransfusion equipment if indicated (see Procedures 77 to 80).
PROCEDURAL STEPS
1. * Cleanse the insertion site with an antiseptic solution.
2. *Drape the chest with sterile drapes.
3. *Infiltrate the area with a local anesthetic if the patient is conscious and if the patient’s condition permits.
4. *Using the chest tube, measure the distance from the insertion site to the apex of the lung and note the distance on the tube.
5. *Make a 2- to 4-cm incision through the chest wall parallel to the ribs of the fifth intercostal space. The incision is made one interspace below the desired interspace. Making an incision below the pleural cavity entry site permits blunt dissection over the superior surface of the rib and creates a tunnel that allows later removal of the tube without an air leak.
6. *Bluntly dissect over the superior surface of the rib with the curved hemostat (nerves and arteries run inferior to the ribs). Enter the pleural cavity with the hemostat. The patient will experience pain as the pleural cavity is entered (Figure 39-2).
7. *Widen the pleural opening and the skin incision by pulling the opened hemostat back out of the chest wall.
8. *With a gloved finger, palpate through the incision to verify entry into the pleural space and to check for adhesions of the pleura and for intrathoracic or intraabdominal organs (Figure 39-3).
9. *Direct the chest tube upward through the incision. Use a large hemostat to introduce the tube. Advance the tube to the premeasured distance (approximately 15 to 25 cm). The immediate return of blood, air, or both confirms the appropriate placement.
10. *Connect the chest tube to the chest-drainage device.
11. Tape all connections in the chest-drainage system. One inch of tape is placed horizontally, extending over connections. Reinforce this with tape placed vertically so that it encircles both ends of the connector (Figure 39-4).
12. *Suture the chest tube in place with silk suture.
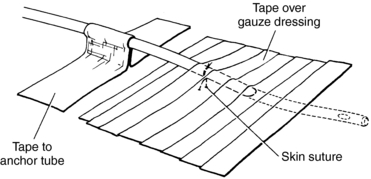
13. Apply an occlusive dressing to the insertion site. Petroleum-impregnated gauze may be wrapped around the tube close to the insertion site if the air leak is large. However, this may cause maceration of the skin and is not routinely necessary (Barefoot, 2005) (Figure 39-5).
14. Tape the chest tube to the skin.
15. Obtain a chest radiograph to confirm the correct tube placement (the last hole on the tube should be inside the pleural space) and to assess the status of the pneumothorax or hemothorax.
16. Monitor the chest-drainage device for the presence of large, continuous air leaks (may signal esophageal or large-airway damage) or excessive blood loss. Indications for surgical intervention include massive blood loss (greater than 1000 to 1500 ml initially or 300 ml in the first hour) or massive or persistent air leaks (Kirsch & Mulligan, 2004).
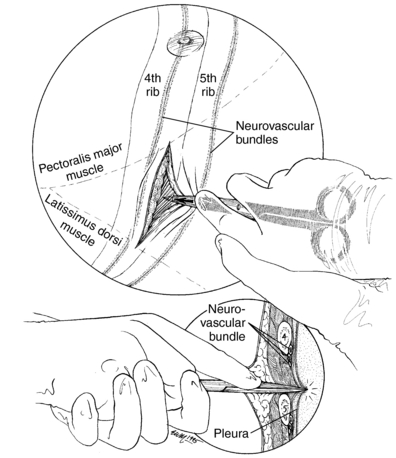
Figure 39-2 Enter the pleural space with a Kelly clamp.
(Rosen, P., Chan, T., Vilke, G., & Sternbach, G. [2001]. Atlas of emergency procedures [p. 41]. St. Louis: Mosby.)
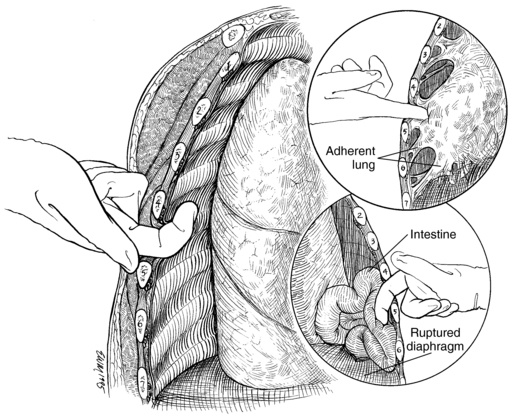
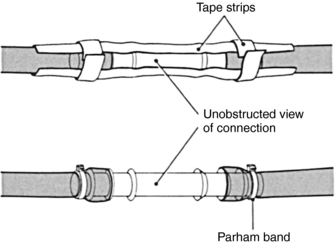
Figure 39-4 Securing of connection points.
(Kersten, L. D. [1989]. Comprehensive respiratory nursing. Dimensions of critical care nursing, 14, 6–13.)
AGE-SPECIFIC CONSIDERATIONS
1. For newborn infants, the tube is placed in the fifth intercostal space of the anterior axillary line and directed anteriorly (Kirsch & Mulligan, 2004).
2. In a small infant, be sure that the dressing is not so large as to splint a large part of the chest wall and interfere with effective ventilation (MacDonald, 2004).
3. Approximate sizes for pediatric thoracostomy by age and weight are shown in Table 39-1.
TABLE 39–1 APROXIMATE SIZES FOR PEDIATRIC THORACOTOMY TUBES BY AGE AND WEIGHT
| Age | Approximate Weight (kg) | Tube Size (French) |
|---|---|---|
| Newborn to 9 months | 3.5-8 | 12-18 |
| 10 to 17 months | 10 | 14-20 |
| 18 months to 3 years | 12-15 | 14-24 |
| 4 to 7 years | 17-22 | 20-32 |
| 8 years | 28 | 28-32 |
| 9 years and older | 35 and higher | 28-38 |
COMPLICATIONS
1. A malpositioned, nonfunctioning tube (with the last hole in the tube outside of the pleural space or the tube malpositioned in the subcutaneous space)
2. Bleeding from the skin incision, from intercostal arteries or veins, or from a pulmonary artery or vein (risk is increased if chest tube with trocar is used)
3. Organ or structure injury (diaphragm, liver, spleen, stomach, or colon); the risk is increased if chest tube with trocar is used
6. Hypovolemia secondary to rapid fluid loss with a hemothorax
8. Reexpansion pulmonary edema
9. Occlusion or kinking of the tube (which may result in the formation of a tension pneumothorax)
10. Pain with reexpansion of the lung
13. Atelectasis or pneumonia due to splinting by the patient (late)
14. Reoccurrence of pathology after removal of the tube
Barefoot W. Chest tube placement (perform). In: Lynn-McHale Wiegand D.J., Carlson K.K. AACN procedure manual for critical care. 5th ed. Philadelphia: Saunders; 2005:145–149.
Kirsch T.D., Mulligan J.P. Tube thoracostomy. In: Roberts J.R., Hedges J.R. Clinical procedures in emergency medicine. 4th ed. Philadelphia: Saunders; 2004:187–209.
MacDonald M. Thoracostomy in the neonate: A blunt discussion. NeoReviews. 2004;5:301–306.
Maxwell R.A., Campbell D.J., Fabian T.C., et al. Use of presumptive antibiotics following tube thoracostomy for traumatic hemopneumothorax in the prevention of empyema and pneumonia: A multicenter trial. Journal of Trauma. 2004;57:742–749.
PROCEDURE 40 Management of Chest-Drainage Systems
The information contained in this procedure should be used in conjunction with that in the procedures pertaining to specific chest-drainage systems (seeProcedures 42 through 46).
CONTRAINDICATIONS AND CAUTIONS
1. Water-seal devices must be kept upright; otherwise, intrapleural negativity may be lost with air entry into the pleural space.
2. Do not clamp the tube unless it is absolutely necessary (to change the chest-drainage device or to check for air leaks), because a tension pneumothorax may develop.
3. Do not raise the device above the patient’s chest level because fluid may reenter the chest and increase the probability of infection (applies to water-seal systems only).
4. Do not allow the tubing to coil below the top of the device or lie on the floor, because dependent fluid-filled loops require increased intrathoracic pressure to continue the emptying of the pleural space.
5. “Milking,” or stripping, chest tubes can result in more than 400 cm H2O of negative pressure within the pleural space (Duncan & Erickson, 1982). This negative pressure may damage the lung tissue and, therefore, stripping of chest tubes should not be performed routinely. Milking may be necessary when a visible clot is obstructing the tube, as is the case when the flow of sanguinous drainage suddenly slows or stops. To milk the tube, fold the tubing over on itself three times. Each fold should be approximately 3 inches long. Squeeze the folded tubing three or four times and release.
GENERAL INFORMATION
1. The fluid level in the water-seal tube/chamber should rise with inspiration and fall with expiration. If fluctuations are not present, the lung is either fully reexpanded or there is an obstruction. Check the tubing for kinks or occlusions. The most common cause is the patient lying on the tubing. Positive-pressure ventilation dampens these fluctuations.
2. For water-seal units, bubbles should be present in the the water in the water-seal chamber only in the presence of an air leak. Intermittent bubbling can occur when the suction is initially turned on due to air being displaced in the collection chamber, or a small leak in the pleural space, or upon exhalation and/or coughing. To determine the etiology of bubbles in the water seal chamber:
AGE-SPECIFIC CONSIDERATIONS
1. Adult chest-drainage units may be used for children; however, pediatric chest-drainage devices are available from most manufacturers. The pediatric collection chamber is smaller than its adult counterpart and has smaller incremental markings for accurate measurement of small volumes. Autotransfusion is not usually available on pediatric units, but adult autotransfusion units may be used instead.
2. Negative 10 to 20 cm H2O is the suction level usually recommended for pediatric patients.
3. Milking or stripping of chest tubes is contraindicated in children.
COMPLICATIONS
1. A tension pneumothorax may develop if there are obstructions in the system. Kinked or clamped tubing is the most likely source of obstruction.
2. If the device breaks or the system becomes disconnected, a loss of intrapleural negativity may result, and an open pneumothorax may develop. If the tubing becomes disconnected at any site, clean the connectors with alcohol and reconnect. If the device breaks, place the end of the drainage tubing (approximately 2.5 cm) in a container of sterile water until another chest-drainage device can be prepared.
3. Accidental dislodgement of the chest tube: If this happens, have the patient cough or exhale forcibly. Apply an occlusive dressing to the area and tape it on three sides. Notify the physician immediately. Check the oxygen saturation as measured by pulse oximetry (SpO2) and administer oxygen. Monitor the patient closely for the development of a tension pneumothorax until another chest tube can be inserted.
PATIENT TEACHING
PROCEDURE 41 One-Way Valve
A one-way valve is also known as a Heimlich, flap, or flutter valve.
CONTRAINDICATIONS AND CAUTIONS
1. If the valve is placed going in the wrong direction, air egress will be prevented and tension pneumothorax may result. Be sure the collapsed end of the valve is distal to the patient and the chest tube (see Figure 41-1).
2. If a hemothorax or pleural effusion is present, it may be necessary to replace the valve or add a regular chest-drainage unit for fluid collection.
Stay updated, free articles. Join our Telegram channel

Full access? Get Clinical Tree


