Section Six Ventilation
PROCEDURE 32 Mouth-to-Mask Ventilation
PROCEDURE 33 Bag-Mask Ventilation
PROCEDURE 34 Anesthesia Bag Ventilation
PROCEDURE 32 Mouth-to-Mask Ventilation
Mouth-to-mask ventilation is also known as face-mask ventilation and face-shield ventilation.
CONTRAINDICATIONS AND CAUTIONS
1. Clear the airway of any obstruction before ventilating the patient.
2. Masks should be made from a transparent material so that lip color, vomit, blood, or other foreign material in the airway are visible. A mask with a one-way valve is preferred.
3. Both hands of the rescuer are needed to provide an adequate seal around the mask and to maintain an open airway. If cardiopulmonary resuscitation (CPR) is indicated, two rescuers are preferred because it is difficult for one person to simultaneously open the airway and quickly reestablish the mask seal with each return to the patient’s head after performing chest compressions. Use of a face shield that drapes over the patient’s face facilitates CPR by one rescuer.
4. The concentration of oxygen delivered in exhaled air is approximately 16%, but delivery to the patient can be enhanced by adding supplemental oxygen via a port (present on some masks).
5. Use of a face mask may not be appropriate for patients who have severe facial trauma, trismus, excessive oral bleeding, or vomiting.
6. Face masks are not used for patients who have a postlaryngectomy stoma.
7. Low tidal volumes without supplementary oxygen may be ineffective for maintaining adequate arterial oxygen saturation, resulting in hypercarbia and acidosis.
EQUIPMENT
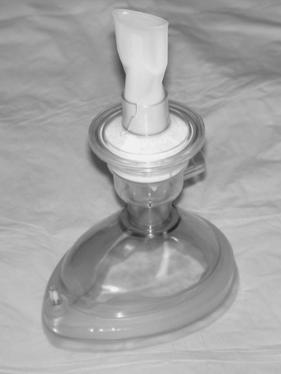
Face mask (Figure 32-1) or face shield (flexible plastic sheet with filter or one-way valve)
Oropharyngeal or nasopharyngeal airway (if needed)
Oxygen tubing and source (optional, but preferred)
PATIENT PREPARATION
1. Place the patient in a supine position on a firm surface when possible. If necessary, ventilations can be delivered to patients who are seated or who are floating in water.
2. Open the airway by using the head-tilt/chin-lift maneuver if there is no evidence of head or neck trauma. If a cervical spine injury is suspected, a jaw-thrust maneuver should be used without extending the neck. If the jaw thrust does not open the airway, use the head-tilt/chin-lift method (see Procedure 3).
3. Clear the airway of any visible obstruction before ventilating the patient; blind finger sweeps are not recommended and may actually be harmful.
4. An oral airway or a nasal airway may be used to maintain airway patency (see Procedures 5 and 6).
5. The rescuer should be positioned to use either a cephalic (above the patient’s head) or a lateral (beside the patient’s head) technique for rescue breathing. Two rescuers are preferred to perform CPR—one to provide ventilation and maintain an adequate seal of the mask on the patient’s face and the other to deliver chest compressions.
PROCEDURAL STEPS
Mouth-to-mask Ventilation
1. Place the mask over the patient’s nose and mouth with the narrow end of the mask over the nose. A properly sized mask should extend from the bridge of the nose to the space between the lower lip and the chin and should provide an airtight seal on the face.
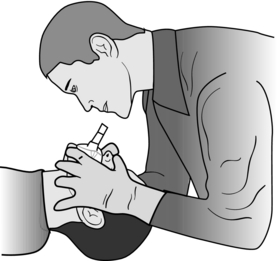
2. If you are using the cephalic technique, apply pressure to both sides of the mask by using the thumbs and thenar aspects of the palms to seal the cuff of the mask tightly against the face (Figure 32-2). If you are using the lateral technique, place the thumb and index finger of your hand nearest the top of the patient’s head over the upper border of the mask and the thumb of your opposite hand (closest to the patient’s chin) over the lower border of the mask. Use the remaining fingers to maintain the correct jaw position.
3. Lift upward on the patient’s mandible, using the index, middle, and ring fingers of your hands to maintain a head tilt.
4. If a third assistant is available, have that person apply cricoid pressure. Cricoid pressure helps prevent gastric inflation and reduces the risk of regurgitation or aspiration. It is applied by pressing down on the cricoid cartilage to compress the esophagus against the cervical vertebrae (AHA, 2006).
5. Blow into the opening of the mask and deliver a normal breath, not a deep breath, over 1 second and observe the chest rise. A rescuer is generally unable to estimate tidal volume during CPR so visible chest rise is used to determine the adequacy of ventilation.
6. For an adult, rescue breaths should be slow, at least 1 second each every 5 to 6 seconds. For a child, one breath every 3 seconds is recommended (AHA, 2006).
7. Remove your mouth from the mask opening to allow passive exhalation by the patient. This step is unnecessary if there is a one-way valve.
8. Ventilate the adult (a person older than age 8) 12 times per minute. The rate of rescue breathing for a child (aged 1 to 8 years) or an infant (younger than 1 year) is 20 times per minute. Reassess the need for continued assisted ventilation every 5 minutes.
9. Connect oxygen tubing to the mask as soon as possible (if an oxygen inlet is present) and adjust the flow rate to 10 to 12 L/min (AHA, 2006). If there is no oxygen inlet, oxygen delivery to the patient may be enhanced if the rescuer wears a nasal cannula dispensing oxygen at a flow rate of 6 L/min.
Face Shield
1. Face shields are sheets of clear plastic or silicone to place over the victim’s mouth and nose. Place the shield on the patient’s face with the filter or one-way valve over the mouth.
2. Position yourself to the side of the patient’s head.
3. Pinch the patient’s nose by using the thumb and index finger of one hand and maintain the head tilt with the other hand.
4. Take a normal breath and blow for at least 1 second through the one-way valve on the face shield as you watch for the chest to rise.
5. Lift your mouth off the shield to allow the patient to exhale passively. Expired air will flow out under the face shield. Leave the shield on the patient’s face during resuscitation.
6. Rescue breathing should be performed 12 times per minute for an adult, 20 times a minute for a child or infant.
7. Every 5 minutes, reassess the need for continued assisted ventilation.
8. Oxygen delivery to the patient may be enhanced if the rescuer wears a nasal cannula dispensing oxygen at a flow rate of 6 L/min.
9. Face shields should be replaced by mouth-to-mask or bag-mask devices as soon as possible.
AGE-SPECIFIC CONSIDERATIONS
Pediatric
1. In children, respiratory problems are a more likely cause of cardiopulmonary arrest than underlying cardiac problems (AHA, 2006). Rescue breathing should begin immediately in apneic patients. In the out-of-hospital setting, notify the emergency medical services (EMS) after the first 2 minutes of rescue efforts on a pediatric patient. Rescue efforts should begin on an adult after the EMS system is activated.
2. For pediatric patients (birth to 8 years of age), the volume of ventilations should be sufficient to cause the chest to rise without causing gastric distention. Because of a wide variation in the compliance and size of children’s lungs (AHA, 2006), no prescribed volume or pressure is recommended.
3. Children’s airways are small and are easily obstructed by mucus, edema, or both. Frequent suctioning may be required. The tongue is the most common cause of airway obstruction in a child (AHA, 2006).
4. Hyperextension of the neck should be avoided in an infant or a small child, because it may obstruct the narrow, pliable airway. Pushing on the soft tissues under the chin may also obstruct the airway.
5. Use appropriately sized infant and pediatric masks.
6. Rescue breaths for pediatric patients should be slow (1 second), with only enough volume to cause the chest to rise. If the chest does not rise, reposition the patient’s head and reattempt ventilation.
7. Gastric distention occurs easily in infants and children, generally as a result of overly rapid delivery or excessive volume of ventilations. Distention can be minimized by delivering rescue breaths slowly (AHA, 2006).
Geriatric
1. Geriatric patients may have decreased pulmonary function associated with aging or chronic diseases. Ventilation may be difficult because of decreased vital capacity, decreased lung compliance, and poor alveolar gas exchange.
2. Dentures may interfere with artificial ventilation efforts. If they are loose or ill fitting, they should be removed.
COMPLICATIONS
1. Loss of oxygen and tidal volume caused by an ineffective seal around the face mask
2. Insufficient airway patency as a result of improper chin-lift or head-tilt position
3. Failure to recognize an obstruction caused by vomiting, excessive secretions, or bleeding in the upper airway
4. Ineffective chest rise resulting from ventilations that are too shallow
5. Gastric distention resulting from ventilations that are excessive in volume or that are delivered too rapidly
6. Improperly assembled one-way valve that does not permit air to enter the patient’s lungs
PROCEDURE 33 Bag-Mask Ventilation
CONTRAINDICATIONS AND CAUTIONS
1. Excessive airway pressure or tidal volume can cause gastric distention and pneumothorax.
2. Care should be taken to ensure a properly fitted mask and to provide a good seal. Frequently, two people are required to provide adequate ventilation to a nonintubated patient. One member of the team maintains the airway positioning and the mask seal while the other delivers the volume of air via the bag. Mouth-to-mask ventilation (see Procedure 32) may be more effective in some situations. One rescuer can provide adequate ventilation using a bag-mask device if the rescuer has some experience and practice with this device.
PATIENT PREPARATION
PROCEDURAL STEPS
1. Connect the oxygen tubing to the oxygen flowmeter and set at 10 to 15 L/min. Using a bag-mask with a reservoir significantly increases the oxygen concentration administered. If no oxygen is readily available, the bag-mask device can be used on room air until oxygen becomes available.
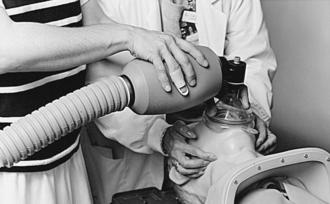
2. For the nonintubated patient, choose the appropriate size of mask and secure it to the bag. The mask should be large enough to seal around the mouth and nose without covering the eyes. Ensure that the equipment is functioning by placing the mask against your hand and noting the gas flow through the mask. Stand behind the patient’s head. Seat the mask on the face by covering the nose, the mouth, and the tip of the chin. The narrow end of the mask goes over the nose. Hold the mask firmly with your thumb over the patient’s nose and your fingers grasping the bony edge of the mandible (Figure 33-1). A two-person technique may be used with one team member maintaining the airway and mask seal while the other delivers the air from the bag (Figure 33-2).
3. To help minimize gastric inflation and passive regurgitation in the unconscious patient, consider the application of cricoid pressure (the Sellick maneuver) to minimize the passage of air into the esophagus. Using the fingers and thumb of one hand on either side of the trachea, gently compress the cricoid ring posteriorly (toward the cervical spine). This technique occludes the esophagus (Figure 33-3).
4. For the intubated patient, attach the bag to the connector or adapter of the endotracheal tube. When one hand is needed to maintain the head position, the free hand can compress the bag and thus inflate the lungs.
5. If two hands are not available to squeeze the bag, compress the bag against your thigh or chest or the stretcher to assist in decompressing the bag and generating additional tidal volume.
6. The gentle symmetrical rise and fall of the chest signals an adequate tidal volume and mask seal or endotracheal tube to bag seal. A tidal volume of 6 to 7 ml/kg or 400 to 600 ml over 1 second is recommended for bag-mask ventilation with oxygen. When no oxygen is connected to the bag-mask ventilation system, a slightly larger chest rise should be seen. A tidal volume of 10 ml/kg or 700 to 1000 ml given over 1 second is recommended with room air (AHA, 2005).
7. Ventilate at the rate indicated below (AHA, 2005):
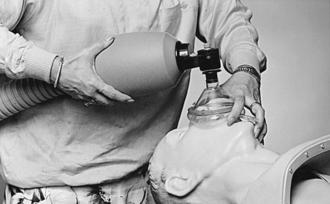
Figure 33-1 Application of a bag-mask by a single rescuer.
(From Jesudian, M. C. et al. [1985]. Bag-mask ventilation: Two rescuers are better than one: Preliminary report. Critical Care Medicine, 13[2], p. 122, with permission.)
Stay updated, free articles. Join our Telegram channel

Full access? Get Clinical Tree


