Part 5 Common Nursing Care Procedures
MEDICATION ADMINISTRATION
Safety Precautions
1. Take a drug allergy history.
2. Check the following five Rs for correctness:


3. Double-check drug and dosage with another nurse.
4. Always double-check the following:


5. May also double-check the following:


6. Be aware of drug-drug or drug-food interactions.
Oral Administration


Intramuscular Administration
Explain procedure to child as developmentally appropriate, and provide atraumatic care.
Follow Safety Precautions for administration of medications (see p. 411).
Select needle and syringe appropriate to the following:


If withdrawing medication from an ampule, use a needle equipped with a filter that removes glass particles; then use a new, nonfilter needle for injection. Replace needle after withdrawing medication from a vial.
Maintain aseptic technique, and follow Standard Precautions.
Provide for sufficient help in restraining the child; children are often uncooperative, and their behavior is usually unpredictable.
Determine the site of injection (see pp. 418-421); make certain that muscle is large enough to accommodate volume and type of medication.


Prepare area for puncture with antiseptic agent, and allow to dry completely.


Remove needle quickly; hold gauze firmly against skin near needle when removing it to avoid pulling on tissue.
Apply firm pressure with dry gauze to the site after injection; massage the site to hasten absorption unless contraindicated (e.g., with iron, dextran).
Clean area of prepping agent with water to decrease absorption of agent in neonate.
Discard syringe and needle in puncture-resistant container near site of use. Do not recap needle.
Subcutaneous and Intradermal Administration
Explain procedure to child as developmentally appropriate, and provide atraumatic care.
Maintain aseptic technique, and follow Standard Precautions.
Follow Safety Precautions for administration of medications (see p. 411).
Any site may be used where there are relatively few sensory nerve endings and large blood vessels and bones are relatively deep.


Subcutaneous and Intradermal Administration (cont’d.)
Subcutaneous Administration
Pinch tissue fold with thumb and index finger.
Using a dartlike motion, insert needle at a 90-degree angle. (Some practitioners use a 45-degree angle on children with little subcutaneous tissue or those who are dehydrated. However, the benefit of using the 45-degree angle rather than the 90-degree angle remains controversial.)
Aspirate for blood. (Some practitioners believe it is not necessary to aspirate before injecting subcutaneously; however, this is not universally accepted. Automatic injector devices do not aspirate before injecting.)
Intradermal Administration
Spread skin site with thumb and index finger if needed for easier penetration.
Insert needle with bevel up and parallel to skin.


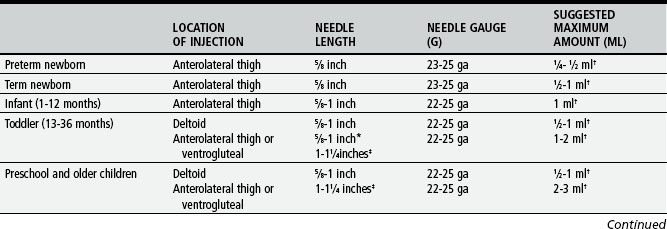
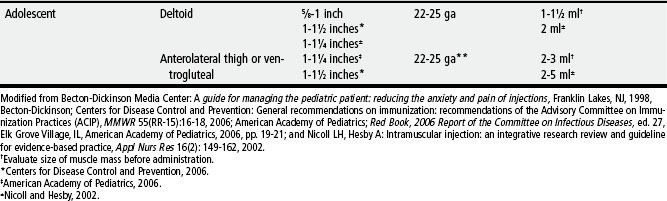
TABLE 5-2 Intramuscular Injection Sites in Children
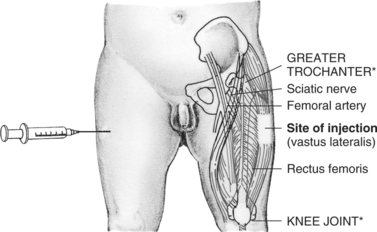
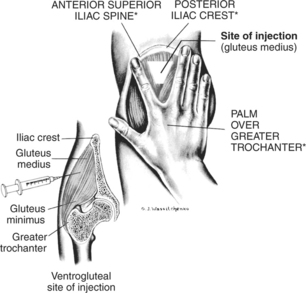
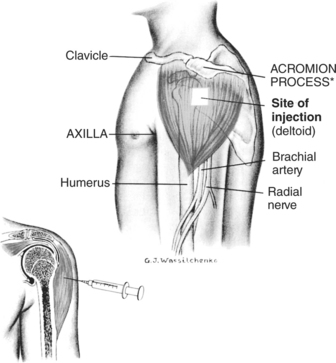
* Locations of landmarks are indicated by asterisks on illustrations.
Use of Insuflon for Subcutaneous Administration of Insulin
Small indwelling catheter placed in the subcutaneous tissues
The average indwelling time is 3 to 5 days.
The catheter is most often inserted in the abdomen, but the buttocks and other areas can also be used. Topical anesthetic cream is recommended before insertion.
Use needles that are 10 mm (0.39 inches) or shorter for injecting to avoid penetration of the tubing of the catheter.
Using indwelling catheters for up to 4 to 5 days does not affect the absorption of insulin.
The long-term (measured by HbA1c) and short-term glucose control (measured by blood glucose profiles and insulin levels) is not altered.
Intravenous Administration
Explain procedure to the child as developmentally appropriate, and provide atraumatic care.
Use pain prevention interventions before procedure.
Maintain aseptic technique, and follow Standard Precautions.
Follow Safety Precautions for administration of medications. (See p. 411.)
Assess the status of IV infusion to determine that it is functioning properly.
Inspect injection site to make certain the catheter or needle is secure.
Dilute the drug in an amount of solution according to the following:


Monitor until medication has been infused. Medication is not completely administered until solution in tubing has infused also (amount of solution depends on tubing length).
Procedure for Inserting and Taping a Peripheral Intravenous Catheter
Explain procedure to child as developmentally appropriate, and provide atraumatic care.
Verify order and confirm patient identity.
Follow manufacturer’s directions for all devices used.
Wash hands, and observe aseptic technique throughout procedure.
Choose catheter insertion site and an alternative site in case the initial attempt is unsuccessful.


For extremity veins, start with the most distal site, especially if irritating or sclerosing agents are to be used.
Apply a topical analgesic such as EMLA or LMX 4 to two sites.
Prepare insertion site by applying with friction an antiseptic solution.
Allow solution to dry completely, but do not blow, blot dry, or fan the area.
Apply tourniquet when site is ready for catheter insertion.
Stretch the skin taut downward below the point of insertion, upward above the site of insertion, or from underneath level with the point of insertion. This technique helps stabilize veins that roll or move away from the catheter as attempts are made to enter the vein.
Inspect catheter, looking for damage (e.g., bent stylet, shavings on the catheter, frayed catheter tip [follow employer’s policy for reporting defective devices]).
Insert catheter through the skin, bevel up, at a 15- to 30-degree angle, and enter the vein. This direct approach is best for large veins and allows the skin and vein to be entered in one step. The indirect approach for smaller veins enables the catheter to enter the vein from the side at an angle. It is sometimes helpful with short veins to start the catheter below the intended site and advance through the superficial layers of skin so that the advancement of the catheter in the vein is a shorter distance. In infants or children with very small veins, insert the catheter bevel down, which prevents the needle from puncturing the back wall of the vein and provides an earlier flashback of blood as the vein is entered.
Watch for blood return in the flashback chamber. Some 24-gauge catheters provide visualization of the flashback within the catheter, so immediate vein entrance is recognized before the needle punctures the back of the vessel or goes through the other side of the vessel.
Once the flashback is seen, lower the angle between the skin and catheter to 15 degrees. Advance the catheter another 1/16 to 1/8 inch to ensure that both the metal stylet and the catheter are inside the vein. Look closely at the IV catheter before inserting it, and note that the stylet tip is slightly longer than the catheter. It is necessary to have both pieces inside the vein before the catheter is advanced. Holding the stylet steady, push the catheter off the stylet and into the vein until the catheter hub is situated against the skin at the insertion site. Activate safety mechanism if necessary (some safety catheters are passive and activate automatically), remove the stylet, and discard into sharps container. Apply pressure to catheter within the vein to prevent backflow of blood before attachment of tubing.
Collect blood if ordered. Remove the tourniquet. Flush the IV line with NS to check for patency (ease of flushing fluid, lack of resistance while flushing), complaints of pain, or swelling at the site. If line flushes easily, proceed to secure the catheter to the skin.
Connect the T-connector, J-connector, injection cap, or tubing, and reinforce connection with a junction securement device (e.g., Luer-Lok, clasping device, threaded device) to prevent accidental disconnection and subsequent air embolism or blood loss.
Place transparent dressing across catheter hub, up to but not including the junction securement device, and surrounding skin.
Further secure the catheter to the skin using tape or adhesive securement devices (e.g., StatLock). Follow manufacturer’s directions for adhesive anchors.
Place a ¼ to ½-inch strip of clear tape across the width of the transparent dressing and the catheter hub, but avoid the insertion site. This will serve as an anchor tape strip, and all other tape will be affixed to this strip (tape-on-tape method). This strip will not compromise the transparent dressing properties or interfere with visual inspection of the catheter-skin insertion site.
To stabilize the catheter and junction securement device, attach 1 to 1½ inches of clear tape that is ¼ to ½ inch wide, adhesive side up, to the underneath side of the catheter hub and junction securement device at their connection. Wrap the ends of the tape around the connections, and meet on top to form a V shape (sometimes referred to as a chevron); secure the overlapping ends onto the anchor tape strip.
Loop the IV tubing away from the catheter hub and toward the IV fluid source. Secure the looped tubing with a piece of tape on the anchor tape strip. Be certain fingers or toes are visible whenever extremity is used.
Consider use of a commercial protective device (e.g., I.V. House) over the catheter hub and looped tubing. Bending one corner of the tape over and onto itself provides a free tab to lift the tape easily for site visualization.
Nasogastric, Orogastric, or Gastrotomy Tube Administration
Use elixir or suspension preparations of medication (rather than tablets) whenever possible.
Dilute viscous medication or syrup with a small amount of water if possible.
Avoid oily medications because they tend to cling to the sides of the tube.
If administering tablets, crush them to a very fine powder and dissolve drug in a small amount of warm water.
Never crush enteric-coated or sustained-release tablets or capsules.
Do not mix medication with enteral formula unless fluid is restricted. If adding a drug:


Check for correct placement of nasogastric (NG) or orogastric tube.
* Place 5 ml of air in the syringe. Connect the syringe to the tube.


Stay updated, free articles. Join our Telegram channel

Full access? Get Clinical Tree


