Section Three Breathing Procedures
PROCEDURE 18 Positioning the Dyspneic Patient
PROCEDURE 19 Drawing Arterial Blood Gases
PROCEDURE 20 Capillary Blood Gases
PROCEDURE 21 Pulse Oximetry and Carbon MonoxideOximetry
PROCEDURE 22 Assessing Pulsus Paradoxus
PROCEDURE 23 Peak Expiratory Flow Measurement
PROCEDURE 24 End-Tidal Carbon Dioxide Detection andMonitoring
PROCEDURE 18 Positioning the Dyspneic Patient
CONTRAINDICATIONS AND CAUTIONS
These positions can only be used if the patient is responsive and has an unobstructed airway.
PROCEDURAL STEPS
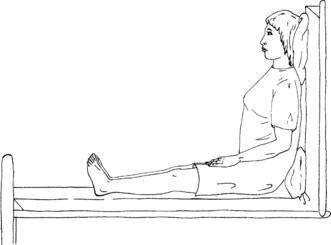
1. Raise the head of the bed to an upright position at a 90-degree angle.
2. Support the patient’s feet with a footboard if available.
3. This position is known as high Fowler’s position (Figure 18-1).
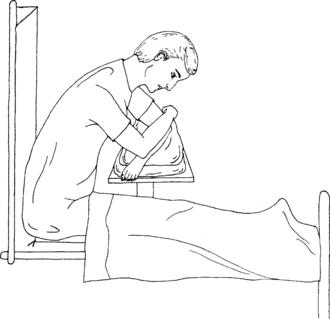
4. An alternative to the high Fowler’s position is the orthopneic position.
AGE-SPECIFIC CONSIDERATIONS
1. It is particularly important to allow the pediatric patient to assume a position of comfort, for example, sitting on the caregiver’s lap. This will decrease anxiety and facilitate spontaneous respirations. Even if it is not possible for the child to sit on the caregiver’s lap, it is extremely important to allow the caregiver to be present to help alleviate the child’s anxiety.
2. Infants and children will often assume a tripod position on their own to facilitate breathing when in respiratory distress.
3. Avoid the use of pillows in small infants as this can cause flexion of the airway and further compromise their respiratory status.
4. Before about age 6 months, infants will need to be treated in a supine position or while being held by a caregiver, because their ability to hold up the head and maintain a patent airway is compromised by their limited neck strength and relatively heavy head (ENA, 2004).
PROCEDURE 19 Drawing Arterial Blood Gases
Arterial blood gases are also known as ABGs.
INDICATIONS
1. To evaluate acute respiratory distress and assist in determining therapeutic interventions
2. To document the existence and severity of a problem with oxygenation or carbon dioxide exchange
3. To analyze acid-base balance
4. To evaluate the effectiveness of respiratory interventions, for example, continuous ventilatory assistance or oxygen therapy
CONTRAINDICATIONS AND CAUTIONS
Proceed with caution and avoid arterial sticks in the following circumstances:
1. Previous surgery in the area (e.g., cutdown, femoral artery surgery, fistula, shunt for dialysis graft, or if artery was used in a coronary artery bypass graft)
2. Patients on anticoagulants or with known coagulopathy
3. Skin infection or other damage to the skin (e.g., burns) at the puncture site
4. Decreased collateral circulation
6. Serious injury to the extremity
7. Fibrinolytic therapy or a candidate for it
8. Patients with femoral grafts or cellulitis (femoral punctures are contraindicated)
9. Patients who have had a cardiac catheterization via the brachial route or who have sclerotic vessels (brachial punctures are contraindicated)
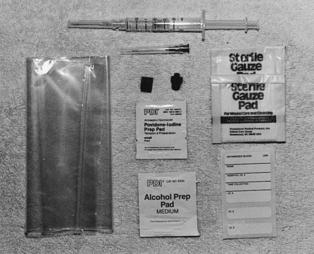
EQUIPMENT
20- to 25-G needle with a clear hub (smaller gauge should be used for a radial puncture)
23- or 25-G butterfly needle (for pediatric patients)
Heparin 1:1000 (if the syringe is not preheparinized)
Most of the above equipment is usually available in a prepackaged kit (Figure 19-1).
PATIENT PREPARATION
1. Select the puncture site on the basis of the clinical situation, how rapidly the sample must be obtained, and the circulatory status of the patient. The preferred site in most patients is the radial artery. The femoral artery is commonly used in critically ill or injured adult patients. However, hematoma or hemorrhage from a failed puncture may be more difficult to control from the femoral site.
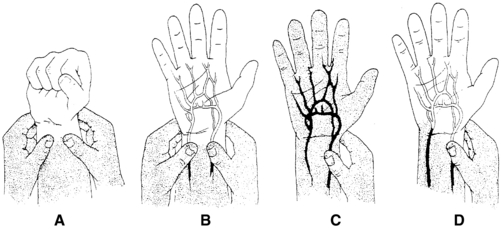
2. If the radial artery is chosen as the puncture site, it is optional to check for the patency of the collateral circulation to the hand by performing a modified version of Allen’s test. Some sources dispute the reliability and accuracy of Allen’s test (McGregor, 1987; Stead & Stirt, 1985; Williams & Schenken, 1987). Interrater reliability with the Allen’s test is poor, and radial artery puncture has been performed on patients with an abnormal Allen’s test without subsequent hand ischemia so it should not be considered a standard of care (Barone & Madlinger, 2006).
If used, the modified Allen’s test is performed as follows:
PROCEDURAL STEPS
1. Prepare the syringe (if not preheparinized). Draw up 1 to 2 ml of heparin and rotate the syringe to coat the barrel. Holding the syringe upright, expel the heparin and air bubbles from the syringe, leaving heparin only in the dead space of the syringe and needle.
2. Palpate the pulse and determine the point of maximal impulse. Do not insert the needle if a pulsation cannot be felt (Stroud & Rodriguez, 2004).
3. Local anesthesia may be useful in particularly anxious patients. Inject approximately 0.2 to 0.3 ml of anesthetic subcutaneously on either side and above the artery. Aspirate before injecting the anesthetic to avoid injecting it into the vessel. Wait 3 to 4 minutes to allow for effective anesthesia to be in place.
4. Cleanse the overlying skin with an antiseptic solution.
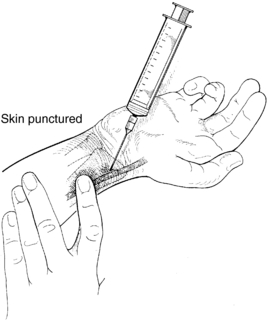
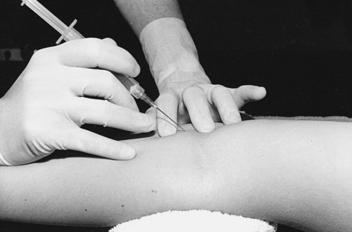
5. Use the index finger of your free hand to palpate the arterial pulse just proximal to the puncture site (Figure 19-3). An alternative technique is to bracket above and below the arterial pulsation with two fingers of one hand and perform the puncture between the two fingers (Figure 19-4).
6. Grasp the syringe as if holding a pencil. Direct the needle with the bevel up, and puncture the skin slowly at approximately a 30- to 45-degree angle to the radial or brachial artery (90 degrees to the femoral artery). Watch the needle hub constantly for the appearance of blood.
7. When blood appears, stop advancing the needle, and allow the blood to flow freely into the syringe. The blood should fill the syringe without aspiration, except in patients with severe hypotension. In these patients, red arterial blood should appear spontaneously in the needle hub. At this time, gentle aspiration may be used to obtain the sample. Some ABG syringes have a vented plunger that must be occluded if aspiration is necessary.
8. If the syringe fails to fill after an initial flash of blood, both walls of the artery may have been pierced. Withdraw the needle slightly until the tip reenters the artery and blood flows into the syringe. If the needle fails to enter the artery and a good pulse is still present, withdraw the needle to just above the bevel and redirect it to the point of maximal impulse.
9. The disappearance of a pulse usually indicates an arterial spasm or hematoma formation. If this occurs, withdraw the needle immediately, apply direct pressure, and select another site.
10. Obtain a sample of 1 to 2 ml. Remove the needle from the artery. Immediately apply direct pressure to the puncture site with dry gauze for 3 to 5 minutes; apply pressure for at least 10 minutes with patients receiving anticoagulants or with clotting disorders (Stroud & Rodriguez, 2004). The following steps a through c should be performed by an assistant:
11. Place a dry, sterile gauze dressing over the puncture site and secure it firmly with tape. Reassess the site in 15 minutes for bleeding or hematoma formation (Stroud & Rodriguez, 2004).
AGE-SPECIFIC CONSIDERATIONS
1. Sites in children include the radial, brachial, temporal, dorsalis pedis, and posterior tibial arteries. The risk of complications is higher when the brachial artery is used so it is usually avoided. The femoral site should not be routinely used in infants and children (Lozon, 2004). The radial artery is the most frequently used site in children.
2. EMLA or ELA-Max, topical anesthetics, may be used for children, see Procedure 135 for complete information.
3. For a child, a 23- or 25-G butterfly needle attached to a syringe can be used. Both the needle and the syringe must be heparinized and the heparin must be fully expelled (Lozon, 2004).
4. In infants, continuous gentle aspiration is necessary during puncture and blood collection (Lozon, 2004).
5. Draw approximately 0.5 to 1 ml of blood for blood gas analysis in a pediatric patient; verify the minimum acceptable amount with your laboratory.
COMPLICATIONS
1. The most common complications are bleeding, hematoma, and thrombosis formation. Compression neuropathies may occur secondary to hematomas caused by arterial punctures (Stroud & Rodriguez, 2004).
2. Nerve injury may occur with inadvertent puncture of the nerve.
3. Avoiding arterial puncture in patients who take or have had heparin, warfarin, fibrinolytics, or glycoprotein IIb/IIIa inhibitors within 12 hours may assist in preventing large hematomas. If the patient is taking any of these medications, carefully consider the necessity for the arterial puncture and apply pressure for 10 minutes or longer after the artery is punctured.
4. If air bubbles are not removed from the sample, the PO2 can increase and yield inaccurate test results.
5. The blood sample may clot if the heparin and blood are not mixed adequately.
Barone J.A., Madlinger R.V. Should Allen’s test be performed before radial artery cannulation? Journal of Trauma-Injury Infection & Critical Care. 2006;61:468–470.
Lozon M.M. Pediatric vascular access and blood sampling techniques. In: Roberts J.R., Hedges J.R. Clinical procedures in emergency medicine. 4th ed. Philadelphia: Saunders; 2004:357–383.
McGregor A.D. The Allen test: An investigation of its accuracy by fluorescein angiography. Journal of Hand Surgery (British). 1987;12:82–85.
Stead S.W., Stirt J.A. Assessment of digital blood flow and palmar collateral circulation. International Journal of Clinical Monitoring and Computing. 1985;2:29–34.
Stroud S., Rodriguez R. Arterial puncture and cannulation. In: Reichman E.F., Simon R.R. Emergency medicine procedures. New York: McGraw-Hill; 2004:398–410.
Williams T., Schenken J.R. Radial artery puncture and the Allen test. Annals of Internal Medicine. 1987;106(1):164–165.
PROCEDURE 20 Capillary Blood Gases
Capillary blood gases are also known as cap gases, CBGs, or mixed venous gases.
INDICATION
To obtain a capillary blood specimen for blood gas analysis when arterial access is unavailable or frequent sampling is indicated. Capillary blood gas values do not vary from arterial blood gas values to a degree of clinical significance when the samples are properly collected from normotensive patients (Yang et al., 2002; Yildizdas et al., 2004).
CONTRAINDICATIONS AND CAUTIONS
1. Collection and analysis may be adversely affected in the presence of poor peripheral perfusion secondary to peripheral vasoconstriction, hypothermia, or hypoperfusion (Escalante-Kanashiro & Tataleán-Da-Fieno, 2000).
2. Use a proper size of lancet (3 mm) to avoid too deep a puncture.
3. Avoid bruised or inflamed sites for sampling. Repetitive sampling from the same site may cause inflammation or scarring and should be avoided.
PATIENT PREPARATION
1. Warm the area to be punctured for approximately 5 to 7 minutes before drawing the blood. This “arterializes” the capillary and increases the accuracy of the analysis. Warming can be accomplished with a chemical pack specifically manufactured for this purpose or a warm moist towel. If a towel is used, be sure it is not hot enough to burn the patient.
PROCEDURAL STEPS
1. Instill heparin into the pipette to coat the walls. Be careful not to leave extra heparin in the pipette; a coating of the inner wall is all that is necessary.
2. Cleanse the site with antiseptic solution and perform the puncture.
3. Wipe away the first drop of blood with gauze and then completely fill the heparinized pipette with blood, making sure that no air bubbles enter the tube. Place the tip of the capillary tube as close to the puncture site as possible to decrease exposure to environmental oxygen.
4. Seal one end of the pipette with the cap or with clay.
5. Insert two metal fleas into the open end. Run the magnet up and down along the length of the pipette to move the fleas through the blood sample and mix with the heparin.
6. Seal the open end of the pipette with a cap or with clay.
7. Label the pipette, place it in a bag on ice, and send it to the laboratory immediately. Document the FiO2 and temperature.
AGE-SPECIFIC CONSIDERATIONS
1. For infants, punctures to the lateral or medial aspect of the heel are used to obtain capillary gas samples. The preferred sites for older children and adults are the finger or the earlobe.
2. When warming the heel of an infant, take special care so as not to burn the patient. Chemical hot packs made for adult use are too hot to be used on an infant.
3. Capillary blood gas samples should not be drawn from the heel of a patient who has begun walking and has callus development, nor should they be drawn from the fingers of neonates, to avoid nerve damage.
COMPLICATIONS
1. Inability to obtain enough blood
2. Obtaining a contaminated blood sample. Usually a blood sample becomes contaminated with interstitial fluid when the area is “milked” for blood or if not all air bubbles are removed.
3. Clotted sample from improper mixing
4. Infection or scarring at the puncture site
5. Inaccurate results if analysis of the specimen is delayed. Consult your laboratory for specimen handling and transport requirements.
Stay updated, free articles. Join our Telegram channel

Full access? Get Clinical Tree


