- The principles of patient sample collection
- Units of measurement used in clinical laboratories
- The concept of the normal (reference) range
- The concept of test sensitivity/specificity
- The concept of critical values
- Difference between (blood) plasma and (blood) serum
Laboratory investigation of patient samples is the sum of three distinct phases:
In this chapter some general principles relating to pre- and post-testing procedures are discussed.
Pre-testing procedures
It is difficult to over emphasise the importance of good practice during the pre-testing phase of laboratory investigation. The production of high quality, accurate results which are clinically useful depends as much on practice before the sample reaches the laboratory as it does on the analytical process within the laboratory. Aspects of the pre-testing phase that need to be considered are:
- The pathology request form.
- The timing of sample collection.
- Sampling technique.
- Collecting the right amount of sample.
- Sample containers and labelling.
- Safety during collection and transport of samples.
This chapter is concerned with principles only. The detail of pre-testing will be considered again under each test heading. However, it must be remembered that practice, although based on the principles in this book, does vary between laboratories. There is no real substitute for consultation with your local laboratory. Clinical pathology departments are now mandated to publish a manual – usually available online – for users (doctors and nurses) of local pathology services. Such user manuals provide the detail of local pre-testing procedures that should guide practice in this area.
Pathology request form
Each patient sample must be accompanied by the appropriate fully completed pathology request form, signed by the doctor or in some instances, where that responsibility has been delegated, the specialist nurse practitioner making the request. Attention to detail is particularly vital for blood transfusion requests. Most cases of incompatible blood transfusion are the result of documentation errors. All pathology request forms should include the following information set:
- Patient details, including: full name, date of birth and hospital number.
- Hospital ward/clinic or GP surgery.
- Nature of specimen (e.g. venous blood, urine, biopsy etc.).
- Date and time of sample collection.
- Name of test requested (e.g. blood glucose, full blood count).
- Clinical details (these should very briefly explain why the test is being requested and may include a suspected or provisional diagnosis or symptoms).
- Details of any drug therapy that might affect test analysis or interpretation.
- An indication, where relevant, of the urgency of the request.
- Some health authorities request details about budget cost centres.
Timing of sample collection
Whenever possible, samples should be taken to coincide with routine transport to the laboratory, so that they can be processed by the laboratory without undue delay. It is not good practice to leave samples for more than a few hours or overnight before sending them to the laboratory; in many cases the samples will be unsuitable for analysis. For a few biochemical tests, for example, blood hormone levels, it is vital that blood is sampled at a particular time of the day. For others (e.g. blood glucose) it is simply important to know what time the sample is collected. Some tests (e.g. blood gases) require that samples be processed immediately they are taken. Collection of these must be timed by prior agreement with the laboratory. Samples for microbiological investigation are best taken before antibiotic therapy is started, since antibiotics will inhibit the growth of bacteria in culture.
Sampling technique
Venous blood collection
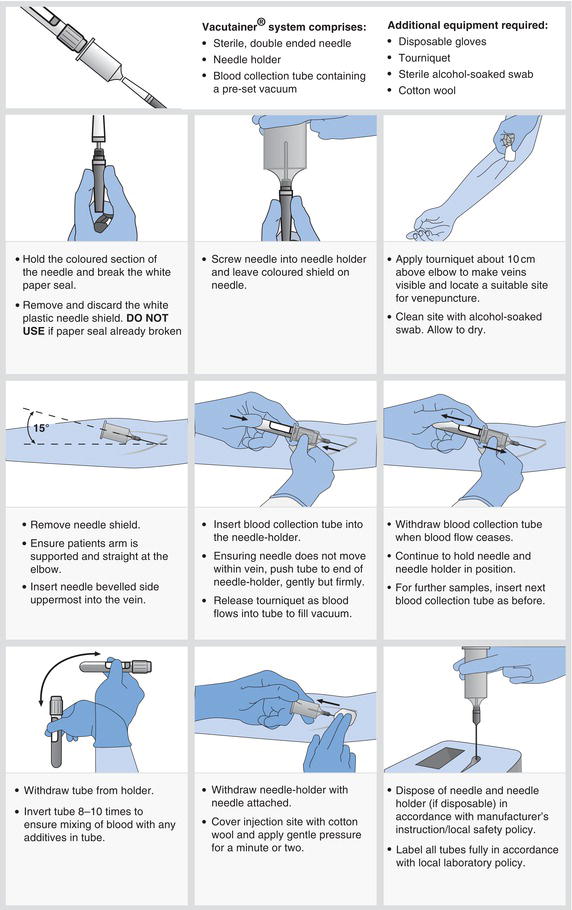
Most blood tests are performed on venous blood collected by a technique known as venepuncture, using either a needle and syringe or, more commonly, an evacuated tube system (Figure 2.1).
- Patients may be anxious at the prospect of a venepuncture. A calm confident manner is important. Explain in simple terms what is involved and that mild discomfort or pain is usually felt as the needle is inserted.
- If there is a history of fainting during blood collection, take the sample with the patient lying down.
- When performing venepuncture on a patient receiving IV fluids, do not take blood from the arm used for IV administration. This avoids the risk of IV fluid contamination of the sample.
- Haemolysis (the rupture of red cells) during blood collection may render the sample unsuitable for analysis. This can occur if blood is forced at speed through narrow gauge needles or if the sample is shaken vigorously. When using syringe and needle technique, remove the needle before expelling blood into the sample container.
- Prolonged use of a tourniquet can affect laboratory results. Avoid the use of a tourniquet if possible and do not collect blood if tourniquet has been in place for more than one minute or two. Release the tourniquet and try the opposite arm.
- Although the cephalic or basilic vein in the forearm at the elbow is the usual preferred site, veins in the back of the hand or the foot provide alternative sites, for those with ‘difficult’ veins.
Capillary blood collection
Capillary blood can be recovered by a simple skin puncture with a sterile lancet, usually on the finger tip or, in the case of neonates and babies, the heel of the foot. It is useful if only very small sample volumes (less than 1 ml) are required. The technique can be performed by patients themselves and is routinely used, after training, by diabetic patients to obtain samples for self-monitoring of blood glucose concentration.
- The finger tip or heel is wiped with alcohol. A sterile lancet or autolet device is used to puncture the cleansed skin on the side of the finger tip or heel. Puncturing the ball of the finger tip is more painful.
- Undue pressure to ‘squeeze’ blood out, can cause inaccurate results; blood must flow freely.
- Blood should be collected immediately into an appropriate container, designated for capillary samples and mixed gently by inversion.
- Pressure must be applied to the puncture site with a sterile gauze until blood flow ceases.
Arterial blood collection
The only test that requires sampling of blood from arteries is blood gases. The technique, which is more hazardous and painful than venepuncture, is described in Chapter 7.
Urine collection
Four kinds of urine collection are commonly made:
- A mid stream urine (MSU).
- A catheter specimen urine (CSU).
- An early morning urine (EMU).
- A 24 hour urine (i.e. all the urine passed during a 24 hour period).
The test requested determines which of these is appropriate. For most non-quantitative purposes, such as dipstick testing and microbiological testing, an MSU is necessary. This is a small 10–15 ml sample of urine collected part way through micturition, which can be collected at any time of the day. A CSU is the urine sample collected from a patient who has an indwelling urinary catheter. The detail of collecting an MSU and CSU for microbiological examination is provided in Chapter 21.
The first urine passed in the day, the so called EMU is the most concentrated and an EMU provides the best method of detecting substances in the urine which are present only in low concentration. An example of its use is pregnancy testing. The urine pregnancy test is based on detection of a hormone, human chorionic gonadotrophin (HCG), which is not normally detectable in urine, but is excreted in increasing concentration during the first few months of pregnancy. Early in pregnancy, the concentration is so low that unless a concentrated urine (i.e. an EMU) is used, the result may be falsely negative.
Sometimes it is useful to know exactly how much of a particular substance (e.g. sodium, potassium) is being lost from the body in urine, on a daily basis. Quantitation of this urinary loss can only be made by collecting all the urine passed during a 24 hour period. The detail of collecting a 24 hour urine is provided in Table 2.1.
Sputum, swab collection
All these specimens are destined for microbiological examination and the object is to sample only from infected sites, whilst avoiding bacterial contamination from other sites on the body or from the environment. For example, a sputum specimen is intended to reflect the environment of the respiratory tract, not the mouth. Saliva is not sputum. Sputum is best collected first thing in the morning and must be coughed up from the lungs. Washing out the mouth before sampling reduces the risk of salivary contamination. When collecting throat swabs it is important to ensure that the swab does not come into contact with the tongue or sides of the mouth. This can be avoided by use of a tongue depressor. The swab should be gently rubbed only over the area at the back of the mouth (pharynx) and tonsils, especially inflamed areas.
Table 2.1 Protocol for collection of 24-hour urine.
| Clinical diagnosis or monitoring is occasionally aided by measurement of the rate of urinary excretion of a substance normally present in urine. This requires collection of a timed (usually 24 hour) urine sample. The validity of results of these tests depends crucially on an accurately timed sample; the object is to collect ALL urine passed during the 24 hour period.
|
Notes: Sometimes a patient’s 24-hour urine volume exceeds the 2 l capacity of the collection container. If this is the case a second container must be obtained to complete the collection. ALL the urine passed MUST be collected.
If the patient inadvertently discards some urine during the collection period, all the urine collected to that point must be discarded, a new container obtained and collection restarted.
The urine container should be stored in the ward sample fridge during the collection period.
Wound swabs are obtained by sampling the affected site only, avoiding contact with surrounding normal skin or tissue. When collecting any microbiological specimen, it is important to minimise environmental contamination by using aseptic technique and replacing swabs back in sterile containers or transport medium immediately.
Tissue (biopsy) collection
A very brief reference to tissue sampling techniques necessary for histopathological examination has already been made in Chapter 1. Such sampling is always the responsibility of doctors and is beyond the scope of this book. Nurses are however involved in sampling of cervical cells for the cervical smear test (Chapter 24).
Collecting the right amount of sample
The amount of blood required for laboratory testing is governed largely by local laboratory equipment and is therefore a matter of local laboratory policy. In general, continuing technological advance serves to significantly reduce the amount of blood required for tests. The local laboratory user guide includes a list of tests with the minimum blood volume requirements. Anyone responsible for blood collection must be familiar with this local list. Some blood specimen bottles contain pre-weighed amounts of chemical preservatives and/or anticoagulants that determine the optimum volume of blood that the bottle should contain; this volume is stated on the side of the bottle. Erroneous results may occur if these blood volume instructions are not observed.
Whilst the volume of urine collected for MSU and CSU is not critical, it is vital, when collecting 24 hour urines, that all the urine passed in the collection period is collected, even if a second collection bottle is required.
In general, the size or amount of sample is important for successful isolation of bacteria. For example, it is more likely that bacteria will be isolated from a large specimen of sputum than a small specimen. Aspiration of pus with a needle and syringe is more likely to result in isolation of the causative organism than a swab of the pus. Falsely negative blood culture results can occur if insufficient blood is added to culture bottles.
Sample containers
Pathology laboratories supply a bewildering array of sample bottles and containers. Each container has specific uses; it is vital for accurate results that the correct container is used for the test requested. Guidance on this is contained within the local laboratory user manual.
The colour coded tops of blood sample containers indicate the chemicals, either in liquid or powder form, that they contain (Table 2.2). These chemicals serve two main purposes: prevention or acceleration of blood clotting; and preservation of blood cell structure or the concentration of some blood constituent. It is important that these chemicals are well mixed with the blood sample by repeated gentle inversion of the sample bottle.
A preservative may be necessary to preserve urine during collection of a 24 hour urine. The need for a preservative is determined by the substance in urine to be measured.
All sample containers for microbiological examination, for example, urine, swabs, blood culture bottles etc., are sterile and should not be used if seals are broken. Some bacteria will only survive outside the body if preserved in special transport media.
The structure of tissue samples is preserved by ‘fixing’ the tissue in formalin. Biopsy sample containers contain this preservative.
All sample containers must be fully labelled including patient’s full name, date of birth and location (ward, clinic or GP). Laboratories receive many hundreds of specimens every day, which may include specimens from two or more patients with the same name. It is vital, if results are to find their way back to the correct patient records, that specimen labels accurately and fully identify the patient. Inadequately labelled specimens or labelled specimens that cannot be incontrovertibly linked to the accompanying pathology request card may be rejected by the laboratory, resulting in the need for the patient to be re-tested; an entirely avoidable waste of time and resources for both patient and staff.
Table 2.2 Some common additives present in blood collection tubes.
| Additive | Purpose |
| Ethylenediaminetetraacetate EDTA) – present as the potassium salt of this acid, i.e. K+-EDTA Colour code of tube top: lavender/ purple | An anticoagulant that prevents blood from clotting by binding to and effectively removing the calcium present in blood (calcium is required for clotting to occur). EDTA also preserves the structure of blood cells. Principle use of EDTA tubes: full blood count (FBC) and some other haematology tests. |
| Heparin – present as the sodium or potassium salt of this acid, i.e. sodium or potassium heparin Colour code of tube top: dark green or orange | An anticoagulant that prevents blood from clotting by inhibiting the formation of thrombin from prothrombin. Principle use of heparin tubes: chemistry tests that require blood plasma. |
| Citrate – present as the sodium salt of this acid, i.e. sodium citrate Colour code of tube top: light blue | An anticoagulant that prevents blood from clotting by precipitating calcium, similar in action to EDTA. Principle use of citrate tube: coagulation study tests. |
| Oxalate – present as either the sodium or ammonium salt of this acid, i.e. sodium or ammonium oxalate Colour code of tube top: yellow or grey | An anticoagulant that prevents blood from clotting by precipitating calcium, similar in action to EDTA. Principle use of oxalate: used with sodium fluoride (see sodium fluoride entry) in tubes specifically for blood glucose measurement. |
| Sodium fluoride Colour code of tube top: yellow or grey | This is an enzyme poison that prevents continued metabolism of glucose by blood cells and thereby preserves blood glucose concentration. Principle use of sodium fluoride: used with oxalate in tubes specifically for blood glucose measurement. |
| Clot activator and gel Colour code of tube top: red or gold | This speeds up the blood clotting process and aids the separation of blood serum from blood cells. Principle use of clot activator/gel tubes: chemistry tests that require blood serum. |
Safety during sample collection and transport
All laboratories have a locally written safety policy relating to the safe collection and transport of patient specimens, based on the premise that all patient specimens are potentially hazardous. Anyone involved in sample collection should be familiar with this policy. Among the many hazards that may be present in pathological specimens are viruses that cause AIDS and hepatitis, both of which can be transmitted by contact with infected blood. Tuberculosis can be transmitted by contact with infected sputum and gastrointestinal infections by contact with infected faeces. Good practice can have a major impact in reducing the risk to all staff and patients. The detail of good practice is included in the local safety policy. Some general points are included here.
- Disposable surgical gloves should be used during sample collection to reduce the risk of infection spread. Open sores offer an entry-point for microbial pathogens.
- Safe disposal of syringe and needles is vital. Needle stick injuries provide an excellent way of inoculating yourself with patient’s blood, which may contain an infective virus.
- Leaking specimens present a major and surprisingly frequent potential hazard which can be prevented by the simple expedient of ensuring sample bottles are not overfilled and tops are well secured. Most clinical laboratories have a policy of discarding leaking specimens.
- Specimens should be transported in specially designed plastic bags which include a separate compartment for the accompanying pathology test request form.
- Specimen spillages should be dealt with in accordance with local policy.
- The use of additional protection (eye goggles, disposable gown) should be considered when collecting samples from patients known to be infected with HIV, or other blood transmissible virus e.g. those that cause viral hepatitis. Specimens from such patients should be clearly identified in some way according to locally agreed policy.
Topics relating to interpretation of laboratory results
The diversity of techniques used to examine patient samples results in many types of laboratory report. Anyone who has filed pathology reports in patient case notes will have noticed that test results may be expressed quantitatively, semi-quantitatively or qualitatively. All reports from the histopathology laboratory, for example, are qualitative; they take the form of highly technical written text, describing the appearance of tissue samples when viewed microscopically. The text will include a summary of the clinical significance of any deviations in appearance from that of normal tissue. Microbiological reports tend to be either qualitative or semi-quantitative. Text describes which pathogenic micro-organisms have been isolated from the sample, but the sensitivity of these micro-organisms to antibiotics tested is reported semi-quantitatively. In contrast, most reports from clinical chemistry and haematology laboratories are quantitative; they take the form of numerical results. As with any other numerical measurement (e.g. body weight, temperature, pulse rate), all quantitative results reported by clinical laboratories are defined by the unit of measurement.
Units of measurement used in clinical laboratories
Systeme international d’Unites (SI units)
Since the 1970s all units of scientific and clinical measurement in the UK have been based, wherever possible, on the SI system, devised in 1960. In the US non SI units continue to be used in the reporting of clinical laboratory results, so that care must be taken when interpreting laboratory results reported in US medical and nursing journals. Of the seven basic SI units (Table 2.3) only three are relevant to clinical laboratories. They are:
- the metre (m),
- the kilogram (kg),
- the mole (mol).
Although everyone is familiar with the metre as a unit of length and kilogram as a unit of mass or weight, the mole requires some explanation.
Table 2.3 The seven basic SI units.
| Basic SI unit | Measure of | Abbreviation/symbol |
| metre | length | m |
| kilogram | mass (weight) | kg |
| second | time | s |
| ampere | electric current | A |
| Kelvin | temperature | K |
| mole | amount of a substance | mol |
| candela | luminous intensity | cd |
What is the mole (mol)?
The mole is defined as the quantity of a substance whose mass in grams is equal to its particle (i.e. molecular or atomic) weight. This is a useful measure because 1 mole of any substance contains the same number of particles, that is 6.023 × 10²³. This is known as Avogadro’s number.
Examples
What is 1 mole of sodium (Na)?
Sodium is an element (single atom) whose atomic weight is 23.
Therefore 1 mole of sodium is 23 g of sodium
What is 1 mole of water (H2O)?
Water is a molecule, composed of 2 atoms of hydrogen and 1 atom of oxygen.
The atomic weight of hydrogen is 1.
The atomic weight of oxygen is 16.
Therefore the molecular weight of water is (2 × 1) + 16 =18.
Therefore 1 mole of water is 18 g of water.
What is 1 mole of glucose?
A molecule of glucose is composed of:
6 carbon atoms,
12 hydrogen atoms,
6 oxygen atoms.
The molecular formula of glucose is written C6H12O6.
The atomic weight of carbon is 12.
The atomic weight of hydrogen is 1.
The atomic weight of oxygen is 16.
Therefore the molecular weight of glucose is

Therefore 1 mole of glucose is 180 g glucose.
Thus 23 g of sodium, 18 g of water and 180 g of glucose all contain 6.023 × 10²³ particles, either atoms in the case of sodium or molecules in the case of water and glucose. Knowing the molecular formula of any substance allows the use of mole as a unit of amount. For some molecular complex chemicals present in blood, for example, proteins, the precise molecular weight cannot be defined. The unit of amount (mole) cannot be used when measuring such substances; instead the kilogram is used.
Multiples and fractions of basic SI units
When the basic SI unit (metre, kilogram, or mole) is too large or too small for the measurement being made, it is convenient to use secondary units which are multiples or fractions of the basic unit. The SI system is decimal so that SI secondary units are expressed as powers of ten of the basic unit. Table 2.4 describes the most commonly used secondary SI units of length, mass (weight) and amount used in clinical and laboratory medicine.
Units for measuring volume
Strictly speaking the SI unit of volume should be based on the metre, that is cubic metre (m3), cubic centimetre (cm3), cubic millimetre (mm3) etc.
However when the SI system was adopted for clinical measurements, it was decided to retain the litre as a measure of fluid volume because it was already in use and is almost exactly the same as 1000 cm3. In fact, 1 litre = 1000.028 cm3.
The litre (L or l) then is the basic ‘SI’ unit of volume. From this are derived the following secondary units of volume used in clinical and laboratory medicine:
decilitre (dL or dl) is 1/10 (one tenth or 10–1) of a litre
centilitre (cL or cl) is 1/100 (one hundredth or 10–2) of a litre
millilitre (mL or ml) is 1/1000 (one thousandth or 10–3) of a litre
microlitre (μL or µl) is 1/1 000 000) (one millionth or 10–6) of a litre
Note: 1 ml = 1.028 cm3
Units of concentration
Nearly all quantitative analysis of patient specimens involves determination of the concentration of a substance in blood or urine. Concentration is defined as the amount or mass (weight) of a substance that is contained in a specified volume of fluid. Units of concentration then comprise two elements; the unit of amount or mass (weight) and the unit of volume. For example, if we weigh out 20 g (mass) of salt and dissolve it in 1 l (volume) of water we have a solution of salt whose concentration is 20 g per litre. In this case the unit of mass (weight) is the gram and the unit of volume is the litre and the SI unit of concentration is gram per litre or g/L. Where the molecular weight of the substance being measured is precisely defined, as it is for many of the blood born chemicals measured in clinical laboratories, the mole (unit of amount) is used.
Table 2.4 Secondary SI units of length, mass (weight) and amount used in laboratory medicine.
| BASIC UNIT OF LENGTH – metre (m) |
Secondary units
|
| BASIC UNIT OF MASS (WEIGHT) – kilogram (kg) |
Secondary units
|
| BASIC UNIT OF AMOUNT – mole (mol) |
Secondary units
|
The ‘real’ examples given here demonstrate some of the variety of units used in the chemical analysis of blood.
Examples
What does the result ‘plasma sodium 144 mmol/L’ mean?
Every litre of blood plasma contains 144 mmol of sodium, that is (144 × 23) mg or 3.3 g.
What does the result ‘plasma albumin 23 g/L’ mean?
There are 23 grams of albumin in every litre of blood plasma.
What does the result ‘plasma iron 9 µmol/L’ mean?
Every litre of blood plasma contains 9 micromoles of iron, that is (9 × 0.055) mg or 0.5 mg.
What does the result ‘plasma B12 300 ng/L’ mean?
There are 300 ng or 0.0000003 g of the vitamin B12 in every litre of blood plasma.
Units of cell count
Much haematology testing involves counting the concentration of cells in blood. Here the unit of amount is the number of cells and the unit of volume is again the litre. Healthy individuals have between 4 500 000 000 000 (i.e. 4.5 million million) and 6 500 000 000 000 (i.e. 6.5 million million) red cells in every litre of blood. The unit of red cell count is the number of million million cells there are in 1 l of blood, expressed in short notation as 1012 per litre or 1012/L. This allows the use of manageable numbers so that in normal practice we might say a patient has a red cell count of 5.3. This does not of course mean the patient has only 5.3 red cells; rather in every litre of blood, the patient has 5.3 million million red cells. There are far fewer white cells than red cells in blood and this is reflected in the unit of the white cell count, which is 109/L or the number of thousand million cells in every litre of blood.
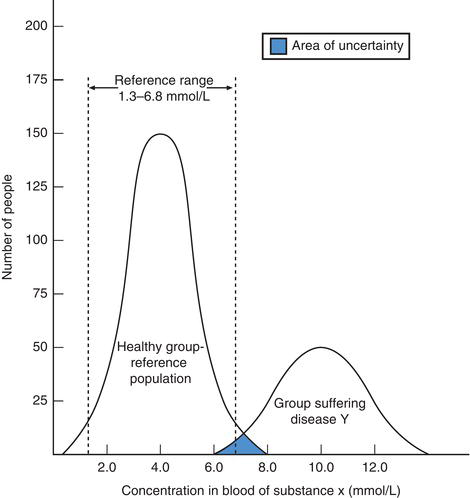
The reference (normal) range
When making any clinical measurement, for example weighing a patient or measuring pulse rate, results are interpreted by reference to what is normal. The same is true of tests performed on patient samples.
All quantitative tests have a reference range recorded alongside patient test results to aid interpretation. Biological variation determines that just as there is no clear cut demarcation between normal and abnormal height and weight, there is no clear cut demarcation between normal and abnormal concentration of any constituent of blood and urine. The use of the term reference range in preference to normal range is recognition of this limitation. Reference ranges are constructed by measuring the substance in question in a large population of apparently healthy ‘normal’ individuals.
Figure 2.2 Demonstrating reference (normal) range for theoretical substance x and the overlap in blood concentration of x among healthy individuals and those suffering theoretical disease y (see text for explanation).
Stay updated, free articles. Join our Telegram channel

Full access? Get Clinical Tree


