Section Two Airway Procedures
PROCEDURE 3 Airway Positioning
PROCEDURE 4 Airway Foreign Object Removal
PROCEDURE 5 Oral Airway Insertion
PROCEDURE 6 Nasal Airway Insertion
PROCEDURE 7 Laryngeal Mask Airway
PROCEDURE 8 General Principles of EndotrachealIntubation
PROCEDURE 9 Rapid Sequence Intubation
PROCEDURE 10 Oral Endotracheal Intubation
PROCEDURE 11 Nasotracheal Intubation
PROCEDURE 12 Retrograde Intubation
PROCEDURE 16 Percutaneous Transtracheal Ventilation
PROCEDURE 3 Airway Positioning
CONTRAINDICATIONS AND CAUTIONS
1. In an unconscious trauma patient or a patient with a known or suspected neck injury, the head and neck should be maintained in a neutral position without neck hyperextension. Use the jaw-thrust or chin-lift maneuver to open the airway in this situation. In resuscitation, maintaining a patent airway is a priority; the head-tilt/chin-lift maneuver may be used if the jaw thrust does not open the airway (AHA, 2005).
2. Positioning alone may be insufficient to achieve and maintain an open airway. Additional interventions, such as suctioning, oral/nasal airway insertion, and intubation, may be indicated.
PROCEDURAL STEPS
1. Place the patient in a supine position.
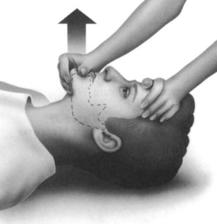
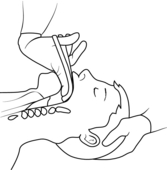
2. For the head-tilt/chin-lift maneuver, lift the chin forward to displace the mandible anteriorly while tilting the head back with a hand on the forehead (Figure 3-1). This maneuver results in hyperextension of the neck and is contraindicated when a neck injury is suspected or known to be present.
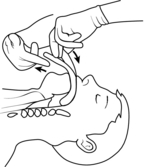
3. If the head-tilt/chin-lift maneuver is unsuccessful or contraindicated, use either the jaw-thrust or the chin-lift maneuver.
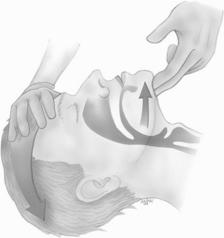
Figure 3-1 Head-tilt/chin-lift maneuver.
(From Sanders, M. [2003]. Mosby‘s paramedic textbook [2nd ed]. St. Louis: Mosby, p. 397.)
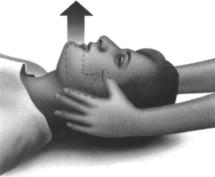
Figure 3-2 Jaw thrust.
(From Emergency Nurses Association. [2002]. Trauma nursing core course: Provider manual [5th ed]. Des Plaines, IL: Author, p. 364.)
AGE-SPECIFIC CONSIDERATIONS
1. For the head-tilt/chin-lift maneuver in the infant or child, place one hand on the patient’s forehead and tilt the head gently back into a neutral position. The neck should be slightly extended. This is known as the “sniffing position.” Hyperextension of an infant’s neck may cause airway compromise or obstruction due to the relative flexibility of their trachea. Place fingers under the bony part of the lower jaw at the chin and lift the mandible upward and outward. Use caution not to close the mouth or push on the soft tissues under the chin because these maneuvers may obstruct the airway.
2. All children should be allowed to maintain a position of comfort. This is particularly important in children presenting with symptoms of epiglottitis, such as high fever, drooling, and respiratory distress. Forcing them into a supine position could obstruct the airway. Allow the child to maintain a position of comfort until definitive airway management is available.
COMPLICATIONS
1. If the airway remains obstructed, suctioning should be completed, and then an oropharyngeal or nasopharyngeal airway should be inserted. (See Procedures 5, 6, and 29.)
2. Injury to the spinal cord may occur if the head and/or neck is moved in patients with cervical spine injuries.
3. If your fingers press deeply into the soft tissue under the chin, blood vessels or the airway could be obstructed.
PROCEDURE 4 Airway Foreign Object Removal
Abdominal thrusts are also known as the Heimlich maneuver.
INDICATION
1. Sudden inability to speak or cry
3. Universal sign for choking: clutching the neck (AHA, 2005a)
4. Noisy airflow (high-pitched sounds) during inspiration
5. Accessory muscle use during respiration and increasing work of breathing
6. Weak or ineffective cough or an inability to cough
7. Absence of spontaneous respirations or cyanosis
8. Infants or children with a sudden onset of respiratory distress associated with coughing, gagging, stridor, or wheezing (AHA, 2005a)
CONTRAINDICATIONS AND CAUTIONS
1. In the conscious patient, a voluntary cough generates the greatest airflow and may relieve the obstruction. Do not interfere with the patient’s attempts to cough up the obstruction.
2. Chest thrusts should not be used in the patient who has a chest injury, for example, flail chest, cardiac contusion, or sternal fractures.
3. In the advanced stages of pregnancy or in the markedly obese, chest thrusts are recommended (AHA, 2005b).
4. Correct hand placement is essential to avoid injury to underlying organs during the delivery of abdominal thrusts.
PATIENT PREPARATION
1. The patient may be sitting, standing, or supine.
2. Suction any blood or mucus you can visualize in the patient’s mouth.
3. Remove broken or loose-fitting dentures.
4. Be prepared to perform more definitive airway management, such as cricothyrotomy (see Procedure 15).
5. Before performing abdominal thrusts on a conscious adult or child, ask the person if he or she is choking. If the victim nods yes and cannot talk, communicate that you are going to help.
Procedural Steps (Adult or Child Older Than Age 1)
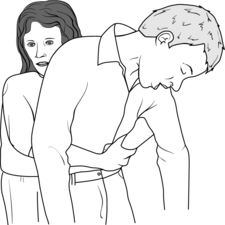
1. Stand or kneel behind the victim and wrap your arms around the victim’s waist.
2. Make a fist with one hand and place the thumb side of your fist against the abdomen of the victim, just above the navel but below the xiphoid process.
3. Grasp your fist with your other hand and press into the victim’s abdomen with a quick upward thrust (Figure 4-1).
4. Thrusts should be repeated, each as a separate, distinct movement, until the object is expelled or the victim becomes unresponsive.
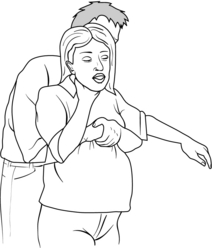
5. For the pregnant or obese patient, the chest thrust may be performed. The patient may be supine, sitting, or standing. Put one hand directly over the other and position the bottom hand at the midsternal area above the xiphoid process (mid-nipple line, the same position used in external cardiac massage). Thrust straight down toward the spine. If necessary, repeat chest thrusts several times to relieve airway obstruction (Figure 4-2).
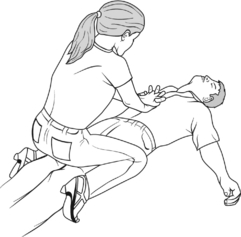
6. If the victim becomes unresponsive, open the airway, remove any object you can see, and begin cardiopulmonary resuscitation (CPR). Each time the airway is opened for breaths, assess for an object and remove it if seen. If nothing is seen, continue with CPR (AHA, 2005c) (Figure 4-3).
7. * For complete obstruction in an unconscious patient, where thrusts are ineffective, use Magill forceps with direct laryngoscopy before ventilation to facilitate removal of the obstruction (Walls, 2004) or surgical cricothyroidotomy.
AGE-SPECIFIC CONSIDERATIONS
Infant (Younger Than Age 1 Year)
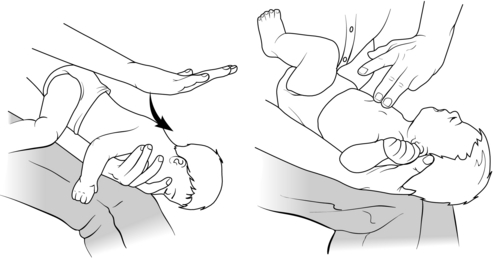
1. Kneel or sit with the infant in your lap, and hold the infant prone with the head slightly lower than the chest. Support the infant’s head and jaw with your hand (Figure 4-4).
2. Deliver up to five forceful back slaps between the shoulder blades using the heel of your hand.
3. Turn the infant supine, supporting the head and neck and keeping the infant’s head lower than the trunk.
4. Give up to five quick downward chest thrusts in the same location as for chest compressions, just below the nipple line. Thrusts should be delivered at a rate of about one per second with enough force to dislodge the foreign body (AHA, 2005b, 2002c; ACEP and AAP, 2004).
5. Steps 1 through 4 are continued until the object is expelled or the infant loses consciousness.
6. If the infant becomes unresponsive, open the airway, remove any object you can see, and begin CPR. Each time the airway is opened for breaths, assess for an object and remove it if seen. If nothing is seen, continue with CPR (AHA, 2005a).
7. * For complete obstruction in which ventilation is not possible, use Magill forceps with direct laryngoscopy to facilitate removal of the obstruction (ACEP and AAP, 2004) or perform a cricothyroidotomy (see Procedure 15).
American College of Emergency Physicians (ACEP) and American Academy of Pediatrics (AAP). APLS: The pediatric emergency medicine resource, 4th. Boston: Jones and Bartlett Publishers, 2004.
American Heart Association. Advanced pediatric life support: Instructors manual. Dallas: Author, 2005.
American Heart Association. Basic life support for healthcare providers. Dallas: Author, 2005.
American Heart Association. ACLS provider manual. Dallas: Author, 2005.
Walls R. Foreign body in the adult airway. In: Walls R., Murphy M., Luten R., Schneider R. Manual of emergency airway management. 2nd ed. New York: Lippincott Williams & Wilkins; 2004:307–311.
PROCEDURE 5 Oral Airway Insertion
The oral airway is also known as an oropharyngeal airway, OPA, Guedel airway, or Berman airway.
INDICATIONS
To maintain airway patency for patients in the following situations:
1. An unconscious spontaneously breathing patient with an airway obstruction caused by an impaired gag reflex and a loss of tone to the submandibular muscles.
2. Unsuccessful airway opening by other maneuvers, such as the head tilt, the chin lift, and the jaw thrust.
3. A patient ventilated by a bag-mask device. The oral airway elevates the soft tissues of the posterior pharynx, easing ventilation and minimizing gastric insufflation.
4. An orally intubated patient who bites/clenches the endotracheal tube; the oral airway is used as a bite block.
5. An unconscious patient during suctioning, to facilitate the removal of a patient’s oral secretions (AHA, 2005).
CONTRAINDICATIONS AND CAUTIONS
1. Insertion of an oral airway in a conscious or semiconscious patient stimulates the gag reflex and may stimulate airway spasm or cause the patient to retch and to vomit (AHA, 2005).
2. Incorrect placement of an oral airway may compress the tongue into the posterior pharynx and cause further obstruction (Vrocher & Hopson, 2004).
3. An airway that is too small may push the tongue into the oropharynx and cause an obstruction, and an airway that is too large may obstruct the trachea (Vrocher & Hopson, 2004).
4. Failure to clear the oropharynx of foreign material before insertion of the airway may result in aspiration.
5. To avoid vomiting and aspiration, the oropharyngeal airway should be removed immediately after the patient regains a gag reflex.
PATIENT PREPARATION
1. Place the patient in a supine position.
2. Suction blood, secretions, or other foreign material from the patient’s oropharynx.
3. Select the appropriately sized oropharyngeal airway. Table 5-1 lists usual airway sizes by age. Align the tube on the side of the patient’s face, so the airway extends from the level of the central incisors with the bite block portion parallel to the hard palate. The tip of the appropriate size airway will meet the angle of the jaw (AAP, 2006).
Table 5-1 Oral Airway Sizing by Age
| Age | Oral Airway Size |
|---|---|
| Premature infant | 000 |
| Neonate | 00 |
| Full-term infant | 0 |
| 1-3 yr | 1 |
| 3-8 yr | 2 |
| Large child, small adult | 3 |
| Medium adult | 4 |
| Large adult | 5, 6 |
PROCEDURAL STEPS
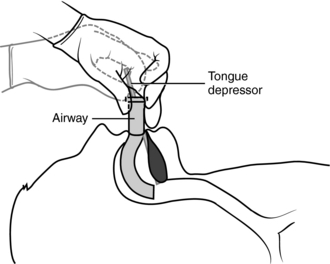
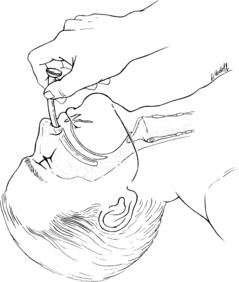
1. Use a tongue blade to depress and displace the tongue forward. Insert the airway with the curve pointing up, and advance it over the tongue into the oropharynx (Figure 5-1).
2. As an alternative procedure for adults and adolescents, insert the airway upside down (with the curve pointing toward the back of the patient’s head) into the mouth. As the tip of the airway reaches the posterior wall of the pharynx, rotate the airway 180 degrees to the proper position.
3. The distal tip of the airway should lie between the base of the tongue and the back of the throat. The flange of the tube should sit comfortably on the lips.
4. Reassess the airway patency, and auscultate the lung for equal and clear breath sounds during ventilation.
AGE-SPECIFIC CONSIDERATION
For pediatric patients, depress and displace the tongue forward with a tongue blade and insert the airway (described in step 1 above). Do not insert an upside-down airway and then rotate it (described in step 2 above), because this technique may injure the soft tissue of the oropharynx (AAP, 2006).
American Academy of Pediatrics (AAP). Pediatric education for prehospital professionals, 2nd. Boston: Jones and Bartlett, 2006.
American Heart Association (AHA). Textbook of advanced cardiac life support. Dallas: Author, 2005.
Vrocher D., Hopson L. Basic airway management and decision-making. In: Roberts J.R., Hedges J.R. Clinical procedures in emergency medicine. 4th ed. Philadelphia: Saunders; 2004:53–68.
PROCEDURE 6 Nasal Airway Insertion
Nasal airways are also known as nasopharyngeal airways and nasal trumpets.
INDICATIONS
The nasal airway is indicated in the following situations:
1. There is a question of patency of the posterior nasopharynx with intact upper airway reflexes.
2. Bag-mask ventilation is ineffective because of difficulty maintaining a patent airway; use of a nasopharyngeal airway may facilitate ventilation. The nasal airway may be used in combination with the oropharyngeal airway in this setting.
3. Insertion of an oropharyngeal airway is technically difficult or impossible because of massive trauma around the mouth, such as mandibulomaxillary wiring.
4. To decrease soft tissue trauma when frequent nasotracheal suctioning is necessary (AHA, 2005; Vrocher & Hopson, 2004).
CONTRAINDICATIONS AND CAUTIONS
1. The insertion of a nasal airway may stimulate the gag reflex and cause the patient to vomit.
2. If the tube is too long, it may enter the esophagus and cause gastric insufflation and hypoventilation (AHA, 2005).
3. Epistaxis may occur and may lead to aspiration of blood.
4. Nasal airways should not be used in patients who have extensive facial trauma or a basilar skull fracture.
PROCEDURAL STEPS
1. Select an appropriately sized nasal airway. Use the largest airway that will pass easily through the naris. Sizing is labeled by a number indicating the inside diameter in millimeters, and sizes are available for neonates through adults. An endotracheal tube can be used if the correct size nasopharyngeal airway is not available. Measure the length of the nasopharyngeal airway from the tip of the nose to the tragus of the ear (ENA, 2004).
2. Vasoconstriction of the mucous membranes may be indicated. Agents commonly prescribed for this purpose include phenylephrine (Neo-Synephrine) or cocaine spray or liquid (Vrocher & Hopson, 2004).
3. Lubricate the tube with water-soluble gel or anesthetic jelly.
4. Pass the airway along the floor of the nostril with the bevel facing the nasal septum (Figure 6-1). Direct the airway posteriorly and rotate it slightly toward the ear until the flange rests against the nostril. Note that all nasal airways have a bevel that is angled for insertion into the right naris. The airway may be used in the left naris. Place the airway in the left naris with the bevel facing the nasal septum. The nasopharyngeal airway curvature will be opposite of the natural nasal curvature. Once the airway tip has reached the correct position, rotate the airway 180 degrees.
5. If resistance is met, a slight rotation of the tube may facilitate passage as the device reaches the hypopharynx. Insertion should never be forced.
American Heart Association (AHA). American Heart Association Guidelines for cardiopulmonary resuscitation and emergency cardiovascular care. Circulation. 112(suppl. IV), 2005.
Emergency Nurses Association (ENA). Emergency nursing pediatric course provider manual, 3rd. Des Plaines, IL: Author, 2004.
Vrocher D., Hopson L. Basic airway management and decision-making. In: Roberts J.R., Hedges J.R. Clinical procedures in emergency medicine. 4th ed. Philadelphia: Saunders; 2004:53–68.
PROCEDURE 7 Laryngeal Mask Airway
The laryngeal mask airway (LMA) resembles an endotracheal tube with a spoon-shaped mask at one end. The spoon-shaped mask has an inflatable collar that forms a seal around the larynx (Murphy, 2004; Walls, 2006) (Figure 7-1).
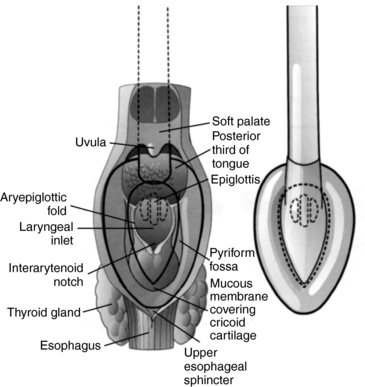
Figure 7-1 Dorsal view of the laryngeal mask airway (LMA) showing position in relation to pharyngeal anatomy.
(Courtesy of LMA North America, Inc.)
The LMA provides a reliable and more secure means of ventilation than the face mask. Training in the insertion of the LMA is less complex than that for endotracheal intubation, and there may be advantages over intubation in the prehospital setting, where access to the patient is limited. Although some risk of aspiration is present, studies have shown that emesis is more likely with mask ventilation than with the LMA (Walls, 2006).
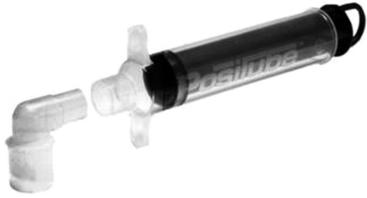
The LMA is manufactured solely by Laryngeal Mask Company Limited (San Diego, CA). Four types of LMA devices are produced: the LMA Classic (a reusable LMA), the LMA Unique (a disposable LMA designed like the classic), the LMA Fastrach (designed to facilitate tracheal intubation with an endotracheal tube), and the LMA ProSeal (LMA, 2003).
The LMA ProSeal is designed to do the following (Brain, Verghese, and Strube, 2000; LMA, 2006; Vrocher & Hopson, 2004):
• Improve the laryngeal seal without increasing mucosal pressures
• Separate the respiratory and alimentary tracts
• Provide higher airway seal pressures for use with positive-pressure ventilation
INDICATIONS
1. The LMA is used as an alternative to a face mask during manual ventilation. The LMA is not intended to be used instead of intubation for continued ventilation (LMA North America, 2005; Murphy, 2004; Urocher and Hopson, 2004; Walls, 2006). It may be used in the operating suite for short procedures when lighter anesthesia levels are preferred.
2. In an emergency, the LMA may serve as a temporary route for gas exchange in failed intubation scenarios until definitive airway control is achieved (Murphy, 2004; Pollack, 2001; Walls, 2006). A laryngoscope is not required and the insertion technique allows the user to rapidly obtain an airway for ventilation. Studies have shown that the LMA provides equivalent ventilation compared with the endotracheal tube (AHA, 2005).
CONTRAINDICATIONS AND CAUTIONS
1. The patient must have absent glossopharyngeal and laryngeal reflexes and be unresponsive.
2. The LMA does not constitute definitive airway control. It does not protect the airway from gastric content aspiration and should be used only in a patient with an empty stomach.
3. The LMA is not indicated for patients with decreased pulmonary compliance, because the low-pressure seal that is formed around the larynx may not allow adequate ventilation (Murphy, 2004).
EQUIPMENT
LMA (Table 7-1 provides sizing information.)
Oxygen source and connecting tubing
For intubating LMA (Fastrach): accompanying silicone-tipped endotracheal tube
Table 7-1 Laryngeal Mask Airway Sizing and Cuff Inflation Volumes
| Patient Weight | Recommended LMA Size | Maximum Cuff Inflation Volume |
|---|---|---|
| Less than 5 kg | 1 | Up to 4 ml |
| 5-10 kg | 1.5 | Up to 7 ml |
| 10-20 kg | 2 | Up to 10 ml |
| 20-30 kg | 2.5 | Up to 14 ml |
| Greater than 30 kg | 3 | Up to 20 ml |
| Normal-size and large adults | 4 | Up to 30 ml |
| Large adults | 5 | Up to 40 ml |
Modified from LMA North America (2005). Laryngeal mask airway instruction manual. San Diego: Author.
PATIENT PREPARATION
1. Preoxygenate the patient with bag-mask ventilation.
2. If necessary, administer sedation, as prescribed. Deep sedation or an unconscious state is required for LMA use (Murphy, 2004).
3. Position the patient with the head extended and the neck flexed (except in patients with potential cervical spine injury). During LMA insertion, it may be helpful to push the patient’s head from behind to maintain this position.
PROCEDURAL STEPS
LMA Classic, LMA Unique
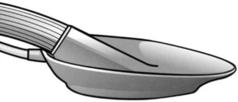
1. * Inflate the cuff to check for leaks and deflate it to form a spoon shape (Figure 7-2).
2. *Coat the posterior surface of the LMA with a water-soluble lubricant.
3. *Grasp the LMA by positioning your index finger in the crease between the airway tube and the laryngeal mask.
4. *Insert the LMA with the cuff tip gliding against the posterior pharyngeal wall.
5. *Using your index finger to push the LMA, apply slight backward (toward the ears) pressure and follow the anatomic curve.
6. *Advance the mask until resistance is noted at the hypopharynx (Figure 7-3).
7. *Remove the index finger while applying slight pressure to the airway tube for the prevention of dislocation (Figure 7-4).
8. *Inflate the cuff with air; the volume varies with the LMA size (see Table 7-1). During inflation, release the LMA to ensure that placement is maintained as the cuff expands.
9. Assess the LMA placement. The following signs indicate an appropriate placement:
10. Ventilate the patient with a bag-valve and supplemental oxygen.
11. Secure the LMA with tape or a securing device; a bite block may be used (LMA, 2005).
Intubating LMA (Fastrach)
1. * Deflate the cuff of the mask and apply a water-soluble lubricant to the posterior surface. Distribute the lubricant over the anterior hard palate.
2. *Place the curved metal tube in contact with the chin and the mask tip flat against the palate before advancing.
3. *Rotate the mask into place with a circular motion, maintaining pressure against the palate and the posterior pharynx.
4. *Inflate the mask. Without holding the tube or handle, inflate cuff to a pressure of 60 cm H2O (Murphy, 2004).
Intubating through the intubating LMA (Fastrach) (LMA, 2005; Murphy, 2004)
LMA North America educational literature states that the Fastrach should be used in situations when blind intubation is anticipated. The LMA Instruction Manual states the success rate using the LMA Classic varies from 20% to 100% depending on the person’s skill and experience (LMA North America, 2005).
1. * Validate endotracheal tube (ETT) cuff integrity.
2. *Deflate the ETT cuff, lubricate the ETT, and pass it through the intubating LMA tube. Rotate and move the ETT up and down to ensure adequate distribution of water-soluble lubricant.
3. *Advance the ETT to the 15-cm depth indicator. This position signifies passage of the tip of the ETT through the epiglottic opening of the LMA.
4. *Use the handle to gently lift the device 2 to 5 cm. A slight resistance is felt as the ETT is advanced.
5. *Advance until intubation is complete.
6. Inflate the ETT cuff and confirm intubation (see Procedure 8).
7. *Remove the LMA. Remove the ETT connector, and gently ease the intubating LMA out over the ETT into the oral cavity while using the stabilizer rod to hold ETT in position as the LMA is pulled over the tube.
8. *Remove the stabilizer rod and hold onto the ETT at the level of the incisors.
9. *Remove the LMA completely.
10. Replace the ETT connector.
AGE-SPECIFIC CONSIDERATIONS
An appropriately sized LMA is effective for use in infants and children of all weights (see Table 7-1) (LMA, 2006; Luten and Kissoon, 2004). When intubation of the pediatric patient is not possible, the LMA is acceptable for use by skilled providers (AHA, 2005) and LMAs are used routinely with pediatric patients in the surgery suite.
American Heart Association (AHA). American Heart Association guidelines for cardiopulmonary resuscitation and emergency cardiovascular care. Circulation. 112(suppl. IV), 2005. Available on-line at www.circulationaha.org
Brain A.I.J., Verghese C., Strube P.J. The LMA ProSeal: A laryngeal mask with an oesophageal vent. British Journal of Anaesthesia. 2000;84(5):650–654.
LMA North America (2005). Airway instruction manual. Retrieved December, 13, 2006, from http://www.lmana.com/prod/components/education_center/instructions_for_use.html
Luten R., Kissoon N. Pediatric airway management. In: Walls R., Murphy M., Luten R., Schneider R. Manual of emergency airway management. 2nd ed. Philadelphia: Lippincott Williams & Wilkins; 2004:212–227.
Murphy M. Laryngeal mask airway. In: Walls R., Murphy M., Luten R., Schneider R. Manual of emergency airway management. 2nd ed. Philadelphia: Lippincott Williams & Wilkins; 2004:97–109.
Pollack C. The laryngeal mask airway: A comprehensive review for the emergency physician. Journal of Emergency Medicine. 2001;20(1):53–66.
Vrocher D., Hopson L. Basic airway management and decision-making. In: Roberts J.R., Hedges J.R. Clinical procedures in emergency medicine. 4th ed. Philadelphia: Saunders; 2004:53–68.
Walls R.M. Airway. In: Marx J.A., Hockberger R.S., Walls R.M. Rosen’s emergency medicine: Concepts and clinical practice. 6th ed. Philadelphia: Mosby; 2006:2–26.
PROCEDURE 8 General Principles of Endotracheal Intubation
Endotracheal intubation refers to the procedure of inserting a tube directly into the trachea. The endotracheal (ET) tube (ETT) may be placed through the nose or the mouth. Methods of insertion include visual (using laryngoscopy), blind (through the nose), digital (also blind), or facilitated using a flexible fiberoptic bronchoscope, the Eschmann tracheal tube introducer, a gum elastic bougie, or a lighted stylet. Details of oral and nasal intubation procedures are included in Procedures 10 and 11.
INDICATION
1. Protects the trachea and lungs from aspiration of gastric contents, saliva, or blood and fluid into the upper airway (Vrocher & Hopson, 2004).
2. Provides an airway for mechanical ventilation in the presence of failure of ventilation or oxygenation (Walls, 2004).
3. Allows direct access to the lungs for removal or suctioning of secretions (Walls, 2004).
4. Allows tracheal administration of emergency medications for rapid absorption through the pulmonary tree (AHA, 2005).
CONTRAINDICATIONS AND CAUTIONS
1. There are no absolute contraindications to endotracheal intubation; however, the procedure should be considered carefully when it is performed in a patient with any of the following (Lutes & Hopson, 2004; Vrocher & Hopson 2004; Walls, 2004):
2. Epiglottitis complicates any intubation attempt because of the potential for laryngospasm and complete airway obstruction. Ideally, intubation of the patient with epiglottitis should be performed in the most controlled setting with the most skilled intubator. Contingency planning should include set-up for the performance of a surgical airway.
3. Specific precautions exist for each method of endotracheal intubation. These are discussed in the procedures devoted to nasal and oral intubation.
EQUIPMENT
Stylets to fit each size of endotracheal tube
10-ml syringe for inflating the cuff of the tube
Lubricating or lidocaine jelly for nasal intubation
Benzocaine, cocaine, or phenylephrine hydrochloride (Neo-Synephrine) drops or spray for nasal intubation (optional)
Medications as prescribed for paralysis and sedation (see Procedure 9)
Tube-securing device (commercially manufactured device or tape)
Adjuncts as indicated, e.g., bronchoscope, lighted stylet, or elastic gum bougie
Bag-mask device with reservoir connected to 100% oxygen
Additional supportive equipment:
PATIENT PREPARATION
1. Preoxygenate the patient with 100% oxygen by using a nonrebreather oxygen mask or a bag-mask device as indicated.
2. Administer sedatives, paralytic agents, or topical anesthesia as prescribed (see Procedure 9, Rapid Sequence Intubation).
3. Restrain the patient as indicated to prevent inadvertent extubation.
PROCEDURAL STEPS
Intubate
The specific steps of intubation depend on the method of insertion used. See Procedures 10 and 11 for specific directions for oral and nasal intubation.
Confirm Tube Placement
No single confirmation technique is completely reliable; therefore, both clinical assessment and other methods should be used to assess appropriate tube placement immediately after insertion as well as after moving the intubated patient (AHA, 2005; Walls, 2004).
1. Epigastric sounds/chest rise: With the first ventilation, auscultate over the epigastric area while observing for chest rise (AHA, 2005). The presence of burping sounds over the epigastrium in the absence of chest rise suggests esophageal placement. Remove the tube immediately, and reoxygenate the patient before attempting intubation again.
2. Breath sounds: Auscultate the right and left axilla, and then the right and left anterior chest for equal bilateral breath sounds. Unilaterally absent or decreased breath sounds (usually on the left) suggest that the tube was advanced into a mainstem bronchus. Withdraw the tube slightly and reassess until breath sounds are equal bilaterally.
3. End-tidal carbon dioxide detection and/or monitoring also helps confirm tube placement (see Procedure 24). These devices are recommended as a secondary technique of tube confirmation in patients with adequate perfusion (AHA, 2005). If the patient is poorly perfused or in cardiac arrest, there may be minimal CO2 expiration even when the tube is properly placed.
4. Esophageal detector devices: These devices are attached to the ETT, and suction is applied with a bulb or syringe device. If the ETT is in the esophagus, the tissue will collapse around the tube when suction is applied and there will be resistance to filling of the bulb or syringe. If the ETT is in the trachea, the bulb or syringe will fill with air easily. These devices are recommended for secondary confirmation of tube placement for the adolescent or adult patient in cardiac arrest (AHA, 2005).
5. Direct visualization of the tube passing through the cords with the laryngoscope.
6. Bag compliance: Ventilation of the stomach is easier than ventilation of the lungs, whereas tube obstruction, bronchospasm, or tension pneumothorax makes ventilation more difficult.
7. Condensation in the ETT on exhalation suggests that the tube is positioned in the trachea.
8. Transillumination of the neck using a lighted stylet: If the neck glows after intubation with the lighted stylet, the tube is placed correctly in the trachea (Murphy & Hung, 2004).
9. Pulse oximetry: Maintenance of adequate oxygen saturation helps confirm tube placement.
10. Presence of gastric contents in the ETT: Material resembling food present in the tube may indicate esophageal intubation.
11. Cuff palpation may be used to verify the appropriate placement within the trachea in reference to the carina and the bronchi. After the cuff is inflated, and with the patient’s head in a neutral position, gently palpate at the suprasternal notch while holding the pilot balloon in your other hand. Advance or withdraw the tube slightly. When the pilot balloon is maximally distended in response to pressure at the suprasternal notch, the tube is appropriately positioned within the trachea (Kaur & Heard, 2003; Pollard & Lobato, 1995).
12. Chest radiographic documentation of the tube location in the trachea just above the carina.
Secure the Endotracheal Tube
1. A bite block or oral airway should be inserted after oral intubation to prevent the patient from biting the tube and occluding the airway.
2. To allow suctioning and mouth care, the mouth must not be completely occluded by tape or other devices.
3. The method used should prevent the inadvertant advancement or withdrawal of the tube.
4. When possible, the method used should minimize pressure points on the skin to prevent long-term complications.
5. When tape is used, it should encircle the head completely for maximum security.
6. When possible, the markings on the tube should be noted at the patient’s teeth and documented so that movement of the tube can be checked visually.
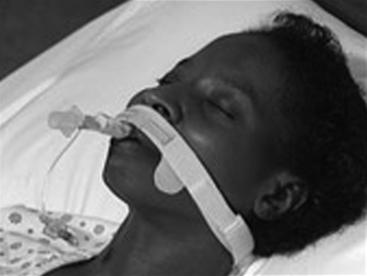
7. The commonly used methods include commercial tube-securing devices (follow the manufacturer’s directions) or tape (Figure 8-2). Apply tape as follows:
AGE-SPECIFIC CONSIDERATIONS
1. Several methods exist for estimating the correct tube size (Table 8-1), usually based on age and weight. Other methods include the following:
Stay updated, free articles. Join our Telegram channel

Full access? Get Clinical Tree


