Section Seventeen Musculoskeletal Procedures
PROCEDURE 111 Spinal Immobilization
PROCEDURE 113 General Principles of Splinting
PROCEDURE 115 Body Jewelry Removal
PROCEDURE 118 Traction Splints
PROCEDURE 119 Pelvic Splinting
PROCEDURE 120 Sling Application
PROCEDURE 121 Shoulder Immobilization
PROCEDURE 122 Knee Immobilization
PROCEDURE 123 Finger Immobilization
PROCEDURE 124 Plaster and Fiberglass Splinting
PROCEDURE 125 Removal and Bivalving of Casts
PROCEDURE 126 Elastic Bandage Application
PROCEDURE 127 Skeletal Traction
PROCEDURE 130 Measuring Compartmental Pressure
PROCEDURE 131 Measuring and Fitting for Ambulation Aids
PROCEDURE 132 Patient Teaching for Ambulation Aids
PROCEDURE 111 Spinal Immobilization
INDICATIONS
Trauma with history of loss of consciousness, altered level of consciousness, or intoxication
Unconsciousness or confusion with potential for unwitnessed trauma
CONTRAINDICATIONS AND CAUTIONS
1. Evacuation should precede immobilization in the presence of an environmental hazard, such as fire or noxious fumes.
2. Preexisting spinal deformities secondary to conditions such as arthritis or ankylosing spondylitis may require modification of these procedures to align the head and neck in a normal position for the patient.
3. If realignment maneuvers cause additional pain or muscle spasm or compromise the airway, the maneuvers should be stopped immediately and the patient should be immobilized in the position found. If the patient holds the head rigidly angulated or is unable to move the head, realignment is contraindicated, and the patient should be immobilized in the position found.
4. Placing the patient on a backboard should be deferred until life-threatening problems (e.g., airway, breathing, circulation) are addressed and a secondary assessment is completed (see Procedures 1 and 2). Manual stabilization of the head should be used during initial resuscitative efforts.
5. Suction should be immediately available in the event that the immobilized or partially immobilized patient begins to vomit.
6. Immobilization of standing patients may be accomplished by placement of the cervical collar and backboard in a standing position before lowering the backboard and patient as a unit to a flat position. This procedure is not addressed here. A common hospital practice is to apply a cervical collar and assist the patient to lie down on a stretcher or backboard.
7. The following immobilization technique is not intended for patients in the prehospital setting or for interfacility transport. Further immobilization may be indicated for these patients.
EQUIPMENT
PATIENT PREPARATION
1. Stabilize the head manually in the position found, and instruct the patient not to move. Large-bore oral suction should be immediately available in case the patient vomits.
2. Instruct the patient to remain as still as possible and to let the health care providers do all of the work.
3. Instruct the patient to alert you immediately if any of the maneuvers causes increased neck pain, numbness or tingling of the extremities, or difficulty breathing.
4. Assess and document neurologic status, including movement and sensation of all extremities both before and after the procedure.
5. If possible, remove the contents of the patient’s back pants pockets to prevent pressure points.
PROCEDURAL STEPS
1. Return the patient’s head to a neutral position unless contraindicated. A proper neutral inline position is maintained without any significant traction (Salomone & Pons, 2007). The traction pull should be just enough to support the weight of the head off the axis and cervical spine. Place your thumbs under the mandible and your index and middle fingers on the occipital ridges to avoid soft tissue compression and secure a firm hold on the patient (Figure 111-1). This manual stabilization should be maintained until the patient is securely immobilized to a spine board with a rigid cervical collar in place.
2. Apply a rigid cervical collar. Soft foam collars are inadequate for cervical spine immobilization. If possible, remove jewelry from the ears and neck before collar placement. A correctly sized collar should extend from the shoulders to the mandible. An effective cervical collar sits on the chest, posterior thoracic spine and clavicle, and trapezius muscles where the tissue movement is at a minimum (Salomone & Pons, 2007). Two commonly used rigid cervical collars are the Laerdal Stifneck Select Collar and the Ambu Perfit ACE Extrication Collar. Both of these collars are adjustable to allow for a wide variety of patient sizes.
3. Log roll the patient to a supine position on a long backboard. The team leader should maintain alignment of the head and coordinate the team’s movements. A useful landmark for maintaining head position is to keep the nose aligned with the umbilicus. At least three additional people are preferred for this movement: one to roll the shoulders and hips, one to roll the hips and legs, and one to place the backboard under the patient.
4. Remove protective headgear if indicated (see Procedure 112).
5. Place padding underneath the head if necessary to prevent hyperextension when the head is lowered to the board.
6. Secure the torso and legs to the board with straps. Many different methods exist for immobilizing the torso and legs to the board. Protection against movement in any direction—up, down, left, or right—should be achieved at both the upper torso (shoulders and chest) and the lower torso (pelvis) to avoid compression and lateral movement of the vertebrae of the torso (Salomone & Pons, 2007). To use regular straps, strap under the armpits at the level of the axilla, across the upper arms, abdomen, hips, distal thighs, and lower legs (Figure 111-4). To use spider straps, ensure that the “Y”portion is placed over the shoulders. The remaining straps will need to be placed across the chest, pelvis, and lower extremites and secured to the hand holds on the backboard with the hook and loop closure (Figure 111-5).
7. Stabilize the head bilaterally with foam block or towel rolls, and place 2- or 3-inch adhesive tape directly on the skin across the patient’s forehead and onto the board (Figure 111-6). The use of sandbags for lateral head stabilization is discouraged because the weight of the sandbags could increase head movement if the board is tipped to the side. Avoid taping across the hair or the eyebrows to prevent patient discomfort and to optimize immobilization. Place the tape directly on the skin of the forehead to improve immobilization. Chin cups or straps encircling the chin should not be used because they may impede mouth opening and lead to aspiration if the patient vomits (Salomone & Pons, 2007).
8. Discontinue manual stabilization of the head at this point.
9. Assess and document neurologic status, including movement and sensation of all extremities.
10. Have suction available at all times, and be prepared to turn the patient on the board should vomiting occur.
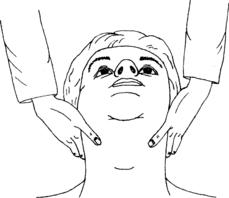
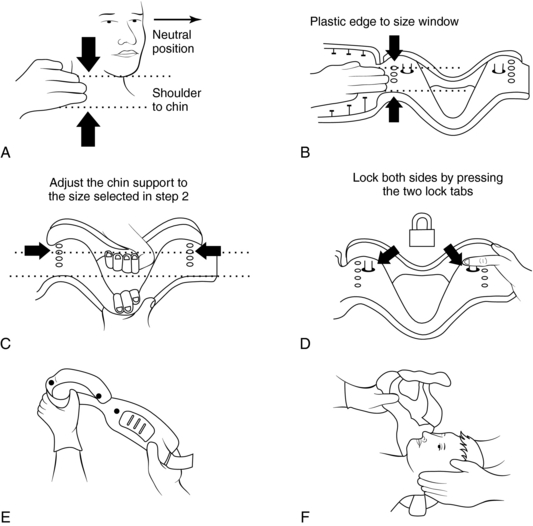
Figure 111-2 A–F, Sizing and application of the Laerdal Stifneck Select Collar. See text for details.
(Laerdal. [2005]. Stifneck Select directions for use [product insert]. Wappingers Falls, NY: Author.)
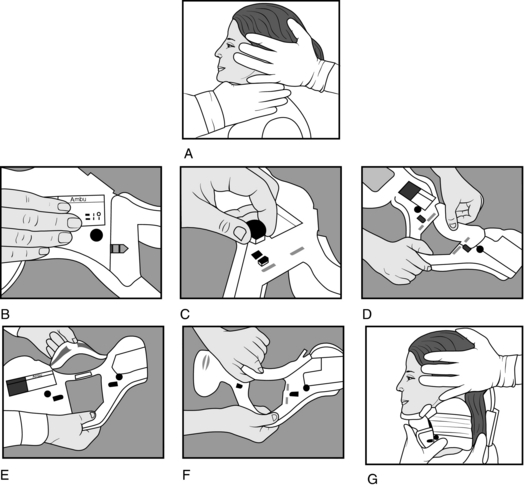
Figure 111-3 A–G, Sizing and application of the Ambu Perfit ACE Extrication Collar. See text for details.
(Ambu. [2003]. Ambu Perfit ACE directions for use [product insert]. Glen Burnie, MD: Author.)
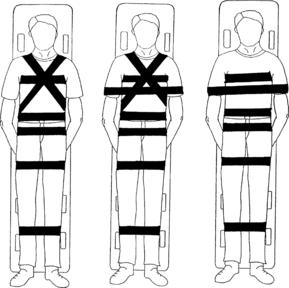
Figure 111-4 Acceptable strapping configurations.
(From Mazolewski, P., & Manix, T. H. [1994]. The effectiveness of strapping techniques in spinal immobilization. Annals of Emergency Medicine, 23, 1292.)
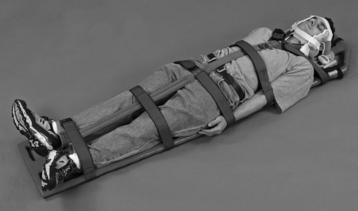
Figure 111-5 Proper application of spider straps.
(From Sanders, M. J. [2007]. Mosby’s paramedic textbook [3rd ed., p. 623]. St Louis: Mosby.)
AGE-SPECIFIC CONSIDERATIONS
1. Young children present challenges in the assessment of pain. Consider the mechanism of injury carefully to decide when to immobilize.
2. If a child is frightened and fighting, attempts at immobilization may increase movement. If possible, position a parent or caregiver at the top of the backboard in the child’s direct line of vision; this can help calm the child and elicit cooperation. The parent can also assist with manual head immobilization.
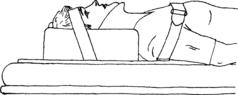
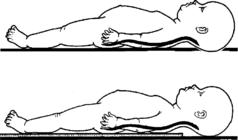
3. The distinctive anatomic characteristics of infants and children up to age 8 include larger head-to-body ratio, underdeveloped cervical musculature, and incomplete vertebral ossification (Boswell et al., 2001). As a result, placement on a standard backboard may cause excess flexion. To achieve neutral alignment, padding should be placed under the trunk or shoulders, or a backboard with a “cutout” for the head may be used. Optimal position results in the external auditory meatus in line with the shoulders (Figure 111-7) (Mintz, 1994).
4. Pediatric and infant rigid collars are available. If an appropriate-sized collar is not available, a folded towel around the neck may help prevent flexion. Tape across the forehead and head blocks are crucial in this instance. Care must be taken to ensure that the towel around the neck is not too tight.
5. Standard head blocks may be too large to be effective with small children. Rolled towels or blankets can be substituted.
6. Geriatric patients may be at increased risk for skin breakdown because of thinner skin, poor peripheral circulation, loss of subcutaneous padding, and concomitant disease processes. Geriatric patients may also have kyphosis and may require 1 to 3 inches of padding under the occiput in order to avoid hyperextension of the cervical spine.
7. Spinal immobilization restricts respiration by an average of 15% (Totten & Sugarman, 1999). Geriatric patients and patients who have cardiopulmonary disease may experience respiratory compromise when supine. Careful monitoring is essential to ensure that ventilatory status is adequate.
8. The main objective is to maintain neutral alignment of the cervical, thoracic, and lumbar spines throughout the immobiliztion procedure. The pediatric and geriatric population may require additional padding to be placed either under the shoulders or occiput to accomplish this.
COMPLICATIONS
1. Further damage to the spine or the spinal cord as a result of movement. Incorrectly applied straps increase this risk.
2. Respiratory compromise secondary to tight straps across the chest, aspiration of vomitus, improperly sized or placed cervical collar, or excessive neck flexion in young children.
3. Pain related to backboard and collar. Perceived comfort levels are significantly better with the vacuum mattress than with the backboard (Ahmad & Butler, 2001).
4. Tissue breakdown secondary to contact of bony prominences with the backboard or stiff cervical collar. Minimize the time spent on the backboard and pad any bony prominences to help decrease this risk.
5. Supine hypotension in pregnant patients (secondary to the pressure of the gravid uterus on the inferior vena cava). This can be minimized by tilting the backboard to the patient’s left 15 to 20 degrees. Care must be taken to immobilize the patient in such a way that she does not slide to the side when the board is tilted.
Ahmad M., Butler J. Spinal boards or vacuum mattresses for immobilisation. Emergency Medicine Journal. 2001;18:379–380.
Ambu. Ambu Perfit ACE directions for use (product insert). Glen Burnie, MD: Author, 2003.
Boswell H.B., Dietrich A., Sheils W.E., King D., Ginn-Pease M., Bowman M.J., Cotton W.H. Accuracy of visual determination of the immobilized pediatric cervical spine. Pediatric Emergency Care. 2001;17:10–14.
Laerdal. Stifneck Select directions for use (product insert). Wappingers Falls, NY: Author, 2005.
Mintz L.J. Traction. In: Weinstein S.L., ed. The pediatric spine: Principles and practice. New York: Raven Press; 1994:1241–1256.
Salomone J.P., Pons P.T. Prehospital trauma life support, 6th ed. St Louis: Mosby, 2007.
Totten V.Y., Sugarman D.S. Respiratory effects of spinal immobilization. Prehospital Emergency Care. 1999;3:347–352.
PROCEDURE 112 Helmet Removal
CONTRAINDICATIONS AND CAUTIONS
1. Helmet removal may be deferred in a patient without airway compromise when cervical spine injury is strongly suspected. Leaving a helmet in place may require padding to elevate the patient’s body from the shoulders down. Otherwise, flexion similar to that seen in a toddler may result with spinal immobiliztion (see Procedure 111).
2. The facemask should be removed at the earliest opportunity, before transportation and regardless of current respiratory status (Kleiner, Almquist, & Bailes, 2001).
3. The presence of football shoulder pads after the removal of a football helmet results in significant cervical extension. Therefore, football players should initially be immobilized with both helmet and shoulder pads left in place to maintain their neck in a neutral postion. The simultaneous removal of the helmet and shoulder pads is best done in a controlled atmosphere, such as the emergency department, with many trained hands (Kleiner et al., 2001).
4. Helmet removal should not be attempted without sufficient trained personnel.
PATIENT PREPARATION
1. Manually stabilize the patient’s head.
2. Instruct the patient to remain as still as possible and let the health care providers do the work of removing the helmet.
3. Instruct the patient to alert you immediately if any of the maneuvers cause increased neck pain or numbness or tingling of the extremities.
4. If possible, have a second person remove the patient’s glasses, necklaces, and earrings.
5. Assess and document neurologic status, including movement and sensation of all extremities both before and after helmet removal.
PROCEDURAL STEPS
1. Leader: Stand at the patient’s head and apply gentle in-line stabilization by placing your thumbs on the patient’s mandibles and your index fingers on the occipital ridges.
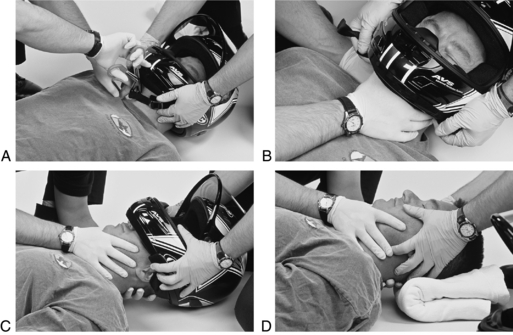
Assistant: Cut or remove any chin strap or face guard. If the helmet has snap-out ear protectors, remove them by prying them loose with a tongue blade (Figure 112-1, A).
2. Assistant: Assume in-line stabilization from the leader by cupping the mandible with the thumb and index finger of one hand and placing the other hand on the occipital ridge (Figure 112-1, B).
Leader: Spread the helmet laterally and gently remove it (Figure 112-1, C). As the helmet comes over the occiput, it may be necessary to rotate the helmet anteriorly over the face, taking care to avoid the patient’s nose.
Assistant: Warning—the head drops as the helmet is removed unless adequate support is provided posteriorly to the occipital ridges.
3. Leader: Resume stabilization laterally with your fingers on the mandible and occipital ridges as described in step 1 (Figure 112-1, D).
Assistant: Place a folded towel or blanket under the patient’s head as necessary to maintain neutral alignment. Assemble equipment and personnel to immobilize the patient’s spine (see Procedure 111).
4. Reassess and document the patient’s neurologic status, including movement and sensation of all extremities.
PATIENT TEACHING
Instruct the patient not to move until instructed to do so by the nurse or physician.
PROCEDURE 113 General Principles of Splinting
INDICATIONS
1. To immobilize and stabilize suspected fractures, dislocations, or tendon ruptures as soon as possible after an injury in order to prevent further soft tissue, blood vessel, nerve, or bony damage.
2. To decrease pain from impaired neurologic function or muscle spasm.
3. To decrease swelling associated with injury by reducing blood and fluid loss into the soft tissues.
4. To immobilize injured areas after burns, bites, or stings.
5. To immobilize an area during the healing of infectious or inflammatory processes and after the surgical repair of muscles or tendons.
CONTRAINDICATIONS AND CAUTIONS
1. Injured extremities should be handled gently and movement of the affected area minimized to decrease pain and risk of complications (e.g., compartment syndrome, fat embolism, vascular or nerve damage, venous thrombosis).
2. Bony prominences should be padded to avoid undue pressure and skin breakdown.
3. The joints above and below the injury site should be immobilized.
4. Gentle longitudinal traction may be exerted while the splint is being applied, except when the injury site involves a joint, a dislocation, or an open fracture. In these cases, the injury should be splinted in the position found, unless circulatory compromise exists, in which case the injury site should be straightened only enough to restore distal pulses.
NOTE: It is generally agreed that traction splints should be applied in cases of open femoral fractures; this is likely to cause the bone ends to slip beneath the skin. Open fractures are generally considered contaminated, and wound care becomes a high priority (ENA, 2000).
5. Align a severely deformed limb with steady gentle traction so a splint can be applied. The extremity should not be forced into the splint. The splint may have to be improvised or altered to fit the limb in the position of deformity (Buckwalter, 2005).
6. No zippers, knots, or attachments of the splinting device should be placed directly over the injury site.
7. Neurovascular status should be assessed and documented before and after splinting. If sensation and circulation are diminished after splinting, the splint must be readjusted or removed and reapplied.
8. Rigid splints should be well padded to prevent local pressure.
9. If the limb is wrapped circumferentially, the wrapping material should be expandable and nonconstricting.
10. When doubt exists, a splint should be applied.
11. All open fractures should be considered contaminated (ENA, 2000). Care should be taken to clean and cover open wounds with sterile dressings before splinting to minimize the potential for infection. Notify the physician of all open wounds and administer antibiotics promptly as prescribed.
EQUIPMENT
Splints are divided into four general categories:
Table 113-1 lists indications. Plaster and fiberglass splinting are not addressed in this procedure (see Procedure 124).
Table 113-1 DEVICES FOR INITIAL IMMOBILIZATION OF ORTHOPEDIC INJURIES
| Site | Type of Splint |
|---|---|
| Clavicle | Sling and swathe |
| Shoulder dislocation | |
| Scapula | Sling and swathe |
| Humerus | Rigid splint with sling and swathe |
| Elbow | Rigid splint with sling and swathe in position found |
| Forearm | Rigid splint with sling, air splint |
| Wrist | Rigid splint with sling |
| Hand, fingers | Rigid splint in position of function |
| Spine | Backboard, stiff cervical collar, lateral head support |
| Pelvis | Backboard, PASG, circumferential binding |
| Hip | Backboard, traction splint, or secure the injured leg to the uninjuredleg with cravats or bandages |
| Femur | Traction splint, rigid splint, or PASG |
| Patella | Soft or padded rigid splint placed posteriorly in position found |
| Tibia/fibula | Air splint, rigid splint |
| Ankle | Air splint or pillow |
| Foot | Air splint or pillow |
| Toes | Tape to adjacent digit on medial side, rigid splint on great toe |
PASG, Pneumatic antishock garment (see Procedure 51).
PATIENT PREPARATION
1. Cut away clothing over the injury site and remove bulky material or sharp objects from pockets that may lie under the splint after application.
2. Assess and document the neurovascular status.
3. Measure the noninjured side to determine the correct size of the splint.
4. Pad bony prominences or soft tissue areas, such as the groin.
5. Remove jewelry from injured extremities (see Procedure 114).
6. Remove boots or shoes from lower extremity injuries to assess pulses and sensation. Footwear that is difficult to remove or that is supportive to the ankle may be left on if some types of traction splints are used; however, the neurovascular status cannot be monitored.
7. Place a sterile dressing over all open wounds.
8. Pad areas of skin-to-skin contact under the splint to absorb perspiration and prevent tissue maceration.
PROCEDURAL STEPS
1. Remove clothing from the injured area to inspect for wounds, deformity, ecchymosis, and swelling.
2. Grasp the extremity with both hands, one hand below and one hand above the injury site, and exert gentle longitudinal traction to straighten any angulation. Maintain manual stabilization until the splint is secure. Fractures or dislocations of the joints should be splinted in the position found unless distal circulation is diminished or absent. In this situation, straighten the limb only enough to restore pulses. Do not attempt to realign fractures of the shoulder, elbow, wrist, or knee. Do not attempt to push protruding bone ends beneath the skin, but if bone ends slip back into the wound, document the existence of an open fracture, and notify the physician.
3. Immobilize the joints above and below the injury site.
4. The splint should fit snugly but not be constrictive. Leave fingers and toes exposed. If possible, elevate the injured part.
5. Assess and document distal neurovascular status. If sensation or circulation is diminished, the splint must be adjusted or removed and reapplied.
6. Use traction splints for fractures of the proximal tibia or femur. Use them with caution if fractures of the pelvis or ankle are also present (see Procedure 118).
7. Leave the splint intact until definitive treatment is determined. If it is necessary to remove or readjust the splint for diagnostic procedures, reassess and document the neurovascular status after splint removal and reapplication.
AGE-SPECIFIC CONSIDERATIONS
Pediatric
1. A child’s bony structure is more elastic and malleable than an adult’s. It takes significant force to result in a fracture. Many injuries in children younger than 5 years are related to abuse. Nonaccidental trauma should be suspected when a child younger than age 1 year presents with a long-bone fracture. Children who are abused may have multiple fractures in various stages of healing or may have repeated fractures (Brady & Burns, 2004).
2. The epiphyses (growth plates) at the ends of long articulating bones are more susceptible to trauma in preadolescent children. Fractures that involve the epiphysis (also known as Salter fractures) may interfere with normal bone growth and result in discrepancy of limb length (Brady & Burns, 2004).
3. Children’s bones have a thicker periosteal covering, which enables faster and smoother recalcification after a fracture. Nonunion is rare.
Geriatric
1. Degenerative changes that affect tendons, joints, and intervertebral discs begin in adults at about age 40. Demineralization and loss of bone mass occur over the life span but significantly increases after age 35. The bones of older adults are more brittle and susceptible to fracture, particularly postmenopausal women (Burke & Laramie, 2004). The elderly have prolonged healing times. Complete healing can take 3 to 6 months and may lead to admission into a skilled nursing facility.
2. The elderly are the fastest growing segment of the population and are at great risk for trauma. The most common orthopedic problems in the elderly are related to unsteady gait and balance problems, sensory deficits, decreased reflexes, and use of medications that increase the risk of falling (Kunkler, 2004). Nearly one-third of the elderly experience a fall every year. Half of those have repeated falls, with 1% resulting in a fracture of the hip (Buckwalter, 2005).
3. Pathologic fractures may occur as a result of chronic disease conditions such as osteoarthritis and osteoporosis (Roberts, 2004).
4. The elderly have thinner skin and less soft tissue padding; therefore, they are more prone to alterations in skin integrity.
5. Be alert to the physical and behavioral signs of abuse in all age groups, they may be covert and masked by the presenting injuries.
PATIENT TEACHING
1. Watch for changes in fingertips and toes—cool to touch, dusky color, swelling, altered or decreased sensation. If an elastic bandage is removed, rewrap it snugly but not too tightly.
2. Report pain that continues to increase in severity and does not respond to pain medications.
3. Elevate the limb above the level of the heart to decrease swelling and pain.
4. Use cold packs over the injured area to minimize bleeding and swelling.
5. Limit mobility and activity to allow healing of the injured site. Perform only approved activities (e.g., weightbearing, stretching, or bending of joints).
6. Do not use coat hangers or other sharp objects to scratch the skin inside the splint.
7. Review with the patient the length of time to wear the splinting or immobilization device and when to follow up with the primary health care provider or physical therapist.
8. Instruct the patient in crutch walking, if indicated, and have the patient give a return demonstration of the techniques (see Procedure 132).
9. Assess the patient’s ability to continue activities of daily living and the possible need for family or professional assistance at home.
10. Discuss injury prevention strategies with patients and families.
Brady M.A., Burns C.E. Musculoskeletal disorders. In: Burns C.E., Dunn A.M., Brady M.A., Starr N.B., Blosser C.G. Pediatric primary care: A handbook for nurse practitioners. 3rd ed. Philadelphia: Saunders; 2004:1047–1082.
Buckwalter J.A. General orthopaedics. In: Griffin L.Y., ed. Essentials of musculoskeletal care. 3rd ed. Rosemont, IL: American Academy of Orthopaedic Surgeons; 2005:1–143.
Burke M.M., Laramie J.A. Primary care of the older adult: A multidisciplinary approach, 2nd ed. St Louis: Mosby, 2004.
Emergency Nurses Association (ENA). Trauma nursing core course: Provider manual, 5th ed. Des Plaines, IL: Author, 2000.
Kunkler C.E. Nursing management: Musculoskeletal trauma and orthopedic surgery. In: Lewis S.M., Heitkemper M.M., Dirksen S.R. Medical-surgical nursing: Assessment and management of clinical problems. 6th ed. St Louis: Mosby; 2004:1650–1691.
Roberts D. Nursing assessment: Musculoskeletal system. In: Lewis S.M., Heitkemper M.M., Dirksen S.R. Medical-surgical nursing: Assessment and management of clinical problems. 6th ed. St Louis: Mosby; 2004:1635–1649.
PROCEDURE 114 Ring Removal
PATIENT PREPARATION
1. Ring removal may not be possible without digital anesthesia if the finger (or toe) is extremely painful. A digital or metacarpal (metatarsal) block producing minimal tissue distention may be performed (see Procedure 136) (Stone & Koutouzis, 2004). Conscious sedation may also be indicated.
2. Before removal using the string method, attempt to decrease edema by using a Penrose drain wrapped distally to proximally along the finger or toe (Stone & Koutouzis, 2004). Elevate the hand or foot, apply an ice pack, and wait a few minutes.
STRING METHOD
Procedural Steps for String Method
1. Rub the bar soap along the length of the tape or suture. This step is optional, but it makes ring removal easier.
2. Pass the end of the string under the ring, using the hemostat if necessary.
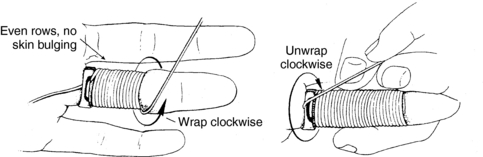
3. Have the patient anchor the tape or suture against the palm with the thumb. Wrap the string tightly around the finger clockwise in close, concentric circles, starting next to the ring and moving toward the finger tip (Figure 114-1). Be especially careful to wrap firmly around the proximal interphalangeal joint, because this is the most difficult area of the ring removal process.
4. While pulling the proximal end of the string toward the fingertip and against the ring, unwrap the string in a clockwise direction from the finger. This moves the ring over the string-wrapped finger (see Figure 114-1).
5. Repeat the procedure until the ring is removed.
Stay updated, free articles. Join our Telegram channel

Full access? Get Clinical Tree


