Section Sixteen Abdominal and Genitourinary Procedures
PROCEDURE 95 Diagnostic Peritoneal Lavage
PROCEDURE 97 Intraabdominal Pressure Monitoring
PROCEDURE 98 Insertion of Orogastric and NasogastricTubes
PROCEDURE 99 Gastric Lavage for GastrointestinalBleeding
PROCEDURE 100 Gastric Lavage for Removal of ToxicSubstances
PROCEDURE 101 Whole Bowel Irrigation
PROCEDURE 102 Balloon Tamponade of GastroesophagealVarices
PROCEDURE 103 Diagnostic Bladder Ultrasound
PROCEDURE 104 Urinary Bladder Catheterization
PROCEDURE 105 Suprapubic Urine Aspiration
PROCEDURE 106 Suprapubic Catheter Insertion
PROCEDURE 107 Pelvic Examination
PROCEDURE 108 Assessing Fetal Heart Tones
PROCEDURE 109 Emergency Childbirth
PROCEDURE 95 Diagnostic Peritoneal Lavage
INDICATIONS
1. To help diagnose intraabdominal bleeding or viscous perforation in hemodynamically unstable patients, especially those who are unable to contribute to the physical examination because of paralysis, unconsciousness, or intoxication or in patients in whom the examination is equivocal because of lower rib, pelvis, or lumbar spine fractures.
2. To evaluate patients at risk for intraabdominal trauma who are about to undergo lengthy anesthesia for nonabdominal surgical or radiographic procedures.
3. To assess patients with undiagnosed hypotension after trauma.
4. To help diagnose intraabdominal bleeding or viscous perforation in hemodynamically stable patients when computerized tomography (CT) or ultrasound is not available.
5. To provide core rewarming for moderately to severely hypothermic patients (temperature less than 32° C [90° F]).
CONTRAINDICATIONS AND CAUTIONS
1. CT or ultrasonography of the abdomen is performed instead of peritoneal lavage in most situations.
2. If abdominal surgery is already indicated because of physical examination or clinical presentation, there is no need to perform peritoneal lavage.
3. The open technique is preferred to decrease the risk of iatrogenic injury; the Seldinger technique is an acceptable alternative for physicians trained in the technique (ACS, 2004).
4. Multiple prior abdominal surgeries increase the risk of adhesions, which may cause the intestines to adhere to the abdominal wall and result in viscous perforation when the catheter is introduced.
5. The open technique with a supraumbilical insertion site is preferred for pregnant patient or pelvic fractures (ACS, 2004; Nagy, 2004).
6. Pelvic fractures may cause false-positive results if the catheter enters a pelvic hematoma. Therefore, the open technique with a supraumbilical insertion site should be chosen in this situation (ACS, 2004).
7. Peritoneal lavage does not rule out retroperitoneal injuries, perforation of a hollow viscus, or diaphragmatic disruption.
8. Morbid obesity, advanced cirrhosis, advanced pregnanacy, and preexisting coagulopathy are relative contraindications to DPL (ACS, 2004; Marx & Isenhour, 2006).
EQUIPMENT
1% lidocaine (with epinephrine)
10-ml syringe, 18-G or 25-G to 27-G needles for local anesthesia
1000 ml of warmed (36.6° to 37.7° C [98° to 100° F]) normal saline or lactated Ringer’s solution
Peritoneal dialysis catheter (with or without trocar) or catheter, dilator, and spring-wire guide assembly
Nonvented intravenous (IV) tubing without a backcheck valve or cystoscopy tubing
Blood collection tubes (optional, for transport of lavage specimens to the laboratory)
(NOTE: Preassembled kits containing much of this equipment are available.)
PATIENT PREPARATION
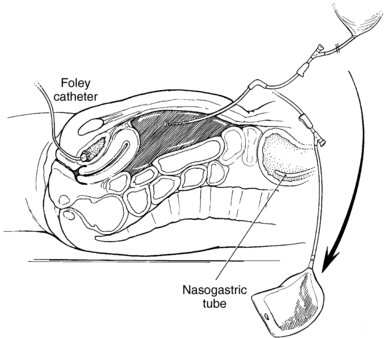
1. Insert an indwelling urinary catheter (Procedure 104) to decompress the bladder and to prevent bladder perforation when the catheter is introduced. If a catheter cannot be inserted for some reason, the open technique should be used (Nagy, 2004).
2. Insert a gastric tube (Procedure 98) to decompress the stomach and to prevent stomach perforation during catheter insertion.
3. If possible, complete any abdominal radiographs before the procedure, because air may enter the abdomen and confuse any future abdominal films.
4. Place the patient in the supine position.
5. * Shave the abdomen or clip the hair and cleanse it with antiseptic solution. The usual site for catheter insertion is midline, one third of the distance between the umbilicus and the symphysis pubis. The umbilical or supraumbilical areas may also be used.
PROCEDURAL STEPS
1. *Drape the abdomen with sterile towels.
2. *Infiltrate the insertion site with lidocaine. In general, lidocaine with epinephrine is used to help control bleeding at the site. Absolute hemostasis at the site is essential to help prevent false-positive results.
3. *Insert the catheter into the peritoneal space via open or Seldinger (closed) technique.
4. * For core rewarming or cooling, insert two catheters; one is used to infuse constantly and the other is used to drain the solution. This is more time efficient than infusing and draining via the same catheter.
5. If the lavage is for diagnostic purposes, attach a 20-ml syringe and aspirate. If 10 ml or more of gross blood is obtained the test is considered positive (ACS, 2004; Marx & Isenhour, 2006; Nagy, 2004).
6. Attach the primed IV tubing to the catheter (Figure 95-1). The IV tubing should not contain a backcheck valve because this prevents the fluid from being siphoned out of the abdomen. If the tubing is vented, the fluid may leak from the vent, or a water seal may form and prevent fluid return. Cystoscopy tubing allows much faster infusion and drainage. To connect the catheter to the cytoscopy tubing, push the end of the connecting tubing into the sleeve of the cystoscopy tubing. Tying a suture around the distal end of the sleeve of the cystoscopy tubing tightens the connection (optional).
7. Infuse 1 L of sterile warmed normal saline solution or lactated Ringer’s solution. Room temperature solutions may cause or worsen hypothermia. Stopping the infusion before the drip chamber is dry facilitates siphoning of the fluid. Monitor urinary catheter and chest-tube drainage for evidence of lavage fluid because this may assist with a diagnosis of diaphragm or bladder rupture.
8. If the patient’s condition allows, leave the fluid in the peritoneal space for 5 to 10 minutes. Palpate the abdomen or gently rock the patient from side to side to help distribute the fluid throughout the peritoneal cavity.
9. Lower the IV bag to the floor and allow the fluid to siphon out of the abdomen. If the fluid does not return, make sure the appropriate tubing has been used. If necessary, cut off a backcheck valve or vent and drain the fluid into a basin. Then try repositioning the patient. The physician may reposition the catheter or insert another catheter to facilitate drainage. Additional fluid may also be instilled to encourage fluid return. Adequate fluid return is 30% or more of the infused volume (ACS, 2004). Any fluid left in the abdomen is absorbed through the peritoneum and should be added to the patient’s parenteral fluid intake.
10. Obtain laboratory specimens from the IV bag when the fluid return is finished. Visual inspection of the fluid is not accurate. Commonly ordered tests include red blood cell (RBC) count, white blood cell (WBC) count, and Gram’s stain. The fluid is placed in the same specimen tubes that would be used if the tests were being performed on blood. Some laboratories also accept the fluid in the IV bag or syringes. Recommended diagnostic tests and positive findings vary from source to source but commonly include the following (ACS, 2004; Marx & Isenhour, 2006):
11. *Remove the catheter and suture the wound. If a laparotomy is indicated, the wound should not be sutured, and a sterile dressing should be applied. If the findings are equivocal, the catheter may be left in place, the wound sutured, and the lavage repeated 2 to 3 hours later.
12. Place a thin layer of an antibiotic ointment and a dry sterile dressing over the wound.
AGE-SPECIFIC CONSIDERATIONS
1. Children require sedation and analgesia. If a child is too young to cooperate with the procedure without deep sedation, DPL should not be performed. The patient should undergo CT scanning or, if the patient is unstable, DPL in the operating room under general anesthesia (Henneman, 1997).
2. Because distressed children tend to swallow air, which leads to stomach distention, it is essential that a gastric tube be inserted before the dialysis catheter is inserted.
3. An infraumbilical approach is used for most children, one-third the distance from the umbilicus to the pubic symphysis. Because the bladder may extend well into the abdominal cavity, a supraumbilical approach (1 to 2 cm above the umbilicus) is used for infants and small children (King & Henretig, 2000).
4. Infuse 10 to 20 ml/kg, but no more than 1000 mL, of warm normal saline solution or lactated Ringer’s solution in children. Infusing additional fluid may interfere with respirations (ACS, 2004; King & Henretig, 2000).
5. Withdrawal of any significant amount of blood is positive for a child under 8 years of age. For an older child or adolescent, 5 to 10 ml of blood is considered a positive result (King & Henretig, 2000).
COMPLICATIONS
1. Perforation of abdominal organs or blood vessels, resulting in peritonitis or hemorrhage.
2. False-positive results may result from bleeding at the insertion site, bleeding within the muscle sheath, or pelvic fractures and lead to a negative laparotomy.
3. Inadequate fluid return or false-negative results as a result of incorrect catheter placement.
4. Wound infection or dehiscence, hematoma.
American College of Surgeons (ACS). Committee on Trauma. Advanced trauma life support for doctors, 7th ed. Chicago: Author, 2004.
Henneman P.L. Diagnostic peritoneal lavage. In: Dieckmann R.A., Fiser D.H., Selbst S.M. Pediatric emergency and critical care procedures. St Louis: Mosby; 1997:604–606.
King C., Henretig F.M. Pocket atlas of pediatric emergency procedures. Philadelphia: Lippincott Williams & Wilkins, 2000.
Marx J.A., Isenhour J. Abdominal trauma. In: Marx J.A., Hockberger R.S., Walls R.M., et al. Rosen’s emergency medicine: Concepts and clinical practice. 6th ed. St Louis: Mosby; 2006:489–514.
Nagy K. Diagnostic peritoneal lavage. In: Reichman E.F., Simon R.R. Emergency medicine procedures. New York: McGraw-Hill; 2004:478–489.
PROCEDURE 96 Paracentesis
CONTRAINDICATIONS AND CAUTIONS
1. Coagulopathies, thrombocyctopenia, and portal hypertension with abdominal collateral circulation increase the chance of bleeding and hemorrhage.
2. Use caution in patients with multiple prior abdominal surgeries and adhesions as the intestines may be adhered to the abdominal wall which could result in viscous perforation during introduction of the needle.
3. An open supraumbilical or ultrasound-assisted approach is preferred during a second- and third-trimester pregnancy (Marx, 2004).
4. Use caution in patients with infection at the insertion site.
EQUIPMENT
2-in sterile needle with inner trocar or 2-in intravenous (IV) catheter with stylet, size 10-G, 12-G, or 14-G
3-ml syringe with 18-G and 27-G, 1½-in needles for local anesthesia
Four empty 1000-ml vacuum bottles or other drainage collection container (e.g., bag, bottle)
Nonvented IV tubing without a backcheck valve, or 36-in pressure tubing
Four sterile tubes or cytology bottles for specimen collection
Male-to-male IV tubing connecter
Sterile dressing/tape/antibiotic ointment
(NOTE: Preassembled trays with some or all of these supplies are available.)
PATIENT PREPARATION
1. Have the patient void immediately before the procedure or if the patient is unable to void, place an indwelling catheter (see Procedure 104) to decompress the bladder and prevent perforation of the bladder during introduction of the needle.
2. Position the patient in an upright postion to faciliate fluid accumulation in the lower abdomen. This can be accomplished by sitting the patient in a chair, on the side of the bed or in high Fowler’s position. Alternatively, a lateral decubitus position may be used if the patient is unable to tolerate being upright for the procedure.
PROCEDURAL STEPS
1. Cleanse the abdomen with antiseptic solution.
2. * Drape the abdomen with the sterile drapes or towels.
3. *Infiltrate the insertion site with lidocaine.
4. * Make an incision midline 2 cm below the umbilicus. In a patient with midline scarring, the incision can be made in either lower quadrant medial to the anterior superior iliac crest and 4 to 5 cm cephalad (Marx, 2004).
5. *Attach a 10-ml syringe to the catheter. The needle or IV catheter is inserted slowly in 5-mm increments through the abdominal wall until peritoneal fluid is aspirated. Avoid continuous aspiration during insertion as this may pull the bowel toward the needle. Remove the inner trocar or stylet.
6. Fluid may be drained by gravity drainage, by aspiration with 60-ml syringe, or by vacuum drainage.
7. Collect laboratory specimens in sterile containers. Commonly ordered laboratory tests include a differential cell count, albumin assay, and cultures (Marx, 2004).
8. When the needle is withdrawn, apply antibiotic ointment and dressing as per institutional dressing protocol.
9. Monitor the patient during and after the procedure. Watch for and report bleeding, fluid leakage, or scrotal edema. Check vital signs often to detect hypotensive complications early. Vital signs are recommended every half hour for 2 hours after the procedure, then hourly for 2 hours, then every 4 hours for 24 hours.
COMPLICATIONS
1. Perforation of blood vessels or abdominal organs (bladder, bowel, or stomach) resulting in hemorrhage or peritonitis
2. Infection at insertion site
3. Shock secondary to fluid and electrolyte shifts
4. Leaking of peritoneal fluid at the puncture site. If leakage continues after applying direct pressure to the site for five minutes a suture may be placed at the site (Hu & White, 2003).
PROCEDURE 97 Intraabdominal Pressure Monitoring
Intraabdominal pressure (IAP) can be measured directly with an intraperitoneal catheter or indirectly via a gastric balloon or urinary bladder pressure measurement (the gold standard). The bladder acts as a pressure reservoir, a compliant structure that reflects pressure changes. There is a significant correlation between bladder pressure and abdominal pressure. Abdominal compartment syndrome (ACS) is defined as a condition in which end-organ dysfunction or damage results from untreated intraabdominal hypertension (IAH) (Cheatham, 2006). IAH occurs when the contents of the abdomen expand secondary to increased organ volume, tumor, blood, fluid, or a change in abdominal wall compliance. This leads to decreased venous return, decreased cardiac output, and dysfunction of the organs contained in the abdominal cavity. When IAP pressure is greater than 15 mm Hg, renal dysfunction can occur. IAH is defined as sustained or repeated IAP of 12 mm Hg or greater or an abdominal perfusion pressure (APP) that is 60 mm Hg or less (Cheatham, 2006). APP is a calculated by subtracting the IAP from the mean arterial pressure (MAP). Normal IAP is less than 5 mm Hg. IAP is categorized by severity according pressure (Wolfe & Gallagher, 2006):
EQUIPMENT
500- to 1000-ml bag of normal saline
Cardiac monitor with hemodynamic monitoring capability
Pressure transducer (if not already part of the pressure tubing setup)
Long pressure extension tubing (for pole-mounted transducer)
Four-way stopcock or two three-way stopcocks
Dead-ender caps (nonvented) for stopcock ports
Pole-mounted transducer holder (optional)
Povidone-iodine pads, swab sticks, or alcohol pad
PROCEDURAL STEPS
1. Prepare the pressure monitoring system as follows (Figure 97-1):
2. Level the air side of the stopcock (air-fluid interface) to the top of the symphysis pubis.
3. Turn on the monitor and select either the 30- or the 60-mm Hg scale.
4. Connect transducer to the monitor and zero balance the transducer. Zero balancing the system to the atmospheric pressure negates the effects of the atmospheric pressure. To prevent erroneous pressure readings, zero the system before and after the pressure system is attached to the patient, with any significant change in the waveform and the values, whenever the system is disconnected, and at the beginning of each shift. To zero, turn the four-way stopcock off to the patient and open to the transducer and to air (air-fluid interface). Zero the monitor according to the manufacturer’s directions. Once the monitor is zeroed, flush the open stopcock port and replace the dead-ender cap. Turn the stopcock on to the patient and on to the transducer.
5. Clamp the drainage bag tubing distal to the sampling port.
6. Cleanse the port with alcohol.
7. Insert the 18-G needle into the sampling port of the drainage tubing or insert the 18-gauge IV catheter and thread the catheter into the port.
8. Instill 50 ml of sterile normal saline into the urinary catheter through the sampling port.
9. Briefly release the clamp to allow fluid from the bladder to fill the tubing and remove air from the system.
10. Run a strip of the waveform and read the mean IAP at end-expiration.
11. Document the reading and patient position (flat or supine).
12. Remove the needle and unclamp the drainage system. If an IV catheter is used, it may be left in place.
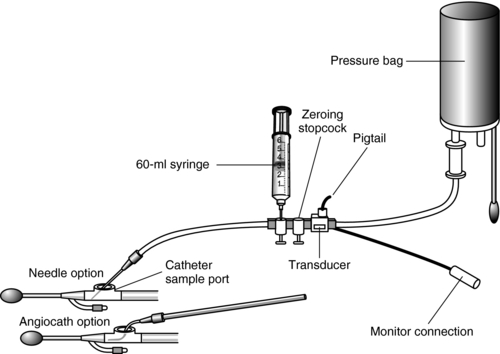
Figure 97-1 Intraabdominal pressure monitoring setup using two threeway stopcocks in place of a four-way stopcock.
(From Gallagher, J. J. [2005]. Intraabdominal pressure monitoring. In D. J. Lynn-McHale Wiegand & K. K. Carlson [Eds.], AACN procedure manual for critical care [5th ed., p. 894]. Philadelphia: Saunders.)
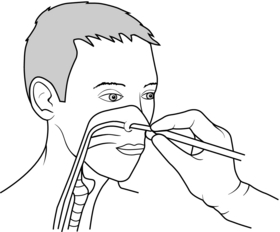
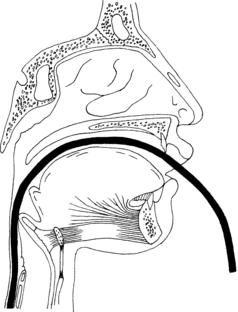
PROCEDURE 98 Insertion of Orogastric and Nasogastric Tubes
CONTRAINDICATIONS AND CAUTIONS
1. In the presence of head trauma, maxillofacial injury, or anterior fossa skull fracture, there is the potential for inadvertent penetration of the brain via the cribriform plate or ethmoid bone if the tube is inserted nasally. In these instances, the orogastric route is used.
2. Caution should be used when inserting the tube in a patient with a potential cervical spine injury; the patient’s head should be manually immobilized for this procedure.
3. If the patient has esophageal varices, there is a risk of inadvertent esophageal rupture and hemorrhage as a result of tube placement.
4. The smallest possible tube appropriate to the intervention or task should be used, because smaller tubes place less stress on the esophageal sphincter.
5. Do not irrigate a Salem sump tube through the blue air vent.
6. If tetracaine is used for intranasal anesthesia, the dose should not exceed 20 mg (Clinical Pharmacology On-Line, 2006).
7. Spray medications used for posterior pharyngeal anesthesia should not exceed 2 seconds of application time. Systemic absorption of benzocaine can have serious adverse effects, including death (FDA, 2006).
8. The traditional method of instilling air while auscultating over the epigastrium is not reliable as the sound produced cannot distinguish between placement in the bronchus, pleural space, or gastrointestinal tract (Cirgin Ellett, 2004). Metheny and Titler (2001) report that there is little scientific evidence to support the use of this method and that the literature contains numerous reports of its ineffectiveness.
EQUIPMENT
Water-soluble lubricant gel or 2% lidocaine gel
Bite block or oral airway (for oral placement)
Cup of water with straw (optional)
1-in tape, benzoin, or commercial tube holder
Capnometer or colormetric end-tidal CO2 (ETCO2) detection device (optional)
Connector from a 5-mm endotracheal tube (if capnography is used to verify placement)
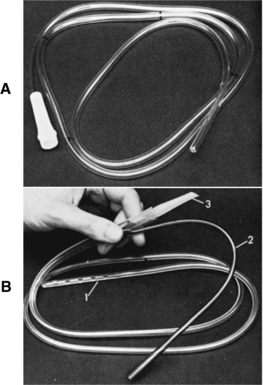
Orogastric or nasogastric tube (Figure 98-1)
NOTE: The type and the size of the tube chosen relate to the size of the patient and the reason for the tube placement. Large-bore tubes are desirable for rapid removal of gastric contents. Smaller-bore tubes are chosen for diagnostics and for removal of air and gastric secretions. The single-lumen tube (Levin) is nonvented; it is used for gastric decompression, lavage, or feeding and should not be attached to suction. The double-lumen tube (Salem sump tube) is chosen if constant air flow and controlled suction force are desired.
Optional for nasopharyngeal anesthesia: Atomizer or mucosal atomization device (MAD; Wolfe Tory Medical, Inc., Salt Lake City, UT) with a 10-ml syringe. Anesthetic (tetracaine, lidocaine, benzocaine) and vasoconstrictor (oxymetazoline, phenylephrine) sprays as prescribed.
PATIENT PREPARATION
1. Position alert patients in an upright or high Fowler’s position. Position obtunded or unconscious patients head down, preferably lying on the left side.
2. If the nasogastric route is to be used, choose the largest naris. Have the patient occlude one nostril at a time and take a breath through the open nostril; select the nostril with the best air flow.
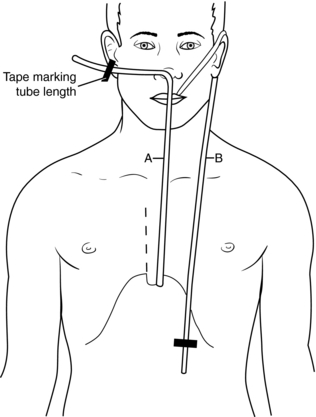
3. Estimate the length of the tube needed to reach the stomach by measuring the tube either from the tip of the nose to the earlobe and down to the xiphoid process or from the tip of the nose to the umbilicus. Mark the length (Figure 98-2).
4. The obtunded or unconscious patient requiring gastric lavage for drug overdose should be intubated to prevent aspiration.
5. If prescribed, apply a topical anesthetic to reduce pain during tube placement. If using lidocaine jelly, it may be applied to the inside of the nose with a cotton swab 2 to 5 minutes before insertion (DHMC, 2004). Alternatively, anesthetics, such as benzocaine, tetracaine, or lidocaine, with or without a vasoconstrictor, such as oxymetazoline, may be sprayed into the nose and posterior pharynx with an atomizer (Ducharme & Matheson, 2003; Wolfe, Fosnocht, & Linscott, 2000). Do not exceed a 2-second spray of anesthetic. Systemic absorption of benzocaine can have serious adverse effects, including death (FDA, 2006).
PROCEDURAL STEPS
3. Verify the tube position. Use the 60-ml syringe to aspirate gastric contents, and assess the appearance of the aspirate. Gastric contents may be cloudy, grassy green, straw, tan, brown, clear, or off-white (Metheny & Titler, 2001). Test the pH of the aspirate. Gastric pH usually has an acidic range of 1 to 5 (Metheny & Titler, 2001). If either of these findings is not consistent with gastric placement, an additional method of verification is recommended. Additional methods include:
NOTE: The traditional method of instilling air while auscultating over the epigastrium is not reliable because the sound produced cannot differentiate between placement in the bronchus, pleural space, or gastrointestinal tract (Cirgin Ellett, 2004; Metheny & Titler, 2001).
4. Center and secure the tube in place with adhesive tape or with a gastric tube holder. Do not tape the tube to the forehead because this places undue pressure on the nares, resulting in tissue ulceration.
AGE-SPECIFIC CONSIDERATIONS
1. Nasogastric tubes should not be placed in infants because they are obligate nose breathers; use the orogastric route instead.
2. The diameter of the air passages of the nasopharynx is smaller in children, and their tongues are disproportionally large for the oral cavity.
3. Children in distress swallow large amounts of air. This can result in gastric distention, which can compromise an efficient abdominal examination as well as effective ventilation; therefore gastric decompression is a high-priority intervention.
4. Gastric dilation is common in children after traumatic injury and in children being ventilated via bag-mask and may compromise ventilation or lead to vomiting and aspiration.
COMPLICATIONS
1. Hypoxia, cyanosis, or respiratory arrest as a result of inadvertent intubation of the trachea or bronchus
2. Cardiac compromise as a result of vagal response secondary to gagging
3. Injury to the spinal cord if movement occurs during tube insertion in a patient with a spinal injury
4. Intracranial placement if a tube is placed through the nose in a patient with head or facial fractures
5. Nasal irritation or skin erosion, rhinorrhea, sinusitis, esophagitis, esophagotracheal fistula, gastric ulceration, or pulmonary and oral infections from prolonged tube placement
6. Epistaxis from trauma during tube insertion
7. Vomiting and aspiration resulting in aspiration pneumonia secondary to a gagging response as the tube is passed
8. Aspiration secondary to incorrect tube position. Reassess tube position before instilling any medication, feeding, or irrigating.
9. Pharyngeal paralysis, vocal cord paralysis, and rupture of esophageal varices
Burns S.M. Detection of inadverdent airway intubation during gastric tube insertion: Capnography versus a colormetric carbon dioxide detector. American Journal of Critical Care. 2006;15(2):188–193.
Cirgin Ellett M.L. What is known about methods of correctly placing gastric tubes in adults and children? Gastroenterology Nursing. 2004;27(6):253–259.
Clinical Pharmacology On-Line. (October 2006). Tetracine. Clinical Pharmacology On-Line, Version 6.10. Retrieved December 6, 2006, from www.http://cponline.hitchcock.org
Dartmouth-Hitchcock Medical Center (DHMC). Nasogastric or orogastric tube: Insertion, verification, & monitoring (adult critical care policy/procedure). Lebanon, NH: Author, 2004.
Ducharme J., Matheson K. What is the best topical anesthetic for nasogastric insertion? A comparison of lidocaine gel, lidocaine spray and aromized cocaine. Journal of Emergency Nursing. 2003;29(5):427–430.
Food & Drug Administration (FDA). FDA Public Health Advisory: Benzocaine sprays marketed under different names, including Hurricaine, Topex, and Cetacaine, 2006. Retrieved February 17, 2007, from http://www.fda.gov/cder/drug/advisory/benzocaine.htm
Metheny N.A., Titler M.G. Assessing placement of feeding tubes. American Journal of Nursing. 2001;101(5):36–45.
Wolfe T.R., Fosnocht D.E., Linscott M.S. Atomized lidocaine as topical anesthesia for nasogastric tube placement: A randomized, double-blind, placebo-controlled trial. Annals of Emergency Medicine. 2000;35:421–425.
PROCEDURE 99 Gastric Lavage for Gastrointestinal Bleeding
In a gastrointestinal (GI) emergency, the primary clinical concern should be hemodynamic stability. The overall mortality of GI bleeding is approximately 10% and has not changed significantly since the 1960s (Henneman, 2006).
INDICATIONS
1. To control an acute upper-GI hemorrhage when other interventions are not immediately available. Other interventions may include electrocoagulation, injection sclerotherapy, photocoagulation (laser technology), vasoactive infusion (usually vasopressin), octreotide infusion, and transcatheter embolization.
NOTE: Gastric lavage is still being performed to control acute GI hemorrhage, but its therapeutic value has not been proved. In many facilities, emergency departments have access to endoscopy units capable of performing esophagogastroduodenoscopy, the primary method of identifying the site of upper GI hemorrhage (Yuan, Padol, & Hunt, 2006).
2. To remove irritating gastric secretions and prevent nausea and vomiting through gastric decompression.
3. To obtain information on the site and rate of bleeding.
CONTRAINDICATIONS AND CAUTIONS
1. In the presence of GI hemorrhage, irrigation can knock the clot off a bleeding vessel and cause further bleeding, resulting in shock.
2. If the patient has a gag reflex but is obtunded or if the patient does not have a gag reflex, there is risk of aspiration if vomiting occurs during lavage. Endotracheal intubation should be considered in order to protect the airway.
3. Airway protection by an endotracheal tube is not absolute. Assurance of gastric placement of the lavage tube is necessary before instilling anything in a patient who is confused, obtunded, sedated, or resisting the procedure (see Procedure 98).
4. Patients with symptoms suggestive of a perforated viscus (e.g., severe pain, abdominal ridgidity) should have a radiograph to exclude the presence of free air. If perforation is present, lavage should not be performed.
5. Controversy exists regarding the use of iced or room-temperature solution. Some authors believe that iced solution causes a local vasoconstriction, resulting in decreased bleeding and in clot formation. Others maintain that cold temperatures stimulate hydrochloric acid production, thereby adding to gastric irritation. Iced solutions may cause hypothermia and prolong bleeding times; room-temperature solutions have been shown effective in clearing the stomach and promoting hemostasis (Maltz, 2003).
6. The traditional method of instilling air while auscultating over the epigastrium to verify tube placement is not reliable as the sound produced cannot distinguish between placement in the bronchus, pleural space or gastrointestional tract (Cirgin Ellett, 2004). Metheny and Titler (2001) report that there is little scientific evidence to support the use of this method and that the literature contains numerous reports of its ineffectiveness. See Procedure 98 for additional information about verifying tube placement.
EQUIPMENT
PATIENT PREPARATION
1. Protect the patient’s airway from aspiration by endotracheal intubation if indicated (see Procedures 8 through 11).
2. Have suction equipment readily available.
3. Place the patient on the cardiac monitor and pulse oximeter (see Procedures 55 and 21) and assess the vital signs every 5 to 10 minutes.
4. Insert at least one large-bore intravenous line; two lines are preferred. Send blood samples for type and crossmatch as indicated (see procedures 60 and 58).
5. Insert a gastric tube in the mouth or nose using lubricating jelly and topical anesthetics and verify gastric placement (see Procedure 98). If the gastric tube is inserted via the mouth, a bite block with a hole for the tube to pass through is preferable.
6. Place the patient in left lateral decubitus position with the bed in Trendelenburg position or semi-Fowler’s position.
PROCEDURAL STEPS
1. Pour normal saline or tap water into an irrigation container.
2. Draw up the solution using a 60-ml syringe and inject it into the gastric tube. Alternatively, use a preassembled lavage setup (see Procedure 100). Infuse approximately 200 to 300 ml.
3. Aspirate or drain the solution from the stomach and discard it into a measured basin.
4. Repeat until active bleeding stops or until the patient is transferred to endoscopy.
5. Measure the volumes of irrigant and aspirant, and document as intake and output.
AGE-SPECIFIC CONSIDERATIONS
1. Older persons are far more likely than younger adults to experience significant morbidity and death from untreated GI conditions or emergencies. Most deaths reulting from GI bleeding occur in patients over the age of 60 (Henneman, 2006). Patient complaints may include vomiting blood or passing blood in the stool but may also be less obvious with complaints of dizziness, weakness, or syncope.
2. Beware of patients on β-blockers. β-Blockers prevent tachycardia, thereby preventing normal compensatory responses and potentially masking symptoms of hypovolemia.
3. Lower GI bleeding requiring admission is more common in children than adults (Henneman, 2006).
COMPLICATIONS
1. Perforation of esophageal varices
2. Mallory-Weiss tear resulting from repeated vomiting, a sharp increase in intraabdominal pressure from overdistention of the stomach, or aggressive insertion of the lavage tube
3. Aspiration of gastric contents into an unprotected airway
4. Systemic hypothermia if the lavage is prolonged or large quantities of cold irrigant are used
Cirgin Ellett M.L. What is known about methods of correctly placing gastric tubes in adults and children? Gastroenterology Nursing. 2004;27(6):253–259.
Henneman P.L. Gastrointestinal bleeding. In: Marx J.A., Hockberger R.S., Walls R.M., et al. Rosen’s emergency medicine: Concepts and clinical practice. 6th ed. St Louis: Mosby; 2006:220–227.
Maltz, C. (2003). Acute gastrointestinal bleeding. Best practice of medicine, February 2003, 1–19. Retrieved August 31, 2006, from http://merck.micromedex.com/index
Metheny N.A., Titler M.G. Assessing placement of feeding tubes. American Journal of Nursing. 2001;101(5):36–45.
Yuan Y., Padol I.T., Hunt R.H. Peptic ulcer disease today. Nature Clinical Practice Gastroenterology & Hepatology. 2006;3(2):80–89.
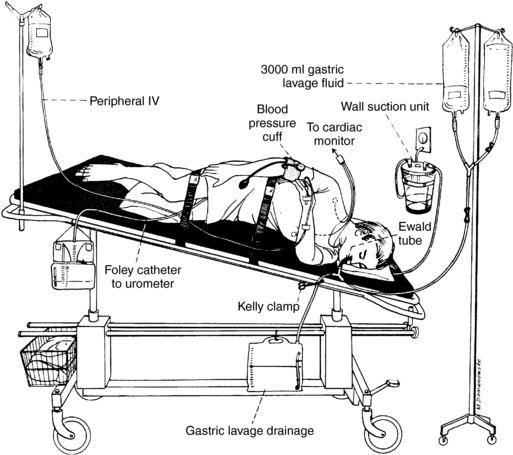
PROCEDURE 100 Gastric Lavage for Removal of Toxic Substances
INDICATION
To assist in the removal of toxic substances or poisons from the stomach, thereby decreasing drug availability and absorption in the body. The effectiveness of gastric lavage is time dependent and is most effective when the procedure is completed within 60 minutes of ingestion (Heard, 2005). Gastric lavage should not routinely be used in managing poisoned patients; instead, gastric lavage should be consider for use in patients who have ingested a potentially life-threatening amount of poison (AACT & EAPCCT, 2000). Lavage can remove drugs either in whole or fragments; however, the amount of drug recovered from the stomach can vary widely (Bartlett & Muller, 2003). Contact your Poison Control Center using the national access number, 1-800-222-1222, for current recommendations regarding the treatment of specific ingestions.
CONTRAINDICATIONS AND CAUTIONS
1. Clinical studies cannot confirm the benefits of gastric lavage as a stand-alone treatment for poisoned patients. The amount of ingested substance that is retrieved using gastric lavage is on average very low, approximately 30% (Bartlett & Muller, 2003).
2. If a patient is unable to protect the airway, then gastric lavage should not be performed unless the patient is intubated (Heard, 2005).
3. Lavage is contraindicated for patients who have ingested a corrosive material or sharp objects (AACT & EAPCCT, 2000).
4. Lavage is contraindicated in patients who have ingested a substance that may cause seizures or abrupt central nervous system depression unless the patient is intubated (Heard, 2005).
5. Gastric lavage may propel stomach contents into the small intestine, which increases the chance of drug absorption (AACT & EAPCCT, 2000).
6. Patients at risk for gastrointestinal bleeding or perforation secondary to pathology, recent surgery, or other medical history should not undergo gastric lavage (AACT & EAPCCT, 2000).
7. Airway protection by an endotracheal tube is not absolute. Careful assessment of gastric placement of the lavage tube is necessary before instilling fluid, especially in a patient who is confused, obtunded, sedated, or resisting the procedure.
8. The gastric lavage procedure is complete when pill fragments are no longer seen in the lavage fluid; however, there is no clearly defined endpoint for the procedure in cases where pill fragments are not seen in the lavage fluid (Heard, 2005).
9. The traditional method of instilling air while auscultating over the epigastrium to confirm tube placement is not reliable as the sound produced cannot distinguish between placement in the bronchus, pleural space or gastrointestional tract (Cirgin Ellett, 2004). Metheny and Titler (2001) report that there is little scientific evidence to support the use of this method and that the literature contains numerous reports of its ineffectiveness. See Procedure 98 for additional information about verifying tube placement.
EQUIPMENT
Cardiac and pulse oximetry monitoring equipment
60-ml irrigating syringe with catheter tip
Lavage tubing setup (commercially available or may be constructed with Y-cystoscopy tubing, suction extension tubing, and enema bags)
Tap water or warm normal saline (Heard, 2005)
Endotracheal intubation supplies and restraints (as indicated and prescribed)
PATIENT PREPARATION
1. Set up pharyngeal suction equipment (see Procedure 29).
2. Initiate pulse oximetry monitoring (see Procedure 21) and cardiac monitoring (see Procedure 55).
3. Restrain the patient as indicated and prescribed (see Procedure 190).
4. Obtain intravenous access (Procedure 60).
5. Assess the patient’s level of consciousness, gag reflex, and ability to maintain airway. Remove dental appliances. Request endotracheal intubation if indicated (Procedures 8 through 11).
6. Assemble the lavage tubing and prime it with fluid.
7. Insert a large-bore orogastric tube and verify tube placement according to Procedure 98. Place a bite block to keep the patient from biting the tube.
Stay updated, free articles. Join our Telegram channel

Full access? Get Clinical Tree


