There are three parts to this section:
1 Insertion of an underwater seal chest drain
2 Changing a chest drainage bottle
3 Removal of an underwater seal chest drain
Learning outcomes
By the end of this section, you should know how to:
▪ support and prepare the patient for these three nursing practices
▪ collect and prepare the equipment necessary to insert a chest drain and connect it to underwater seal drainage, change a chest drainage bottle and assist with removal of an underwater seal chest drain
▪ assist the medical practitioner in parts 1 and 3
▪ care for the patient who has a chest drain connected to underwater seal drainage.
Background knowledge required
Revision of the anatomy, physiology and pathology of the respiratory system, including the structures of the chest wall
1. INSERTION OF AN UNDERWATER SEAL CHEST DRAIN
Indications and rationale for insertion of an underwater seal chest drain
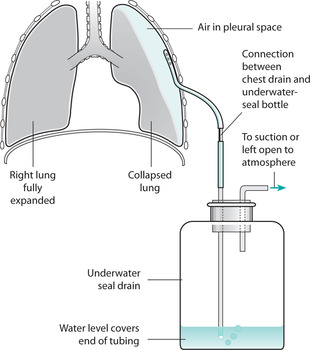
Chest drainage refers to a closed system of drainage that allows air or fluid to pass in one direction only, from the pleural space to either a collecting bottle or flutter valve system. It may be required in a variety of situations when ventilation is impaired, such as traumatic injuries, malignancy, post-thoracic surgery or following spontaneous collapse of the lung (pneumothorax). Chest drainage may therefore be used to remove air, blood, fluid or pus from the pleural space to improve ventilation capacity.
Chest drains may also be inserted to allow drug administration to occur, for example in lung cancer.
The drain insertion site will also vary according to the clinical status of the patient. Confirmation of the insertion site should be made following clinical examination and chest X-ray in all cases, apart from tension pneumothorax when it would be a priority to insert the drain quickly. Sometimes the drain is inserted with the aid of imaging such as ultrasound (Laws et al 2003). For many of the indications for chest drain insertion, the site will be the third, fourth or fifth intercostal space in the mid axillary line.
Position of the patient
During insertion, the patient’s clinical status will determine the optimum position to be adopted. It is often sitting upright and the patient may use a table with a pillow to rest on.
Outline of the procedure
Using an aseptic technique, the medical practitioner cleanses the patient’s skin with iodine or an alcohol-based antiseptic (as per local skin preparation policy), over the selected site of entry for the drain, injects a local anaesthetic and waits for it to take effect. The method of drain insertion will vary depending on the size of drain required. The aim is to avoid excessive force that may cause damage to intrathoracic structures. Sometimes an introducer is used, or blunt dissection of the subcutaneous tissue using forceps may be used for larger sizes of drainage tube. Once the tube is in place, the medical practitioner connects the drain to the equipment already prepared by the nurse. A suture is inserted round the entry site of the drain to seal the site off when the drain is eventually removed. A purse-string suture should not be used (Laws et al 2003). A sterile transparent dressing is placed over the site to help to prevent infection of the small wound (Fig. 12.1).
 |
| FIGURE 12.1Underwater seal chest drainage systemFrom Brooker& Nicol 2003, with permission |
 Equipment
1. Trolley
2. Sterile dressings pack
3. Sterile gloves
4. Iodine preparation or alcohol-based antiseptic (as per local policy on skin cleansing)
5. Local anaesthetic and equipment for its administration
6. Sterile scalpel and blade and/or Spencer Wells forceps
7. Sterile black silk suture
8. Sterile chest drain and introducer
9. Sterile drainage equipment, e.g. Pleurovac or Argyle double-seal system
10. Two pairs of tubing clamps
11. Receptacle for soiled disposable items
12. Sharps box.
▪ help to explain the procedure to the patient to gain informed consent and co-operation. Patients should be encouraged to be active partners in care
▪ ensure the patient’s privacy to help maintain dignity
▪ administer a pre-medication if prescribed by the medical staff to help to reduce the patient’s anxiety
▪ administer analgesia as prescribed to minimize pain during and after the procedure
▪ collect the equipment, for efficiency of practice
▪ help the patient into the position suggested by the medical staff to allow best access to the site for insertion of the drain
▪ observe the patient throughout this activity to detect signs of discomfort, distress or adverse effects
▪ ensure that the drainage equipment is assembled correctly and ready for connection to the drain when required, for efficient practice
▪ open the sterile equipment and help the medical practitioner as requested
▪ seal all connections to ensure that they are airtight, as this is necessary for maximum functioning of the drain
Stay updated, free articles. Join our Telegram channel

Full access? Get Clinical Tree


Get Clinical Tree app for offline access

